Table of Contents
Advertisement
Advertisement
Table of Contents

Related Manuals for Pfaff creative 7570


Summary of Contents for Pfaff creative 7570
- Page 2 3 A or with the corresponding colour code. The plug must never be used without fuse cover. Spare fuse covers are available from electrical suppliers or the PFAFF agencies. Please also observe the general safety notes on page 2.
- Page 3 Important safety instructions For the United States only This sewing machine is designed and manufactured for HOUSEHOLD use only. When you use an electric appliance, basic safety precautions should always be adhered to as follows: Read all instructions before using this sewing machine. DANGER To reduce the risk of electric shock: The sewing machine should never be left unattended when plugged in.
- Page 4 2345 P A F th’e 7570 .—..——.—.——...—..— 30—_ 1’6\ ?4 28— 3839 PFAFF creative 7570...
-
Page 5: Parts List
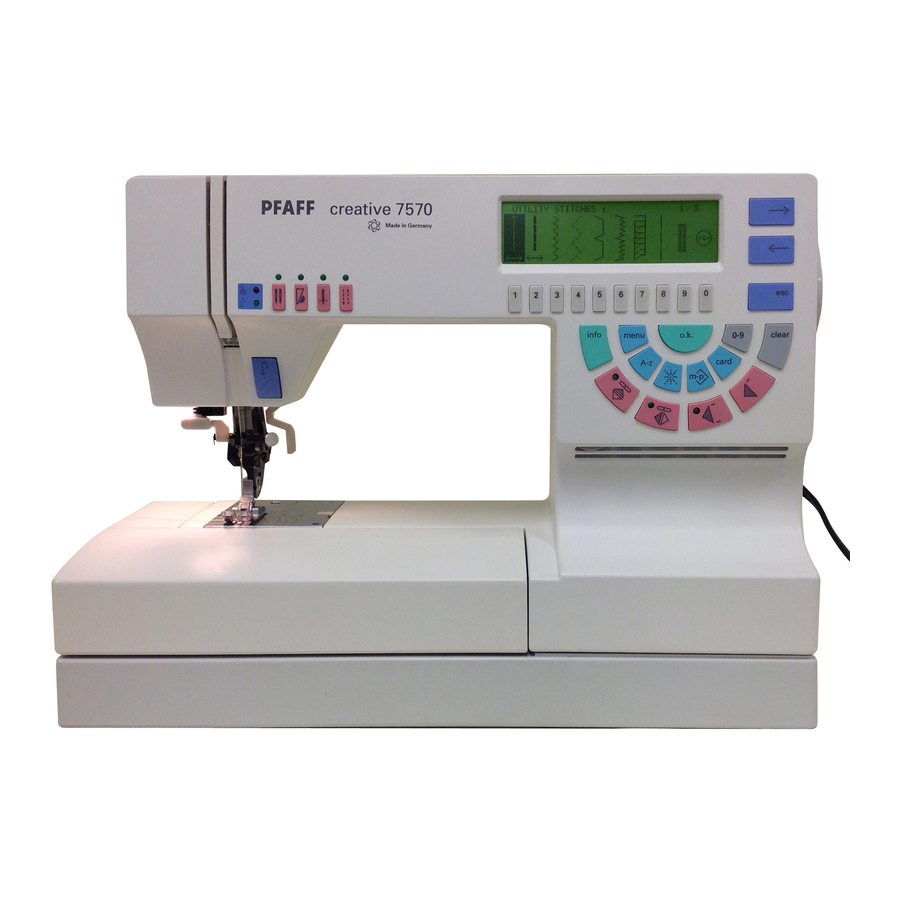
Parts of the creative 7570 (1) Bobbin thread monitor and sewing function light “reverse sewing” (2) “Twin needle” key (3) “Slow sewing” key (4) “Needle up/down” key (5) “Tacking” key (6) Multi function display (7) Number keys (8) Cursor keys (9) “esc”... - Page 6 — — It’s full will PFAFF will PFAFF...
- Page 7 1 0. To avoid the risk of electric shock, do not open the machine. There are no parts inside the machine which the user can repair. This is solely the responsibility of our qualified service staff. 11. Only original PFAFF parts may be used.
- Page 10 Index “o.k.” Open appliqué foot 1 50 Operational help Overlock stitches Pattern combinations 69—96 Pattern length Pattern mirroring Pattern selection 49, 51—53 Pattern sequence 78—8 1 Pattern sequence symbols 81—84 Pattern start Pattern stencils 1 81 Pattern width Pintuck foot Programmable seam length with straight stitch Programs Pullover stitch...
- Page 11 Index Tacking ke y Technical section 1 9—38 Thread cutter Thread tension Threading the needle thread Threading through the needle Top cover Topfeed Traditional embroidery techniques 161—182 Twin-needle cording foot 1 50 Twin-needle embroidery 1 80 Twin-needle key Upper/lower case letters Utility stitches 101—121 Utility stitch programs...
- Page 12 Utility stitch programs 00 01’0203 04 05 06’07080910 1213 14 15 I UL Width up Program Description Application to mm Straight stitch For all straight stitch jobs and one 6 mm wide center needle positions decorative topstitching stitch. — For highly durable seams where great strength Stretch triple is needed.The seams stretch with each stress straight stitch,...
- Page 13 —...
- Page 14 programs Utility stitch 34 35 39 40 41 42 43 44 45 46 Program Width u Description Application to mm Open overlock stitch Elastic serging seam. With edge thread, also suitable on terry cloth Overlock stitch for hemming and as assembly seam. Light-knit fabric For sewing and patching light knit wear patching stitch...
- Page 18 Maxi stitches 21)217 size The stitches are not shown in their original...
- Page 21 — ‘—I’...
- Page 26 “O’ dflr...
- Page 28 pcPir...
- Page 30 UitiVU •1.•...
- Page 32 Taking out the bobbin case Hook cover Lift the latch of the bobbin case and pull the Switch off the master switch. bobbin case out. Release the latch and take out Hold the hook cover (49) at the side and open towards the front.
- Page 36 Presser foot lifter Pulling up the bobbin thread The sewing foot is raised and lowered with the Raise the sewing foot. Hold the needle thread presser foot lifter (26). and turn the handwheel towards you until the needle has reached its highest position and the bobbin thread has formed a loop.
- Page 38 The built in dual teed IDT System PFAFF offers the ideal solution for sewing difficult materials: the built in dual feed. This system feed the material from the top and the bottom simultaneously just the same as by industrial sewing macl nes.
- Page 48 — — — — — — — —...
- Page 50 01 C “>“...
- Page 51 Programmable seam length for straight stitch stitch is shown with its length settings. On the right of the screen “pat” is displayed. Now press If you wish to join several workpieces of the same the cursor key (8) the additional message size you can enter the seam length with straight —‘, “prog”...
- Page 53 “info” (21) ± Cursork eys(8) a) Using this key you can select a pattern by motif With the cursor keys you can browse through the groups (see pattern selection). screen pages in backwards or forwards direction. Within a pattern these keys are used to adjust the b) “info”...
- Page 54 0’ Single pattern (15) card When pressing this key an assembly seam will be Press this key if you wish to select patterns from tied off immediately and a fancy seam at the the maxi design cards or from the Creative fantasy seam end.
- Page 55 ____ /‘ “—*“ “*—‘...
- Page 57 “—+“...
- Page 60 “ ——...
- Page 62 —...
- Page 73 Contents Pages 72—74 Alphabets/monograms Page 73 Changing the letter width Switching from upper to lower Page 74 case letters Page 75 M-memory Pages 75—77 Creating a letter sequence Pages 78—80 Pattern sequences Symbols in the pattern sequence Pages 81—84 Pages 78/82—83 Correction of pattern sequences 86—88 (deleting, inserting)
- Page 78 ..,.‘np,...
- Page 79 f ;_J Deleting and inserting letters With the cursor keys you can make If you select another letter and confirm it with “*—“ “—*“ changes in an already entered text. Using the “ok.” it will be inserted right in front of the dele cursor keys select the letter to be corrected.
- Page 80 “*— —*“:...
- Page 81 I 12 — menu Now enter, say, pattern number 162 via keys “1-0”. Then confirm with “o.k.’ 1. 1 Now you are in the programming screen. In the top right-hand side of the screen the pattern number and number of the selected memory are displayed, and below the message appears: to save’...
- Page 82 <- Changing stitch length and width The stitch width and stitch length can be changed by pressing the keys “1-0” underneath the screen before saving the pattern sequence. -> <- ) [-: o.k. Fciar info menu Then confirm by pressing the “o.k.” key. The selected pattern is displayed.
- Page 84 info Symbols in the sewing screen Symbol “K” You will find the following symbols in the sewing Pressing the “K” key will open another menu. screen: Using the cursor keys you can correct the pattern “edt” (see section “Balance”). Pressing the “o.k.” key Pressing the key below it will bring you to the will bring you back to the sewing screen.
- Page 85 escr info menu o.k. ,r;ç When you combine maxi patterns in a sequence, in the programming screen you will see the sym bols “zo” and “ZO” besides the icons described before. By pressing the keys underneath you can reduce or enlarge (zoom> your saved pattern sequence. The pattern zooming is only a visual aid and has no influence on the sewn pattern.
- Page 86 <- menu Pattern sequences consisting of maxi patterns from Design Cards Within an M-memory, pattern sequences can be created not only from the machine’s maxi patterns but also from the maxi patterns of the Design Cards (see Page 60). To this end select a free M-memory and open it by pressing “o.k.’...
- Page 87 “*—“ “-+“ “+—“...
- Page 88 1121345 67890 info menu clear Inserting a pattern On the screen the message appears: “Store by Press teh “0-9” key and enter the number of your pressing “o,k,” Press the “o,k.” key. The new desired motif using the “1-0” keys. Confirm with pattern will then be inserted into your sequence.
- Page 89 — — — “.
- Page 90 “H I ‘1.
- Page 91 —...
- Page 92 o.k. menu Now press key (18) Eight arrows appear on the display representing the different sewing directions. “I Press the key for the desired direction (for our example key”6”), and a sub-men u will appear. The selected direction will be highlighted.The top menu bar shows four additional options within this stitch direction.
- Page 93 2rzzr Select the connecting stitches by pressing the You can now save the connecting stitches using the “o.k.” key. For our example, six stitches of the key, choose a direction and save it by selected direction will be entered into the memory, pressing the “o.k.”...
- Page 94 Example No. 1; 1 x No. 139 1 x No. 139 1 x No. 139 1 x No. 139 Example No. 2: 1 x No. 138 1 x No. 138 1 x No. 138 1 x No. 138...
- Page 96 —...
- Page 97 —...
- Page 104 Zigzag stitch Program 02 the stitch width It you press the key” With zigzag stitch 02, all edges can be serged ‘ changes starting from the left needle position, easily. Make sure that while serging an edge the e.g. for eyelet embroidery and cording work. needle goes into the fabric and over the edge alternately.
- Page 105 •ø...
- Page 106 1’, /\/‘/‘/‘/ /‘JV’/ ç ,‘ ‘ ‘ Stretch triple zigzag stitch Elastic stitch Program 22 Program 03 The stretch triple zigzag stitch produces a highly Due to its high elasticity, this stitch is used for elastic and decorative seam which is very suitable sewing elastic, e.g.
- Page 112 L’ —— • —- ‘. Darning with straight stitch Program 00 • Now guide the fabric back and forth evenly; Fit darning toot No. 6. the length of the darn will be set by the size of Set the needle at its highest position by turning the hole.
- Page 113 _‘...
- Page 114 Gathering with straight stitch Gathering with elastic threads Program 00 Program 14 If you wish to gather sleeves, skirts, cuffs or va This kind of gathering is particularly suitable for visible, elastic gathering seams on blouse sleeves, lances, this technique is the easiest and most commonly used.
- Page 117 Darning with elastic stitch Program 03 The elastic stitch is very suitable for repairing holes, tears and damaged areas. Depending on the size of the damaged area, sew over this area with rows of elastic stitches until it is well covered. When doing so, make sure that the stitch rows overlap each other.
- Page 118 Smocking 2) Smocking with elastic thread Smocking is a technique with which several seams Program 00 sewn parallel to each other produce a gathering For this technique, elastic thread is wound onto effect which is mainly used for children’s wear the bobbin without tension.
- Page 120 Sewing in zippers Inserting zippers concealed on both sides • Engage the zipper foot on the right side. Program 00 • Baste the zipper on and place under the There are different ways to sew in zippers. For skirts we recommend the zipper concealed on sewing foot so that the teeth run at the side of the foot Bring the needle into the desired, both sides, for ladies’...
- Page 121 • Sew in the second half of the zipper parallel and at the same distance. • Stop shortly before the seam end and leave the needle in the material. Raise the sewing foot and open the zipper. • Now the seam can be finished. Trouser zippers •...
- Page 122 Sewing on patches Program 15 • Baste the piece of new material onto the dam- The best way to darn larger holes is to cover the damaged area with a piece of new material of a aged area. matching color. •...
- Page 126 choose from the followin g buttonho les: 1. Standard buttonho le No.40 (for blouses, shirts, dresses etc.) a) fully automat ic b) semi-aut omatic 2. Stretch buttonho le No. 41 for highly elastic materials and heavy knit fabrics. a> fully automat ic b) semi-aut omatic 3.
- Page 128 you wish to message screen next to the 4d:5...
- Page 129 •...
- Page 130 Shortly before the buttonhole is finished, the The total length of the buttonhole is defined sewing machine reduces sewing speed. When the during the sewing operation with the help of the second buttonhole seam is the same length as the buttonhole foot No.
- Page 131 Adjusting the buttonhole seam length with the balance • Sew the first seam and the first bartack. On highly slippery fabrics it may happen that the • While sewing the second seam adapt the stitch density of the left seam turns out differently stitch density with the balance (in the plus- to that of the right seam.
- Page 133 —- — — — — 1.”y’...
- Page 134 ______ —> < 1 [H The stitch density of the second seam can be • Press the “o.k.” key. The buttonhole appears adjusted with the balance. on the screen along with length, width and balance indications. Important! Before you start the buttonhole, push •...
- Page 135 Buttonholes with gimp thread • Push the runner forwards up to the second Buttonholes which are sewn with a gimp thread are more durable and neater. Use pearl cotton or marking. a regular gimp thread as available at specialized • Now sew buttonhole No. 40, 41 or 42. shops.
- Page 136 Keyhole buttonhole with gimp thread • Push the buttonhole guide backwards. • Place the gimp thread over the front ridge. Pull the thread ends taut backwards under the sewing foot. Clamp them right and left of the back ridge respectively. •...
- Page 137 • When the machine sews the first stitches of • Pull the gimp thread to the left and backwards the rounding, pull down the gimp thread from until the loop is just in front of the needle. the back ridge using an ordinary pin. •...
- Page 141 Accessories and needles Pages 140—142 Sewing feet (accessories> Page 143 Special accessories table Felling foot/Appliqué foot Page 144 Page 145 Fringe foot/Pintuck foot Page 146 Cording foot/Shirring toot Page 147 Knit edge toot/Ruffler Page 148 7/9 hole foot/Braiding foot Quilt and patchwork foot Page 149 Twin needle cording foot Page 150...
- Page 143 Zipper and edge sewing foot No. 4 Part No.: 98-694-884-00 Buttonhole foot No. 5 A Part No.: 98-694-830-00 Buttonhole guide No.10 Part 93-037 595-91 No.: Darning foot No. 6 Part No.: 93-035 960-91 C’,...
- Page 145 Sewing feet (special accessories) The special accessories allow you to do special sewing work. The listed sewing feet are available for a charge at your PFAFF dealer: Special accessory Part No. Sewing work Appliqué foot 93-042 941 -91 For appliqué work Open appliqué...
- Page 151 —...
- Page 154 -..,- — — --... —..-—. ---.-- .-.— — _---_ —...
- Page 155 --—-—- --------.— -,-,, —.—— -.--.---.— -— — _.___ Twill, 80—1 — ‘ i—a...
- Page 157 & Contents Page 156 Changing the bafferies Page 157 Changing the needle plate Page 157 Cleaning and oiling Page 158 Changing the sewing lamp Page 159 Sewing faults and their removal 4-’...
- Page 158 Changing the batteries: Switch on the sewing machine to avoid de leting the memories during the battery change. Tilt the machine over on the side as illustrated. The battery compartment is installed in the base. Using a screwdriver lightly push the catch into recess A, lift it, and remove the cover.
- Page 159 — Changing the needle plate Cleaning and lubricating • Switch off the master switch. • Switch off the master switch. • Raise the sewing foot lifter. • Remove the needle plate and lower the feed dog. • Pull the needle plate upwards at the back and remove •...
- Page 170 ‘...
- Page 174 —...
- Page 190 Page Fitting the fabric into the embroidery frame 1 8, 1 9 Info Inserting / removing the embroidery pattern card Lowering the feed dog rn-p key 36, 37 Marking the fabric 1 8, 1 9 Maxi pattern combina tions from the card Message s in the display Mirroring patterns Motif selection...
- Page 196 •0 rrax Plug the mains cord into the foot pedal and switch the machine on at the on/off switch. Take care that the swivel arm is not swung too far Open the swivel arm, followed by the hook flap and to the rear.
- Page 197 Engaging the frame in the embroidery unit Take care to ensure that the first guide spigot (A) is Pass the frame underneath the sewing foot by pushed into the rear metal guide. The frame is now raising the sewing foot lifter as far as possible. The the embroidery unit.
- Page 199 w— rqjr ‘yim...
- Page 200 — PFAFF creative 7570...
- Page 201 ; ’ i...
- Page 202 Now insert the card into the slot (47) in the This message only appears with the card machine. The machine can be left on while doing 1/Fantasy. On all further cards (except the mono this. Then press the “Card” key (14). gram cards) the first 5 patterns are shown in the display.
- Page 204 øv Messages in the display Insert full bobbin Then select the pattern on the machine with the It is recommended to insert a full bobbin before corresponding number key. The embroidery frame starting to embroider. We recommend using cotton normalizes, i.e. it searches for the starting position. garn with thickness 50 as the bobbin thread or a At the same time the following messages appear in polyester yarn 1 00.
- Page 206 Then tighten the retaining screw. frame, make sure that screw 9 is facing forwards and the guide spigots 8 are on the right. I,’ PFAFF cieafr757O uI” 5. Now attach the frame onto the embroidery unit of the sewing machine (see Technical section...
- Page 207 —‘ [1j213j4 15 Key 7 by a if a...
- Page 208 ______ ____ ____ __: ,...
- Page 209 Pressing the cursor key next to this symbol extends the menu (with esc or ok you return to the previous menu). The following symbols appear the display:...
- Page 212 —,...
- Page 213 will will...
- Page 214 56{78 Embroidering/multicolour The patterns can be embroidered with up to 1 2 Make sure you have the required threads prepared different colours. in the order listed. Select a pattern, e.g. the butterfly The following Select the symbol “col 1 3” with key 8, thread the messages appear in the display: first thread and begin to embroider.
- Page 215 will If a No. 1 will If a will will will...
- Page 217 Error messages in embroidery mode • Needle thread broken or empty Check the bobbin thread • If the needle thread breaks or runs out the machine The bobbin thread supply display blinks when the stops after max. 6 stitches and elicits the message: bobbin thread is running low.
- Page 224 Pattern sequence If you combine several patterns in one M-memory, this is called a pattern sequence. Insert the card (e.g. card 1> into the slot. menu m-p) With the key you open the M or P memory.
- Page 225 — — — — — — —— “+“.
- Page 226 ‘0 4j5, — — — — — — — — là After confirming with the “ok” key you will see in the display: This pattern sequence is empty Now press the card key. Select the desired pattern group with the number keys e.g.
- Page 227 •4; ’rJ;...
- Page 228 —...
- Page 230 Store with the m-p) key. in the display you will see the selected monograms next to eachother. You will also see a new menu in the right of the display.
- Page 231 _______ With the following symbols you can process the monograms or patterns within a pattern sequence. Reduce the size of the motif for a picture in the display. Zooming has no effect the pattern sewn, it is merely a visual aid. The key with the o arrowheads left and right opens a new menu.
- Page 232 If you wish to move the letters closer together, press the arrow key (cursor key> next to the symbol This opens a new menu. ><. Using the two cursor keys, place the arrow on the letter you wish to move (e.g. arrow on the M).
- Page 233 _____ ________ L. . l Once the arrow is in position press the ok key twice. 3] 4j ‘ AInenu. After a short period you will see a new screen. the display the position of the pattern in the frame is displayed using the x and y values. Y stands for the vertical and x for he horizontal axis.
- Page 234 By pressing the second cursor key again you move If you now move one letter, e.g. the M (with the second cursor key> to the left, the values of the axes the letter in the direction of the arrow. change. You can also press and hold the key.
- Page 235 — — — If you have placed the letter where you want it press the esc key to return to the initial screen. With the key underneath the symbol you enter the sewing screen. You can now sew the pattern sequence. embroidery frame moves to start position.
- Page 236 <—1 5[67819 With the 0 key underneath the symbol you can view the entire sequence letter by letter. You are in the sewing screen. With the key underneath you store your sequence on the “Creative Card”.
- Page 237 ____ 5— ‘ To d&ete a letter press “esc” to return to the revious screen and then press the key underneath edt. 5- - ahId ILtiJ With the 0 key underneath the symbol you can delete one letter or the entire sequence.
- Page 238 cieari rnenu With the key underneath the symbol access a new menu. 4] [5 6 Li / menu clear) info fl-s key underneath the symbol With the delete the letter on which the arrow is placed.
- Page 239 With the 0 key underneath the symbol you call up the question “Delete entire sequence?”. With the “ok” key you delete the entire sequence, with the esc key you leave the sequence as it is.
- Page 240 — key. key.
- Page 241 ‘0 56,I8 Using the number keys select a frame. ‘0 You can change the size of the motif with keys 4 and 5. Save the desired pattern by pressing the ‘ok” key.
- Page 242 ‘0 info menu Repeat this procedure by pressing the Card again and then selecting key 2 for embroidery monograms. ‘0 menu .‘ Then select a monogram alphabet.
- Page 243 hufo Now enter both letters with the key (e.g. BM). “ok ‘2 The description of how to move the monograms key the letters appear After pressing the m-p) within the frame is on pages 44—47. automatically in the frame. Press the key under and you neath the sewing machine symbol can sew your motif.
- Page 244 Creating a word sequence When dealing with word sequences or names, please note that the size of the letters can be altered. At a letter height of 40 mm, 3 letters can be embroidered within the frame, depending on the width of the letters. The smaller the letters the more letters can be stored one after another in the sequence.
- Page 245 Press the Card key. —. — Lino menu L Press key 2 for embroidery monograms.
- Page 247 Linfo — menu clear (1-9 Now select the block letter alphabet with the number keys. Info menu oi’ [0-9 Now enter the letters using the number keys. If you wish to write on 2 or 3 lines, enter a maximum of 6 letters in the first line.
- Page 249 __________ 112I 3456 78 — menu info If you wish to store motifs with word sequences, “creative select a free Mmemory. Use card 1 fantasy”. Then press the “Card’ key.
- Page 250 ‘——...
- Page 251 1 _J...
- Page 252 info menu To keep a word sequence in the same memory, “Card’s press the key once again. Press the 2 key for monograms. In the display you will see the 2 current monograms on card 1. ‘0 4nto menu Press key 2.
- Page 253 ——...
- Page 254 [213j{45[r6[7I89 menu Press the first cursor key next to the arrows. You will see a new menu. 1112 \‘4Z I ‘ Using the cursor keys, move the arrow in the display to the first letter of the word (D in DONALD).
- Page 255 — ç Press the “ok” key once. info menu Move the arrow in the display to the last letter of the word (D in DONALD).
- Page 256 ‘> ‘. Now press the “ok” key again. The word sequence can now be moved up or down in the display. [2 (3 menu Now use key 9 or 0 underneath the symbols E Efl...
- Page 258 If you want to store pattern sequences on the Press key 2 to copy. The following message “Creative Card” in which patterns from card 1 appears: Fantasy are used, the following message will Please use the programmable card, ok? appear if the card is not inserted in the machine: 1.
- Page 259 __________ info menu o.k. clear /0-9 After a short time the machine switches and you are back in the selection menu of the pattern sequence. 2 3j Tctear — info menu Press the “Card” key as a check. You can see the selection menu of the “Creative Card”...
- Page 260 5IL1H89 Another method of storing a pattern sequence on Insert full bobbin — the Creative Card is: Attach embroidery foot and bring lever to embro idery position. Insert card 1 Fantasy into the sewing machine and select the pattern sequence again. You will see the following message: Once you have set all the functions press the ok Fit and insert the “1 20 frame...
- Page 262 menu o.k. /cJnx If you have not inserted a Creative Card you will see the above message in the display. menu Now insert the Creative Card and confirm with “ok”.
- Page 263 —‘...
- Page 264 1[23][41 5I[67 l89 If you wish to call up pattern sequences from the Creative Card, insert the card into the slot and press the card key. In the display the M-memories of the card appear. jnfr Select an occupied memory with the number key beneath it.
- Page 265 da*r fl-O key.
- Page 266 menu L ør IId! Now insert card 1 into the slot and press the “ok” key. nany info menu .‘ In the display you will see the summary of the M-memory again. Now re-select the M-memory by pressing the “ok” key.
- Page 267 :—‘ — ‘any ‘...
- Page 268 mønu If you wish to delete a pattern sequence from the Creative Card, press the “Card” key. (The “Creative Card” must be in the machine.) The M-memories on the card appear in the display. — — — — — — flfnu If other motifs are stored on the “Creative Card”...
- Page 269 L-> <-1 23456 F ;; info menu Using the number keys select the memory you wish to delete. This is then given a dark back ground. Press the 0 key underneath the symbol. -> <- info menu o.k. clear The question appears the display: Delete M-memory ok?
- Page 270 — — — — — — --— — ‘- key.
- Page 274 •• • • ••Jt_ ‘ .r4;4 Contents Richelieu work Page 86 Appliqué Page 87 Embroidering thin fabrics Page 88 Embroidering frotté Pages 89, 90 Embroidering small pieces of fabric Page 91 Combining motifs to form a border Pages 92, 93 Combining motifs Pages 94, 95 Embroidering a word sequence...
- Page 276 Appliqué with the embroidery motifs It is also possible to embroider appliqué with this Select pattern No. 1 from this card for example. Embroider the pattern. After the first segment the card. Including a piece of coloured material lends profile to the pattern. Beautiful coloured effects can machine stops and the message “Insert appliqué”...
- Page 277 The Avalon dissolves in water (available recommend reinforcing the material with a textile from your Pfaff dealer). Now you can select your hardener from PFAFF; desired pattern and embroider. The fabric must be hardened because you cannot...
- Page 278 • Lay embroidery fleece underneath the fabric and Avalon (available from your Pfaff dealer). pin it to the fabric. • Lay Avalon on top of the fabric and pin it to the fabric also. The Avalon covers the loops of the frotté...
- Page 279 s)cxxxj1 If the frottO is too thick to fit into the frame, fit a piece of embroidery fleece into the frame and stick the frotté fabric onto it with a glue pen. Embroidering with the embroidery unit If you wish to embroider motifs on frotte or velvet with the embroidery unit, we recommend using embroidery fleece and Avalon.
- Page 281 Combining motifs to form a border Many motifs can be used to make a border. Cut a ong strip of fabric. Draw a line down the middle of the fabric with disappearing chalk or disappearing magic marker. Lay embroidery fleece under the fabric and fit both phes into the frame.
- Page 282 Remove the fabric from the frame and measure the length of the pattern. Halve this length. This shows you where the middle of the pattern is. Now mark the middle of the fabric with a dot This is very important because the placing and moving of a pattern in the embroidery frame is always based around the middle of the pattern.
- Page 283 Combining patterns to form a large motif In this example the pattern has been embroidered four times. Position the needle over the marking in the middle Mark a large cross on the fabric. Select pattern keys. The pattern of the pattern using the No.
- Page 284 Remove the fabric from the frame and fit again. Mark the middle of the pattern on the fabric and position the needle above the marking with keys &v4 Using the pattern start key you can return to the beginning of the pattern. This allows you to check if the second pattern borders on the first.
- Page 285 first. Size>. a ply instrLlct ions for use 57> page...
- Page 287 1 9) 1 7).
- Page 289 • I...
- Page 290 ‘I..
- Page 293 PFAFF G.M.PIaff Aktiengesellschaft Werk Kar!sruhe-Durlach Gritznerstrafe 11 76277 Karisruhe Printed in Germany Rohr Druck GmbH Mainzer Straf.e 105 67657 Kaiserstautem Subject to alteration No. 29-629 994-93/000 RD 8/95 engl.