Table of Contents
Advertisement
OWNER'S MANUAL
DieHard
BATTERY CHARGER
50/1512 Amp
Manual
ENGINE STARTER
With Battery Tester and
Air Compressor
225/125 Amp
Model No.
200.71233
CAUTION:
Read all Safety Rules and Operating Instructions,
and follow them with each use of this product.
Sears, Roebuck
and Co., Hoffman
Estates,
IL 60179 U.S.A.
00-99-000538/0506
Advertisement
Table of Contents

Related Manuals for DieHard 200.71233


Summary of Contents for DieHard 200.71233
- Page 1 OWNER'S MANUAL DieHard BATTERY CHARGER 50/1512 Amp Manual ENGINE STARTER With Battery Tester and Air Compressor 225/125 Amp Model No. 200.71233 CAUTION: Read all Safety Rules and Operating Instructions, and follow them with each use of this product. Sears, Roebuck and Co., Hoffman...
-
Page 2: Table Of Contents
THREE-YEAR FULL WARRANTY If this Battery Charger fails due to a defect in material or workmanship within three years from the date of purchase, RETURN iT TO ANY SEARS STORE or OTHER DIEHARD OUTLET iN THE UNITED STATES FOR FREE REPLACEMENT. -
Page 3: Important Safety Instructions
Important Safety Instructions SAVE THESE INSTRUCTIONS • Read all instructions and cautions printed on the • Do not disassemble charger. Take it to a battery charger, battery, and vehicle or equipment qualified service professional if service or repair using battery. is required. -
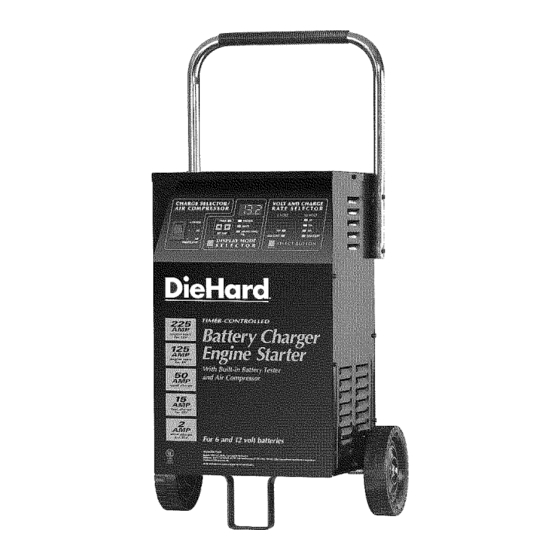
Page 4: Parts
Parts This section shows an illustration of your battery charger. Use it to become familiar with where all the parts are located, and what they look like. Replacement Parts List DieHard 71233 ITEM DESCRIPTION PART HUMBER Handle 3599000286 Positive (RED) Cable w/clamps... -
Page 5: Before Using Your Battery Charger
Before Using Your Battery Charger It is important to prepare your charger for use. This section will tell you how to assemble the charger, ground and connect the power cord, and prepare to charge a battery. Assembling your charger It is important to fully assemble your charger before use. Follow these instructions for easy assembly. -
Page 6: Plugging It In
AxleAssembly(continued): Place the charger on its side. Place one end of each bracket into slot, then place the axle assembly under each bracket. Fasten the other side of each bracket using the two, 10-32 thread cutting screws provided. Handle: Turn the charger right side up onto its foot and wheels. Remove the two top screws from each side of the charger. -
Page 7: Using An Extension Cord
Using an extension cord The use of an extension cord is not recommended. • Use the recommended minimum AWG (American you must use an extension cord, please make sure Wire Gauge) to be sure that wire size is large that you follow these guidelines: enough for the rating of the charger. -
Page 8: Using Your Battery Charger
Using Your Battery Charger To obtain the best results from your battery charger, you must know how to use it properly. This section tells how to set the controls and how to charge a battery in and out of the vehicle. Setting the controls BATTERY TEST... - Page 9 12V ALTERNATOR/GENERATOR DISPLAY Connect the battery charger as outlined in "Charg- 14 - 15 volts Good condition ing Your Battery" on page 10. The voltage will be displayed. 12.8 or less volts Check with qualified technician NOTE: If a battery has recently been charged or in 12.8 - 14 volts or See vehicle owner's a vehicle that has been run recently, turn on the...
-
Page 10: Using The Compressor
Using the compressor CAUTION - Read instructions of the product being The air compressor will run for a maximum of 15 inflated before using the compressor. Avoid over minutes or it may automatically shut down sooner inflation, do not exceed the manufacturer's recom- if a high load causes it to overheat. -
Page 11: Charging Your Battery
Charging Your Battery NOTE: A marine (boat) boat battery must be removed To charge a positive grounded post system: and charged on shore. To charge it on board requires Connect the black (NEGATIVE) battery charger equipment specially designed for marine use. clamp to the NEGATIVE (NEG,N,-) ungrounded post of the battery. - Page 12 Take the other end of the 6-gauge (AWG) insu- Charging your battery outside the vehicle: lated battery cable (at least 24-inches in length), NOTE: A marine (boat) must be removed and charged and, standing as far away from the battery on shore.
-
Page 13: Calculating Charge Times
Calculating charge times The Chart Method • Marine, or deep-cycle batteries are usually rated in Use the following table to more accurately determine Reserve Capacity (RC). the time it will take to bring a battery to full charge. First, identify where your battery fits into the chart. •... -
Page 14: Troubleshooting
Troubleshooting Performance problems often result from little things that you can fix yourself. Please read through this table for a _ossible solution if a problem occurs. PROBLEM POSSIBLE CAUSE SOLUTION/REASONS No reading on Digital AC cord and/or extension Check AC outlet and extension cords for loose fitting Display, charger fan cord is loose, plug. - Page 15 For information about troubleshooting, call toll-free from anywhere in the U.S.A. 7 am to 4:30 pm Central Time Monday through Friday. 1-800-SEARS-64 (1-800-732-7764).