Table of Contents
Advertisement
Advertisement
Table of Contents

Related Manuals for DieHard 200.71223


Summary of Contents for DieHard 200.71223
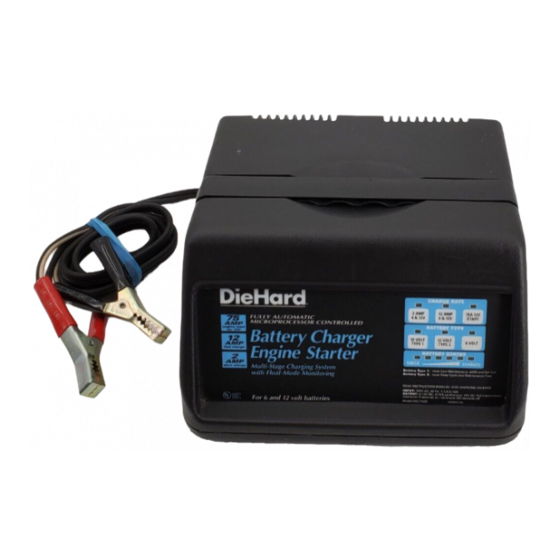
- Page 1 OWNER'S MANUAL DieHard, Battery Charger 12/2 Amp Fully Automatic Microprocessor Controlled Engine Starter 75 Amp Model No. 200.71223 CAUTION: Read all Safety Rules and Operating instructions, and follow them with each use of this product. Sears_ Roebuck Hoffman Estates_ IL 60179 U.S.A.
- Page 2 DIAGRAM ....................Please read this Owner's Manual before using your Battery Charger The DieHard model 71223 Fully Automatic Battery Charger/Engine Starter, offers a wide range of features to accommodate the needs for home or light commercial use. This manual will show you how to use your charger safely and effectively. Please read and follow these instructions and precautions carefully.
- Page 3 WARNING: To reduce the risk of HELP US HELP YOU-- explosion, explosive gases, or injury Remember: while using your battery charger, follow • Place charger as far away from the the precautions listed below: battery being charged as the charger •...
- Page 4 For your own personal safety, please follow the following precautions: Remove all personal metal items • Wear complete eye and clothing from your body such as rings, protection when working with lead- bracelets, necklaces and watches, acid batteries, while working with a lead-acid battery. •...
- Page 5 It is important to understand your charger's requirements. This section will tell you about your charger's electrical requirements and how to prepare a battery for charging. ASSEMBLING YOUR CHARGER Included with your battery charger are two cord wrap cleats for storage of the clamp cables.
- Page 6 It is important that you read and follow these guidelines while you are preparing to charge your battery. vent caps while charging, and • Make sure that you have a 6 volt or recommended rates of charge. 12 volt lead-acid battery.
- Page 7 For best results from your battery charger, learn to use it properly. This section tells how to set the controls and how to charge a battery in and out of a vehicle. TOUCH PAD LEDs CONTROL BATTERY TYPE BUTTONS _ 12VOLT _-V_] r nVnlT'_...
- Page 8 The next four LED's are amber. First, NOTE: The charger defaults to Type when first plugged in or when discon- only the leftmost amber LED will light. nected from a battery. The 6 VOLT Then two, then three, and eventually button must then be pressed before...
- Page 9 MODEL 71223 °"°"° i ;"°: I--I r--I _l '_ iE_-mmr STATUS X indicates panel lights that continuously glow. EAMP 12M,IF _lZ'It 12¥DLT IZ¥0LI" 8VnL1r i I"-3 r--I r-'1 r--I B indicates panel lights that blink on and off. J 6 & 12V. 6 i 12V.
- Page 10 is made. Then connect the black IMPORTANT: Follow all safety instruc- tions and precautions when charging (NEGATIVE) output clamp to a your battery. Wear complete eye heavy, unpainted metal part of the protection and clothing protection. chassis or engine block, away from Charge your battery in a well-ventilated the battery (see figure above).
- Page 11 To disconnect the charger, unplug Charging your battery removed from the vehicle: the charger power cord before attempting to disconnect the charger clamps. Then, standing away from POSITIVE NEGATIVE the battery, remove the output clamp from the NEGATIVE battery post. Finally, remove the output clamp from the POSITIVE battery post.
- Page 12 This charger adjusts the charging time in order to charge the battery completely, efficiently, and safely. The microprocessor automatically makes all necessary calculations. However, this section includes guidelines that can be used to estimate charging time. The duration of the charging process de- charger allows.
- Page 13 A minimal amount of care can keep your battery charger working properly for years. 3. Occasional cleaning of the case of 1. Clean the clamps each time you are the charger with a soft cloth will keep finished charging. Wipe off any battery the finish shiny and help prevent fluid that may have come in contact corrosion.
- Page 14 Performanceproblemsoften resultfrom little things that you can fix yourself. Please read throughthis chart for a possiblesolution if a problemoccurs. PROBLEM POSSIBLE CAUSE SOLUTION Indicator lights are lit in The charger may be Return to place an erratic manner defective, of purchase for a explained in the "Using...
- Page 15 This section shows an illustration of your battery charger. Use it to become familiar with part locations and appearance. Item Description Part Number Item Description Part Number 1. Transformer 93026558 ACPowerCord 90026135 SCRControlModule 2299001160 Handle 3599000270 Screw 8-18 xY2"(4) 5199000274 Faceplate 0899001725 Touch Pad Control Board...
- Page 16 For information about troubleshooting, call toll-free from anywhere in the U.S.A. 7 am to 4:30 pm CT Monday through Friday. 1-800-SEARS-64 (1-800-732-7764).