Table of Contents
Advertisement
Quick Links
Advertisement
Table of Contents

Related Manuals for EVGA nForce 122-YW-E173


Summary of Contents for EVGA nForce 122-YW-E173
- Page 1 User’s Guide EVGA nForce 750i SLI Motherboard...
- Page 2 EVGA...
-
Page 3: Table Of Contents
Configuring the BIOS ... 24 Enter BIOS Setup ... 25 Main Menu ... 25 Standard CMOS Features Menu ... 28 Date and Time ... 29 IDE Channel and SATA Channel ... 29 Drive A ... 31 Halt On ... 31 EVGA... - Page 4 Securing the Motherboard into the Chassis... 10 Connecting Cables and Setting Switches ... 11 Power Connections ... 12 24-pin ATX Power (PW1) ... 13 8-pin ATX 12V Power (PW2) ... 14 Connecting IDE Hard Disk Drives ... 14 Table of Contents EVGA...
- Page 5 IDE HDD Block Mode ... 42 Onboard FDC Controller ... 42 Onboard Serial Port 1 ... 42 Power Management Setup Menu ... 43 ACPI Function ... 43 ACPI Suspend Type ... 43 Soft-Off by PBNT ... 44 WOL(PME#) From Soft-Off ... 44 EVGA...
- Page 6 Memory Timing Setting ... 55 System Voltages ... 57 Load Timing/Voltage Set ... 59 Save Timing/Voltage Set ... 59 Installing Drivers and Software ... 60 Windows XP Drivers Install ... 60 EVGA Gloassary of Terms ... 61 Appendix A. POST Codes ... 63 EVGA...
- Page 7 Figure 13. Frequency/Voltage Control ... 51 Figure 14. FSB & Memory Config Menu ... 53 Figure 15. System Voltages Menu ... 57 EVGA...
-
Page 8: Before You Begin
Parts NOT in the Kit This kit contains all the hardware necessary to install and connect your new EVGA nForce® 750i SLI motherboard. However, it does not contain the following items that must be purchased separately to make the motherboard functional. -
Page 9: Nvidia Nforce 750I Sli Motherboard
Thank you for buying the EVGA nForce 750i SLI Motherboard: This motherboard offers the tools and performance PC users’ demand. When combined with two SLI-Ready NVIDIA GeForce graphics cards, you get innovative NVIDIA SLI Technology for enhanced system performance. Motherboard Specifications Size ATX form factor of 12 inch x 9.6 inch... - Page 10 Supports S0 (normal), S1 (power on suspend), S3 (suspend to RAM), S4 (Suspend to disk - depends on OS), and S5 (soft - off) Expansion Slots Two PCI slots One PCI Express x1 slot Two PCI Express x16 Graphics slots EVGA...
-
Page 11: Unpacking And Parts Descriptions
Unpacking The EVGA nForce 750i SLI motherboard comes with all the necessary cables for adding a motherboard to a new chassis. If you are replacing a motherboard, you may not need many of these cables. All parts shipped in this kit are RoHS-compliant (lead-free) parts. -
Page 12: Nvidia Nforce 750I Sli Motherboard
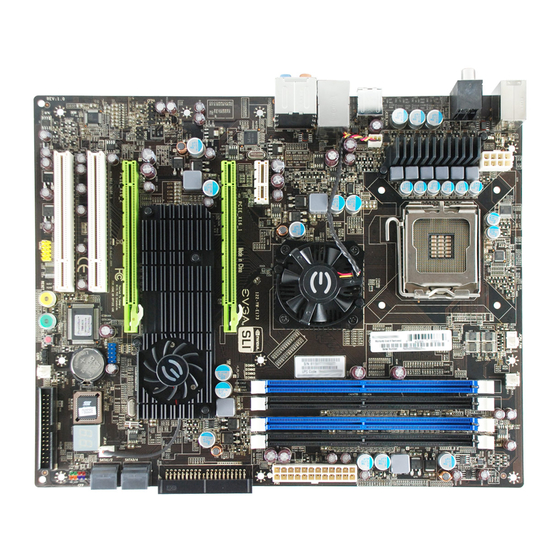
EVGA nForce 750i SLI Motherboard The EVGA nForce 750i SLI motherboard with the NVIDIA nForce 750i SLI SPP and MCP processor is a PCI Express, SLI-ready motherboard. Figure 1 shows the motherboard and Figures 2 shows the back panel connectors. -
Page 13: Nvidia Nforce 750I Sli Motherboard
24. PCI Express x1 Slot 15. AUX Fan Connector 25. Backpanel Connectors (Figure 2) 16. PC Speaker Connector 26. 8-pin ATX_12V Power connector 17. Clear CMOS Button 27. SPDIF Connector 18. Power Button 19. Reset Button 20. Serial Connector EVGA... - Page 14 Activity LED Status Blinking (Green) 6. Port 2-Channel Blue Line-In Green Line-Out Pink Mic In Orange Black Grey EVGA Chassis Back Panel Connectors Speed/Link LED Status Description Yellow No data transmission Green Data transmission 4-Channel 6-Channel/8-Channel Line-In Line-In Front Speaker Out...
-
Page 15: Hardware Installation
Safety Instructions To reduce the risk of fire, electric shock, and injury always follow basic safety precautions. Remember to remove power from your computer by disconnecting the AC main source before removing or installing any equipment from/to the computer chassis. EVGA... -
Page 16: Preparing The Motherboard
There are many different fan types that can be used with this motherboard. Follow the instructions that came with your fan assembly. Be sure that the fan orientation is correct for your chassis type and your fan assembly. EVGA Align notches with notches on the CPU... -
Page 18: Installing The Motherboard
Align the mounting holes with the studs/spacers. Align the connectors to the I/O shield. Ensure that the fan assembly is aligned with the chassis vents according to the fan assembly instruction. Secure the motherboard with a minimum of eight-to-ten screws. EVGA... -
Page 19: Connecting Cables And Setting Switches
8-pin ATX 12V power ( Internal Headers Front panel USB Headers Audio Speaker Serial ATA II Chassis Fans Expansion slots CMOS jumper settings See Figure 1 on page 5 to locate the connectors and jumpers referenced in the following procedure. PWR1 PWR2 EVGA... -
Page 20: Power Connections
Make sure you have enough power to cover all the expansion cards you will be installing. To determine what power requirements are for your specific configuration or a certified power supply vendor, refer to EVGA 6-pin (3x2) PCI-E connector Power Supply Connectors... -
Page 21: 24-Pin Atx Power (Pw1)
This connector is notched, do not force in. Board edge Figure 4. PWR1 Motherboard Connector Table 1. Connector PWR1 connector Plug power cable from system power supply to PWR1 PWR1 Pin Assignments Signal Signal +3.3V +3.3V PWROK +5V_AUX +12V +12V +3.3V +3.3V -12V PS_ON RSVD EVGA... -
Page 22: 8-Pin Atx 12V Power (Pw2)
If an ATA-66/100 disk drive and a disk drive using any other IDE transfer protocol are attached to the same cable, the maximum transfer rate between the drives may be reduced to that of the slowest drive. EVGA Card Edge IDE Connector... -
Page 23: Connecting Serial Ata Cables
There are six serial ATA connectors on the motherboard that support RAID 0, RAID 1, RAID 5, RAID 0+1 and JBOD configurations. SATA 1 (bottom) SATA 2 (top) Connect the locking cable end to the motherboard connector. Connect the end without the lock to the drive. SATA 3 (bottom) SATA 4 (top) EVGA... -
Page 24: Connecting Internal Headers
Attach the hard disk drive indicator LED cable to these two pins. The HDD indicator LED indicates the activity status of the hard disk drives. RESET Attach the Reset switch cable from the front panel of the case to these two pins. The system restarts when the EVGA RESET switch is pressed. -
Page 25: Usb Headers
Hard disk drive LED pulls up to +5V Hard disk drive active LED Front panel green light Front panel yellow light Ground Reset switch Power switch Ground USB 2.0 Header Pins Signal 5V_DUAL Empty Signal 5V_DUAL No Connect Card Edge EVGA... -
Page 26: Audio
Table 4. Connector Front Audio Connector Speaker Connector This speaker header allows connection to a computer case speaker for PC Beeps. Table 5. CSPK Header Pins Connector Speaker Header EVGA Front Audio Connector Signal PORT1_L AUD_GND PORT1_R PRECENCE_J PORT2_R SENSE1_RETURN... -
Page 27: Fan Connector
Connect a 3-pin connector to pins 1, 2, and 3 on the motherboard connector. EVGA nForce 750i SLI SPP/MCP Fan Connector Install the fan over the nForce 750i SLI SPP to draw heat from the MCP. The fan plugs into a 3-pin connector. -
Page 28: Com1
Floppy Disk Drive (FDD) Connector The motherboard supports a standard 360K, 720K, 1.2M, 1.44m, and a 2.88M floppy disk drive (FDD). EVGA MCP Fan Auxiliary Fan Connector Connector +12V... -
Page 29: Expansion Slots
Expansion Slots The EVGA nForce 750i SLI motherboard contains five expansion slots, three PCI Express slots and two PCI slots. PCI Slots The two PCI slots support many expansion cards such as a LAN card, USB card, SCSI card and other cards that comply with PCI specifications. When installing a card into the PCI slot, be sure that it is fully seated. -
Page 30: Onboard Buttons
Hard Disk Drive Activity LED which will flicker accordingly. The Green Power button features an integrated power LED and will stay solid for as long as the system is turned on and running. EVGA Onboard Onboard Onboard... -
Page 31: Post Port Debug Led And Led Status Indicators
LED3: STANDBY LED (Blue) When the system is in standby mode, the LED is on. LED4: CPU Hot LED (Red) When the CPU processor is overheating, the LED is on. STANDBY LED DIMM LED Debug LED POWER LED CPU HOT LED EVGA... -
Page 32: Configuring The Bios
Detailed descriptions of the BIOS parameters are also provided. This section includes the following information: Enter BIOS Setup Main Menu Standard CMOS Features Advanced BIOS Features Advanced Chipset Features Integrated Peripherals Power Management Setup PnP/PCI Configurations PC Health Status Frequency/Voltage Control EVGA Configuring the BIOS... -
Page 33: Enter Bios Setup
Note that on the BIOS screen all data in changeable, data in red box is highlighted for selection. keys to scroll through the options or Page Down white is for information only, data in blue is non-changeable, and data in a arrow keys to yellow EVGA... - Page 34 Use this menu to monitor the real-time system status of your PC, including temperature, voltages, and fan speed. Frequency/Voltage Control Use this menu to optimize system performance and configure clocks, voltages, memory timings, and more. EVGA Phoenix – AwardBIOS CMOS Setup Utility Frequency/Voltage Control Load Fail-Safe Defaults Load Optimized Defaults...
- Page 35 Use this command to set, change, and disable the password used to access the BIOS menu. Save & Exit Setup Use this command to save settings to CMOS and exit setup. Exit Without Saving Use this command to abandon all setting changes and exit setup. EVGA...
-
Page 36: Standard Cmos Features Menu
Figure 6. Note that all data in blue is non-changeable, and data in a EVGA keys to scroll through the options or press arrow keys to position the selector in the option you corresponds to the option highlighted. Item Help Phoenix –... -
Page 37: Date And Time
Press ENTER to display [None] IDE Channel sub-menu [None] [None] [None] [None] [None] IDE HDD Auto-Detect IDE Channel 0 Slave Access Mode Capacity Cylinder [Press Enter] Head Precomp [None} Landing Zone Auto Sector 0 MB [Press Enter] [Manual} [CHS] 0 MB EVGA... - Page 38 For HDD greater than 528 MB and supporting LBA (Logical Block Addressing). Large For HDD greater than 528 MB but not supporting LBA. Auto Recommended mode. EVGA and change [Manual] Access Mode [Press Enter] [Manual} [CHS] Press ENTER to display sub-...
-
Page 39: Drive A
... [ ] ... [ ] ... [ ] ... [ ] ENTER:Accept ESC:Abort to accept the changes arrow keys to accept the Enter ... [ ] ... [ ] ... [ ] ... [ ] ... [ ] ENTER:Accept ESC:Abort EVGA... -
Page 40: Memory
(or conventional) memory installed in the system. Extended Memory BIOS determines how much extended memory is present during the POST. Total Memory This value represents the total memory of the system. EVGA Base Memory 640K Extended Memory 1047552K... -
Page 41: Advanced Bios Features
[CDROM] [Hard Disk] [Enabled] [On] [Setup] [Enabled] [1.4] [Disabled] +/-/PU/PD:Value F10:Save ESC:Exit F6: Fail-Safe Defaults is for information only, data in yellow red box is highlighted for selection. Item Help Main Level F1:General Help F7:Defaults is changeable, data in EVGA... -
Page 42: Cpu Feature
Thermal throttling is achieved by reducing the CPU multiplier and CPU core voltage. TM1 & TM2 Enables support for both TM1 and TM2. EVGA from the Advanced Chipset Features menu and press Phoenix – AwardBIOS CMOS Setup Utility CPU Feature... -
Page 43: Hard Disk Boot Priority
– Use the + and – keys to move the priority of the device within the list to see the list Enter EVGA... -
Page 44: Cd-Rom Device Priority
Removable Hard Disk CDROM Legacy LAN Disabled :Move ENTER:Accept EVGA Enter to see the list of bootable devices in your arrow keys to go to the various devices. Then use the TSSTcorp CDDVDW SH-S203B Enable Disable keys to scroll through the options or press... -
Page 45: Boot Other Device
, the system boots from some other device if the NumLock when the system is started. Select to require a password to gain Setup to require a password to System Page Up Page Down keys to toggle Page Up Page Down . Select to disable keys to EVGA... -
Page 46: Advanced Chipset Features Menu
PCIE Spread Spectrum (SPP) Use the Page Up options for the SPP PCIe. Option values are This option reverts to Spread]. value for PCIe x16_1 exceeds 100MHz. EVGA and press Enter Advanced Chipset Feature [Press Enter] [Disabled] Main Level +/-/PU/PD:Value... -
Page 47: System Bios Cacheable
CMOS Setup Utility menu and press Integrated Peripherals [Press Enter] [Press Enter] [V1.1+V2.0] Main Level [Enabled] [Disabled] [Enabled] [Enabled] [ISO Queue] [ISO Queue] [non-ISO Quese] [Auto] [Auto] [Enabled] [Enabled] [Enabled] [3F8/IRQ4] +/-/PU/PD:Value F10:Save ESC:Exit F6: Fail-Safe Defaults F7:Defaults Item Help F1:General Help EVGA... -
Page 48: Ide Function Setup
Serial-ATA Controller This function allows you to enable specific SATA controllers, enable all controllers, or disable all controllers. The options available are [SATA-0+1] IDE Prefetch Mode Use this function to enable or disable the EVGA [Enabled] [Auto] [Auto] UDMA [Auto]... -
Page 49: Raid Config
, you can enable or disable the [Enabled] [Enabled] [Disabled] [Disabled] , the keyboard and mouse [Disabled] and cannot be changed. Versions that Enabled OnChip USB USB Keyboard Support USB Mouse Support [Disabled] Disabled Disabled Disabled Disabled [Disabled] Enabled Enabled EVGA... -
Page 50: Hd Audio
This function on the Integrated Peripherals menu allows you to enable or disable the onboard Floppy Disk Controller function. Onboard Serial Port 1 This function on the Integrated Peripherals menu allows you to select the onboard serial port 1 function. Options are [3E8/IRQ4] EVGA [Enabled] [Enabled] [3F8/IRQ4] , and [Auto] [Disabled]. -
Page 51: Power Management Setup Menu
CMOS Setup Utility menu and press Power Management Setup [Enabled] [S1&S3] [User Define] [DPMS Support] Main Level [Disabled] [Disabled] [Instant-Off] [Disabled] [Disabled] [Enabled] [BUTTON ONLY] Enter Ctrl-F1 [Off] +/-/PU/PD:Value F10:Save ESC:Exit F6: Fail-Safe Defaults F7:Defaults Item Help F1:General Help EVGA... -
Page 52: Soft-Off By Pbnt
This function on the Power Management Setup menu allows you to define the power-on function. Options for this function are: BUTTON ONLY Keyboard 98 EVGA [S1&S3] [Delay 4 Sec] [Disable] , you can manually put in the day of the... -
Page 53: Pwron After Pwr-Fail
If ON is selected, system will attempt to power back on automatically after a power failure. If OFF is selected the system will remain turned off after a power failure. is selected, the KB Power ON Password [Password] [Enter] Ctrl-F1 Hot key Power On function Ctrl+F12 [Hot KEY] Enter [Ctrl-F1] function is EVGA... -
Page 54: Pnp/Pci Configuration Menu
PCI/VGA Palette Snoop ** PCI Express relative items ** Maximum Payload Size :Move Enter:Select F5: Previous Values Figure 11. EVGA from the CMOS Setup Utility menu and press Phoenix – AwardBIOS CMOS Setup Utility PnP/PCI Configuration [PCI Slot] [Disabled] [Auto(ESCD)]... -
Page 55: Reset Configuration Data
[Disabled] if you want the BIOS to automatically populate so you can assign the resources, [Manual] [Auto(ESCD)] Press Enter [Manual)] [Press Enter] Resources Controlled By to see options. Enter [Manual] EVGA... -
Page 56: Pci/Vga Palette Snoop
This function on the PnP/PCI Configuration menu allows you to set the maximum TLP payload size (in bytes) for the PCI Express devices. Use the Page Up Page Down the keyboard numbers or use the sizes. EVGA [PCI Device] [PCI Device] [PCI Device] [PCI Device] [PCI Device]... -
Page 57: Pc Health Status Menu
1.28V 1.19V 1.81V 3.26V 3.26V 12.19V 4.99V 3.00V 4272 RPM 0 RPM 4500 RPM 0 RPM 0 RPM +/-/PU/PD:Value F10:Save ESC:Exit F6: Fail-Safe Defaults are dynamic and change as the speed and Blue Enter Item Help F1:General Help F7:Defaults EVGA... -
Page 58: Dynamic Fan Control
To set the fan speed to a constant rate, select Set the desired speed for the Aux, nForce, and Chassis fans from 0% to 100%. The system defaults to 100%. EVGA [SmartFan] [SmartFan] [Auto] 100%... -
Page 59: Frequency/Voltage Control Menu
.5 to the multiplier. Ex: 9.5x [Enabled] from the CMOS Setup Utility menu. Frequency/Voltage Control [Press Enter] [Press Enter] [Press Enter] Main Level [Disabled] [5x] [Press Enter] [Press Enter] +/-/PU/PD:Value F10:Save ESC:Exit F6: Fail-Safe Defaults F7:Defaults [Disable] Item Help F1:General Help . If set EVGA... -
Page 60: System Clocks
SLI-Ready memory, FSB memory, and memory timing, go to the FSB & Memory screen. PCIe Frequency This option will overclock the PCI-E frequency. Adjustments can be made from [100] to [200]. EVGA Phoenix – AwardBIOS CMOS Setup Utility System Clocks Setting Current Value 2933.3... -
Page 61: Fsb & Memory Config
Proportionally. [Unlinked] Enter FSB and memory speed manually. +/-/PU/PD:Value F10:Save ESC:Exit F6: Fail-Safe Defaults keys to scroll through the FSB and Memory Page Down is changed to editable and the FSB (QDR), MHz Item Help F1:General Help F7:Defaults EVGA... - Page 62 Use the type in a new value. Note that the frequency that takes effect when the system reboots. Memory Timing Setting Press Enter optimal timings or to manually enter timings. EVGA 2933.3 [Linked] [1067] 1066.7 Auto 800.0 FSB (QDR), MHz...
-
Page 63: Memory Timing Setting
Optimal to use the manufacturers’ recommended values. Item Help Main Level Select [Expert] to enter timings manually 7.8uS F10:Save ESC:Exit F1:General Help F7:Defaults keys to select Optimal Optimal. keys to select . When Expert is Expert EVGA... - Page 64 : The Write recovery time (options are 2 through 7). : This is the minimum write-to-read delay with the same chip tWTR selected (options are 1 through 10). : This is the DRAM refresh rate (options are tREF 3.9uS EVGA Settings Current Value [Expert] [Auto(5)] [Auto(7)] [Auto(7)] [Auto(23)]...
-
Page 65: System Voltages
System Voltages Select System Voltages to display the System Voltages menu. Enter Phoenix – AwardBIOS CMOS Setup Utility Parameters EVGA VDroop control CPU Core CPU FSB Memory nForce SPP NF200 Voltage Level GTLVREF Lane 0 GTLVREF Lane 1 GTLVREF Lane 2... - Page 66 GTLVREF Lane 3 This function defines the voltage level for GTLVREF Lane 3. Use the Page Down set the voltage. EVGA keys to select a voltage (1.20V, 1.30V, Page Down to automatically set the voltage. [Auto] keys to select a voltage or select...
-
Page 67: Load Timing/Voltage Set
Press Enter to Exit ... [ ] Select Profile 1 ... [ ] Select Profile 2 ... [ ] Select Profile 3 ... [ ] :Move ENTER:Accept function. to see the options. ESC:Abort for all settings. Press Enter to see the options. ESC:Abort Auto EVGA... -
Page 68: Installing Drivers And Software
Adobe Acrobat Reader User’s Manual Driver Installation Insert the EVGA nForce 750i SLI installation CD for the motherboard included in the kit. The CD will autorun, install the drivers and utilities listed on the install screen. If the CD does not run, go to My Computer and click on the CD to open. -
Page 69: Evga Glossary Of Terms
EVGA Glossary of Terms: ACPI - Advanced Configuration and Power Interface AFR – Alternate Frame Rendering APIC - Advanced Programmable Interrupt Controller BIOS - Basic Input Output System CD-ROM - Compact Disc Read-Only Memory CMOS - Complementary Metal-Oxide Semiconductor CPU – Central Processing Unit D-ICE –... - Page 70 SLI - Scalable Link Interface SPD - Serial Presence Detect SPDIF - Sony/Philips Digital Interconnect Format SPP - System Platform Processors TCP/IP - Transmission Control Protocol/Internet Protocol USB - Universal Serial Bus VDroop - V-core Voltage Drop VGA - Video Graphics Array EVGA...
-
Page 71: Appendix A. Post Codes
EVGA nForce 750i SLI Motherboard This section provides the Award POST Codes (Table 5) for the EVGA nForce 750i SLI Motherboard during system boot up. These POST Codes are displayed on the LED POST Code readout located directly onboard the motherboard. - Page 72 Program chipset Init PNP Shadow VBIOS Clock Gen Setup BDA Reserved EVGA Description Check the integrity of the ROM,BIOS and message Check Flash type and copy flash write/erase routines Test and Reset CMOS Load Chipset Defaults Initialize onboard clock generator...
- Page 73 Test 8259-1 Mask Verify 8259 Channel 1 masked interrupts by alternately turning off and on the interrupt lines. Reserved Test 8259-2 Mask Verify 8259 Channel 2 masked interrupts by alternately turning off and on the interrupt lines. Reserved Reserved EVGA...
- Page 74 PnP Init Display Reserved Setup Virus Reserved Awdflash Load Reserved EVGA Description Turn off interrupts then verify no 8259's interrupt mask register is on. Test 8259 Force an interrupt and verify the interrupt occurred. Reinitialize Preboot agent serial port If EISA non-volatile memory checksum is good, execute EISA initialization.
- Page 75 Initialize floppy disk drive Reserved FDD install Install FDD and setup BIOS data area parameters Reserved Reserved Reserved Initialize Hard Initialize hard drive controller Drive Reserved Detect HDD IDE device detection Reserved Detect serial ports Initialize serial ports. Reserved Reserved EVGA...
- Page 76 IRQ12 Enable Reserved Reserved Reserved Boot Medium Read Final Init EVGA Description Initialize parallel ports. HDD check for write protection Check POST error and display them and ask for user intervention Ask password security. Write all CMOS values back to RAM and clear screen.
- Page 77 If interrupt occurs in protected mode. Unclaimed NMI If unmasked NMI occurs, display Press F1 to disable NMI, F2 reboot. Program MCP To program chipset from defaults values E1-EF Setup Pages E1- Page 1, E2 - Page 2, etc. Boot EVGA...