
Related Manuals for Eden World Tour 1205


Summary of Contents for Eden World Tour 1205
- Page 1 THE LEADER IN BASS AMPLIFICATION. World Tour 1205 Bass Guitar Amplifier Operation Manual Never Compromise™ ©09-20-2005 by U.S. Music Corp.
- Page 2 FORWARD Congratulations on the purchase of your new Eden World Tour Integrated Amplifier System. All of us at Eden are totally committed to providing you with the very best bass guitar systems in their class. Our goals are to offer...
- Page 3 The Eden World Tour products group is the result of our quest for ultimate bass tone and maximum reliability. Your new World Tour Amplifier was designed, engineered and manufactured equivalent to aircraft vibration standards and housed in a one-piece aluminum case with steel top to ensure maximum reliability.
-
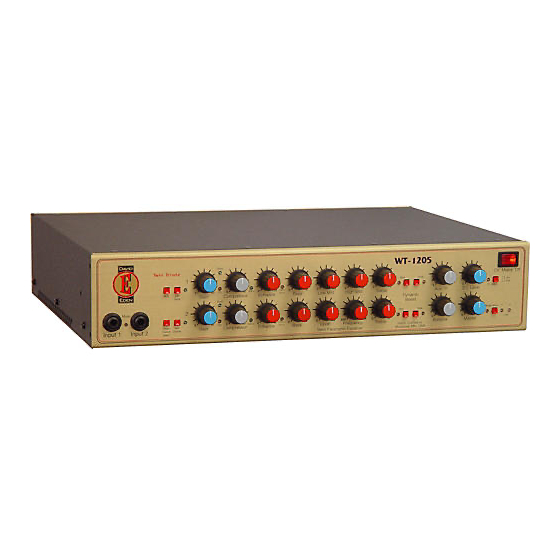
Page 4: Front Panel Features
FRONT PANEL FEATURES Input Jacks – Designed to accept a standard ¼ inch mono phone plug. For best results use a high quality shielded cable to connect your instrument to the amplifier. Both inputs are buffered and will handle standard passive, high level active, and piezo input signals. - Page 5 Compressor Active Indicators – Light to indicate that the signal has crossed the threshold of the compression circuit and that compression is taking place. Enhance Controls – Called the “Magic Knob” by some, this complex control simultaneously boosts the very low bass, upper middle, and high frequencies while putting a dip in the lower middle frequencies.
- Page 6 We recommend you engage these switches at low volumes so that your sound remains consistent at any volume. At higher volume levels they aren’t needed but you may want to use them as a matter of taste. Because we strongly support Freedom of Choice, we’ve incorporated these two switches into our design.
-
Page 7: Rear Panel Features
Mains On/Off Switch – This switch turns the system power ON or OFF. The switch illuminates to indicate the presence of AC power present in the chassis. This switch is prior to the fuse. The switch light can be on even if the fuse is blown. - Page 8 All models come with a holder marked (FUSE) or (115/230) and are factory configured for 100/120/ 230/240 only and must be adapted by a service tech for any voltage change. Fuse Requirements: USA @ 120 Volts /60 HZ – 10 Amps, 5 x 20 mm GMC/T/slow blow Europe @ 240 Volts/50 Hz - 5 Amps, 5 x 20 mm GMC/T/slow blow Japan @ 100 Volts/60 Hz - 12 Amps, 5 x 20 mm GMC/T/slow blow IMPORTANT NOTE: Always use slow blow or time delay type fuses.
- Page 9 Footswitch Jack – Connect the Footswitch here. When connected, the footswitch overrides the corresponding front panel controls. Tuner Out Jack – This standard ¼ inch jack is designed to provide a pre- gain signal for connection to a tuner. It can also be used to provide pre-tone signal to other devices such as a direct box or console.
- Page 10 Cooling System – Your amplifier features a thermostatically controlled fan, which will switch on when the internal temperature reaches 130 degrees F. In low volume situations (into 8 Ohm loads) the fan may not come on at all. The cooling system also features a high temperature thermal safety system, which will activate a standby switch if the operating temperature goes above 190 degrees F.
- Page 11 Dual (Stereo) Channel Operation – Engage this switch when using stereo instruments. Engaging this switch will bypass the Channel Switching. Turbo Boost – Also known as the Solo Button, this engages a +6dB boost to put you on top of the mix. Use this for solos and such. This control is global, meaning that it affects both channels simultaneously.
-
Page 12: Initial Setup
INITIAL SET UP As bassists, each of us has in our head a concept of our perfect sound. Eden amplifiers are designed to help you easily achieve the sound you hear inside you. However, it’s a multi-step process as explained below. - Page 13 Once you’ve ensured correct voltage and speaker connection, set the Master Volume control to minimum (fully counter-clockwise). Set the tone controls to the center position (12:00 or 0). Turn the Enhance controls to the minimum position. Set the Input Gain controls to the minimum (fully counter-clockwise).
- Page 14 They then send a post-EQ D.I. to the board. We encourage you to experiment with different settings to obtain the sound you desire. On our website (www.eden-electronics.com), you can download a “Favorite Settings” chart to record, well, your favorite settings. It’s on the Manuals page.
- Page 15 Using the EQ Controls – Before you begin to twiddle knobs, let’s talk about a few things. Excessive boosting of one or more EQ frequencies may cause an overload in the EQ section. If this happens, the Clip light will engage.
- Page 16 We suggest you do some experimenting with the Midrange controls to better understand how they can affect your tone. While playing, boost and cut the Low Midrange so you can hear how it affects your tone. Remember to play in all ranges, not just on the first few frets. Once you have an idea of the tonal possibilities, return this control to FLAT and repeat the procedure with the High Midrange control.
- Page 17 A FEW TECHNICAL THINGS TO REMEMBER Clipping = Bad – Keep an eye on the EQ Clip light. If it blinks, either reduce Input Gain or cut back on one or more EQ ranges. As we said earlier, Clipping in the preamp section is a Very Bad Thing and is to be avoided at all times.
-
Page 18: Other Considerations
There you have it: a quick and easy process to help you get the perfect tone from your Eden amplifier. As previously mentioned, it make take a few extra minutes the first few times you go through this, especially if you take the time to experiment with all the knobs and switches, which we highly recommend. -
Page 19: Maintenance
Like we said earlier, neighbors and room mates really love this, which qualifies it as another Really Neat Thing. MAINTENANCE Your Eden amplifier has been designed to require minimal routine maintenance. Attention to the following areas will ensure optimum performance of your amplifier. We’re serious. Don’t blow this off, OK? Contact Point Cleaning –... - Page 20 Learn More – If you’d like to learn more about your amplifier (or about our company and its activities), we invite you to visit our website – www.eden- electronics.com. There you’ll find articles to help you better understand our products and the technical stuff some people find so interesting. You’ll also find our FAQ (Frequently Asked Questions) file, which is updated regularly.
- Page 21 Eden Never Compromise™ Note for those who care: This manual was written by David (Eden) Nordschow, Eden’s Chief Propellerhead & Master of All Things Technical, and Lane Baldwin, Eden’s Special Projects Coordinator (Many Other Functions). Any grammar errors are David and Lane’s fault, as are the attempts at humor.