
Related Manuals for Eden World Tour WT800C


Summary of Contents for Eden World Tour WT800C
- Page 1 THE LEADER IN BASS AMPLIFICATION. World Tour Bass Guitar Amplifier Covering Model WT800 (C Version) Never Compromise™ ©10-01-2006 by U.S. Music Corp.
-
Page 2: Operation Manual
This manual will cover domestic and international versions of the WT800C Integrated Amplifier. The WT800C delivers 300 watts RMS output @ 8 Ohms, 440 watts @ 4 Ohms and 550 watts @ 2 Ohms (per channel). In Bridge Mode, it delivers 880 Watts @ 8 Ohms and 1100 Watts @ 4 Ohms. - Page 3 The Eden line of World Tour amplifiers is the result of our research and development in combining high performance and compact size. Just as a skilled craftsman needs good quality tools that won't let him down on the job, so does a good musician. We hope you enjoy the tool we’ve created for you.
-
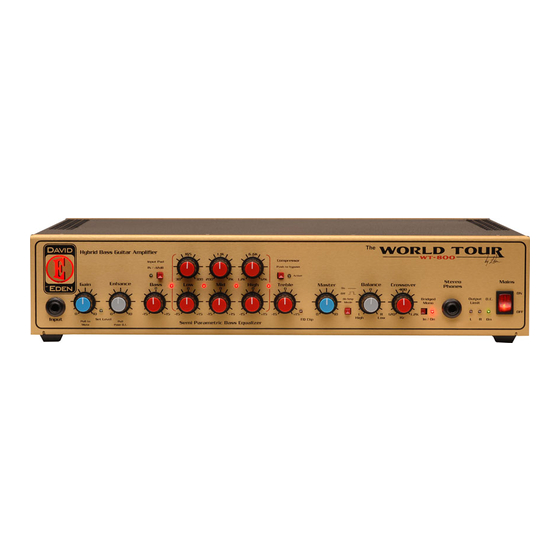
Page 4: Front Panel Features
FRONT PANEL FEATURES Input Jack – Designed to accept a standard _ inch mono phone plug. For best results use a high quality shielded cable to connect your instrument to the amplifier. The input is buffered and will handle standard passive, high level active, and piezo input signals. - Page 5 Semi-Parametric Controls There are three sets of semi-parametric controls. Each set has a Frequency control (top knob) and a Level control (bottom knob). The Level controls provide 15 dB of cut or boost. The control is FLAT in the 12:00 position. From left to right, the Frequency controls have the following ranges: 30-300Hz 200Hz-2Khz...
-
Page 6: Rear Panel Features
EXTREMELY IMPORTANT NOTE: Do NOT engage Mono Bridge in combination with bi-amp operation. Doing so may cause damage to your amplifier and possibly your speakers! And, as we said earlier, it will sound REALLY BAD. Headphone Jack – Accepts a standard _ inch stereo or mono headphone plug. - Page 7 Note: Our new D610XLT is rated at 6 Ohms and is rated at 1050 Watts RMS. When connecting this cabinet to the WT800C in Bridge Mode, it will receive approximately 1000 Watts RMS, which is a near-perfect match. Left/High Amp Output – These consist of two _ inch jacks and an NL-4 connector (sometimes called a Speakon).
- Page 8 Recording Out (D.I.) – This fully balanced XLR output allows you to send a pre- or post-EQ signal to a recording or sound reinforcement mixing console. We use Pin 2 hot configuration. Adjusting the Master Volume control will not affect this send. This output is designed to use with phantom powered systems.
-
Page 9: Operating Instructions
Master Volume control. This jacks can also be used to return a studio cue signal, allowing the WT800C to provide you with your own headphone mix in the studio. The Aux signal is summed with the main input and sent to all outputs, including the DI. -
Page 10: Initial Setup
Electrical Connection – The WT800C requires at least 20 Amps of correctly wired alternating current for proper operation. Providing less than 20 Amps of power may result in poor amplifier performance, so it’s probably not a good idea to plug all of your band’s gear into a single wall outlet. - Page 11 Bridge Mode Operation: Connect speaker(s) to the Bridge Mono output ONLY. Do NOT use the individual amplifier outputs. The total impedance of all speakers should not exceed 4 Ohms. Engage Bridge Mode by depressing the switch on the front panel. You can do this using the tip of a pin, a small screwdriver, etc.
- Page 12 &/or speakers. We’re serious about this. Pay attention. GETTING A GREAT TONE As bassists, each of us has in our head a concept of our perfect sound. Eden amplifiers are designed to help you easily achieve the sound you hear inside you.
- Page 13 Turn On – Once you’ve completed the steps above, you can plug in your bass and turn on the unit (plug it in first, ok?) and let’s get started. We recommend turning your system on with the Master Volume control set to its minimum position.
- Page 14 We encourage you to experiment with different settings to obtain the sound you desire. We have included some EQ panel diagrams at the back of this manual to help you record your settings. Enhance – Once you’ve set your gain, you can move on to setting your EQ, beginning with the Enhance control, or Magic Knob, as some call it.
- Page 15 Using the Semi-Parametric EQ Controls – Adjusting the Semi-Parametric controls allows you to focus in on particular frequencies to achieve your desired tone. We suggest you spend some time experimenting with these controls to learn more about how they can affect your sound. Here’s an easy way to do that: Beginning with all controls FLAT, turn the first (left) frequency control fully counterclockwise.
- Page 16 A FEW TECHNICAL THINGS TO REMEMBER Clipping = Bad – Keep an eye on the EQ Clip light. If it blinks, either reduce Input Gain or cut back on one or more EQ ranges. As we said earlier, Clipping in the preamp section is a Very Bad Thing and is to be avoided at all times.
-
Page 17: Other Considerations
This will provide a signal that is post-EQ and after the Master Volume control, allowing the entire system to be controlled from the WT800C. This way, you only have to adjust one set of knobs. This is a Really Neat Thing, huh? -
Page 18: Maintenance
Neighbors and room mates really love this, which qualifies it as another Really Neat Thing. In addition, some users don’t need all the power of the WT800C in all situations. Think small gigs and rehearsals. If you like, you can connect a speaker to a single amplifier channel. - Page 19 DO NOT continue to use the amplifier in this condition. Learn More – If you’d like to learn more about your amplifier (or about our company and its activities), we invite you to visit our website – www.eden- electronics.com. There you’ll find articles to help you better understand our products and the technical stuff some people find so interesting.
-
Page 20: My Favorite Settings
My Favorite Settings Setting 1____________________________________________________ Setting 2____________________________________________________ Setting 3____________________________________________________ Setting 4____________________________________________________...