
Related Manuals for Oster 6078


Summary of Contents for Oster 6078
- Page 1 Large Countertop Oven User Manual Horno Grande Para Mostrador Manual de Instrucciones 6078/6079 MODELS/ MODELOS www.oster.com P.N. 128263...
-
Page 2: Important Safeguards
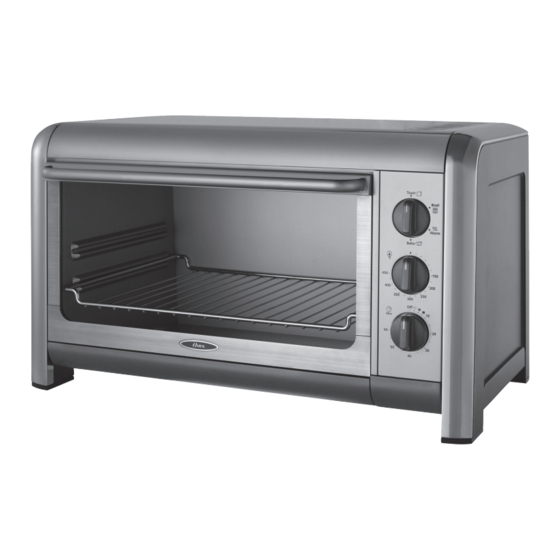
IMPORTANT SAFEGUARDS SAVE AND READ THESE INSTRUCTIONS When using electrical appliances, basic safety precautions should always be followed including the following: • READ ALL INSTRUCTIONS, PRODUCT LABELS AND WARNINGS BEFORE USING THE COUNTERTOP OVEN. • Do not touch hot surfaces. Always use oven mitts when handling hot materials and allow metal parts to cool before cleaning. Allow the unit to cool thoroughly before putting in or taking off parts. Always use the oven handles when moving the unit. • When the unit is not in use and before cleaning, unplug the countertop oven from the wall outlet. Note: Make sure the oven is turned off before unplugging. - Page 3 Toast Function Broil Warm Convection Bake Time Learning About Your Countertop Oven Toast Function 1. Function Selector dial – Select cooking function by Broil turning knob to desired setting. (See Figure 1) Toast Function 2. Temperature Control dial – Adjust the thermostat Broil to the desired temperature. (See Figure 2) Warm Toast 3. Timer Control dial with bell signal – Set cooking Function Convection Bake Broil time up to 60 minutes. Will automatically turn the Warm...
- Page 4 Preparing To Use Your Countertop Oven for the First Time If you are using your Countertop oven for the first time, please be sure to: • Remove any stickers from the surface of the oven. • O pen oven door and remove all printed documents and paper from inside the Countertop Oven. • C lean the rack, and pan with hot water, a small amount of dishwashing liquid and a non-abrasive cleaning pad. • DO NOT IMMERSE THE BODY OF THE UNIT IN WATER. • Dry the unit thoroughly before using. • S elect a location for the Countertop Oven. The location should be in an open area on a flat counter where the plug will reach an outlet. • Plug the Countertop Oven into a 120 Volt AC electrical outlet.
-
Page 5: To Use The Toast Function
To Use the Toast Function Toast Function Broil Step 1. Place food on Wire Rack. Step 2. For Best Toast Result, position the rack on the upper guide. Warm Convection Step 3. C lose glass door completely. Bake Step 4. Turn the Function dial to Toast. Step 5. T urn the Timer past 20 minute mark then back to desired toast time anywhere between the Toast symbols. Step 6. W hen toasting is complete, open door completely and remove food. * * Time To Use the Convection Bake Function Toast Function Broil Preheat oven 5-7 minutes at desired temperature with oven rack in place. Step 1. P lace baking pan with food inside on wire rack. Warm Step 2. Close glass door completely. - Page 6 To Use the Warm Function Toast Function Step 1. P lace baking pan with food inside on wire rack. Broil Step 2. Close glass door completely. Warm Step 3. Turn the Function dial to Warm. Convection Bake Step 4. T urn the Temperature Control to 200˚ F. Step 5. T urn the Timer to desired warming time.* Step 6. W hen Warming is complete, open door completely and remove food. * * Time Tips for Cooking Pizza Step 1. Oven rack should be on upper rack guide. Toast Function Step 2. Set function dial to Convection Bake. Broil Step 3. Set temperature dial to 400º F. Warm Sep 4. S et timer control to desired time (Toaster ovens will cook Convection Bake...
-
Page 7: Cleaning Your Countertop Oven
Cleaning Your Countertop Oven Step 1. Turn all knobs to off position then unplug unit and let it cool. Step 2. W ipe unit down with damp cloth. *DO NOT IMMERSE IN WATER. Make sure to only use mild, soapy water. Abrasive cleaners, scrubbing brushes and chemical cleaners will damage the continuous clean coating on this unit. Step 3. Remove crumb tray by pulling out of Countertop Oven. Step 4. S hake off crumbs from crumb tray. Cleaning the crumb tray often will avoid any accumulations. Step 5. R emove wire rack and clean with damp cloth or place in top rack of dishwasher. Storing Your Countertop Oven Allow the appliance to cool completely before storing. If storing the Countertop Oven for long periods of time make certain that the Countertop Oven is clean and free of food particles. Store the Countertop Oven in a dry location such as on a table or countertop or cupboard shelf. Wind the electrical cord around the cord storage brackets. Other than the recommended cleaning, no further user maintenance should be necessary. eLpfUL roUbLesHooTinG roblem otential auSe olution • O vercooked / • I ncorrect temperature or • Y ou may have to adjust the time Undercooked Foods time setting... -
Page 8: Year Limited Warranty
1-Year Limited Warranty Sunbeam Products, Inc. doing business as Jarden Consumer Solutions or if in Canada, Sunbeam Corporation (Canada) Limited doing business as Jarden Consumer Solutions (collectively “JCS”) warrants that for a period of one year from the date of purchase, this product will be free from defects in material and workmanship. JCS, at its option, will repair or replace this product or any component of the product found to be defective during the warranty period. Replacement will be made with a new or remanufactured product or component. If the product is no longer available, replacement may be made with a similar product of equal or greater value. This is your exclusive warranty. Do NOT attempt to repair or adjust any electrical or mechanical functions on this product. Doing so will void this warranty. This warranty is valid for the original retail purchaser from the date of initial retail purchase and is not transferable. Keep the original sales receipt. Proof of purchase is required to obtain warranty performance. JCS dealers, service centers, or retail stores selling JCS products do not have the right to alter, modify or any way change the terms and conditions of this warranty. This warranty does not cover normal wear of parts or damage resulting from any of the following: negligent use or misuse of the product, use on improper voltage or current, use contrary to the operating instructions, disassembly, repair or alteration by anyone other than JCS or an authorized JCS service center. Further, the warranty does not cover: Acts of God, such as fire, flood, hurricanes and tornadoes. What are the limits on JCS’s Liability? JCS shall not be liable for any incidental or consequential damages caused by the breach of any express, implied or statutory warranty or condition. Except to the extent prohibited by applicable law, any implied warranty or condition of merchantability or fitness for a particular purpose is limited in duration to the duration of the above warranty. JCS disclaims all other warranties, conditions or representations, express, implied, statutory or otherwise. -
Page 9: Precauciones Importantes
PRECAUCIONES IMPORTANTES LEA Y GUARDE ESTAS INSTRUCCIONES Cuando use aparatos eléctricos, siempre deben tomarse algunas precauciones básicas de seguridad, incluyendo las siguientes: • LEA TODAS LAS INSTRUCCIONES, LAS ETIQUETAS EN EL PRODUCTO Y LAS ADVERTENCIAS, ANTES DE USAR EL HORNO TOSTADOR. • N o toque las superficies calientes. Siempre use guantes cuando maneje materiales calientes y permita que las partes metálicas se enfríen antes de limpiar. Permita que la unidad se enfríe completamente antes de poner o quitar partes. Siempre use las asas del horno cuando mueva la unidad. • D esconecte el horno tostador del tomacorriente cuando la unidad no esté en uso y antes de limpiarla. NOTA: Verifique que el horno tostador esté apagado antes de desconectar. - Page 10 Toast Function Broil Warm Convection Bake Time Información Sobre Su Horno de Mesa 1. Dial de selección de función – Seleccione la función de cocción girando la perilla hasta la configuración deseada. (Vea la figura 1) Toast Function 2. Dial de control de la temperatura – Ajuste el termostato Broil a la temperatura deseada. (Vea la figura 2) Toast Function 3. Dial de control de reloj programador con alarma Broil Warm – Ajuste el tiempo de cocción hasta 60 minutos.
- Page 11 Preparación Para Usar Su Horno de Mesa por Primera Vez Si está usando su horno de mesa por primera vez asegúrese de: • Retirar todos los adhesivos de la superficie del horno. • A brir la puerta del horno y retirar todos los documentos impresos y los papeles de la parte interior del horno de mesa. • L impiar la rejilla y la bandeja con agua caliente, una pequeña cantidad de líquido lavavajillas y una esponja no abrasiva. • NO SUMERGIR EL CUERPO DE LA UNIDAD EN AGUA. • Secar la unidad por completo antes de usarla. • S eleccionar una ubicación para el horno de mesa. Deberá ubicarse en un área abierta sobre un mostrador plano donde el enchufe llegue hasta el tomacorriente. • Enchufar el horno de mesa en un tomacorriente de 120 voltios CA. : Cuando el horno esté en uso o se esté enfriando, asegúrese de que dverTenCia haya un espacio de 6 pulg. (15cm) entre el horno de mesa y cualquier otra superficie incluyendo los cables. Asegúrese de que el cable no esté...
- Page 12 Uso de la Función De Tostar Toast Function Broil Paso 1. Coloque los alimentos sobre la rejilla de alambre. Paso 2. P ara los mejores resultados al tostar, coloque la rejilla Warm en la guía superior. Convection Bake Paso 3. Cierre completamente la puerta de vidrio. Paso 4. Gire el dial de función a la posición “Toast” (tostar). Paso 5. G ire la perilla del reloj programador pasando la marca de los 20 minutos y luego vuelva al tiempo deseado para tostar entre cualquiera de los símbolos para tostar. Time Paso 6. C uando termine de tostar, abra por completo la puerta del horno y retire los alimentos. ** Uso de la Función de Horneado por Convección Toast Function Precaliente el horno de 5 a 7 minutos a la temperatura deseada con la Broil rejilla del horno en su lugar.
- Page 13 Uso de la Función de Calentar Toast Paso 1. C oloque una bandeja para horneado con alimento en la rejilla Function Broil de alambre. Paso 2. Cierre completamente la puerta de vidrio. Warm Paso 3. Gire la perilla de función a la posición “Warm” (calentar). Convection Bake Paso 4. Gire el control de temperatura a 200˚ F. Paso 5. G ire la perilla del reloj programador hasta el tiempo de calentamiento deseado.* Paso 6. C uando termine de calentar, abra por completo la puerta del horno y retire los alimentos. ** Time Sugerencias Para Hornear Pizzas Paso 1. L a rejilla del horno debe estar en la guía para rejillas superior. Paso 2. G ire el dial de función a la posición “Convection Bake” Toast (horneado por convección).
- Page 14 Limpieza del Horno de Mesa Paso 1. G ire todas las perillas a la posición de apagado, desconecte la unidad y déjela enfriar. Paso 2. L impie la unidad con un paño húmedo. *NO LA SUMERJA EN AGUA. Asegúrese de usar sólo agua con jabón suave. Los limpiadores abrasivos, cepillos para fregar y limpiadores químicos dañan el revestimiento de limpieza continua de esta unidad. Paso 3. Retire la bandeja para migas del horno de mesa. Paso 4. S acuda la bandeja para quitar las migas. La limpieza regular de la bandeja para migas evitará las acumulaciones. Paso 5. R etire la rejilla de alambre y limpie con un paño húmedo o colóquela en la rejilla superior del lavavajillas. Para Guardar el Horno de Mesa Deje que el electrodoméstico se enfríe por completo antes de guardarlo. Si guarda el horno de mesa por períodos largos asegúrese de que esté limpio y libre de partículas de comida. Guarde el horno de mesa en un lugar seco como por ejemplo en una mesa o mostrador o en el estante de un armario. Enrolle el cable eléctrico en los apliques para guardar el cable. Además de la limpieza recomendada no es necesario ningún otro tipo de mantenimiento. onsejos úTiLes diaGnósTico de probLemas roblema oSibleS CauSaS oluCión...
-
Page 15: Garantía Limitada Por Un Año
Garantía Limitada por un Año Sunbeam Products, Inc. operando bajo el nombre de Jarden Consumer Solutions, o en Canadá, Sunbeam Corporation (Canada) Limited operando bajo el nombre de Jarden Consumer Solutions, (en forma conjunta, “JCS”), garantiza que por un período de un año a partir de la fecha de compra, este producto estará libre de defectos de materiales y mano de obra. JCS, a su elección, reparará o reemplazará este producto o cualquier componente del mismo que presente defectos durante el período de garantía. El reemplazo se realizará por un producto o componente nuevo o reparado. Si el producto ya no estuviera disponible, se lo reemplazará por un producto similar de valor igual o superior. Ésta es su garantía exclusiva. No intente reparar o ajustar ninguna función eléctrica o mecánica de este producto. Al hacerlo elimínará ésta garantía. La garantía es válida para el comprador minorista original a partir de la fecha de compra inicial y la misma no es transferible. Conserve el recibo de compra original. Para solicitar servicio en garantía se requiere presentar un recibo de compra. Los agentes y centros de servicio de JCS o las tiendas minoristas que venden productos de JCS no tienen derecho a alterar, modificar ni cambiar de ningún otro modo los términos y las condiciones de esta garantía. Esta garantía no cubre el desgaste normal de las piezas ni los daños que se produzcan como resultado de uso negligente o mal uso del producto, uso de voltaje incorrecto o corriente inapropiada, uso contrario a las instrucciones operativas, y desarme, reparación o alteración por parte de un tercero ajeno a JCS o a un Centro de Servicio autorizado por JCS. Asimismo, la garantía no cubre actos fortuitos tales como incendios, inundaciones, huracanes y tornados. ¿Cuál es el límite de responsabilidad de JCS? JCS no será responsable de daños incidentales o emergentes causados por el incumplimiento de alguna garantía o condición expresa, implícita o legal. Excepto en la medida en que lo prohíba la ley aplicable, cualquier garantía o condición implícita de comerciabilidad o aptitud para un fin determinado se limita, en cuanto a su duración, al plazo de la garantía antes mencionada. JCS queda exenta de toda otra garantías, condiciones o manifestaciones, expresa, implícita, legal o de cualquier otra naturaleza. JCS no será responsable de ningún tipo de daño que resulte de la compra, uso o mal uso del producto, o por la imposibilidad de usar el producto, incluidos los daños incidentales, especiales, emergentes o similares, o la pérdida de ganancias, ni de ningún incumplimiento contractual, sea de una obligación esencial o de otra naturaleza, ni de ningún reclamo iniciado contra el comprador... - Page 16 For product questions contact: Jarden Consumer Service USA: 1.800.334.0759 www.oster.com ©2008 Sunbeam Products, Inc. doing business as Jarden Consumer Solutions. All rights reserved. Distributed by Sunbeam Products, Inc. doing business as Jarden Consumer Solutions, Boca Raton, Florida 33431. YMI-06302008 Para preguntas sobre los productos llame: Jarden Consumer Service EE.UU.: 1.800.334.0759 www.oster.com ©2008 Sunbeam Products, Inc. operando bajo el nombre de Jarden Consumer Solutions. Todos los derechos reservados. Distribuido por Sunbeam Products, Inc. operando bajo el nombre de Jarden Consumer Solutions, Boca Raton, Florida 33431. Printed in China Impreso en China...