Table of Contents
Advertisement
Available languages
Available languages
Owner's Manual
CRRFTSMRN °
WHEELED
WEEDTRIMMER
6.0 Horsepower
22 Inch Cut
Model No.
917.773706
• Espahol, p. 17
_,CAUTION:
Read and follow all
Safety Rules and Instructions
before operating this equipment.
Sears, Roebuck and Co., Hoffman Estates, IL 60179
Visit our Craftsman website: www.sears.com/craftsman
U.S.A.
Advertisement
Table of Contents

Related Manuals for Craftsman 917.773706


Summary of Contents for Craftsman 917.773706
- Page 1 WEEDTRIMMER 6.0 Horsepower 22 Inch Cut Model No. 917.773706 • Espahol, p. 17 _,CAUTION: Read and follow all Safety Rules and Instructions before operating this equipment. U.S.A. Sears, Roebuck and Co., Hoffman Estates, IL 60179 Visit our Craftsman website: www.sears.com/craftsman...
- Page 2 Sears Service ......Back Cover LIMITED TWO YEAR WARRANTY ON CRAFTSMAN WEEDTRIMMER For two (2) years from date of purchase, when this Craftsman Weedtrimmer is main- tained, lubricated, and tuned up according to the operating and maintenance instruc- tions in the owner's...
- Page 3 AWARNING: Engine • Do not pull machine backwards unless ab- exhaust, some solutely necessary. Always look down and of its constituents, and certain vehicle behind before andwhile moving backwards. components contain or emit chemicals known to the State of California •...
- Page 4 Repair Agreements Protection Congratulations on making a smart put- • Fast help by phone - phone support chase. Your new Craftsman® product from a Sears technician on products designed and manufactured for years of requiring in-home repair, plus conve- dependable operation.
- Page 5 Serial Number: Date of Purchase: GasolineCapacity/Type: 1.6 Quarts (UnleadedRegular) Oil Type (API SG-SL): SAE 30 (above32°F);SAE 5W-30 (below32°F) Oil Capacity: 20 Ounces Spark Plug (Gap: .030") ChampionRJ19LM or J19LM TrimmerLine Length: 18.75Inches (0.155 Inch Diameter) • The model and serial numberswill be found on a decal on the rear of the trimmer. Record both serial number and date of purchasein the space providedabove.
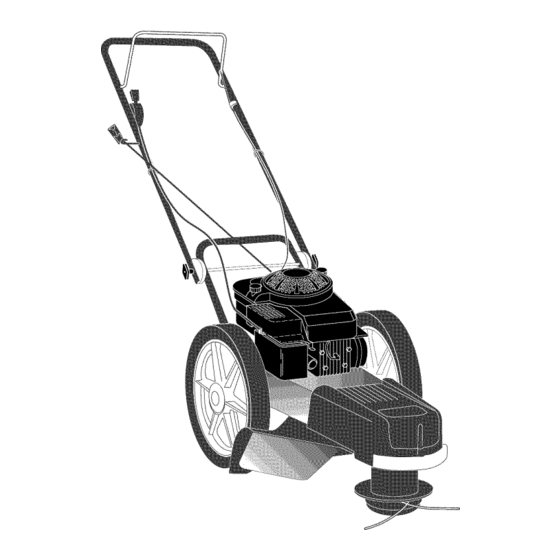
- Page 6 KNOWYOUR TRIMMER READ THIS OWNER'S MANUAL AND ALL SAFETY RULES BEFORE OPERATING YOUR TRIMMER. Compare the illustrations with your trimmer to familiarize yourself with the location of various controls and adjustments. Save this manual for future reference. These symbols may appear on your trimmer or in literature supplied with the product.
- Page 7 TO ADJUST TRIMMING HEIGHT _CAUTION: Stop the engine and wait for SAFETY GLASSES all moving parts to stop. Disconnect spark plug wire from spark plug and place wire where it cannot come in contact with plug. The height of cut can be set to six (6) dif- ferent positions ranging from 1-1/2 inches...
- Page 8 ADD GASOLINE NOTE: In cooler weather it may be necessary to repeat priming steps. • Fill fuel tank to bottom of gas tank warmer weather overpriming may cause filler neck. Do not overfill. Use fresh, flooding and engine will not start. If you clean, regular...
- Page 9 MAINTENANCE FILL IN DATES _(b_'_. _'£._ _" AS YOU COMPLETE /__O_'J SERVICE REGULAR SERVICE /__'/%'4 _"y%" 4¢,.,_/_/" DATES Check for Loose Fasteners Clean Trimmer Clean Under Engine Cover Check Drive Belt / Pulleys Check / Replace Trimmer Lines Check Engine Oil Level Change Engine Oil 11_1,2 Clean Air Filter...
- Page 10 TRIMMER Always observe safety rules when per- forming any maintenance. TIRES • Keep tires free of gasoline, oil, or insect control chemicals which can harm rub- ber. • Avoid stumps, stones, deep ruts, sharp objects and other hazards that may cause tire damage.
- Page 11 ENGINE Fill engine with oil (See "ADD OIL:' in the Operation section of this manual). LUBRICATION Replace engine oil cap. Use only high quality detergent oil rated Reconnect spark plug wire to spark with API service classification SG-SL. plug. Select the oil's SAE viscosity grade according to your expected...
- Page 12 Keep finished surfaces and wheels free ACAUTION: Disconnect spark plug wire of all gasoline, oil, etc. from spark plug and place wire where We do not recommend using a garden cannot come in contact with plug. hose to clean trimmer unless the elec- •...
- Page 13 Tighten pulley bolts securely. Always use Craftsman replacement parts NOTE: Be sure belt is inside top belt to assure proper fit and long life. keeper on idler assembly.
- Page 14 Immediately prepare your trimmer for stor- Also, alcohol blended fuels (called gasohol age at the end of the season or if the unit or using ethanol or methanol) can attract will not be used for 30 days or more. moisture which leads to separation formation of acids during...
- Page 15 TROUBLESHOOTING - See appropriate section in manual unless directed to a Sears Parts & Repair Center. PROBLEM CAUSE CORRECTION Does not start 1. Dirty air filter. 1. Clean/replace air filter. 2. Out of fuel. 2. Fill fuel tank. 3. Stale fuel. 3.
- Page 17 Sears reparar_, gratis todo defecto en el material y la mano de obra. Si la recortadora para mala hierba Craftsman se usa para fines comerciales o de arriendo, esta garantfa s61o se aplica por noventa (90) dfas a partir de la fecha de compra.
- Page 18 I. OPERAClON GENERAL • Operesolamente conluzdeldiao conuna buenaluzartificial. • Antesdeempezar, debefamiliarizarse completamente conloscontroles y el uso • Nooperela m_.quina bajola influencia d el correcto de lamaquina. Paraesto,debeleer alcohol o delasdrogas. y comprender todaslasinstrucciones que • Nunca operela maquina cuandolahierba aparecen enla maquina y enlosmanuales estemojada.
- Page 19 Congratulacienes per su buena compra. Ayuda r_pida per tel_fono - soporte tele- nuevo producto Craftsman® ester diseSado f6nico per parte de un t_cnico Sears sobre y fabricado para funcionar de mode liable per productos que requieren un arreglo en casa, muchos aSos.
- Page 20 Nt_mero de Serie: Fecha de Compra: Capacidad y Tipo de Gasolina: 1.6 Cuartos (Regular sin Plomo) Tipo de Aceite (API SG-SL): SAE 30 (Sobre 32°F); SAE 5W-30 (Debajo 32°F) Capacidad de Aceite: 20 Onzas Bujia (Abertura: .030") Champion RJ19LM o J19LM Longitud de la linea de la recortadora: 18.75...
- Page 21 FAMILIAR|CESE CONSURECORTADORA LEAESTEMANUAL DEUSUARIO Y LASREGLAS DESEGURIDAD A NTES DEOPERAR SU RECORTADORA. Compare lasilustraciones consu recortadora p arafamiliarizarse c onla ubi- caci6ndelosdiversos controles yajustes. G uarde estemanual p arareferencia e nelfuturo. Estossimbolospuedenaparecersobresu recortadorao en las p_ginasproporcionadas con el producto. Aprenda y comprenda sus significados. R_,PIDO LENTO ATTENCION...
- Page 22 SEGURIDAD Cabeza de recortadora La operaci6n de cualquier recortadora puede Tabulaci6n hacer que salten objetos extra_os dentro de de la placa sus ojos, Io que puede producir da_os graves de bloque en 0stos. Siempre use anteojos de seguridad o protecci6n para los ojos mientras opere su recortadora o cuando haga ajustes o reparacio- nes.
- Page 23 GASOLINA • Llene el estanque de combustible hasta la parte inferior del cuello de relleno del estanque de gasolina. No Io Ilene demasiado. Use gasolina regular, sin plomo, nueva y lim- pia con el mfnimo de 87 octanos. No mezcle el aceite con la gasolina.
- Page 24 /JJJ A MEDIDA QUE COMPLETE Revisar si hay sujetadores sueltos Limpiar la recortadora Limpiar debajo de la cubierta del motor Revisar las correas y las poleas impulsadas Verifique / reemplazar las lineas de la recortadora Revisar el nivel del aceite V'1,2 Cambiar el aceite del motor Limpiar el filtro de aire...
- Page 25 Con la extremidad de la linea plagada en el _PRECAUCl6N: Utilice s61o la linea de lado trasero del clip del sujetador, empujar recortadora recomendada. No utilice otros la linea hacia afuera hasta que la linea est_ materiales como cables, cuerdas, cintas, completamente colocada debajo del clip del etc.
- Page 26 Revise el nivel del aceite del c_trter antes de Instale el cartucho, luego vuelva a poner la arrancar el motor y despues de cada cinco (5) cubierta asegur_.ndose que las orejas esten horas de uso continuado. Apriete el tapdn del alineadas con las ranuras en la plancha aceite en forma segura cada vez que revise el trasera.
- Page 27 PARA REMOVER/AJUSTAR LA CORREA DE ,_ ADVERTENClA: Para evitar lesi6nes serias IMPULSION DEL CABEZAL DE LA RE- ntes de dar cualquier sercicio o de hacer CORTADORA ajustes: Remueva el tornillo en el frente de la cubi- Pare el motor. erta clel chasis. Aseg_rese que las Ifneas rotatorias y que Gire la cubierta hacia arriba y a distancia de todas las partes movibles se hayan cletenido...
- Page 28 Remueva la correa de la polea del cabezal 12. Instale la correa y el conjunto del piSon Ioco de la recortadora. en la recortadora, vuelva a conectar un Observe la posici6n del cable de control y resorte del piSon Ioco y monte el piSon Ioco del resorte de Ilamada del piSon Ioco.
- Page 29 Prepare inmediatamente su recortadora p arael formaci6n de _.cidos durante almacemamiento. almacenamiento a l finalde cadatemporada o la gasolina _.cideca puede nafiar el sistema de si launidadnosevaa usarpor30diaso m_.s. combustible de un motor durante el perido de alcamenmiento. RECORTADORA • Vaciar el dep6sito del carburante poniendo Cuanclo se va a guarclar la recortaclora por un en marcha el motor y dej_.ndolo funcionar cierto pefioclo de tiempo, Ifmpiela cuiclaclosa-...
- Page 30 SOLUCION DE PROBLEMAS -Vea la seccibn apropiada en el manual amenos est_ dirigido a un centro de servico Sears. PROBLEMA CAUSA CORRECCION No arranca 1. Filtro de aire sucio. 1. Limpie/cambie el filtro de aire. 2. Sin combustible. 2. Llene el estanque de combus tible.
- Page 31 CRAFTSMAN WEED TRIMMER - - MODEL NUMBER 917.773706 "\\_ PART PART DESCRIPTION DESCRIPTION Engine, Briggs & Stratton, 83923 Nut, Hex, Flangelock 3/8-16 Model No. 128H02-0515-E1 181699 Drive Control Cable (See Breakdown) 178365 Decal, Warning 150406 Bolt, Engine Mounting 3/8-16 178364...
- Page 32 CRAFTSMAN WEED TRIMMER - - MODEL NUMBER 917.773706 20 44 47 21 17 __...
- Page 33 CRAFTSMAN WEED TRIMMER - - MODEL NUMBER 917.773706 PART DESCRIPTION 174031X558 Chassis Assembly 182219 Line, Trimmer .155 diameter x 18.75 long 173715 Screw, Self-Tapping 5/16-18 x 1 185476 V-Belt 172145X004 Bracket, Idler 166042 Pulley, Idler, V-Groove 173716 Bolt, Hex Head 3/8-16 x 1.25...
- Page 34 BRIGGS & STRATTON 4-CYCLE ENGINE MODEL NUMBER 128H02-0515-E1 847J 1330 REPAIR MANUAL 1058 OWNER'S MANUAL [ 1329 REPLACEMENT ENGINE 1019 LABEL...
- Page 35 BRIGGS & STRATTON 4-CYCLE ENGINE MODEL NUMBER 128H02-0515-E1 121 CARBURETOR OVERHAUL 633 @ 188 _ 977 CARBURETOR GASKET 276 @ 358 ENGINE GASKET 524_ 668_) 842 _...
- Page 36 BRIGGS & STRATTON 4-CYCLE ENGINE MODEL NUMBER 128H02-0515-E1 1210 KEY PART KEY PART NO. NO. DESCRIPTION NO. NO. DESCRIPTION 691270 697322 Cylinder Assembly Spring-Valve (Intake) 691270 399269 Kit-Bushing/Seal Spring-Valve (Exhaust) 694086 299819 • Seal-Oil (Magneto Side) Guard-Flywheel 692194 Retainer-Valve 493279 Sump-Engine 691997 691160...
- Page 37 BRIGGS & STRATTON 4-CYCLE ENGINE MODEL NUMBER 128H02-0515-E1 KEY PART KEY PART NO. NO. DESCRIPTION DESCRIPTION 398188 O Valve-Needle/Seat 493823 Spacer (Includes 2) 692294 693981 O:1:Gasket-FloatBowl Spacer-Fuel Tank 691753 Bracket-Air Cleaner Primer 393760 Deflector-Muffler 690661 272653 •O:1:Gasket-Air Cleaner Screw (Muffler Deflector) 690345 Screw 691050...
- Page 38 SERVICE NOTES...
- Page 40 Your Home iiiiiiiiiiiiiiiiiii iiiiiiiiiiiiiiiiiih, For repair = in your home = of aH major brand appliances, iiiiiiiiiiiiiiiiiiii_ HHHHHHHHHi iiiiiiiiii _ lawn and garden equipment, or heating and cooling systems, iiiiiiiiii no matter made it, no matter sold iiiiiiiiii iiiiiiiiii iiiiiiiiii For the replacement parts, accessories iiiiiiiiii...