Nikon D700 User Manual
Hide thumbs
Also See for D700:
- User manual (533 pages) ,
- Manual del usuario (472 pages) ,
- Repair manual (268 pages)
Table of Contents
Advertisement
Quick Links
Advertisement
Chapters
Table of Contents

Related Manuals for Nikon D700


Summary of Contents for Nikon D700
- Page 1 DIGITAL CAMERA User's Manual...
- Page 2 Where to Find It Find what you're looking for from: Know what you want to do but don't know the function name? Find it from the "question and answer" index. Find items by function or menu name. A brief guide for those who want to get started taking pictures right away.
- Page 3 Package Contents Be sure all items listed here were included with your camera. Memory cards are sold separately. • D700 digital • Body cap • BM-9 LCD monitor camera (pg. 3) (pp. 36, 388) cover (pg. 21) • EN-EL3e • MH-18a quick •...
- Page 4 Multimedia Interface are trademarks or registered trademarks of HDMI Licensing LLC. PictBridge is a trademark. All other trade names mentioned in this manual or the other documentation provided with your Nikon product trademarks or registered trademarks of their respective holders.
- Page 5 [] Introduction [] Tutorial [] Image RecordingOptions [] Focus [] ReleaseMode [] ISOSensitivity [] Exposure [] White Balance [] Image Enhancement [] FlashPhotography [] Other Shooting Options [] More About Playback [] Menu Guide [] TechnicalNotes_...
- Page 6 Find what you're looking for using this "question and answer" index. iii i: i How do I take pictures in FX format? Image area How do I take high-quality NEF (RAW) 14-bit NEF (RAW) photos? Can I use the monitor as a viewfinder? Live view Can I control...
- Page 7 How doIkeep the shutter speed and Auto meter off 48, 296 aperture displays from turning off? Can I display aframing grid inthe Viewfinder grid display 298 viewfinder? How doIset t he clock? How doIset t he clock for d aylight savings time? World time...
- Page 8 i'!ii!ii!!!!i What do these indicators mean? Viewfinder, control What information is in the shooting panel, shooting 8, 1O,12 information display? information display Error messages and What does this warning mean? displays How much charge does the battery Battery level have left? How do I get more information about Battery info...
- Page 9 iilliiiiliiiil ¸liiil ¸liiil ¸liiil ¸li Exposure mode S How do I freeze or blur moving objects? (shutter-priority auto) How do I blur background details or Exposure mode R keep both foreground and background (aperture-priority auto) in focus? Can I set both shutter speed and Exposure mode/I, aperture manually? (manual)
- Page 10 Can I view my photographs on the Camera playback camera? Can I view more information about Photo info photos? Why do parts of my photos blink? Photo info, highlights 222, 264 How do I get rid of an unwanted photo? Deleting individual photos...
- Page 11 !!!!!!!!!!!!_!!!!!!!_!!!!!!!!!!!!!!!!!!!!!!!!!!!!!!!!!!!!!!!!!!!!_ !'!!!!!!!!!!!!!!!!!!!!!!!!!!!!!!!!!!!!!!!!!!!!!!!!!!!!!!!!! iiiii_iiil, _iilliiiiliiiil ¸liiil ¸liiil ¸liiil ¸li Can I use the camera to create JPEG Color balance copies of NEF (RAW) photographs? Can I overlay photos to make a single image? Image overlay Can I view my photos on TV? Television playback Can I view my photos in High HDMI...
- Page 12 Table of Contents Q&A Index ....................For Your Safety .................. xviii Notices ..................... Introduction Overview ....................Getting to Know the Camera .............. Camera Body ..................3 The Control Panel ................8 The Viewfinder Display ..............10 The Shooting Information Display ..........12 The Command Dials ...............
- Page 13 Image Recording Options Image Area ..................... Image Quality ..................Image Size ....................Focus Focus Mode ................... AF-Area Mode ..................Focus Point Selection ................. Focus Lock ....................Manual Focus ..................Release Mode Choosing a Release Mode ..............84 Continuous Mode ................Framing Pictures in the Monitor (Live View) ......
- Page 14 Long Time-Exposures ............... Autoexposure (AE) Lock ..............Exposure Compensation ..............Bracketing .................... White Balance White Balance Options ..............Fine-Tuning White Balance ............Choosing a Color Temperature ............ 147 Preset Manual ..................Image Enhancement Picture Controls .................. Creating Custom Picture Controls .......... Active D-Lighting ................
- Page 15 More About Playback Full-Frame Playback ................. Photo Information ................Viewing Multiple Images: Thumbnail Playback ..... 232 Taking a Closer Look: Playback Zoom ........234 Protecting Photographs from Deletion ........235 Deleting Individual Photographs ..........236 Connections Connecting to a Computer ............
- Page 16 Active Folder ................272 File Naming ................274 Image Quality ................274 Image Size ................... 274 Image Area ................. 274 JPEG Compression ..............275 NEF (RAW) Recording ............. 275 White Balance ................275 Set Picture Control ..............275 Manage Picture Control ............275 Color Space ................
- Page 17 bS: Center-Weighted Area ............ 294 b6: Fine Tune Optimal Exposure ......... 294 c: Timers/AE Lock ................296 cl : Shutter-Release Button AE-L ......... 296 c2: Auto Meter-off Delay ............296 c3: Self-Timer Delay ..............297 c4: Monitor off Delay ............... 297 d: Shooting/Display ..............
- Page 18 f12: R everse Indicators ..........TheSetup Menu: Camera S etup ..........Format Memory Card ..........LCD Brightness ............Clean I mage Sensor ............ Lock M irror upforCleaning ........... Video M ode ............. HDMI ..............World T ime ............. Language ...............
- Page 19 Technical Notes Compatible Lenses ................Optional Flash Units (Speedlights) ..........377 Other Accessories ................Caring for the Camera ..............Storage ....................Cleaning ................... The Low-Pass Filter ............... "Clean Now"................"Clean at Startup/Shutdown"..........Manual Cleaning ............... Caring for the Camera and Battery: Cautions ......398 Troubleshooting ................
- Page 20 To prevent damage to your Nikon product or injury to yourself or to others, read the following safety precautions in their entirety before using this equipment. Keep these safety instructions where all those who use the product will read them.
- Page 21 Do not use in the presence of flammable metal objects such as necklaces hairpins. Do not use electronic equipment • Batteries are prone to leakage in the presence of flammable gas, when fully discharged. To avoid as this could result in explosion damage to the product,...
- Page 22 • Using the flash close to the exposed, take the power cable to subject's eyes could cause a Nikon-authorized service temporary visual impairment. Particular care should representative for inspection. Failure to observe this precaution...
- Page 23 Notices • No part of the manuals included with this • Nikon will not be held liable for any product may be reproduced, transmitted, damages resulting from the use of this transcribed, stored in a retrieval system, product. or translated...
- Page 24 Notices for Customers in Canada CAUTION ATTENTION This Class B digital apparatus complies Cet appareil num_rique de la classe Best with Canadian ICES-O03. conforme _ la norme NMB-O03 du Canada. Symbol for Separate Collection in European Countries This symbol indicates that this product is to be collected separately.
- Page 25 (including battery chargers, batteries, AC adapters, and flash accessories) certified by Nikon specifically for use with this Nikon digital camera are engineered and proven operate within the operational and safety requirements of this electronic circuitry. The use of non-Nikon...
- Page 26 (such as at weddings before taking the camera on a trip), take a test shot to ensure that the camera is functioning normally. Nikon will not be held liable for damages or lost profits that may result from product malfunction. Life-Long Learning As part of Nikon's "Life-Long...
- Page 27 Introduction This chapter covers information you will need to know before using the camera, including the names of camera parts. Overview ................pg. 2 Getting to Know the Camera ........... pg. 3 Camera Body ..................pg. 3 The Control Panel ................pg. 8 The Viewfinder Display ..............
- Page 28 Thank you for your purchase ofa Nikon single-lens reflex (SLR) digital camera. Please be sure to read all instructions thoroughly to get the most from the camera, and keep them where they will be read by all those who use the product.
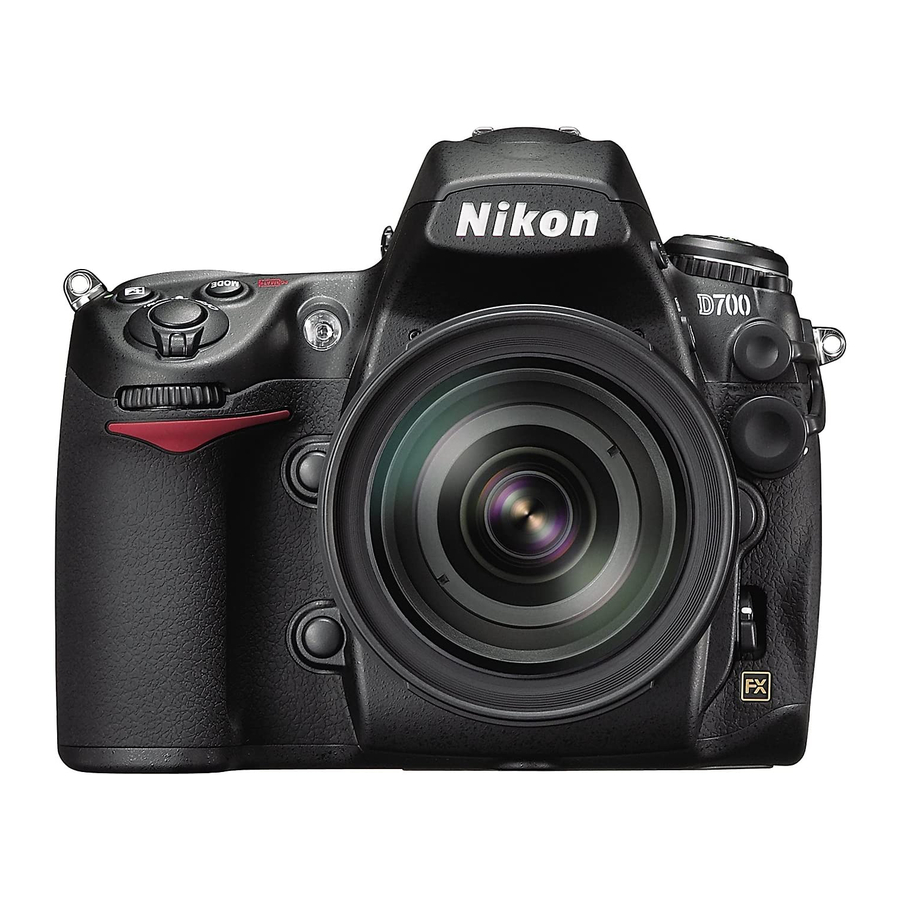
- Page 29 Take a few moments to familiarize yourself with camera controls and displays. You may find it helpful to bookmark this section and refer to it as you read through the rest of the manual. Camera Body 1 Release mode dial ....... 8 5 8 BS-1 accessory shoe cover..377 2 Release mode dial 9 Power switch ........
- Page 30 Camera Body (Continued) 8 Connector cover ..... 240, 255 1 Built-in flash .......185 9 HDMI mini-pin connector..257 2 Flash pop-up button ....185 10 Video connector ......3 _ (flash mode) button ....185 I_ (flash compensation) 11 USBconnector ....240, 245 button ..........
- Page 31 AF-assist illuminator ....290 6 Battery-chamber cover Self-timer lamp ......103 latch ..........3 4 Red-eye reduction lamp ..188 7 Contact cover for optional 2 Sub-command dial ..... 1 6 MB-D10 battery pack ....385 8 CPU contacts 3 Depth-of-field preview button ........
- Page 32 Camera Body (Continued) 1 Viewfinder ........45 8 o-n (protect) button ....235 ? (help) button ......3 1 2 Viewfinder eyepiece ....4 5 9 ql_ (thumbnail/playback 3 Eyepiece shutter lever ....45 zoom out) button ..... 2 32 4 -_ (delete) button ....56, 236 10 _ (playback zoom in) (format)
- Page 33 8 Focus selector lock .....76 1 Diopter adjustment control ..45 2 Metering selector .....113 9 Memory card slot cover ....41 3 _,[:[ ( AE/AF lock) 10 AF-area mode selector .....74 button ......78, 79, 325 11 Memory card access 4 AF-0N(AF-ON) button ..73, 96 lamp .........
- Page 34 The Control Panel 1 Shutter speed ...... 118, 121 4 Exposure mode ......114 Exposure compensation 5 Image size.......... value ..........6 Image quality ........65 Flash compensation value ..190 7 White balance fine-tuning ISO sensitivity ........ 106 indicator .......... 146 White balance fine-tuning ..146 8 White balance .......
- Page 35 13 Aperture (f-number) ..119, 121 20 MB-D10 battery indicator ..304 Aperture 21 Battery indicator ......46 22 Interval timer indicator ....206 (number of stops) ....120, 373 Exposure and flash 23 Electronic analog exposure bracketing increment ....132 display ..........123 WB bracketing increment ..136 Exposure compensation ...128 Exposure and flash...
- Page 36 The Viewfinder Display 10 11 1314 18 19...
- Page 37 16 Number of exposures 1 Framing grid (displayed when On is selected for Custom remaining ........47 Setting d2; not displayed when Number of shots remaining DX format (24 x 16) is selected before memory buffer fills... 53, 87 for Image area; pg. 58) ..298 White balance recording indicator ........
- Page 38 The Shooting Information Display Shooting information, including shutter speed, aperture, the number of exposures remaining, buffer capacity, and AF-area mode, is displayed in the monitor when the button is pressed. Press the [] button again to change selected settings (pg. 15). [] button To clear shooting information...
- Page 39 1 2 3 1 Exposure mode ......114 10 Camera battery indicator ..46 2 Flexible program indicator... 11 MB-D10 battery type display .......... 304 3 Shutter speed lock icon ..326 MB-D10 battery indicator ..303 4 Shutter speed ....118, 121 12 'JK" (appears when memory Exposure compensation remains for over 1000...
- Page 40 The Shooting Information Display (Continued) 22 23 25 2627 21 ISO sensitivity indicator ..106 32 Active D-Lighting indicator..180 Auto ISOsensitivity indicator 33 Color space indicator ....181 ............34 Depth-of-field preview button 22 Exposure compensation assignment ......... 324 indicator ........35 Fn button assignment .....
- Page 41 II TheQuickSet'tings D isplay To change settings for the items listed below, press the button in the shooting information display. Highlight items using the multi selector and press O to jump the menu for the highlighted item. [] button 1 Active D-Lighting .....180 6 Picture Control ......
- Page 42 The Command Dials The main- and sub-command dials are used alone or in combination with other controls to adjust a variety of settings. Fn button button Flash mode/ Bracketing Flash compensation ISub,command dial 1 QUAL button Image quality/ size WB button 7mP ensati°n --v-s ODEbutton...
- Page 43 II Image Qualityand Sbe Press tile QUAL button and rotate the command dials. Set image quality (pg. 65) C5 _ l] I QUAL button Main command dial Control panel Choose an image size (pg. 70) [5_ l] / QUAL button Sub-command dial Control panel...
- Page 44 II Exposure Press the MODEbutton and rotate the main command dial to choose the exposure mode. Choosethe (pg.eXp°surem°de _ _ _114) FS._ MODE b utton Main command dial Control panel Use the command dials to adjust exposure. .osa combination of shutterspeed aperture and (exposure mode...
- Page 45 Set exposure compensation (pg. 128) [] button Main command dial Control panel Activate or cancel bracketing/ selectnumber of shotsin bracketing Fnbutton Main command dial Control panel sequence (pp. 131,134) Select bracketing exposure increment (pg. 132) Fn button Sub-command dial Control panel The Fn Button Depending...
- Page 46 II WhiteBalance Press theWB button and rotate the command dials. Choose a white balancesetting (pg. 141) WB button Main command dial Control panel Fine-tune white balance (pg. 146), set color temperature (pg. 147), or WB button Sub-command dial Control panel choose a white balancepreset(pg.157) II Flash Settings...
- Page 47 Attaching the AN-D700 Camera Strap Attach the camera strap securely to the two eyelets on the camera body as shown below. The BM-9 Monitor Cover A clear plastic cover is provided with the camera to keep the monitor clean and protect it when the camera is not in use.
- Page 48 Quickstart Guide Follow these steps for a quick start with your camera. Charge the battery (pg. 32). 2 Insert the battery (pg. 34). 3 Attach a lens (pg. 36). Mounting index 4 Insert a memory card (pg. 41 ). Front 5 Turn the camera on (pg.
- Page 49 6 Check camera settings (pp. 46, 49). [ Exposure mode F_II Batterylevel Imagesize Image quality ___Numberofexposuresremaining [ White balance _|_=m ISOsensitivity Control panel VJewfinderdisplay 7 Select single-servo autofocus (pp. 51,72). Rotate the focus-mode selector to S(single-servo autofocus). 8 Focus and shoot (pp.
-
Page 51: Table Of Contents
i ¸ Tutorial This section describes how to use the camera menus, how to ready the camera for use, and how to take your first pictures and play them back. Camera Menus ..............pg. 26 Using Camera Menus ..............pg. 28 Help ...................... - Page 52 MENU button Most shooting, playback, and setup options can be accessed from the camera menus. To view the menus, press the MENU button. Tabs Choose from playback, shooting, Slider shows position in current Custom Settings, setup, retouch, menu. and My menus (see following page).
- Page 53 II Menus The following menus are available: _-_:i'_"i_"i_"i-Menu _ °'u' _'_'I_'I_'I_': Description Adjust playback settings and manage photos Playback (pg. 260). I_1 Shooting Adjust shooting settings (pg. 268). Custom Settings Personalize camera settings (pg. 280). Format memory cards and perform basic camera Setup setup (pg.
- Page 54 Using Camera Menus II Menu Controls The multi selector and @ button are used to navigate the menus. Multi selector Select Move cursor up highlighted item Select Canceland return . /' _d_i% _ _ highlighted item Niko to eviou @ button Selecthighlighted Move cursor clown item...
- Page 55 Select a menu. Press• or • to select the desired menu. © © Position the cursor in the selected menu. Press I_ to position the cursor in the selected menu. Highlight a menu item. Press • or • to highlight ©...
- Page 56 8 Select t he highlighteditem. Press @ to select the highlighted item. To exit without making a selection, press the MENU button. @ button Note the following points: • Menu items that are displayed in gray are not currently available. •...
-
Page 57: Help
Help_ If a ? icon is displayed at the bottom left corner of the monitor, help can be displayed by pressing the o-n (?) button. description of the currently selected option or menu will be displayed while the button is pressed. Press • or • to scroll through the display. -
Page 58: Charge The Battery
Charge the Battery The camera is powered by an EN-EL3e rechargeable Li-ion battery (supplied). The EN-EL3e is not fully charged at shipment. To maximize shooting time, charge the battery in the supplied MH-18a quick charger before use. About two and a quarter hours are required to fully recharge the battery when no charge remains. - Page 59 Insert the battery. i¸ Insert the battery into the charger. CHARGE lamp will blink while the battery charges. Remove the battery when charging is complete. Charging is complete when the CHARGE lamp stops blinking. Remove the battery and unplug the charger.
-
Page 60: Insert The Battery
Insert the Battery Turn the camera off. Power switch Always turn the camera off before inserting or removing batteries. Open the battery-chamber cover. Open the battery-chamber cover on the bottom of the camera. Insert the battery. Insert the battery as shown at right. i ¸... - Page 61 The Battery and Charger Read and follow the warnings and cautions on pages xviii-xx and 398-401 of this manual. To prevent short-circuits, replace the terminal cover when the battery is not in use. Do not use the battery at ambient temperatures below O°C (32°F) or above 40°C (I04°F).
-
Page 62: Attach A Lens
Attach a Lens Care should be taken to prevent dust from entering the camera when the lens is removed. Remove the rear lens cap and the camera body cap. After confirming that the camera is off, remove the rear lens cap from the lens and remove the camera body cap. - Page 63 Remove the lens cap. II Detachingthe Lens Be sure the camera is offwhen removing exchanging lenses. To remove the lens, press and hold the lens release button while turning the lens clockwise. After removing the lens, replace the lens caps and camera body cap. CPU Lenses with Aperture Rings In the case of CPU lenses equipped...
-
Page 64: Basic Setup
Basic Setup The language option in the setup menu is automatically highlighted the first time menus are displayed. Choose a language and set the time and date. Note that if the time and date are not set, _ will blink in the monitor and the time and date recorded _with photographs... - Page 65 Select World time. Select World time and press I_. Set time zone. A time-zone selection dialog will be displayed. Press • or I_ to highlight the local time zone (the UTC field shows the difference between selected time zone and Coordinated Universal Time, or UTC, in hours) and press O.
- Page 66 Set date format. Press • or • to choose the order in which the year, month, and day will be displayed press 0. Exit to shooting mode. Press the shutter-release button halfway to exit to shooting mode. The Clock Battery The camera clock is powered by an independent, rechargeable...
-
Page 67: Insert A Memory Ca Rd
Insert a Memory Card The camera stores photographs on Type I CompactFlash memory cards (available separately; pg. 390). Type II CompactFlash cards and microdrives can not be used. The following section describes how to insert and format a memory card. Turn the camera off. - Page 68 Close the card slot cover. Close and latch (<(2_) the card slot (_1_) cover. II Removing Memory Cards Turn the camera off. Confirm that the access lamp is off and turn the camera off. Access lamp Remove the memory card. Open the memory card slot cover and press the eject button (_rl_)to partially eject the card (_r2_).
- Page 69 Formatting Memory Cards Memory cards must be formatted before first use. Format the card as described below. Formatting Memory Cards Formatting memory cards permanently deletes any data they may con rain. Be sure to copy any photographs and other data you wish to keep to a computer before proceeding (pg.
- Page 70 Memory Cards • Memory cards may be hot after use. Observe due caution when removing memory cards from the camera. • Memory cards that have been formatted in a computer or other device must be reformatted in the camera before they can be used for recording or playback.
- Page 71 Adjust Viewfinder Focus The camera is equipped with diopter adjustment to accommodate individual differences in vision. Check that the display in the viewfinder is in focus before shooting. Lift the diopter adjustment control. Remove the lens cap, turn the camera on, and pull the diopter adjustment control out (_1_).
- Page 72 Turn the Camera On Before taking photographs, turn the camera on and check the battery level and number of exposures remaining as described below. Turn the camera on. Powerswitch Turn the camera on. The control panel will turn on and the display in the viewfinder will light.
- Page 73 Check the number of exposures remaining. The exposure-count displays in the control panel and viewfinder show the number of photographs that can be taken at current settings. When this number reaches zero, will flash in the exposure-count displays while the shutter-speed displays will show a blinking...
- Page 74 LCD Illuminators Holding the power switch in the -',6.'. Power switch position activates the exposure meters and control panel backlights (LCD illuminators), allowing the display to be read in the dark. After the power switch is released, the illuminator will remain lit for six seconds (at default settings) while the camera exposure...
- Page 75 Adjust Camera Settings This tutorial describes how to take photos at default settings. Check camera settings. I Exp°sure m°de Image size Imagequality White balance ISO sensitivity Control panel Viewfinder display Default settings are listed below. _- O_p_t i_°on_° _-_i)efa_uit _ Description Page NORM...
- Page 76 Choose exposure mode,P. MODE button Press the MODE button and rotate the main command dial to select exposure mode P. The camera will automatically adjust shutter speed and aperture for optimal exposure in most situations. Main comniand dial Choose single frame Release mode dial lock release...
- Page 77 Focus-mode Choose single-servo selector autofocus. Rotate the focus-mode selector until it clicks into place pointing to S (single-servo autofocus). At this setting, the camera will automatically focus on the subject in the selected focus point when the shutter-release button is pressed halfway.
- Page 78 Ready the Camera When framing photographs in the viewfinder, hold the handgrip in your right hand and cradle the camera body or lens with your left. Keep your elbows propped lightly against your torso for support and place one foot halfa pace ahead of the other to keep you upper body stable.
- Page 79 Focus and Shoot Press the shutter- release button halfway to focus (pg. 54). At default settings, the camera will focus on the subject in the center Focus Buffer focus point. Frame a indicator capacity photo in the viewfinder with the main subject positioned in the center focus point and press the shutter-release button...
- Page 80 Press the shutter-release button the rest of the way down to shoot. Smoothly press the shutter- release-button the rest of the Access lamp way down to take the picture. While the photograph is being recorded to the memory card, the access lamp next to the card slot cover will light.
- Page 81 Viewing Photographs Press the[] button. A photograph will be displayed in the monitor. © View additional pictures. Additional pictures can be displayed by pressing • or I_. To view additional information on the current photograph, press • and • (pg. 220). ©...
- Page 82 To delete the photograph currently displayed in the monitor, press the @ button. Note that photographs can not be recovered once deleted. Displaythe photograph. Display the photograph you wish to delete as described "Viewing Photographs" on the previous page. [] button Delete the photograph.
- Page 83 Image Recording Options This section describes how to choose image area, quality, and size. Image Area ................. pg. 58 Image Quality ..............pg. 64 Image Size ................. pg. 69...
- Page 84 The camera's FX format (36.0 x 23.9 mm) image sensor can be used to record pictures with an image area (picture angle) equivalent to a 35 mm (135) format film camera. Image area is selected using the Imagearea option in the shooting menu.
- Page 85 II ChooseImage Area Choose the image area used when Off is selected for Auto crop (pg. 61). =o_==..................Description Images are recorded in FX format using the full area of the image sensor (36.0 x 23.9 mm), FX format producing a picture angle (36x24) equivalent...
- Page 86 DX Lenses DX lenses are designed for use with DX format cameras and have a smaller picture angle than lenses for 35 mm format cameras. If Auto DX crop is off and FX format (36 x 24) is selected for Image area when a DX lens is attached, the edges of the image may be eclipsed.
- Page 87 Image area can be set using the Image area option in the shooting menu or (if image area is assigned to the Fn button) by pressing the Fn button and rotating the main command dial. II TheImageArea Menu Select Imagearea. Highlight Image area in the shooting menu (pg.
- Page 88 II TheFn Button Assign image area to the Fn button. Select Choose image area for Custom Setting f5, Assign FUNC. button > FUNC. button + dials (pg. 323). Choose the image area. Press the Fn button and rotate the main command dial until the desired crop is displayed in the viewfinder...
- Page 89 [I_ Auto DX Crop The Fnbutton can not be used to select image area when a DX lens is attached and Auto DX crop is on. The Fn, Depth-of-Field Preview, and AE-L/AF-L Buttons Changes to image area settings can be made using the Fnbutton (the default setting, see Custom Setting fS, Assign FUNC.
- Page 90 °:i_!-_=_Descriptio Raw data from the image sensor are saved directly to the memory card in Nikon Electronic Format (NEF). Use with images that will be transferred to a computer for printing NEF (RAW) processing. Note that once transferred...
- Page 91 Image quality is set by pressing the QUAL button and rotating the main command dial until the desired setting is displayed in the control panel. QUAL button Main command dial [5 I] Control panel The Image Quality Menu Image quality can also be adjusted using the Image quality option in the...
- Page 92 NEF (RAW) Recording The NEF (RAW) recording item in the shooting menu controls compression (pg. 67) and bit depth (pg. 68) for NEF (RAW) images. JPEG Compression JPEG images can be compressed for relatively uniform file size or optimal image quality. The JPEG compression option in the shooting menu can...
- Page 93 II TheJPEG CompressionMenu compression The JPEG item in the shooting menu offers following options for JPEG images: II TheNEE(RAW)Recording Menu:Type The NEF (RAW) recording > Type item in the shooting menu offers the following compression options for NEF (RAW) images: Option Description Lossless...
- Page 94 II TheNEF(RAIV)Recording Menu:NEF(RA W)Bit Depth The NEF (RAW) recording > NEF (RAW) bit depth item in the shooting menu offers the following bit-depth options for NEF (RAW) images: 12-bit ( ld2-fb 14-bit 14-bit _esbut increasing the lcolor data recorded. NEF (RAW) Images Note that the option selected for image size does not affect the size of NEF (RAW) images.
- Page 95 Image size is measured in pixels. Choose from Large (the default option), Medium, or Small (note that image size varies depending on the option selected for Image area, pg. 58): 4,256 x 2,832 54.1 x 36.0/21.3 x 14.2 FX format 3,184 x 2,120 40.4 x 26.9/15.9 x 20.6 (36 x 24)
- Page 96 Image size can be set by pressing the QUAL button and rotating the sub-command dial until the desired option is displayed in the control panel. QUAL button Sub-command dial /,0_M [5'4l] Control panel The Image Size Menu Image size can also be adjusted using the Image size option in the shooting...
- Page 97 FOCUS - Controlling How the Camera Focuses This section describes the options that control how your camera focuses. Focus Mode ..............pg. 72 AF-Area Mode ..............pg. 74 Focus Point Selection ............pg. 76 Focus Lock ................pg. 78 Manual Focus ..............pg. 81...
-
Page 98: Focus Mode
Focus-mode selector Focus mode is controlled by the focus-mode selector on the front of the camera. There are two autofocus (AF) modes, in which the camera focuses automatically when the shutter-release button pressed halfway, and one manual focus mode, in which focus must be adjusted... - Page 99 Choose single-servo AF for landscapes and other stationary sub- jects. Continuous-servo AF may be a better choice with erratically- moving subjects. Manual focus is recommended when the camera is unable to focus using autofocus. The AF-ON B utton Autofocus can also be activated by pressing the AF-ON button AF-ON b utton.
- Page 100 AF-area mode determines how the focus point is selected in autofocus mode. To select the AF-area mode, rotate the AF-area mode selector. The following options are available: AF-area mode selector Description User selects focus point manually; camera focuses on subject in selected focus point only.
-
Page 101: Af-Area Mode
AF-Area Mode AF-area mode is shown in the shooting information display when the [] button is pressed. AF-area mode indicator AF-area mode Information display Custom Setting a3 (Dynamic AF area, pg. 285) 9 points (default) 21 points E,:,-3 Dynamic -area AF_ 51 points 51 points (3D-tracking) ["3... - Page 102 The camera offers a choice of 51 focus points that together cover a wide area of the frame. The focus point can be selected manually, allowing photographs to be composed the main subject AF-area mode selector positioned almost anywhere in the frame (single-point and dynamic-area AF), or automatically...
-
Page 103: Focus Point Selection
See Also For information on choosing when the focus point is illuminated, Custom Setting a6 (AF point illumination, pg. 288). For information setting focus-point selection to "wrap around;' see Custom Setting a7 (Focus point wrap-around, pg. 288). For information on choosing number of focus points that can be selected using the multi selector, see... -
Page 104: Focus Lock
Focus lock can be used to change the composition after focusing, making it possible to focus on a subject that will not be in a focus point in the final composition. It can also be used when the autofocus system is unable to focus (pg. 80). Focus. - Page 105 Continuous-servo A F Press the AE-L/AF-L b utton to lock both focus and exposure (an AE-L icon appears in the viewfinder, see page 126). Focus and exposure will remain locked while the AE-LIAF-L button is pressed, even if Shutter-release you later remove your finger from the button shutter-release button.
- Page 106 Getting Good Results with Autofocus Autofocus does not perform well under the conditions listed below. The shutter release may be disabled if the camera is unable to focus under these conditions, or the in-focus indicator (II) may be displayed and the camera may sound a beep, allowing shutter to be released even when the subject is not in focus.
-
Page 107: Manual Focus
Manual focus is available for Focus-mode selector lenses that do not support autofocus (non-AF Nikkor lenses) or when the autofocus does not produce the desired results (pg. 80). To focus manually, set the focus-mode selector to M and adjust the lens focusing ring until the image displayed on the clear matte field in the viewfinder... - Page 108 The Electronic Rangefinder If the lens has a maximum aperture of f/5.6 or faster, the viewfinder focus indicator be used to confirm whether the subject in the selected focus point is in focus (the focus point can be selected from any of the 51 focus points).
- Page 109 No reproduction in any form of this manual, in whole or in part (except for brief quotation in critical articles or reviews), may be made without written authorization from NIKON CORPORATION. NIKONCORPORATION Fuji Bldg., 2-3 Marunouchi 3-chome, Chiyoda-ku,Tokyo 100-8331, Japan Printed...