
Related Manuals for Regency FireGenie

Summary of Contents for Regency FireGenie
-
Page 1: Remote Control
North American Version REMOTE CONTROL INSTALLATION & OPERATING INSTRUCTIONS © Copyright 2009, FPI Fireplace Products International Ltd. All rights reserved. 918-290e 09/22/09... -
Page 2: Fcc Requirements
The FireGenie Remote Control is tested safe when installed in accordance with this installation manual. It is your responsibility to read all instructions before starting installation and to follow these instructions carefully during installation. The FireGenie Remote Control is carefully engineered and MUST be installed only as specifi ed. If you modify it or any of its components, you may possibly cause a fi... -
Page 3: Table Of Contents
TABLE OF CONTENTS Matching Remote Control & Receiver ID Code ..............4 Remote Control Keypad ....................... 5 Remote Control Screen Display (LCD) ................6 Remote Control - Basic Functions ..................6 Switching the Remote ON and OFF ................6 Setting Time & Day ......................7 Receiver Operation ....................... -
Page 4: Matching Remote Control & Receiver Id Code
MATCHING REMOTE CONTROL & RECEIVER ID CODE The Remote Control handset has a set of unique ID codes that is pre-programmed into its memory. This set of ID codes helps to differentiate one Remote Control handset from another so that only the control box with a matching ID code will respond to the appropriate Remot Control handset. -
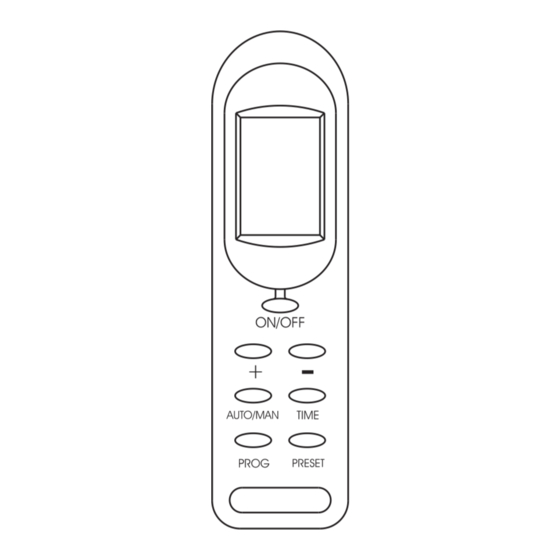
Page 5: Remote Control Keypad
The FireGenie is a custom designed Remote Control system with the following features: * Thermostatic Control; * An Automatic & Manual Mode for controlling unit ON and OFF; * A Program Mode for programming 2 time periods per day for all days of the week. A Quick Reference Sticker is available to be placed on the back of your Remote Control Handset. -
Page 6: Remote Control Screen Display (Lcd)
REMOTE CONTROL SCREEN DISPLAY (LCD) The LCD provides the following display features: 1. Flame Indication; 2. Manual & Auto Mode Indication - “MANUAL” / “AUTO”; 3. “ROOM” or “SET” Temperature Indicator; 4. Day of Week; 5. Transmit Indicator “ ” ; 6. -
Page 7: Setting Time & Day
Setting Time & Day Note: The Remote Control Keypad must be “ON” in order to set the Time & Day. Time Press and hold the “TIME” button for 2 seconds and then use the “+” button to set the hour and use the “-”... -
Page 8: Manual Mode
MANUAL MODE Note: Ensure the Remote Control has been turned ON in order to operate in this mode. Manual mode can be selected by pressing and releasing the AUTO/MAN button until the symbol “MANUAL” is shown on the LCD. In Manual mode, the Flame can be turned on and off using the Remote Control via the ON/OFF button. AUTO MODE There is a 3-minute delay built into the Remote Control. -
Page 9: Program Mode
ADVANCED FUNCTION - PROGRAM MODE Note: Ensure the Remote Control has been turned ON in order to operate in this mode. Program mode is selected by pressing and releasing the AUTO/MAN button until the symbol “PROG” is shown on the LCD. The Remote Control will operate according to the settings in the 2 Time Periods programmed by the user. -
Page 10: Setting The Program Mode
SETTING THE PROGRAM MODE The user can program two On-Times and two Off-Times as well as the Temperature settings for each day of the week. The PROG button is used to initiate the programming mode. The “+” and “-” buttons are used to adjust the time and temperature settings. - Page 11 2) Programming the Off -Time of Time Period 1 Press and release the PROG button again to program the Off-Time for Time Period 1. Use the “+” and “-” buttons to adjust this time setting. The LCD will show the following: Programming of Time Period 1 Programming of Time Zone 1 Time Period 1 Off -Time...
- Page 12 4) Programming the On-Time of Time Period 2 Press and release the PROG button again to program the On-Time of Time Period 2. Use the “+” and “-” buttons to adjust this time setting. The LCD will show the following: Programming of Time Period 2 Programming of Time Zone 2 Time Period 2 On-Time...
- Page 13 6) Programming the Set Temperature of Time Period 2 Press and release the PROG button one more time to program the Set Temperature of Time Period 2. Use the “+” and “-” buttons to adjust the temperature setting. See step 7b) immediately if you would like to copy the set program over to other days of the week.
- Page 14 The “Day”, “Set Temperature” and “Prog 2” will all begin to fl ash simultaneuosly, indicating that Copy Mode has been activated. Pressing and releasing the “+” button will select the Day(s) of which the program is to copy to. Pressing and releasing the “-” button will confi rm the copying process in which the original program will copy across to the selected day(s).
-
Page 15: Installing The Receiver
INSTALLING THE RECEIVER 1. Make sure the slide switch on the Receiver is at the “OFF” position. 2. Connect the output cable of the Receiver to the valve. Refer to the unit instruction manual for wiring details. Installing the Receiver to a Wall Mount a. -
Page 16: Installing To A Fireplace
Installing the Receiver to a Fireplace 1) Remove Control Switch from Remote Receiver 4) Place Heat Shield over Receiver. Be careful not by pulling out gently. to crimp wires under edge of Shield. Heat Shield Control Switch Remote Receiver Receiver 2) Remove spring loaded Battery Pack by pushing in and then pulling out. - Page 17 Continuation For E21 Installation Only 7) Secure Heat Shield with 2 screws as shown 4) Remove Bottom Glass Trim. below. 5) Place Remote Receiver under fi rebox. Remote Firebox Receiver 8) Ensure wires do not touch base of fi rebox. 9) Re-install Bottom Glass Trim.
-
Page 18: Troubleshooting
TROUBLESHOOTING If the Remote Control does not turn on: Check to see that the Receiver is in the “Remote” position. Ensure the batteries are correctly installed in the Receiver. Check the batteries for replacement. When batteries are replaced, only the current time and day will need to be reset. The set program times are not affected. -
Page 19: Special Conditions In Program Mode
Special Conditions in Program Mode o If the On-Time of a Time Period matches the Off-Time of the same Time Period, the Time Period is disabled. o If the Off-Time of the First Time Period crosses over to the On-Time of the second Time Period, the Off-Time of the fi... - Page 20 NOTES: FPI FireGenie Remote Control Manual...
- Page 21 NOTES: FPI FireGenie Remote Control Manual...
- Page 22 NOTES: FPI FireGenie Remote Control Manual...
- Page 23 FPI FireGenie Remote Control Manual...
-
Page 24: Important
IMPORTANT! The transmitter and receiver in this box must be coded together before proceeding to program the remote to function. Please follow the instructions under “Matching Remote Control and Receiver ID Code” on page 4 in the enclosed manual, and follow the coding instructions carefully.