Table of Contents
Advertisement
Advertisement
Table of Contents

Related Manuals for Asus P5Q SE2


Summary of Contents for Asus P5Q SE2
- Page 1 P5Q SE2...
- Page 2 Product warranty or service will not be extended if: (1) the product is repaired, modified or altered, unless such repair, modification of alteration is authorized in writing by ASUS; or (2) the serial number of the product is defaced or missing.
-
Page 3: Table Of Contents
Contents Notices......................vi Safety.information..................vii About.this.guide..................vii P5Q SE2 specifications summary.............. ix Chapter.1:.Product.introduction 1.1. Welcome!..................1-1 1.2. Package.contents................1-1 1.3. Special.features................1-1 1.3.1 Product highlights ............1-1 1.3.2 ASUS unique features ............ 1-2 1.3.3... - Page 4 Managing.and.updating.your.BIOS..........2-1 2.1.1 ASUS Update utility ............2-1 2.1.2 Creating a bootable floppy disk ........2-3 2.1.3 ASUS EZ Flash 2 utility ........... 2-3 2.1.4 AFUDOS utility ..............2-4 2.1.5 ASUS CrashFree BIOS 3 utility ........2-6 2.2. BIOS.setup.program..............2-7 2.2.1...
- Page 5 Boot Device Priority ............2-22 2.7.2 Boot Settings Configuration .......... 2-22 2.7.3 Security ................. 2-23 2.8. Tools.menu.................. 2-24 2.8.1 ASUS EZ Flash 2 ............2-24 2.8.2 Express Gate ..............2-24 2.8.3 AI NET 2................ 2-25 2.8.4 ASUS O.C. Profile ............2-25 2.9.
-
Page 6: Notices
Notices Federal.Communications.Commission.Statement This device complies with Part 15 of the FCC Rules. Operation is subject to the following two conditions: • This device may not cause harmful interference, and • This device must accept any interference received including interference that may cause undesired operation. -
Page 7: Safety.information
Safety.information Electrical.safety • To prevent electric shock hazard, disconnect the power cable from the electric outlet before relocating the system. • When adding or removing devices to or from the system, ensure that the power cables for the devices are unplugged before the signal cables are connected. If possible, disconnect all power cables from the existing system before you add a device. - Page 8 Refer to the following sources for additional information and for product and software updates. ASUS.websites The ASUS website provides updated information on ASUS hardware and software products. Refer to the ASUS contact information. Optional.documentation Your product package may include optional documentation, such as warranty flyers, that may have been added by your dealer.
-
Page 9: P5Q Se2 Specifications Summary
- 4 x 240-pin DIMM sockets support unbuffered non-ECC DDR2 1200/1066/800/667MHz memory modules - Supports up to 16GB system memory * Refer to www.asus.com or this user manual for the Memory QVL (Qualified Vendors Lists) ** When you install a total memory of 4GB or more, Windows 32-bit operating system may only recognize ®... - Page 10 - Memory tuning from 667MHz to 1333MHz for DDR2 - PCI Express frequency tuning from 100MHz to 160MHz at 1MHz increment Overclocking protection: - ASUS C.P.R. (CPU Parameter Recall) Other.features ASUS MyLogo 2 Rear.panel.ports 1 x PS/2 keyboard port...
-
Page 11: Chapter.1:.Product.introduction
Green.ASUS. This motherboard and its packaging comply with the European Union’s Restriction on the use of Hazardous Substances (RoHS). This is in line with the ASUS vision of creating environment-friendly and recyclable products/packaging to safeguard consumers’ health while minimizing the impact on the environment. -
Page 12: Asus Unique Features
Windows at anytime! • The actual boot time depends on the system configuration. • ASUS Express Gate supports file uploading from SATA HDDs, ODDs and USB drives and downloading to USB drives only. Chapter 1: Product introduction... -
Page 13: Asus Stylish Features
ASUS.EZ.DIY. ASUS EZ DIY feature collection provides you with easy ways to install computer components, update the BIOS or back up your favorite settings. ASUS O.C. Profile The motherboard features the ASUS O.C. -
Page 14: Asus Intelligent Overclocking Features
1.3.4. ASUS.Intelligent.Overclocking.features AI.Booster The ASUS AI Booster allows you to overclock the CPU speed in Windows environment ® without the hassle of booting the BIOS. Precision.Tweaker. This feature allows you to fine-tune the CPU/memory voltage and gradually increase the memory, FSB, and PCI Express frequency at 1MHz increment to achieve maximum system performance. -
Page 15: Motherboard.overview
The edge with external ports goes to the rear part of the chassis as indicated in the image below. 1.5.2. Screw.holes Place six screws into the holes indicated by circles to secure the motherboard to the chassis. Do not overtighten the screws! Doing so can damage the motherboard. Place.this.side.towards. the.rear.of.the.chassis P5Q SE2 ASUS P5Q SE2... -
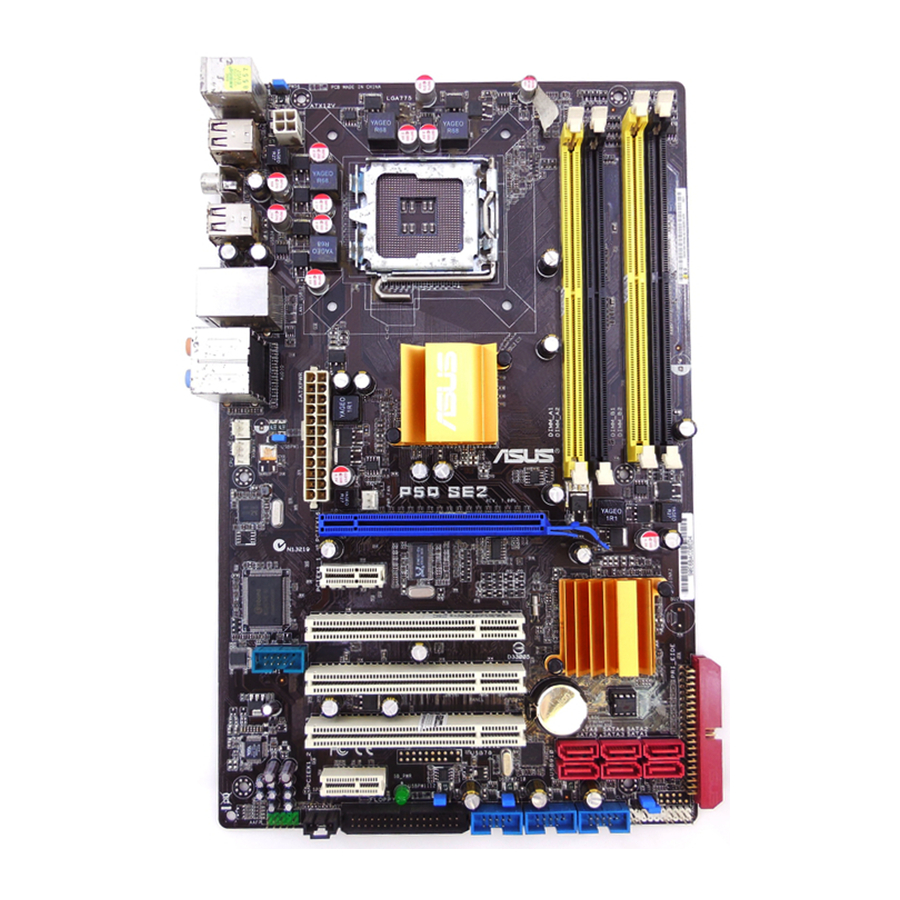
Page 16: Motherboard Layout
1.5.3. Motherboard.layout PS2_USBPW56 KBMS ATX12V USB56 SPDIF_O USB34 LGA775 LAN1_USB12 AUDIO Intel ® CHA_FAN USBPW1-4 CPU_FAN PWR_FAN P5Q SE2 8111C PCIEX16 PCIEX1_1 Super Intel ® PCI1 ICH10 COM1 PCI2 Lithium Cell BIOS CMOS Power PCI3 VT1708S PCIEX1_2 SB_PWR SATA6 SATA4... -
Page 17: Layout Contents
Contact your retailer immediately if the PnP cap is missing, or if you see any damage to the PnP cap/socket contacts/motherboard components. ASUS will shoulder the cost of repair only if the damage is shipment/ transit-related. -
Page 18: Installing The Cpu
To install a CPU: Locate the CPU socket on the motherboard. P5Q SE2 P5Q SE2 CPU Socket 775 Before installing the CPU, ensure that the socket box is facing towards you and the load lever is on your left. Press the load lever with your thumb Retention.tab... - Page 19 Close the load plate (A), then push the load lever (B) until it snaps into the retention tab. This motherboard supports Intel ® LGA775 processors with the Intel Enhanced Intel SpeedStep ® ® Technology (EIST) and Hyper-Threading Technology. ASUS P5Q SE2...
-
Page 20: Installing The Cpu Heatsink And Fan
Do not forget to connect the CPU fan connector! Hardware monitoring errors CPU_FAN can occur if you fail to plug this connector. CPU FAN PWR CPU FAN IN P5Q SE2 CPU FAN PWM P5Q SE2 CPU fan connector 1-10 Chapter 1: Product introduction... -
Page 21: Uninstalling The Cpu Heatsink And Fan
The motherboard comes with four Double Data Rate 2 (DDR2) Dual Inline Memory Modules (DIMM) sockets. The figure illustrates the location of the DDR2 DIMM sockets: P5Q SE2 P5Q SE2 240-pin DDR2 DIMM sockets Channel Sockets Channel A DIMM_A1 and DIMM_A2... -
Page 22: Memory Configurations
1.7.2 Memory configurations You may install 512MB, 1GB, 2GB, and 4GB unbuffered non-ECC DDR2 DIMMs into the DIMM sockets. Recommended Memory Configurations Sockets Mode DIMM_A1 DIMM_A2 DIMM_B1 DIMM_B2 Populated Single-Channel Populated Dual-channel.(1) Populated Populated Dual-channel.(2) Populated Populated Populated Populated • When using only one DDR2 DIMM, start installing it from DIMM_A1 or DIMM_B1 for better overclocking capability. - Page 23 P5Q SE2 Motherboard Qualified Vendors Lists (QVL) DDR2-1200MHz.capability DIMM.support Chip. Size Vendor Part.No. SS/DS .Chip.No. Brand OCZ2FX12002GK Heat-Sink Package • • DDR2-1066MHz.capability DIMM.support Size Vendor Part.No. Chip.Brand .Chip.No. 512MB Kingston KHX8500D2/512 Kingston Heat-Sink Package • • • 512MB Kingston KVR1066D2N7/512...
- Page 24 DDR2-800MHz.capability DIMM.support Size Vendor Part.No. Chip.Brand Chip.No. OCZ2RPR8002GK Heat-Sink Package • • • OCZ2G800R22GK Heat-Sink Package • • • OCZ2P800R22GK Heat-Sink Package • • • OCZ2VU8004GK Heat-Sink Package • • • Elixir M2Y1G64TU8HB0B-25C Elixir N2TU51280BE-25C802006Z1DV • • • AENEON AET760UD00-25DC08X AENEON AET03R250C 0732 •...
-
Page 25: Installing A Dimm
•. C*: Supports four modules inserted into both the yellow slots and the black slots as two pairs of dual-channel memory configuration. Visit the ASUS website for the latest DDR2-1200/1066/800/667MHz QVL. 1.7.3. Installing.a.DIMM Unplug the power supply before adding or removing DIMMs or other system components. -
Page 26: Removing A Dimm
1.7.4. Removing.a.DIMM To remove a DIMM: Simultaneously press the retaining clips outward to unlock the DIMM. Support the DIMM lightly with your fingers when pressing the retaining clips. The DIMM might get damaged when it flips out with extra force. DDR2.DIMM.notch Remove the DIMM from the socket. -
Page 27: Pci Slots
• Due to the chipset limitation, AC power off is required before you use the C.P.R. function. You must turn off and on the power supply or unplug and plug the power cord before rebooting the system. ASUS P5Q SE2 1-17... - Page 28 USBPW7-10 and USB1112 jumpers are for the internal USB connectors that you can connect to additional USB ports. USBPW1-4 +5VSB (Default) P5Q SE2 USBPW1112 USBPW7-10 +5VSB +5VSB (Default) (Default) P5Q SE2 USB Device Wake Up 1-18 Chapter 1: Product introduction...
-
Page 29: Connectors
Side.Speaker.Out.port.(gray). This port connects the side speakers in an 8-channel audio configuration. Refer to the audio configuration table on the next page for the function of the audio ports in 2, 4, 6, or 8-channel configuration. ASUS P5Q SE2 1-19... -
Page 30: Internal Connectors
FDD cable with a covered Pin 5. • The FDD cable is purchased separately. FLOPPY P5Q SE2 PIN1 NOTE:Orient the red markings on the floppy ribbon cable to PIN 1. P5Q SE2 Floppy disk drive connector 1-20 Chapter 1: Product introduction... - Page 31 S/PDIF Out module cable to this connector, then install the module to a slot opening at the back of the system chassis. P5Q SE2 SPDIF_OUT P5Q SE2 Digital audio connector The S/PDIF module is purchased separately. IDE.connector.(40-1.pin.PRI_EIDE) The onboard IDE connector is for an Ultra DMA 133/100/66 signal cable. There are three connectors on an Ultra DMA 133/100/66 signal cable: blue, black, and gray.
- Page 32 CHA_FAN +12V Rotation CPU_FAN CPU FAN PWR P5Q SE2 CPU FAN IN CPU FAN PWM PWR_FAN Rotation +12V P5Q SE2 fan connectors Only the CPU fan supports the ASUS Q-FAN feature. 1-22 Chapter 1: Product introduction...
- Page 33 This connector is for a serial (COM) port. Connect the serial port module cable to this connector, then install the module to a slot opening at the back of the system chassis. COM1 PIN 1 P5Q SE2 P5Q SE2 Serial port (COM1) connector The serial port module is purchased separately. ASUS P5Q SE2 1-23...
-
Page 34: Front Panel Audio Connector
Legacy AC’97 pin definition compliant definition P5Q SE2 Analog front panel connector • We recommend that you connect a high-definition front panel audio module to this connector to avail of the motherboard’s high-definition audio capability. • If you want to connect a high-definition front panel audio module to this connector, set the Front.Panel.Type item in the BIOS setup to [HD.Audio];.if you want to connect an... - Page 35 These connectors allow you to receive stereo audio input from sound sources such as a CD-ROM, TV tuner, or MPEG card. P5Q SE2 P5Q SE2 Internal audio connector 11.. ATX.power.connectors.(24-pin.EATXPWR,.4-pin.EATX12V) These connectors are for ATX power supply plugs. The power supply plugs are designed to fit these connectors in only one orientation.
-
Page 36: System Panel Connector
IDE_LED PWRSW RESET * Requires an ATX power supply P5Q SE2 System panel connector •. System.power.LED.(2-pin.PLED) This 2-pin connector is for the system power LED. Connect the chassis power LED cable to this connector. The system power LED lights up when you turn on the system power, and blinks when the system is in sleep mode. -
Page 37: Software.support
Autorun is enabled on your computer. Click.an.icon.to. display.Support.DVD/ motherboard.information Click.an.item.to.install If Autorun is NOT enabled in your computer, browse the contents of the Support DVD to locate the file ASSETUP.EXE from the BIN folder. Double-click ASSETUP.EXE.to run the DVD. ASUS P5Q SE2 1-27... - Page 38 1-28 Chapter 1: Product introduction...
-
Page 39: Chapter.2:.Bios.information
BIOS in the future. Copy the original motherboard BIOS using the ASUS Update or AFUDOS utilities. 2.1.1. ASUS.Update.utility The ASUS Update is a utility that allows you to manage, save, and update the motherboard BIOS in Windows environment. The ASUS Update utility allows you to: ®... - Page 40 Updating.the.BIOS.through.the.Internet To update the BIOS through the Internet: Launch the ASUS Update utility from the Windows desktop by clicking Start.>. ® Programs.>.ASUS.>.ASUSUpdate.>.ASUSUpdate. The ASUS Update main window appears. Select Update.BIOS from.the. Select the ASUS FTP site nearest you Internet option from the drop-down to avoid network traffic, or click Auto.
-
Page 41: Creating A Bootable Floppy Disk
2.1.3. ASUS.EZ.Flash.2.utility The ASUS EZ Flash 2 feature allows you to update the BIOS without having to go through the long process of booting from a floppy disk and using a DOS-based utility. The EZ Flash 2 utility is built in the BIOS chip so it is accessible by pressing <Alt>.+.<F2> during the Power-On Self-Test (POST). -
Page 42: Afudos Utility
ASUSTek EZ Flash 2 BIOS ROM Utility V3.24 FLASH TYPE: MXIC 25L8005 Current ROM Update ROM BOARD: P5Q SE2 BOARD: Unknown VER: 0304 (H:00 B:00) VER: Unknown DATE: 09/01/2008 DATE: Unknown PATH: A:\ Note [Enter] Select or Load [Tab] Switch [V] Drive Info [Up/Down/Home/End] Move [B] Backup [ESC] Exit... - Page 43 Updating the BIOS file To update the BIOS file using the AFUDOS utility: Visit the ASUS website at www.asus.com to download the latest BIOS file for this motherboard. Save the BIOS file to a bootable floppy disk. We recommend that you write the BIOS filename on a piece of paper; you will need to key in the exact BIOS filename at the DOS prompt later.
-
Page 44: Asus Crashfree Bios 3 Utility
2.1.5. ASUS.CrashFree.BIOS.3.utility The ASUS CrashFree BIOS 3 is an auto recovery tool that allows you to restore the BIOS file when it fails or gets corrupted during the update process. You can update a corrupted BIOS file using the motherboard Support DVD, a floppy disk, or USB flash disk that contains the updated BIOS file. -
Page 45: Bios.setup.program
BIOS file. Restart the system after the utility completes the update process. • Only the USB flash disk with FAT 32/16 format and single partition supports ASUS CrashFree BIOS 3. The device size should be smaller than 8GB. -
Page 46: Bios Menu Screen
• The BIOS setup screens in this section are for reference only. They may not exactly match what you see on your screen. • Visit the ASUS website at www.asus.com to download the latest BIOS file for this motherboard. 2.2.1. -
Page 47: Menu Bar
You cannot select an item that is not user- configurable. A configurable field is enclosed in brackets, and is highlighted when selected. To change the value of a field, select it then press <Enter> to display a list of options. Refer to 2.2.7.Pop-up. window. ASUS P5Q SE2... -
Page 48: Pop-Up Window
2.2.7. Pop-up.window Select a menu item then press BIOS SETUP UTILITY Main Ai Tweaker Advanced Power Boot Tools Exit <Enter> to display a pop-up window Use [ENTER], [TAB] or System Time [14:14:35] with the configuration options for [SHIFT-TAB] to select System Date [Wed 04/16/2008] a field. -
Page 49: Sata 1-6
Select an item then press <Enter> if you want to configure the item. SATA Configuration [Enhanced] Configuration options: [Disabled] [Compatible] [Enhanced] Configure SATA as [IDE] Sets the configuration for the Serial ATA connectors supported by the Southbridge chip. Configuration options: [IDE] [AHCI] ASUS P5Q SE2 2-11... -
Page 50: System Information
Due to Intel chipset driver support regulation, the AHCI mode is not supported in Windows XP environment. The AHCI mode is only supported by Windows Vista with OS built-in driver. Hard.Disk.Write.Protect.[Disabled]. Disables or enables device write protection. This will be effective only if device is accessed throuh BIOS. - Page 51 FSB 800 200 MHz PCIE Frequency [Auto] Use the <+> and <-> keys to adjust the PCIE frequency. You can also type the desired PCIE frequency using the numeric keypad. The values range from 100 to 160. ASUS P5Q SE2 2-13...
- Page 52 FSB.Strap.to.North.Bridge.[Auto] Allows you to adjust the FSB strap. Configuration options: [Auto] [200MHz] [266MHz] [333MHz] [400MHz] DRAM.Frequency.[Auto] Allows you to set the DDR2 operating frequency. Configuration options: [Auto] [DDR2-533MHz] [DDR2-639MHz] [DDR2-667MHz] [DDR2-709MHz] [DDR2-800MHz] [DDR2-852MHz] [DDR2-887MHZ] [DDR2-1066MHz] [DDR2-1200MHz] DRAM frequency lower than 667MHz may cause system boot failure due to spec violation. DRAM.Timing.Control.[Auto] Allows selection of the DRAM timing configuration.
- Page 53 Pull-In of CHA/B PH1/2/3/4 [Disabled] Set this item to [Enabled] to apply enhancement on DRAM Channel A and B, Phase 1 to 4. The number of phases is determined by DRAM frequency and FSB strap. Configuration options: [Disabled] [Enabled] ASUS P5Q SE2 2-15...
- Page 54 CPU.Voltage.[Auto] Allows you to set the CPU VCore voltage. The values range from 0.8500V to 1.7500V with a 0.00625V interval. Configuration options: [Auto] Refer to the CPU documentation before setting the CPU Vcore voltage. Setting a high VCore voltage may damage the CPU permanently, and setting a low VCore voltage may make the system unstable.
-
Page 55: Advanced.menu
Configuration options: [Enabled] [Disabled] CPU.TM.function.[Enabled] Enables or disables Intel CPU Thermal Monitor (TM) function, a CPU overheating protection ® function. When enabled, the CPU core frequency and voltage are reduced when the CPU overheats. Configuration options: [Disabled] [Enabled] ASUS P5Q SE2 2-17... -
Page 56: Chipset
Execute-Disable.Bit.Capability.[Enabled] Allows you to enable or disable the No-Execution Page Protection Technology. Setting this item to [Disabled] forces the XD feature flag to always return to zero (0). Configuration options: [Disabled] [Enabled] The following item appears only when you installed an Intel Pentium 4 or later CPU that ®... -
Page 57: Usb Configuration
When set to [No], BIOS configures all the devices in the system. When set to [Yes] and if you install a Plug and Play operating system, the operating system configures the Plug and Play devices not required for boot.Configuration options: [No] [Yes] ASUS P5Q SE2 2-19... -
Page 58: Power.menu
2.6. Power.menu The Power menu items allow you to change the settings for the Advanced Power Management (APM). Select an item then press <Enter> to display the configuration options. BIOS SETUP UTILITY Main Ai Tweaker Advanced Power Boot Tools Exit Select the ACPI state Suspend Mode [Auto]... -
Page 59: Hardware Monitor
Configuration options: [Disabled] [Enabled] CPU Fan Profile [Standard] Allows you to set the appropriate performance level of the CPU Q-Fan. Configuration options: [Standard] [Silent] [Turbo] The CPU Fan Profile item appears when you enable the CPU Q-Fan Control feature. ASUS P5Q SE2 2-21... -
Page 60: Boot.menu
POST items. Configuration options: [Disabled] [Enabled] Full.Screen.Logo.[Enabled] This allows you to enable or disable the full screen logo display feature. Configuration options: [Disabled] [Enabled] Set this item to [Enabled] to use the ASUS MyLogo2 feature. ™ AddOn.ROM.Display.Mode.[Force.BIOS] Sets the display mode for option ROM. Configuration options: [Force BIOS] [Keep Current]... -
Page 61: Security
This item allows you to select the access restriction to the Setup items. Configuration options: [No Access] [View Only] [Limited] [Full Access] [No.Access].- prevents user access to the Setup utility. [View.Only].- allows access but does not allow change to any field. ASUS P5Q SE2 2-23... -
Page 62: Tools.menu
2.8.1. ASUS.EZ.Flash.2 Allows you to run ASUS EZ Flash 2. When you press <Enter>, a confirmation message appears. Use the left/right arrow key to select between [Yes] or [No], then press <Enter> to confirm your choice. See section 2.1.3 for details. -
Page 63: Ai Net 2
• This function supports devices such as USB flash disks and floppy disks with FAT 32/16 format and single partition only. • DO.NOT shut down or reset the system while updating the BIOS to prevent the system boot failure! ASUS P5Q SE2 2-25... -
Page 64: Exit.menu
2.9. Exit.menu The Exit menu items allow you to load the optimal or failsafe default values for the BIOS items, and save or discard your changes to the BIOS items. BIOS SETUP UTILITY Main Ai Tweaker Advanced Power Boot Tools Exit Exit Options Exit system setup...