Panasonic HM-TA2 Owner's Manual
High definition mobile camera
Hide thumbs
Also See for HM-TA2:
- Operating instructions manual (100 pages) ,
- Owner's manual (108 pages)
Table of Contents
Advertisement
Before connecting, operating or adjusting this product, please read the
instructions completely.
Spanish Quick Use Guide is included.
Guía para rápida consulta en español está incluida.
For USA and Puerto Rico assistance, please call: 1-800-211-PANA(7262) or,
contact us via the web at: http://www.panasonic.com/contactinfo
For Canadian assistance, please call: 1-800-561-5505 or visit us at www.panasonic.ca
P
PC
High Definition Mobile Camera
Model No.
Owner's Manual
HM-TA20
HM-TA2
1AG6P1P6253--(S)
VQT3N87
Advertisement
Table of Contents

Related Manuals for Panasonic HM-TA2


Summary of Contents for Panasonic HM-TA2
- Page 1 Spanish Quick Use Guide is included. Guía para rápida consulta en español está incluida. For USA and Puerto Rico assistance, please call: 1-800-211-PANA(7262) or, contact us via the web at: http://www.panasonic.com/contactinfo For Canadian assistance, please call: 1-800-561-5505 or visit us at www.panasonic.ca VQT3N87 1AG6P1P6253--(S)
-
Page 2: Safety Precautions
Dear Customer, Date of Purchase Thank you for choosing Dealer Purchased From Panasonic! You have purchased one Dealer Address of the most sophisticated Dealer Phone No. and reliable products on the market today. Used Model No. properly, we’re sure it will Serial No. - Page 3 HM-TA2 WARNING: TO REDUCE THE RISK OF FIRE, ELECTRIC SHOCK OR PRODUCT DAMAGE, ≥ Do not expose this unit to rain, moisture, dripping or splashing. ≥ Do not place objects filled with liquids, such as vases, on this unit. ≥ Use only the recommended accessories. ≥...
- Page 4 Panasonic Model No.: HM-TA20/HM-TA2 Responsible party: Panasonic Corporation of North America One Panasonic Way, Secaucus, NJ 07094 Support Contact: Panasonic Consumer Electronics Company 1-800-211-PANA (7262) This device complies with Part 15 of the FCC Rules. Operation is subject to the following two conditions: (1) This device may not cause harmful interference, and (2) this device must accept any interference received, including interference that may cause undesired operation.
- Page 5 HM-TA20 HM-TA2 Product Identification Marking is located on the bottom of unit. U.S.A./CANADA CONSUMERS: ATTENTION: A lithium ion battery that is recyclable powers the product you have purchased. Please call 1-800-8-BATTERY for information on how to recycle this battery. <For USA-California only> This product contains a CR Coin Cell Lithium Battery which contains Perchlorate Material –...
- Page 6 CAUTION ≥ DO NOT AIM YOUR CAMERA AT THE SUN OR OTHER BRIGHT OBJECTS ≥ DO NOT EXPOSE YOUR CAMERA TO EXTENDED HIGH TEMPERATURE ... Such as, in direct sunlight, inside a closed car, next to a heater, etc... This action could permanently damage the internal parts of your camera.
-
Page 7: Cards That You Can Use With This Unit
∫ Indemnity about recorded content Panasonic does not accept any responsibility for damages directly or indirectly due to any type of problems that result in loss of recording or edited content, and does not guarantee any content if recording or editing does not work properly. -
Page 8: Table Of Contents
Contents HM-TA20 Please be sure to read “(Important) About the Waterproof/ Dustproof and Anti-shock Performance of this unit [HM-TA20]” (l 10) before using this unit underwater to prevent the unit from being mishandled, which may cause water to seep in. Recording/Playback (Important) About the Waterproof/... - Page 9 With a PC What you can do with a PC ..60 Operating environment ... 62 Installation ........ 65 Connecting to a PC....67 About the PC display....68 Starting HD Writer PE 2.0 ..69 Reading the operating instructions of the software applications ......
-
Page 10: About The Waterproof
5 devices.) Panasonic’s test method is based on the above “MIL-STD 810F Method 516.5-Shock”. However, the drop height was changed from 122 cm (4.0 feet) to 150 cm (5.0 feet) dropping onto 3 cm (0.10 feet) thick plyboard. - Page 11 ≥ Waterproofing is not guaranteed if the unit is subject to an impact as a result of being hit or dropped etc. If an impact to this unit occurs, it should be inspected (subject to a fee) by a Panasonic’s Service Center to verify that the waterproofing is still effective.
-
Page 12: Check Before Using Underwater
≥ Contact Panasonic’s Service Center if the fogging does not disappear. Conditions in which inner side of the lens may be fogged Condensation may occur and the inner side of the lens may be fogged... - Page 13 To avoid permanently damaging this unit the seals should be replaced once each year. Please contact Panasonic’s Service Center for related costs and other information. Close the door/cover securely. ≥ Lock the LOCK lever securely until the red part is no longer visible.
-
Page 14: Using This Unit Underwater
Using this unit underwater ≥ Use this unit underwater at a depth of up to 3 m (10 feet) with the water temperature between 0 oC and 35 oC (32 oF to 95 °F). ≥ Do not use this unit at a depth of over 3 m (10 feet). ≥... -
Page 15: Care Of This Unit After Using It Underwater
Care of this unit after using it underwater Do not open or close the door/cover until the sand and dust is removed by rinsing this unit with water. Make sure to clean this unit after using it. ≥ Thoroughly wipe off any water droplets, sand, and saline matter on your hands, body, hair, etc. - Page 16 Drain water by holding this unit upside down and shaking it lightly a few times. ≥ After using this unit at the seaside or underwater, or after washing it, water will remain at the speaker site of this unit for a while and it may cause lower sound or sound distortion.
-
Page 17: Accessories
Accessories Check the accessories before using this unit. Keep the accessories out of reach of children to prevent swallowing. Product numbers correct as of April 2011. These may be subject to change. Hand strap with stylus pen VFC4708 ≥ The stylus pen is used for operations that are hard to operate with your fingers or performing detailed operations with the touch screen operation. -
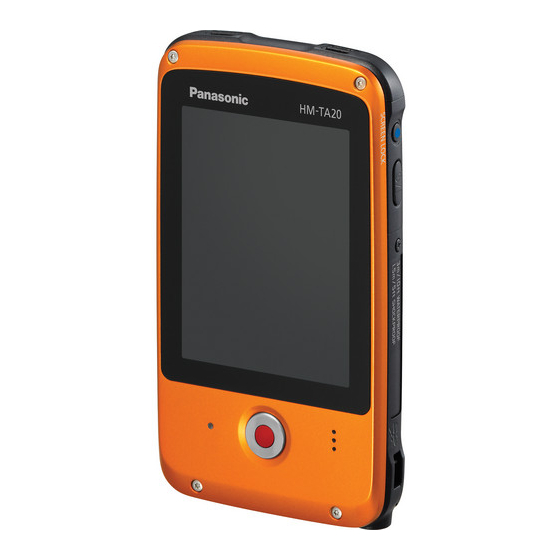
Page 18: Preparation
Preparation Parts identification and handling HM-TA20 HM-TA2 Internal microphones Power button [ ] (l 31) Speaker Hand strap fixture ≥ Attach the hand strap to this unit and adjust its length using the stylus pen. Recording button (l 35) Status indicator (l 22, 29, 31, 58) LCD monitor (Touch screen) (l 32) Due to limitations in LCD production technology, there may be some tiny bright or dark spots on the LCD monitor screen. - Page 19 HM-TA20 HM-TA2 10 11 Tripod receptacle ≥ If you attach a tripod with a 5.5 mm (0.22 q) screw or larger, it may damage this unit. 10 LED light (l 39) 11 Lens HM-TA2 USB Latch (l 22) VQT3N87...
- Page 20 HM-TA20 RESET 13 14 HM-TA2 22 23 13 14 RESET 13 SD card door (l 29) 14 Card slot (l 29) 15 Headphone terminal [Ë] ≥ Use the earphone/headphone with a A part width ‰ 11 mm (0.43 q) or smaller. 16 Reset button [RESET] (l 80) 17 HDMI mini connector (l 58) HM-TA20...
- Page 21 HM-TA20 USB Latch (l 22) 20 USB terminal [ ] (l 22, 65, 67, 73) 21 USB terminal cover (l 22) HM-TA2 HDMI cover HM-TA2 Headphone terminal cover HM-TA20 About locks for USB terminal cover, HDMI/Headphone cover and SD card door Each door/cover is equipped with a LOCK lever to lock the open/close lever.
-
Page 22: Charging The Battery
Preparation Charging the battery When this unit is purchased, the battery is not charged. Charge the battery fully before using this unit for the first time. Important: ≥ This unit has a built-in rechargeable lithium-ion battery. Do not remove except when disposing of this unit. ≥... - Page 23 ≥ Insert the USB extension cord securely all the way. (Insert to line C.) It will not operate properly if it is not inserted all the way. ≥ Always use a genuine Panasonic AC adaptor (VSK0750; optional). ≥ The status indicator will flash red at an interval of 2 seconds, indicating that charging has begun.
- Page 24 ∫ To return the USB terminal to its original position ≥ When pressing the USB terminal with your fingers, press slowly and carefully. HM-TA20 1 Press the USB Latch C. 2 While pressing on the USB Latch C, press the USB terminal with your finger.
-
Page 25: Charging And Motion Pictures Recording Time
230 pictures By CIPA standard Recording time Approx. 115 min Playback time Approx. 210 min Recording conditions by CIPA standard ≥ CIPA is an abbreviation of Camera & Imaging Products Association. ≥ Using a Panasonic SD Memory Card (2 GB) VQT3N87... -
Page 26: Charging And Voices Recording Time
Charging and voices recording time ∫ Charging/Recording time ≥ Temperature: 25 oC (77 oF)/humidity: 60%RH Maximum continuous Charging time Recording mode recordable time 4 h 30 min 4 h 20 min 4 h 30 min 4 h 30 min 128Low * Maximum continuous recordable time for one voice: Approx. -
Page 27: Preparing The Card
Preparation Preparing the card The following operations can be performed using this unit. ≥ When a card has not been inserted: Scenes, still pictures and voices can be recorded on the built-in memory and played back. appears.) ≥ When a card has been inserted: Scenes, still pictures and voices can be recorded on the card and played back. - Page 28 Memory Cards/SDXC Memory Cards that can be used for motion picture recording on the following website. http://panasonic.jp/support/global/cs/e_cam (This website is in English only.) ≥ 4 GB or more Memory Cards that do not have the SDHC logo or 48 GB or more Memory Cards that do not have the SDXC logo are not based on SD Memory Card Specifications.
-
Page 29: Inserting/Removing An Sd Card
Inserting/removing an SD card When using an SD card not from Panasonic, or one previously used on other equipment, for the first time on this unit, format the SD card. (l 57) When the SD card is formatted, all of the recorded data is deleted. - Page 30 ≥ Do not touch the terminals on the back of the SD card. ≥ Do not apply strong shocks, bend, or drop the SD card. ≥ Electrical noise, static electricity or the failure of this unit or the SD card may damage or erase the data stored on the SD card.
-
Page 31: Turning The Unit On/Off
Preparation Turning the unit on/off Press the power button to turn on the unit. ≥ The LCD monitor lights on. To turn off the unit Continue pressing the power button until the LCD monitor goes off. ∫ About the screen display Please refer to page 74 for details of the icons displayed on the screen. -
Page 32: How To Use The Touch Screen
Preparation How to use the touch screen You can operate by directly touching the LCD monitor (touch screen) with your finger. It is easier to use the stylus pen (supplied) for detailed operation or if it is hard to operate with your fingers. ∫... -
Page 33: Setting Date And Time
Preparation Setting date and time Select the menu. (l 53) [MENU] # # [CLOCK SET] Touch the date or time to be set, then set the desired value using ≥ The year can be set between 2000 and 2039. ≥ The 12-hour system is used to display the time. Touch [ENTER]. -
Page 34: Recording/Playback
Recording/Playback Recording ≥ This unit will perform automatic recording. Auto focusing, auto white balance, and electronic stabilizer will function during the recording. * The electronic stabilizer will not function when recording still pictures or during operation of digital zoom. ≥ Record with this unit vertically. Selecting a mode Touch [MODE]. -
Page 35: Recording Motion Pictures
Recording motion pictures When in Motion Picture Recording Mode Press the Recording button to start recording. ≥ When you begin recording, ; changes to ¥. Press the Recording button again to pause recording. ≥ The images recorded between pressing the Recording button to start recording and pressing it again to pause recording become one scene. -
Page 36: Recording Still Pictures
Recording still pictures When in Still Picture Recording Mode Press the Recording button. ≥ is displayed where the focus is set. ≥ (Red) appears on the screen. ≥ Still pictures cannot be recorded while recording the motion picture. ≥ The screen aspect ratio changes depending on the number of recording pixels that is set. -
Page 37: Recording Voices
Recording voices When in Voice Recording Mode Press the Recording button to start recording. ≥ When you begin recording, (White) changes to (Red). Press the Recording button again to pause recording. ∫ To record still pictures while recording voices Touch ≥... -
Page 38: Intelligent Auto Mode
Intelligent Auto Mode The following modes (appropriate for the condition) are set just by pointing the unit to what you want to record. Mode Scene Portrait When the object is a person Scenery Recording outdoors Spotlight Under a spotlight Night portrait Recording night portrait Night scenery Recording night scenery... -
Page 39: Digital Zoom In/Out Function
Digital zoom in/out function The maximum digital zoom ratio is k4. Touch and hold ≥ You can also zoom by directly touching the zoom bar. ≥ Motion pictures: Independent of zoom magnification, this unit can focus on a subject approx. 30 cm (11.8 q) away from the lens. Still pictures: Independent of zoom magnification, this unit can focus on a subject approx. -
Page 40: Night View Mode
Night View mode It is possible to record brighter than usual. ¬ Change the mode to Motion Picture Recording Mode. Touch [MENU] while the recording is paused. Touch ≥ Each time is touched, the Night View mode is turned on or off. When the scene is dark, or when the Night View mode is on and the scene becomes bright, will flash automatically. -
Page 41: For Underwater Recording [Hm-Ta20]
≥ The setting will be normal when you turn off the unit or touch [PLAY]. For underwater recording [HM-TA20] This unit can record motion pictures/still pictures under water to a depth 3 m (10 feet). Press and hold the screen lock button until the precaution message appears. -
Page 42: Playback
Recording/Playback Playback During playback, we recommend you use this unit horizontally. In this Owner’s Manual, instructions for playback are given primarily for using horizontally. Touch [PLAY]. ≥ The last recorded scene or still picture or voice will be played back. ≥... -
Page 43: Playback Operation
∫ Playback operation Icon/ Playback Operating steps Playback operation data (Only playing back horizontally) Thumbnail display Touch during pause. (l 44) Touch during playback. Scenes/ Pause Voices Touch during playback. : Increases the volume Volume adjustment : Decreases the volume Touch (fast forward playback) or... - Page 44 Icon/ Playback Operating steps Playback operation data Touch the Direct playback bar or slide it while touching. ≥ The playback pauses temporarily and skips to the Scenes/ Voices position touched or slid to Direct playback while touching. ≥ Playback will start by releasing your touching or sliding finger.
- Page 45 ∫ When switching the thumbnail display for scene/still pictures and voice Touch [MODE]. ∫ Playback with this unit vertically Scene/Still picture Voice 01h30m59s 01h30m59s 01h30m59s 29m59s 29m59s 12m30s NOV 15 2011 12:15 PM 100-0010 Touch the thumbnail display A, then the touched scene, still picture or voice will play back.
-
Page 46: Playing Back The Slide Show/Continuous Playback
Motion picture compatibility ≥ This unit is based on the MPEG-4 AVC file format. ≥ This unit may degrade or not play back motion pictures recorded or created on other products, and other products may degrade or not play back motion pictures recorded on this unit, even if the products support MP4. -
Page 47: Zooming In On A Still Picture During Playback (Playback Zoom)
≥ Slide show/continuous playback will start from the scene/still picture or voices that is currently being played back. It will stop once all the recorded scenes/still pictures or voices are played back. ≥ Scenes are played back normally, and still pictures are played back for approx. -
Page 48: Deleting Scenes, Still Pictures Or Voices
Deleting scenes, still pictures or voices Deleted scenes, still pictures or voices cannot be restored, so perform appropriate confirmation of the contents before proceeding with deletion. ≥ When a card has been inserted, scenes, still pictures and voices can be deleted on the card. ≥... - Page 49 When scenes or still pictures are selected, all the scenes or still pictures on the SD card/ [ALL] built-in memory will be deleted. When voices are selected, all the voices on the SD card/built-in memory will be deleted. (Only playing back vertically) [SINGLE] Delete the selected scene, still picture or voice.
-
Page 50: Creating Still Picture From Motion Picture
Creating still picture from motion picture A single frame from the recorded motion picture can be saved as a still picture. (Only playing back horizontally) Touch Touch Pause at the scene you want to save as a still picture during playback. ≥... -
Page 51: To Delete Unwanted Parts Of A Motion Picture
To delete unwanted parts of a motion picture You can delete unwanted parts of scenes. (Only playing back horizontally) Touch Touch Slide A or B while 00m00s 00m00s 03m20s touching it to determine the unwanted part C. Start ≥ When you touch A or B, appears. -
Page 52: Setting Of Online Sharing Of Motion Pictures
Setting of online sharing of motion pictures You can easily upload to YouTube or Facebook when this unit is connected to the PC by setting up the upload destination of the motion pictures. (l 60) The PC for connection needs to have the HD Writer PE 2.0 installed and be connected to the Internet. -
Page 53: Using The Setup Menu Screen
Recording/Playback Using the Setup menu screen Touch [MENU]. Touch Touch the submenu ≥ To display the next (previous) page: j Touch j Slide the submenu display upward (downward) while touching it. Touch the desired item to enter the setting. ≥ Touch [EXIT] to exit the menu setting. Menu list [Video Rec Mode] Switch the picture quality of the motion pictures to be recorded. -
Page 54: Picture Size
≥ Please refer to page 90 for details about approximate recordable time. ≥ When the unit is moved a lot or moved quickly, or when a fast-moving subject is recorded (particularly when recording using ), mosaic- type noise may appear at playback. [PICTURE SIZE] The higher the number of pixels, the higher the clarity of the picture when printing. -
Page 55: Self Timer
[SELF TIMER] This is for recording scenes, still pictures or voices using the timer. [MENU] # # [SELF TIMER] # desired setting [OFF]: Cancel the setting [2sec]: Records after 2 seconds [10sec]: Records after 10 seconds ≥ When the Recording button is pressed or is touched (In Voice Recording Mode only), a motion picture/still picture or voice is recorded after the Ø10 or Ø2 flashes for the time which has been set. -
Page 56: Hdmi Resolution
[ALERT SOUND] You can check the start and stop of recording, or turning the unit on/off with an audio tone. [MENU] # # [ALERT SOUND] # [ON] [HDMI resolution] Select the desired method of HDMI output. [MENU] # # [HDMI resolution] # desired setting [AUTO]/[1080i]/[576p]/[480p] ≥... -
Page 57: Format Media
[FORMAT MEDIA] Please be aware that if a medium is formatted, then all the data recorded on the medium will be erased and cannot be restored. Back up important data on a PC etc. (l 60) [MENU] # # [FORMAT MEDIA] ≥... -
Page 58: Watching Motion/Still Pictures On Your Tv
A HDMI mini cable (optional) ≥ Check that the plugs are inserted as far as they go. ≥ Always use a genuine Panasonic HDMI mini cable (RP-CDHM15, RP-CDHM30; optional). Select the video input on the TV. ≥ Example: Select the [HDMI] channel with a HDMI mini cable. - Page 59 Start playback on this unit. Perform playback operations by touching the icons. During playback/pause During thumbnail display A Playback operations (l 43) B Switching the modes (l 45) C Thumbnail display (l 44) D Up/down/left/right, Enter VQT3N87...
-
Page 60: With A Pc
With a PC What you can do with a PC ≥ The unit comes with built-in HD Writer PE 2.0 video editing software. ≥ See page 65 for how to install HD Writer PE 2.0 on your PC. HD Writer PE 2.0 You can copy the motion/still picture data to the HDD of PCs or write to SD cards using the HD Writer PE 2.0 software. -
Page 61: Important Notice
Important Notice ≥ When using an SDXC Memory Card, check the following support site. http://panasonic.net/avc/sdcard/information/SDXC.html ≥ Motion pictures that have been recorded on another device cannot be written to HD Writer PE 2.0. ≥ We cannot guarantee operation if you use software other than HD Writer PE 2.0 to read/write motion picture. -
Page 62: Operating Environment
With a PC Operating environment ≥ Even if the system requirements mentioned in this owner’s manual are fulfilled, some PCs cannot be used. ≥ Operation is not guaranteed in the following cases. j When 2 or more USB devices are connected to a PC, or when devices are connected through USB hubs or by using extension cables other than the supplied USB extension cord. - Page 63 Display High Color (16 bit) or more (32 bit or more recommended) Desktop resolution of 1024k768 pixels or more (1920k1080 pixels or more recommended) Windows 7/Windows Vista: DirectX 9.0c compatible video card (DirectX 10 recommended) Windows XP: DirectX 9.0c compatible video card Compatible with DirectDraw overlay ™...
-
Page 64: Mass Storage
∫ Operating environment for the card reader function (mass storage) IBM PC/AT compatible PC Windows 7 (32 bit/64 bit) or SP1 Windows Vista (32 bit) (SP1/SP2) Windows XP (32 bit) (SP3) Windows 7/Windows Vista: 1.0 GHz or higher 32-bit (x86) or 64-bit (x64) processor Windows XP: Intel Pentium 450 MHz or higher or Intel Celeron 400 MHz or higher... -
Page 65: Installation
With a PC Installation When installing the software, log on to your computer as the Administrator or with a user name with equivalent authorization. (If you do not have authorization to do this, consult your manager.) ≥ Before starting the installation, close all applications that are running. ≥... - Page 66 Select where the application is to be installed, then click [Next]. Select [Yes] or [No] to create shortcut. When installation is complete, some notes will appear. Check the contents, then close the window. Select [Yes, I want to restart my computer now.], then click [Finish].
-
Page 67: Connecting To A Pc
SD card slots built into PCs and some SD card readers are not compatible with the SDHC Memory Card or SDXC Memory Card. ≥ When using an SDXC Memory Card, check the following support site. http://panasonic.net/avc/sdcard/information/SDXC.html ≥ Operation is not guaranteed for all devices equipped with a USB terminal. -
Page 68: About The Pc Display
∫ To disconnect USB terminal of this unit safely Select the icon in task tray displayed on the PC, and then click [Eject Panasonic Mobile Camera]. ≥ Depending on your PC’s settings, this icon may not be displayed. About the PC display When the unit is connected to a PC, it is recognized as an external drive. -
Page 69: Starting Hd Writer Pe 2.0
The software cannot be used with the user name for a guest account. (On the PC) Select [Start] # [All Programs] # [Panasonic] # [HD Writer PE 2.0] # [HD Writer PE]. ≥ For details on how to use the software applications, read the PDF operating instructions of the software. -
Page 70: If Using Mac
With a PC If using Mac ≥ HD Writer PE 2.0 is not available for Mac. ≥ iMovie’11 supported. For details about iMovie’11, please contact Apple Inc. ∫ Operating environment Mac OS X 10.6.6 Intel Core Duo or better 1 GB or more Interface USB port ≥... -
Page 71: To Use As A Camera For Skype
With a PC To use as a camera for Skype It is possible to perform video conferencing using Skype when this unit is connected to a PC that is connected to the Internet. Skype is a software that allows you to perform video conferencing using an Internet connection. - Page 72 ∫ Operating environment for Skype IBM PC/AT compatible PC Software Skype 5.1 for Windows Skype 5.0 for Mac OS X Windows 7 (32 bit/64 bit) or SP1 Mac OS X 10.6.6 Windows Vista (32 bit) (SP1/SP2) Windows XP (32 bit) (SP3) Intel Core 2 Duo 1.8 GHz or higher Intel Core 2 32-bit (x86) or 64-bit (x64) processor...
-
Page 73: How To Connect
How to connect ≥ Turn on the unit. Connect USB terminal of this unit to a PC with a USB extension cord. ≥ Connect the USB extension cord by inserting it securely all the way without forcing. A USB extension cord (supplied) ≥... -
Page 74: Indications
Others Indications ∫ Recording indications Motion pictures Still pictures Voices 01h30m45s 01h30m 12345 F2.8 1 / 3 0 Video Rec Mode (l 53) ¥ Recording motion picture Recording pause (motion picture) Intelligent Auto Mode (l 38) 01h30m Remaining time for motion picture or voice recording (l 35, 37) 00m00s Elapsed recording time for motion pictures... -
Page 75: Playback Indications
Voice Rec Mode (l 54) 128Low 12345 Remaining number of recordable pictures (l 36) Focus area (l 36) Ø10/Ø2 Self-Timer Recording (l 55) F2.8 Iris value 1/30 Shutter speed Effect icon (l 40) Night View mode (l 40) Recording still pictures during voice recording (l 37) ∫... - Page 76 Protected motion pictures/still pictures/ voices (l 49) 00m00s Playback time for motion pictures (l 45) 00h00m00s Playback time for voices (l 45) 100-0001 File number (l 45) NOV 15 2011 12:34PM Date/Time indication (l 33) ∫ Confirmatory indications SD card is not inserted or is incompatible. VQT3N87...
-
Page 77: Messages/Troubleshooting
Battery runs down after the battery is fully charged, the quickly. battery has worn out and needs to be replaced. Contact Panasonic’s Service Center. ≥ Press the RESET button with the This unit cannot be stylus pen. (l 80) Then about operated though it is 1 minute later, turn on the unit again. - Page 78 Problem Check points ≥ Use an SD card that can be used for The unit arbitrarily motion picture recording. (l 27) stops recording. ≥ The recordable time may have shortened due to the deterioration of the data writing speed or repeated recording and deletion.
- Page 79 Problem Check points ≥ Check that the device is compatible If the SD card is inserted in another with the capacity or type of SD card device, it is not (SD Memory Card/SDHC Memory recognized. Card/SDXC Memory Card) that you inserted.
- Page 80 Problem Check points ≥ After re-inserting the SD card into the When connected by unit, reconnect the USB terminal of the USB terminal, this unit. this unit is not ≥ Select another USB terminal on the detected by the PC. ≥...
-
Page 81: Cautions For Use
Others Cautions for use About this unit The unit and the SD card become warm during use. This is not a malfunction. Do not drop or bump the unit. Do not subject to strong pressure. ≥ A strong impact can break the lens, LCD monitor or the unit’s casing, causing it to malfunction. - Page 82 ≥ Do not leave rubber or plastic products in contact with the unit for a long time. When you use the unit in a sandy or dusty place such as a beach, do not let sand or fine dust get into the body and terminals of the unit.
-
Page 83: Lcd Monitor
Cleaning When cleaning, wipe this unit with a soft, dry cloth. ≥ If the unit is very dirty, dip a cloth in water and squeeze firmly, and then wipe the unit with the damp cloth. Next, dry the unit with a dry cloth. ≥... -
Page 84: About The Battery
≥ If the lens gets dirty with fingerprints etc., wipe the lens surface with a soft dry cloth. (If you leave fingerprints on or otherwise dirty the lens, the pictures you take may look whiter than normal.) HM-TA20 ≥ A sound might be muffled or warped when there is water on the microphone or the speaker. -
Page 85: About Condensation
When disposing of or giving away the SD card, note that: Formatting and deletion of this unit or computer only changes the file management information and does not completely delete the data in the SD card. It is recommended to physically destroy the SD card or use the commercially available computer data deletion software to completely erase the data in the SD card before transferring to another party or disposing. -
Page 86: Requests When Disposing Of This Unit
Others Requests when disposing of this unit When disposing of your used products, remove the battery built into the unit, and please cooperate in recycling of the battery. Please refer to page 87 about how to remove the battery. ≥ Please make sure that the battery is disposed of at an officially assigned location, if there is one in your country. - Page 87 If disassembled, repair is not possible. ≥ Using a driver (optional), disassemble in the following sequence. ≥ If it cannot be removed smoothly, contact Panasonic’s Service Center. ≥ Keep disassembled parts out of reach of children. Remove all screws shown in the figure.
- Page 88 Open this unit as shown in the figure below, and remove the battery with a driver. HM-TA20 HM-TA2 Regarding the handling of used batteries ≥ Insulate the terminals with cellophane tape or similar. ≥ Do not disassemble. VQT3N87...
-
Page 89: About Copyright
Others About copyright ∫ Carefully observe copyright laws Whatever you have recorded and created can be used for your personal entertainment only. Under copyright laws, other materials cannot be used without obtaining permission from the holders of the copyrights. ∫ Licenses ≥... -
Page 90: Recording Modes/Approximate Recordable Time (Motion Pictures)
Others Recording modes/approximate recordable time (motion pictures) ≥ SD cards are only mentioned with their main memory size. The stated times are the approximate recordable times for continuous recording. Recording mode Picture size 1920k1080 1280k720 640k480 960k540 4 GB 40 min 50 min 2 h 20 min 20 min... -
Page 91: Approximate Number Of Recordable Pictures
Others Approximate number of recordable pictures ≥ SD cards are only mentioned with their main memory size. The stated number is the approximate number of recordable pictures. Aspect ratio 16:9 Picture size 3264k2448 1600k1200 640k480 1920k1080 4 GB 1400 5400 23900 5200 SD card... -
Page 92: Specifications
Others Specifications High Definition Mobile Camera Information for your safety Power source: DC 5.0 V (When using USB)/DC 3.7 V (When using battery) Power consumption: Recording; 2.6 W/Charging; 2.5 W Signal system: 1080/30p, 720/30p, 540/30p, 480/30p Recording format: MPEG-4 AVC file format compliant (.MP4) Image sensor: 1/4z MOS image sensor Total;... - Page 93 Monitor: 3.0z LCD monitor (Approx. 230 K dots) Microphone: Stereo Speaker: 1 round speaker, dynamic type White balance adjustment: Auto tracking white balance system Standard illumination: 1,400 lx Minimum required illumination: Approx. 9 lx (1/30) HDMI mini connector video output level: ™...
- Page 94 Dimensions: HM-TA20 64.3 mm (W)k112.6 mm (H)k17.7 mm (D) [2.53 q (W)k4.43 q (H)k0.70 q (D)] (excluding projecting parts) HM-TA2 59.8 mm (W)k108.9 mm (H)k16.9 mm (D) [2.35 q (W)k4.29 q (H)k0.67 q (D)] (excluding projecting parts) Mass (Weight) in operation: HM-TA20 Approx.
- Page 95 (If failure occurs during the test, a new set is used to pass the drop orientation test within a total of 5 devices.) ≥ Panasonic’s test method is based on the above “MIL-STD 810F Method 516.5-Shock”. However, the drop height was changed from (0.10 feet)
- Page 96 Recording mode and transfer rate: Approx. 12 Mbps (VBR) Approx. 9 Mbps (VBR) Approx. 3 Mbps (VBR) Approx. 24 Mbps (VBR) Refer to page 90 for the recordable time. Picture size: 1920k1080/30p 1280k720/30p 640k480/30p 960k540/30p Audio compression: AAC (2 ch) ∫...
- Page 97 ∫ Voices Recording media: SD Memory Card (FAT12 and FAT16 system compliant) SDHC Memory Card (FAT32 system compliant) SDXC Memory Card (exFAT system compliant) Refer to page 27 for details on SD cards usable in this unit. Built-in memory; Approx. 10 MB Compression: Specifications may change without prior notice.
-
Page 98: Optional Accessories
Others Optional accessories Accessory No. Figure Description RP-CDHM15 HDMI mini cable RP-CDHM30 RP-SDN16GU1A Class 4 16 GB SDHC Memory Card RP-SDN08GU1A Class 4 8 GB SDHC Memory Card RP-SDN04GU1A Class 4 4 GB SDHC Memory Card RP-SDN02GU1A Class 4 2 GB SD Memory Card RP-SDW64GU1K Class 10 64 GB SDXC... -
Page 99: Accessory Order Form (For Usa And Puerto Rico Customers)
CALL PANASONIC’S ACCESSORY ORDER LINE AT 1-800-332-5368 [6 AM-6 PM M-F, PACIFIC TIME] MAIL THIS ORDER TO: PANASONIC SERVICE AND TECHNOLOGY COMPANY ACCESSORY ORDER OFFICE 20421 84th Avenue South Kent, WA. 98032 In CANADA, please contact your local Panasonic dealer for more information on Accessories. VQT3N87... -
Page 100: Limited Warranty (Only For U.s.a. And Puerto Rico)
If your product does not work properly because of a defect in materials or workmanship, Panasonic Consumer Electronics Company (referred to as “the warrantor”) will, for the length of the period indicated on the chart below, which starts with the date of original purchase (“warranty period”), at its option either (a) repair your product with new or refurbished parts, (b) replace it... - Page 101 Monday-Friday 9am-9pm, Saturday-Sunday 10am-7pm EST For hearing or speech impaired TTY users, TTY: 1-877-833-8855 Accessory Purchases (United States and Puerto Rico) Purchase Parts, Accessories and Instruction Books online for all Panasonic Products by visiting our Web Site at: http://www.pstc.panasonic.com Or, send your request by E-mail to: npcparts@us.panasonic.com...
-
Page 102: (For Canadian Customers)
(a) repair your product with new or refurbished parts, (b) replace it with a new or a refurbished equivalent value product, or (c) refund your purchase price. The decision to repair, replace or refund will be made by Panasonic Canada Inc. Panasonic HM-TA20/HM-TA2... -
Page 103: Index
Index ∫ A ∫ M ......56 ..46 Alert sound Motion picture compatibility Approximate number of ∫ N ....91 recordable pictures ......40 Night view mode ∫ B ∫ P ........84 Battery ......54 Picture size ..26 Battery capacity indication ......47 Playback zoom ∫... -
Page 104: Spanish Quick Use Guide/Guía Española Para El Uso Rápido
Spanish Quick Use Guide/ Guía española para el uso rápido ∫ Carga de la batería ≥ Esta unidad tiene una batería de litio recargable incorporada. No la retire excepto cuando va a desechar esta unidad. ≥ La batería no se cargará si la unidad está encendida. 1) Sacar el terminal USB ≥... - Page 105 ≥ No utilice ningún otro cable de extensión USB que no sea el suministrado. (No se garantiza la operación con otros cables de extensión USB.) ≥ Inserte por completo el cable de extensión USB de forma segura. (Inserte en la línea B.) No funcionará correctamente si no se inserta por completo.
- Page 106 ∫ Cómo usar la pantalla táctil Puede actuar directamente tocando el monitor LCD (pantalla táctil) con el dedo. Es más sencillo utilizar el lápiz electrónico (suministrado) para operaciones detalladas o bien si es difícil de actuar con los dedos. Toque Deslice mientras toca Toque y suelte la pantalla táctil para Mueva el dedo mientras pulsa la...
- Page 107 ∫ Grabación de voces Pulse el botón de grabación para comenzar a grabar. ≥ Cuando comienza a grabar, (Blanco) cambia a (Rojo). ∫ Reproducción 1) Toque [PLAY]. 29m59s 29m59s 10m30s ≥ La última escena o fotografía grabada se reproducirá. ≥ Si las voces a reproducir se grabaron con fotografías, se visualiza la fotografía.
- Page 108 Panasonic Consumer Electronics Company, Division of Panasonic Corporation of North America One Panasonic Way, Secaucus, NJ 07094 Panasonic Canada Inc. 5770 Ambler Drive, Mississauga, Ontario, L4W 2T3 VQT3N87 © Panasonic Corporation 2011 F0411KK0 Printed in Indonesia 1AG6P1P6253--(S)