Table of Contents
Advertisement
Quick Links
Advertisement
Table of Contents

Related Manuals for Cortelco DECT 6


Summary of Contents for Cortelco DECT 6
- Page 1 OWNER’S INSTRUCTION MANUAL DECT 6 CORDLESS TELEPHONE SYSTEM...
-
Page 2: Table Of Contents
Contents Unpacking and Installation ..............7 Box Contents ..................7 Telephone Part Identification .............. 8 Installation ..................9 Desk Mount ..................9 Wall Mount ..................9 Initial Setup ..................9 Setup Menu ..................10 Local Code ..................10 Set Default ..................10 Set Time .................... - Page 3 Conference Call ................17 Transfer ..................... 17 Intercom Call ..................17 Volume Control ................. 17 Profile Menu ..................18 HS Ringer Music ................18 HS Ringer Vol ................... 18 Page Tone ..................19 Key Tone .................... 19 Alarm 1/Alarm 2 ................20 Function Menu ..................
- Page 4 THANK YOU FOR PURCHASING THE 6012 DECT 6 CORDLESS TELEPHONE We want you to know all about your new telephone, how to install it, the features it provides, and the services you can expect from its use. We have included this information in your Owner’s Instruction Manual.
-
Page 5: Important Safety Instructions
Important Safety Instructions Always follow basic safety precautions when using your telephone to reduce the risk of fire, electical shock and injury. Read and understand all instructions. Follow all warnings and instructions marked on the product. Unplug this product from the wall outlet before cleaning. Do not use liquid cleaners or aerosol cleaners. -
Page 6: Safety Instructions For Handset Battery Pack
instructions. Adjust only those controls that are covered by the operating instructions because improper adjustment of other controls may result in damage and will often require extensive work by a qualified technician to restore the product to normal operation. If the product has been dropped or cabinet has be damaged. If the product exhibits a distinct change in performance. -
Page 7: Unpacking And Installation
Unpacking and Installation Box Contents The following items should be packed with your 6012. Please contact your dealer if any of them is missing. B a s e H a n d s e t P o w e r A d a p t e r B e l t C l i p L i n e... -
Page 8: Telephone Part Identification
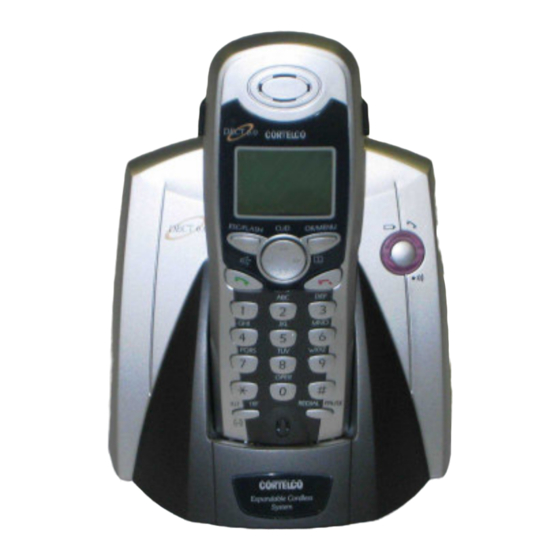
Telephone Part Identification 1 LCD 9 2.5 mm Headset Jack 2 CID Review/Volume Up 10 Hang Up Button 3 Esc/Flash Button 11 CID Review/Volume Down 4 Speaker Button 12 Dial Pad 5 Answer Button 13 Redial/Pause Button 6 Intercom/Transfer Button 14 Ring/Charge Indicator 7 Ok/Menu Button 15 Page Button... -
Page 9: Installation
Installation Desk Mount Connect the power adapter. The power adapter connects to the round jack on the bottom of the base. Plug the large part of the adapter into the wall outlet. Use only a 6V DC 350mA, center positive Class 2 adapter. Connect the line cord. -
Page 10: Setup Menu
Setup Menu Local Code Press MENU. Press CID/UP until SETUP is displayed. Press MENU. LOCAL CODE is displayed. Press MENU. Enter your local area code (3 Digits) with the keypad. Any calls received from this area code will be displayed as 7 digits in caller ID. -
Page 11: Time Format
Time Format Press MENU. Press CID/UP until SETUP is displayed. Press MENU. Press CID/UP until TIME FORMAT is displayed. Use CID/UP or Volume Down to toggle between 24 Hour and 12 Hour Format. When the desired format is selected, press MENU. Change PIN Code Use this selection to change the PIN code that links the handset to the base. -
Page 12: New Register
New Register Press MENU. BASE UNIT is displayed. Use CID/UP to select between Base 1 and Base 2. Press MENU. INPUT PIN is displayed. Use keypad to enter the 4 digit PIN. Press MENU. Unit will begin registration. This may take up to 2 minutes. -
Page 13: Unit Name
Unit Name Press MENU. Press CID/UP until SETUP is displayed. Press MENU. Press CID/UP until UNIT NAME is displayed. Press MENU. Use the keypad to enter the desired unit name. You may enter up to 8 characters. Use the ESC/FLASH button to erase if you make a mistake. -
Page 14: Dial Mode
Dial Mode Use this option to select TONE or PULSE dialing. The default setting is TONE. Press MENU. Press CID/UP until SETUP is displayed. Press MENU. Press CID/UP until DIAL MODE is displayed. Press MENU. Use CID/UP to select between TONE and PULSE. Press MENU. -
Page 15: Telephone Features
Telephone Features Receiving a Call When the phone rings, remove the handset from the base and press the green ANSWER button or the SPEAKER button to answer the call. You may toggle between normal mode and SPEAKER mode by pressing the ANSWER button. Note: If the phone is configured for AUTO TALK ON, you will be connected as soon as the handset is lifted from the base. -
Page 16: Ringer
Ringer You may choose from 20 ring tones. Detailed instructions for selecting a ring tone are given in the PROFILE MENU section. Redial There are two ways to redial the last number dialed. To redial immediately, press the ANSWER button or the SPEAKER button, and then press the REDIAL button. -
Page 17: Conference Call
Conference Call The 6012 can make a conference call between one outside party and two 6012 handsets registered to the same base. Initiate a call to the outside party from one of the 6012 handsets. Once the outside call is connected, press INT/TRF. Dial the registration number of the second 6012 handset. -
Page 18: Profile Menu
Profile Menu This menu allows you to set the tones made by the phone. HS Ringer Music This selects the ringer tone. Ring tones can be assigned for up to five different groups. Numbers placed in these groups will then ring with that tone. -
Page 19: Page Tone
Page Tone This selects the tone played by the handset when the PAGE button on the base is pressed. There are four different page tones. Press MENU. Press CID/UP until PROFILE is displayed. Press MENU. HS RINGER MUSICwill be displayed. Press CID/DOWN until PAGE TONE is displayed. -
Page 20: Alarm 1/Alarm 2
Alarm 1/Alarm 2 The 6012 will allow you to set up to two alarm times. At this time, the ringer of the telephone will ring. Press MENU. Press CID/UP until FUNCTION is displayed. Press MENU. NONDISTURB will be displayed. Press CID/UP until ALARM 1 or ALARM 2 is displayed. Press MENU. -
Page 21: Function Menu
Function Menu This menu allows you to access the special features of the phone. Nondisturb This feature disables the ringer of the handset. You can choose to have the ringer disabled from 1 to 16 hours or select OFF to have the phone ring normally. -
Page 22: Baby Call
Baby Call This feature will allow you to program an emergency number. This number will be dialed whenever the phone is taken off hook. Warning: If this feature is activated, the phone cannot be used to dial 911. Press MENU. Press CID/UP until FUNCTION is displayed. -
Page 23: Phone Book
Phone Book The 6012 can store the numbers of up to 100 of your contacts in the phone book. Names are sorted alphabetically starting with the first character. (If you want your Phone Book sorted by the last name, enter the last name first.) Entering a New Number Press PHONEBOOK. -
Page 24: Speed Dial
Speed Dial You may store up to 10 of the Phone Book entries as Speed Dial numbers for ease of dialing. Storing a Speed Dial Number Press PHONEBOOK. Use CID/UP or CID/DOWN to scroll to the desired entry. Press MENU. NEW ENTRY is displayed. Press CID/UP until SPEED DIAL is displayed. -
Page 25: Deleting A Phone Book Entry
Deleting a Phone Book Entry Press PHONEBOOK. Use CID/UP or CID/DOWN to scroll to the desired entry. Press MENU. NEW ENTRY is displayed. Press CID/UP until DELETE RECORD is displayed. Press MENU. The unit will beep to confirm and the next phone number in the phone book will be displayed. -
Page 26: Call Log
Call Log The 6012 will store records of your calls. It records missed calls, received calls, and dialed calls. Each of these records can be dialed, stored to the phone book or deleted. Reviewing Call Records Press MENU. PHONEBOOK is displayed. Press CID/UP. -
Page 27: Deleting A Call Log Entry
Deleting a Call Log Entry Follow the procedure for reviewing call records above to display the desired record. Press MENU. STORE RECORD is displayed. Press CID/UP or CID/DOWN until DELETE RECORD is displayed. Press MENU. The unit will beep to confirm the deletion. Press the HANG UP key to exit the Call Log. -
Page 28: Maintenance Information
MAINTENANCE INFORMATION Treat your telephone equipment with care for trouble-free performance. Avoid dropping the handset. Carefully place the handset in the base after use. Avoid putting near heating appliances and devices that generate electrical noise (for example, motors and florescent lamps). Clean your telephone equipment with a damp cloth. -
Page 29: Troubleshooting
TROUBLESHOOTING PHONE DOES NOT RING Line cord is disconnected at telephone outlet or at telephone. 2. Phone is OFF HOOK. Make certain the phone is well seated in the base. NO DIAL TONE Wire is disconnected at telephone or at wall jack. Test the telephone in a different wall jack. -
Page 30: Telephone Repair
DO NOT ATTEMPT TO REPAIR THIS PRODUCT YOURSELF. Telephones manufactured by CORTELCO must be returned to us for repair. You can return your telephone to CORTELCO for repair or replacement in accordance with our LIMITED WARRANTY. CORTELCO warrants THIS PRODUCT against defects in material and workmanship in accordance with our LIMITED WARRANTY. -
Page 31: Fcc Information
FCC INFORMATION Part 68 is a Federal regulation which requires equipment to be tested and registered with the FCC prior to its connection to the network. This equipment complies with Part 68 of FCC rules. On the bottom of the telephone is a label that contains, among other information, the FCC Registra- tion Number and the Ringer Equivalence Number (REN) for this equipment. - Page 32 IMITED ARRANTY If you purchased this product new in the U.S. or Puerto Rico, CORTELCO warrants it against defects in material and workmanship for a period of one (1) year from the date of original purchase. This warranty is in lieu of all other express warranties.