Table of Contents
Advertisement
Table of Contents
Introduction . . . . . . . . . . . . . . . . . . . . . . . . . . . . . . . . . . . . . . . . . . . . . . . . . . . . . . .2
What's in the Box? . . . . . . . . . . . . . . . . . . . . . . . . . . . . . . . . . . . . . . . . . . . . . . . . . .2
About the Delta 1010LT Digital PCI Audio Card . . . . . . . . . . . . . . . . . . . . . . . . . . .2
Quick Start Guide . . . . . . . . . . . . . . . . . . . . . . . . . . . . . . . . . . . . . . . . . . . . . . . . . . .3
Product Features & Specifications . . . . . . . . . . . . . . . . . . . . . . . . . . . . . . . . . . . . . .4
Minimum System Requirements . . . . . . . . . . . . . . . . . . . . . . . . . . . . . . . . . . . . . . . .4
Breakout Cable 1: . . . . . . . . . . . . . . . . . . . . . . . . . . . . . . . . . . . . . . . . . . . . . . . . . . .5
Setting the Jumpers . . . . . . . . . . . . . . . . . . . . . . . . . . . . . . . . . . . . . . . . . . . . . . . . .7
Windows XP,2000, and ME Installation . . . . . . . . . . . . . . . . . . . . . . . . . . . . . .9
Windows 98 Installation . . . . . . . . . . . . . . . . . . . . . . . . . . . . . . . . . . . . . . . . .10
Windows 95 Installation . . . . . . . . . . . . . . . . . . . . . . . . . . . . . . . . . . . . . . . . .10
Verifying Windows Driver Installation . . . . . . . . . . . . . . . . . . . . . . . . . . . . . . . . . .11
Verifying Delta Control Panel Software Installation in Windows . . . . . . . . . . . . . .12
Delta Driver Software Installation on the Mac . . . . . . . . . . . . . . . . . . . . . . . . . . . .13
Delta Control Panel Installation on the Mac . . . . . . . . . . . . . . . . . . . . . . . . . . . . . .14
Delta System Basics . . . . . . . . . . . . . . . . . . . . . . . . . . . . . . . . . . . . . . . . . . . . . . . .14
The Digital Monitor Mixer . . . . . . . . . . . . . . . . . . . . . . . . . . . . . . . . . . . . . . .15
The Patchbay / Router . . . . . . . . . . . . . . . . . . . . . . . . . . . . . . . . . . . . . . . . . . .15
Synchronization . . . . . . . . . . . . . . . . . . . . . . . . . . . . . . . . . . . . . . . . . . . . . . .15
Using the Delta 1010LT with your Music Software Application . . . . . . . . . . . . . . .16
Monitor Mixer Page . . . . . . . . . . . . . . . . . . . . . . . . . . . . . . . . . . . . . . . . . . . .19
Patchbay/Router Page . . . . . . . . . . . . . . . . . . . . . . . . . . . . . . . . . . . . . . . . . . .22
Hardware Settings Page . . . . . . . . . . . . . . . . . . . . . . . . . . . . . . . . . . . . . . . . .23
S/PDIF Page . . . . . . . . . . . . . . . . . . . . . . . . . . . . . . . . . . . . . . . . . . . . . . . . . .27
About Page . . . . . . . . . . . . . . . . . . . . . . . . . . . . . . . . . . . . . . . . . . . . . . . . . . .28
Save, Delete, Load Buttons; H/W Installed . . . . . . . . . . . . . . . . . . . . . . . . . . .28
Delta 1010LT Control Panel Software - Mac . . . . . . . . . . . . . . . . . . . . . . . . . . . . .29
Hardware Settings Page . . . . . . . . . . . . . . . . . . . . . . . . . . . . . . . . . . . . . . . . .33
Delta 1010LT Recording Tutorials . . . . . . . . . . . . . . . . . . . . . . . . . . . . . . . . . . . . .39
Typical Setup #1 . . . . . . . . . . . . . . . . . . . . . . . . . . . . . . . . . . . . . . . . . . . . . . . . . . .39
Typical Setup #2 . . . . . . . . . . . . . . . . . . . . . . . . . . . . . . . . . . . . . . . . . . . . . . . . . . .45
Transferring from DAT to Delta 1010LT . . . . . . . . . . . . . . . . . . . . . . . . . . . . .46
Transferring from 1010LT to DAT, monitoring with DAT . . . . . . . . . . . . . . . .47
Troubleshooting . . . . . . . . . . . . . . . . . . . . . . . . . . . . . . . . . . . . . . . . . . . . . . . . . . .49
Troubleshooting Tips for Frequently Asked Questions . . . . . . . . . . . . . . . . . . . . . .52
Before You Call Midiman/M-Audio Technical Support . . . . . . . . . . . . . . . . . . . . . .53
Appendix A - Technical Specs . . . . . . . . . . . . . . . . . . . . . . . . . . . . . . . . . . . . . . . .56
Appendix B-If You Use An External Mixer... . . . . . . . . . . . . . . . . . . . . . . . . . . . . .57
Limited Lifetime Warranty . . . . . . . . . . . . . . . . . . . . . . . . . . . . . . . . . . . . . . . . . . .59
Delta 1010LT
. . . . . . . . . . . . . . . . . . . . . . . . . . . . . . . . . . . . . . . .11
. . . . . . . . . . . . . . . . . . . . . . . . . . . . . . . . . . . .14
. . . . . . . . . . . . . . . . . . . . . . . . . . . . . . . . . . . . . . . . . .31
. . . . . . . . . . . . . . . . . . . . . . . . . . . . . . . . . . . . . . . . . . . . . . . . .37
- Users Manual
. . . . . . . . . . . . . . . . . . . . . . . . . . . . . .19
1
Version: D1010LT-121002
Advertisement
Table of Contents
Troubleshooting

Related Manuals for M-Audio Delta 1010LT


Summary of Contents for M-Audio Delta 1010LT
-
Page 1: Table Of Contents
Troubleshooting Tips for Frequently Asked Questions ..... .52 Before You Call Midiman/M-Audio Technical Support ..... .53 Appendix A - Technical Specs . -
Page 2: Introduction
Congratulations on your purchase of the Delta 1010LT PCI Audio Card designed and built by M-Audio. The Delta 1010LT is an excellent choice for audio and MIDI production utilizing your PC or Macintosh computer, and will interface easily with professional and “prosumer”... -
Page 3: Quick Start Guide
Within the Delta 1010LT’s PCI chip is a hardware digital mixer. Controlled by the Delta Control Panel software, it may handle all of your mixdown needs, give you extra control of all left, right and stereo levels plus pans, solos, and mutes, or simply give you an alternate or headphone mix. -
Page 4: Product Features & Specifications
Another way to approach this is by directly monitoring those inputs. This can be done in the Delta Control Panel’s “Patchbay/Router” page by selecting the Delta input and connecting it directly to the Delta output. You can also use the Delta panel’s Monitor Mixer to send the signal at the inputs to the Delta outputs, as well as mix those signals with the software outputs, i.e., your music software sending audio to the Delta outputs. -
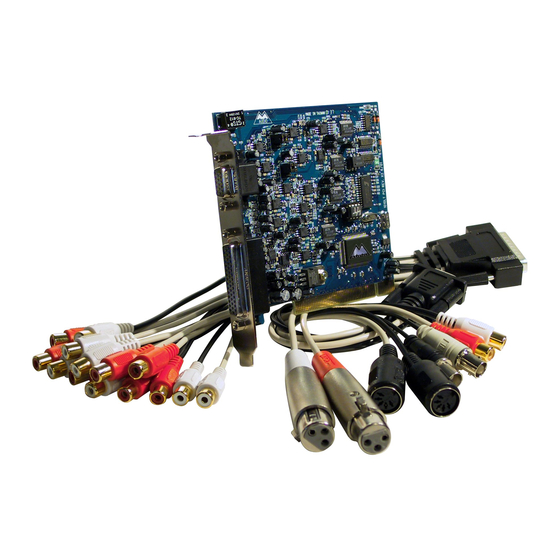
Page 5: Breakout Cable 1
Macintosh • 128 MB of RAM for 96kHz operation. 64MB SDRAM for 48kHz or less. • Mac G3 with 128 MB of RAM recommended. Some faster Power PCs will perform adequately. • Mac OS 8.5.1 or higher. • UDMA EIDE or fast SCSI HDD recommended. Breakout Cable 1: 1. - Page 6 Breakout Cable 2: 7. Host Cable connector: This 44-pin female D-sub connector is used to attach the breakout cable to the PCI host card’s male D-sub connector. 8. Analog Inputs 3-8: These jacks input analog audio from a variety of external sources.
-
Page 7: Setting The Jumpers
PCI Host Adapter Card: 11. Host Cable connector 1: This 15-pin D-sub connector attaches to the supplied breakout cable #1 to allow communication between the PCI host card and external digital devices. 12. Host Cable connector 2: This 44-pin D-sub connector attaches to the supplied breakout cable #2 to allow communication between the PCI host card and external analog devices. -
Page 8: Hardware Installation
Changing the jumper setting is easy to do when the 1010LT PCI card is not installed in the computer. Since it is usually impossible to change the jumpers while the card is in the computer, it’s a good idea to make a decision now. If you wish to connect a dynamic or ribbon microphone directly to the Delta 1010LT’s XLR analog inputs 1&2, then leave the jumpers set to their default setting, +4dBu. -
Page 9: Windows Xp,2000, And Me Installation
3. Select the PCI slot where you will install your Delta 1010LT PCI host card. Make sure the slot is a PCI slot. If you don't know what "PCI slot" means, check the owner’s manual for your computer. PCI slots are distinguishable from ISA slots by being shorter and set back farther from the outside of the computer, however some newer computers have only PCI slots. -
Page 10: Windows 98 Installation
4. The ‘Wizard’ reports that its Windows driver file search has found the M-Audio Delta 1010LT. Click Next>. If announcements that “No Driver Signature” pop up, ignore them and continue with the installation procedure. 5. Windows is now ready to install the driver files from the specified location. -
Page 11: Windows Nt Installation
to the Delta drivers, which will be D:\Delta Products\Delta98 (these drivers also work in Win95). Click ‘Next>’. 4. Windows will start to copy files, with a progress indicator on the screen. Once this process completes itself, your Delta 1010LT will be ready for action. After completion of the driver installation, Windows may require you to restart. -
Page 12: Verifying Delta Control Panel Software Installation In Windows
This example shows the M-Audio Delta 1010LT entry in the Windows Device Manager device list. The Delta 1010LT is properly installed with no conflicts. If you do not see your M-Audio Delta 1010LT in your Device Manager in this fashion, please jump ahead to the "Troubleshooting"... -
Page 13: Delta Driver Software Installation On The Mac
Delta Driver Software Installation on the Mac 1. Open the System folder on your Macintosh hard drive. In the System folder, locate the Extensions folder. 2. On you Drivers CD disk, open the Mac Delta Drivers folder. Place the extension file "Delta 1010LT Driver" in your Extensions folder by clicking on it and dragging it to the Extensions folder. -
Page 14: Delta Control Panel Installation On The Mac
1. In the Opcode folder, which you will find on your hard drive, locate the OMS Applications folder, "then OMS Setup." Double click on OMS Setup. 2. OMS will inform you that it has not yet been configured. Click OK. 3. -
Page 15: The Digital Monitor Mixer
Instead run the microphone signal through a microphone pre-amp (such as the M-Audio "Audio Buddy™" or M-Audio “DMP2™”) and then connect the pre-amp output to the input of the Delta 1010LT. Inputs 1 & 2 are female XLR connectors, and allow connection to balanced microphone or line level audio signals. -
Page 16: Using The Delta 1010Lt With Your Music Software Application
Using the initial default setting, the master clock is derived from the internal crystal oscillators. Operation in this mode is similar to that of a generic sound card – for instance, when an audio file is played through the Delta drivers, the software application playing the audio file is responsible for setting the sample rate in the sound card hardware. - Page 17 WINDOWS MME AUDIO INPUT DEVICES: All Delta 1010LT analog and S/PDIF inputs may be used simultaneously for a total of 10 input channels. Within your software application(s), the names of the Delta 1010LT audio input devices are: PCM In 1/2 Delta-1010LT PCM In 3/4 Delta-1010LT PCM In 5/6 Delta-1010LT PCM In 7/8 Delta-1010LT...
- Page 18 ASIO or EASI DRIVER INPUT DEVICES: When using the ASIO or the EASI audio drivers with music programs that support this type of audio, the input devices are displayed as mono devices. Within these software applications, the names of the Delta 1010LT audio input devices are: Analog In1 Delta-1010LT Analog In2 Delta-1010LT...
-
Page 19: Delta 1010Lt Control Panel Software - Pc
Windows may also use the Delta 1010LT as its default MIDI device. This allows the Delta 1010LT to be used with the MIDI applications included with Windows. To set this up, go to Control Panel | Multimedia | MIDI. Set the Delta MIDI driver as the default Windows MIDI driver by clicking on the "MIDI Out Delta-1010LT"... - Page 20 The Monitor Mixer Page is essentially a collection of volume level faders, audio level (or ‘peak’) meters, and solo/mute controls. For each mixer output and input channel there is one of each: a volume fader, a peak meter, a solo control, and a mute control. LEVEL FADERS: Each volume fader may be controlled by dragging the fader ‘handle’...
- Page 21 MASTER VOLUME: At the left side of the Monitor Mixer page, you will see the ‘Master Volume’ faders and peak meters. These faders have the longest ‘throw’ and highest meter resolution of any level controls in the mixer page. They control the overall stereo level of the mixer output.
-
Page 22: Patchbay/Router Page
Patchbay/Router Page The Patchbay/Router page allows you to connect each of the Delta 1010LT’s hardware outputs (4 pairs of analog outputs and 1 pair of digital output channels) to specific audio sources within the Delta 1010LT board. To display this page, click the "Patchbay/Router" tab of the Delta Control Panel. -
Page 23: Hardware Settings Page
mode, the left channel of the S/PDIF In is routed to OUT4 and the right channel of the S/PDIF In is routed to OUT3. 4. Options four through seven connect the hardware analog inputs 1 & 2, 3 & 4, 5 & 6, or 7 &... - Page 24 MASTER CLOCK: This section allows you to select the source of the board’s master clock: Internal Xtal (crystal), S/PDIF In, or Word Clock. Master clock operation is outlined in the Synchronization section of this manual. Internal Xtal is the default setting. Be sure to select "S/PDIF In"...
- Page 25 WORD CLOCK SAMPLE RATE: When using Word Clock In as your master clock, this section tells the driver what the expected word clock input sample rate is. The section is only displayed when the board is set to use Word Clock In as the master clock source. From the list, select the sample rate closest to that of the incoming word clock.
- Page 26 At the Delta analog outputs, a +4dBu setting will give the “hottest” output signal level. Generally, this signal level is associated with balanced audio inputs. The Delta 1010LT’s outputs are unbalanced, but can still interface successfully with balanced inputs. The Consumer and -10dBV settings are typically associated with unbalanced operation for both consumer and prosumer audio gear, with Consumer being less hot (-4dBV) and -10dBV being the least hot.
-
Page 27: S/Pdif Page
"Invalid or Not Present." Below this message are two ‘grayed-out’ buttons: "Coax(RCA)" and "Optical." These are functions of the Delta DiO 2496, another product in the M-Audio Delta line, one with both optical and coaxial S/PDIF inputs. These controls do not apply to the Delta 1010LT. -
Page 28: About Page
If you have Internet browsing capabilities and are currently connected to the Internet, clicking on the Midiman copyright will link you to the M-Audio / Midiman web site. Save, Delete, Load Buttons; H/W Installed At the rightmost side of the Delta Control Panel are the Save, Load and Delete buttons as well as an "installed hardware"... -
Page 29: Delta 1010Lt Control Panel Software - Mac
Delta 1010LT Control Panel Software - Mac The Delta Control Panel must be placed on the hard drive by dragging the application from the Drivers CD. Once this is done, an alias may be created by highlighting the Delta Control Panel on the hard drive and pressing the Apple key+M. Then, this alias may be dragged to the desktop. - Page 30 LEVEL FADERS: Each volume fader may be controlled by dragging the fader ‘handle’ vertically with the mouse, or by clicking on the ‘handle’ to make it active and then adjusting it with the up/down cursor keys of your computer keyboard. Because the mixer has no gain, these faders only attenuate (reduce) the signal levels.
-
Page 31: Patchbay/Router Page
Further to the right are more channels, labeled "H/W In S/PDIF" and "H/W In 1/2." These mixer inputs are audio streams from the physical Delta 1010LT hardware inputs, hence the "H/W" at the front of each label. PAN: Each mixer input may be individually panned anywhere in the stereo output mix. A pan control is positioned directly under each input channel peak meter and has the appearance of a small vertical pointer. - Page 32 3. The third option, "S/PDIF In," connects ports OUT1 and OUT2 directly to the hardware S/PDIF input on the Delta 1010LT PCI host card. The left channel of the S/PDIF In is routed to OUT1 and the right channel of the S/PDIF In is routed to OUT2.
-
Page 33: Hardware Settings Page
hardware S/PDIF output on your Delta 1010LT PCI host card. 2. The second option, "Monitor Mixer," connects the S/PDIF Out port to the outputs of the Delta 1010LT monitor mixer. For more information on the capabilities of the monitor mixer, please see the section "Monitor Mixer Page.” 3. - Page 34 Word Clock is selected as the master clock source, the control panel will display "Locked" only when a valid S/PDIF or Word Clock signal is detected. It will display "Unlocked" when there is no signal at the selected input, or when the signal is corrupt or invalid for any reason.
- Page 35 MULTITRACK DRIVER DEVICES: The Delta 1010LT drivers intelligently synchronize the beginning of recording and playback across all audio devices on the board. When using application software that is capable of using multiple channels simultaneously, select "Single and In-Sync" to ensure that all audio channels will begin playback and/or recording at the same time.
- Page 36 VARIABLE OUTPUT LEVELS: This section has two layers, providing extremely versatile control of your Delta 1010LT’s input and output operating line levels. In the first layer there are three selections available for globally setting the operating line levels for the Delta 1010LT’s analog input and output ports. These selections are labeled “+4dBu,”...
-
Page 37: S/Pdif Page
"Invalid or Not Present." Below this message are two ‘grayed-out’ buttons: "Coax(RCA)" and "Optical." These are functions of the Delta DiO 2496, another product in the M-Audio Delta line, one with both optical and coaxial S/PDIF inputs. These controls do not apply to the Delta 1010LT. - Page 38 About Page The "About" page, while displaying the handsome M-Audio logo and applicable copyright information, also reports the driver version and control panel software version. Save, Delete, Load Buttons; H/W Installed To save your Delta control Panel settings, go to the File menu and select “Save,”or “Save...
-
Page 39: Delta 1010Lt Recording Tutorials
In the upper righthand corner of the control panel is a “H/W Installed” drop-down list. At the time of this writing, the Delta Mac ASIO drivers will support only a single Delta device, and of course the Sound Manager will support only one stereo pair regardless of how many audio cards are installed in your system. - Page 40 NOTE: Because improper connections may potentially make very loud noises, it’s a good idea to have all monitor levels set low or muted while hooking up audio equipment -- you may even choose to turn your computer off before making the connections. 1.
- Page 41 mixer sample rate from being set too low and therefore lowering its frequency response. Select a sample rate in the "CODEC Sample Rate" group to use as this idle sample rate. Choose a 44.1kHz or higher setting for best results, and select the same sample rate you will be using in your application if possible.
- Page 42 9. In the Mixer Input column labeled "WavOut 1/2," click on each fader handle and drag it up to the 0dB setting. Also, deactivate (uncheck) each WavOut 1/2 mute box to unmute the channels. This will allow us, once we’ve recorded into a music software program, to hear those software outputs upon playback.
- Page 43 11. You want to be seeing a good level on the input meters, about –6dB to –3dB in the loudest parts (this is playing it a safe because you don’t want to hit 0dB and “clip” the signal). These are the levels at which the signals will be recorded.
- Page 44 Note: For efficiency’s sake, this step could have taken place while you were setting up the recording track assignments. However, since this step only affects playback and does not affect the recording setup in any way, we’ve placed it here to lessen confusion.
-
Page 45: Typical Setup #2
recorded tracks from the software are being sent to WavOut 1, WavOut 2, WavOut 3, and WavOut 4 simultaneously. Therefore they are all being input to the monitor mixer and their playback levels can be controlled at the corresponding channels of the monitor mixer. Open the Monitor Mixer page of the Delta Control Panel and adjust the levels of the four channels according to your taste. -
Page 46: Transferring From Dat To Delta 1010Lt
Transferring from DAT to Delta 1010LT Delta 1010LT S/PDIF IN MIDI WORDCLOCK 1. Connect the DAT’s coaxial S/PDIF output to the S/PDIF In of the Delta 1010LT PCI host card, using a good quality cable. 2. Connect the 1010LT analog outputs 1 & 2 to some type of amplified sound system. -
Page 47: Transferring From 1010Lt To Dat, Monitoring With Dat
5. In order to monitor the digital signal coming into the 1010LT, switch to the Patchbay/Router page of the control panel software. In the "H/W Out 1/2" column, select the radio button named "S/PDIF In." This will copy all S/PDIF input audio directly over to the analog outputs –... - Page 48 1. Connect the Delta 1010LT’s S/PDIF Out to the DAT’s coaxial S/PDIF Input using a good quality cable. 2. Connect the DAT analog outputs to some type of amplified sound system. The sound system should be equipped with speakers or headphones. 3.
-
Page 49: Troubleshooting
Troubleshooting This section addresses potential problems that can occur in all operating system environments, with emphasis on hardware troubleshooting. Within the PC environment there are a limited number of hardware resources (I/O addresses, IRQs, and DMA channels) available for use. Since audio cards require many resources, most audio card installation problems arise from unavailable or improperly set resources. - Page 50 If relocating your card to another PCI slot does not cure the Delta 1010LT’s conflict(s), then you must do some further investigation to determine the exact nature of the conflict(s). Again, go to the Windows Device Manager, highlight the Delta 1010LT or other devices with conflicts and click the "Properties"...
- Page 51 Address conflicts are rare amongst PCI devices, but if there is no obvious IRQ conflict, why not check for I/O Address conflicts while in the Device Manager? You may view the list of assigned I/O addresses by selecting the "Input/output (I/O)" radio button below the "Interrupt Request (IRQ)"...
-
Page 52: Troubleshooting Tips For Frequently Asked Questions
To change your system to Standard PC mode: 1. Boot into Windows and open the Device Manager. Right-click the + sign next to “Computer.” 2. Double-click the entry that appears under Computer, which should indicate that the computer is in ACPI mode. Click the Driver tab, then click the “Update Driver” button. 3. -
Page 53: Before You Call Midiman/M-Audio Technical Support
‘Hardware Settings Page’ for more information. Before You Call Midiman/M-Audio Technical Support The technical support team at Midiman/M-Audio wants to get you up and running in an efficient and timely manner. To help us help you, please read the... - Page 54 The Midiman/M-Audio web page is also available to you on your drivers CD ROM. There you will find FAQs, Tips & Tricks, and How-To Guides to walk you through installing your product as well as configuring it with some of today’s most popular software...
- Page 55 Sit back, try to relax and then dial. Our top-notch technical support team will be ready to help you fix your problems. Thanks for using Midiman/M-Audio products.
-
Page 56: Appendix A - Technical Specs
Appendix A - Technical Specs Analog Audio Peak Analog Input Signal: +14.2 dBu (+4dBu setting +2.1dBV (-10dBV setting) Peak Analog Output Signal: +14.0dBu (+4dBu setting), +2.0dBV (-10dBV setting) Dynamic Range: Outputs: 101.5 dB (a-weighted), Inputs: 99.6 dB (a-weighted) THD (at 0dBFS): Outputs: less than 0.002%, Inputs:... -
Page 57: Appendix B-If You Use An External Mixer
Appendix B-If You Use An External Mixer... Our main objective is to get the signal we want to record to the Delta 1010LT, and to monitor the outputs from the Delta 1010LT. The 1010LT has a mixer contained on its chip that allows you to mix hardware inputs and software outputs and send it to an analog stereo output pair and/or the S/PDIF out. - Page 58 stereo buss or output. When selecting ‘alt out’ on a channel, it mutes that channel to the stereo buss and redirects it to the alt out buss. This could be viewed as a 2-buss system, and can be used effectively for recording purposes. In our Typical Setup 1 and 2 in the previous section, we used pre-amps to handle the recording.
-
Page 59: Limited Lifetime Warranty
Limited Lifetime Warranty MIDIMAN warrants that this product is free of defects in materials and workmanship under normal use so long as the product is: owned by the original purchaser; the original purchaser has proof of purchase from an authorized MIDIMAN dealer; and the purchaser has registered his/her ownership of the product by sending in the completed warranty card.