Table of Contents
Advertisement
Available languages
Available languages
Quick Links
Advertisement
Table of Contents

Related Manuals for M-Audio AIR 192/6


Summary of Contents for M-Audio AIR 192/6
- Page 1 User Guide English ( 2 – 5 ) Guía del usuario Español ( 6 – 9 ) Guide d'utilisation Français ( 10 – 13 ) Guida per l'uso Italiano ( 14 – 17 ) Benutzerhandbuch Deutsch ( 18 – 21 ) Appendix English ( 22 –...
-
Page 2: Box Contents
Follow the on-screen instructions to install the drivers. Software: We've included Pro Tools | First M-Audio Edition and Ableton Live Lite with your AIR 192|6 so you can get started making music with professional software right out of the box. Register your AIR 192|6 on m-audio.com, and follow the install instructions in your User Account. -
Page 3: Connection Diagram
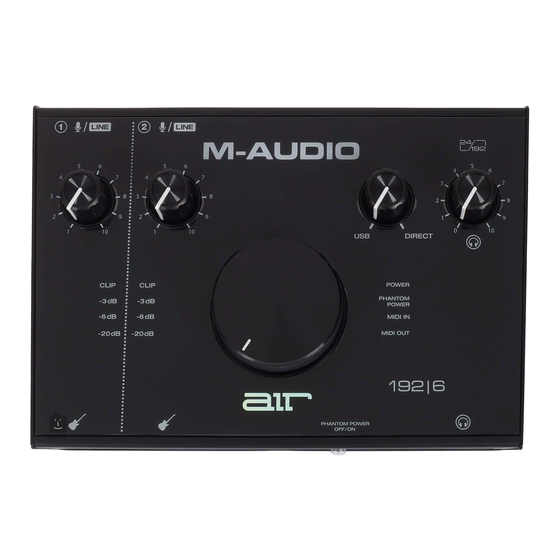
5. Select your Sample Rate and then click OK to close the Setup window. 6. Go to the Setup > I/O and select M-Audio AIR 192|6 for the Input and Output devices. You can now add tracks to send and receive audio and MIDI from sources connected to AIR 192|6 inputs and stream recorded audio back through the AIR 192|6 outputs. - Page 4 Features Top Panel Input Gain: Adjusts the input's gain level. Set this knob so the corresponding Meter (located below knob) displays a "healthy" level during performance—but not so high that the meter "clips" or peaks, causing distortion in the audio. Meters: Indicates input signal level from the...
- Page 5 Rear Panel USB Port (Type C): This connection will allow you to send audio and MIDI data to and from a computer. Use the included USB-C-to-USB-C or USB- C-to-USB-A cables to connect the AIR 192|6 to a computer. The AIR 192|6 requires a USB 2.0 connection (or higher).
-
Page 6: Contenido De La Caja
Siga las instrucciones de la pantalla para instalar los drivers. Software: Hemos incluido Pro Tools | First M-Audio Edition y Ableton Live Lite con su AIR 192|6 de modo que puede comenzar a hacer música con software profesional en cuanto lo saca de la caja. -
Page 7: Conexión Rápida
Seleccione su Sample Rate (Tasa de muestreo) y luego haga clic en OK para cerrar la ventana de configuración. Vaya a Configuración > E/S y seleccione M-Audio AIR 192|6 para los dispositivos de entrada y salida. Ahora puede añadir pistas para enviar y recibir audio y MIDI desde las fuentes conectadas a las entradas del AIR 192|6 y transmitir el audio grabado de regreso por las salidas del AIR 192|6. - Page 8 Características Panel superior Ganancia de entrada: Ajusta el nivel de ganancia de la entrada. Ajuste esta perilla de manera que el LED medidor correspondiente (ubicado debajo de la perilla) muestre un nivel "saludable" durante la ejecución— pero no tan alto que el medidor "recorte"...
- Page 9 Panel trasero Puerto (tipo Esta conexión le permitirá enviar audio y datos MIDI hacia o desde un ordenador. Utilice los cables USB- C–a–USB-C o USB-C–a–USB-A para conectar el AIR 192|6 a un ordenador. El AIR 192|6 requiere una conexión USB 2.0 (o superior). Entradas combinadas: Conecte un micrófono, guitarra o bajo con captador activo o un dispositivo de nivel de línea a esta entrada.
-
Page 10: Contenu De La Boîte
Suivez les instructions à l’écran pour installer les pilotes. Logiciel : Nous avons inclus l’application Pro Tools | First M-Audio Edition et Ableton Live Lite avec l'AIR 192|6 afin que vous puissiez commencer à créer de la musique avec un logiciel de qualité... -
Page 11: Schéma De Connexion
Remarque : Il se peut que vous ayez à sauvegarder et à relancer votre projet. Sélectionnez la fréquence d'échantillonnage, puis cliquez sur OK pour fermer la fenêtre Setup. Accédez au menu Setup > I/O et sélectionnez M-Audio AIR 192|6 pour les périphériques d'entrée et de sortie. -
Page 12: Caractéristiques
Caractéristiques Panneau supérieur Gain d’entrée : boutons permettent d'ajuster le niveau de gain du signal d’entrée. Réglez ces boutons afin que le vumètre DEL (sous le bouton) correspondant affiche un niveau « raisonnable » durant la prestation — mais pas si élevé... - Page 13 Panneau arrière Port USB (type C) : Cette connexion permet de transmettre et de recevoir des signaux audio et des données MIDI vers et depuis un ordinateur. Utilisez le câble USB-C–vers–USB-C ou USB-C–vers–USB-A fourni pour brancher l'AIR 192|6 à un ordinateur. L'AIR 192|6 requiert une connexion USB 2.0 (ou version ultérieure).
-
Page 14: Contenuti Della Confezione
Seguire le istruzioni su schermo per installare i driver. Software: Con l’AIR 192|6 abbiamo incluso il Pro Tools | First M-Audio Edition e Ableton Live Lite in modo da consentirvi di iniziare immediatamente a fare musica con software professionale. Registrare l’AIR 192|6 su m-audio.com, e seguire le istruzioni di installazione nel proprio Account utente. -
Page 15: Schema Dei Collegamenti
Selezionare la Frequenza di campionamento e cliccare su OK per chiudere la finestra di configurazione (Setup). Recarsi su Setup > I/O e selezionare M-Audio AIR 192|6 per i dispositivi di Ingresso e di Uscita. È ora possibile aggiungere tracce per inviare e ricevere audio e MIDI dalle fonti collegate agli ingressi dell’AIR 192|6 e inviare lo streaming dell’audio registrato attraverso le uscite dell’AIR 192|6. - Page 16 Caratteristiche Pannello superiore Gain d'ingresso: regola il livello di guadagno degli ingressi. Impostare questa manopola in modo che il corrispondente misuratore (situato sotto la manopola) mostri a display un livello "sano" durante le esibizioni, ma non un livello tale da provocare "salti"...
- Page 17 Pannello posteriore Porta (tipo questo collegamento consente di inviare audio e dati MIDI da/a un computer. Servirsi dei cavi da USB-C–a–USB-C o da USB-C–a–USB-A in dotazione per collegare l'AIR 192|6 al computer. L'AIR 192|6 richiede un collegamento USB 2.0 (o superiore). Ingressi combo: collegare un microfono, una chitarra o un basso con pickup attivo o un dispositivo a livello di linea a questo ingresso.
- Page 18 3. Befolgen Sie die Anweisungen am Bildschirm, um die Treiber zu installieren. Software: Wir liefern AIR 192|6 mit Pro Tools | First M-Audio Edition und Ableton Live Lite aus, damit Sie Ihre Musikproduktion gleich mit professioneller Software starten können. Registrieren Sie Ihren AIR 192|6 zuerst auf m-audio.com...
- Page 19 Wählen Sie Ihre Abtastrate aus und klicken Sie auf OK, um das Setup-Fenster zu schließen. Gehen Sie zu Setup > I/O und wählen Sie M-Audio AIR 192|6 als Eingabe- und Ausgabegeräte. Sie können jetzt Tracks zum Senden und Empfangen von Audio und MIDI von Quellen hinzufügen, die an die AIR 192|6-Eingänge angeschlossen sind, und die aufgenommenen Audiosignale über die AIR 192|6-...
- Page 20 Funktionen Oberseite 1. Eingangsverstärkung: Passt Verstärkungsfaktor des Eingangs an. Stellen Sie diesen Regler so ein, bis entsprechende LED-Anzeige (unterhalb des Reglers) während der Performance einen "gesunden" Pegel anzeigt. Der Pegel sollte jedoch nicht so hoch sein, dass die Anzeige "clippt" oder Pegelspitzen erreicht werden, Audiosignal verzerren.
- Page 21 Rückseite 1. USB-Port (Typ C): Über diesen Anschluss können Sie Audio- und MIDI-Daten an und vom Computer senden. Verwenden Lieferumfang enthaltenen USB-C- auf-USB-C oder USB-C-auf-USB-A- Kabel, um Ihr AIR 192|6 an einen Computer anzuschließen. AIR 192|6 benötigt einen USB 2.0-Anschluss (oder höher).
-
Page 22: Technical Specifications
Appendix (English) Technical Specifications All specifications are measured at 20 kHz bandwidth. Specifications are subject to change without notice. Mic Inputs 1-2 (balanced XLR) Frequency Response 20 Hz – 20 kHz (+0.1 dB) Dynamic Range 104 dB (A-weighted) Signal-to-Noise Ratio 104 dB (+1.0 dBu, A-weighted) 0.002% THD+N... -
Page 23: Trademarks And Licenses
2.1 lbs. 0.95 kg Trademarks and Licenses M-Audio and AIR Music Tech are trademarks of inMusic Brands, Inc., registered in the U.S. and other countries. Windows is a registered trademark of Microsoft Corporation in the United States and other countries. - Page 24 Manual Version 1.0...