Table of Contents
Advertisement
Advertisement
Table of Contents

Related Manuals for Honda HS35


Summary of Contents for Honda HS35
- Page 2 HONDA SNOW THROWER The high-performance HS 35 is designed be compact and light. It is engineered for ease of handling and safety. BEFOREUSINGTHE SNOWTHROWER,READTHEINSTRUCTIONS ON SAFETYANDCLEARLYUNDERSTANDTHEPROPER‘OPERAT- INGPROCEDURE. Pay special attention to statements preceded by the following words: Indicates a strong possibility of severe personal injury or loss of life if instructions are not followed.
-
Page 3: Table Of Contents
SAFETY INSTRUCTIONS-OBSERVE THESE PRECAUTIONS ........WARNING LABEL LOCATION ....... LEARN THE NAMES OF COMPONENTS AND THEIR OPERATIONS ........Engineswitchknob ....... Fuelvalveknob ............... Chokeknob Chute crank ........Starter grip ........Auger clutch lever ........ Chuteguide ........ITEMS TO BE CHECKED BEFORE STARTING ENGINE... -
Page 4: Safety Instructions-Observe These Precautions
SAFETY INSTRUCTIONS OBSERVE THESE PRECAUTIONS. Before operating the snowthrower, inspect the area in which you are going to clear snow. Remove debris and other obstacles the snowthrower might strike or throw, as that may cause injury or damage to the snowthrower. Inspect the snowthrower before operating it. - Page 5 Adjust the snow discharge chute to avoid hitting the operator, bystanders, windows, and other objects with thrown snow. Stay clear of the snow discharge chute while the engine is running. Children and pets must be kept away from the area of operation to avoid injury from flying debris and contact with the snowthrower.
- Page 6 Never permit anyone to operate the snowthrower without proper instruction. If people or pets suddenly appear in front of the snowthrower while it is in opera- tion, immediately release the auger clutch lever to stop the snowthrower and avoid possible injury from rotating auger blades. If the snow discharge chute becomes clogged, stop the engine and use a wooden stick to unclog it.
- Page 7 Gasoline is extremely flammable and is explosive under certain conditions. Do not smoke or allow flames or sparks where the snowthrower is refueled or where gasoline is stored. Refuel in a well-ventilated area with the engine stopped. Do not overfill the fuel tank, and make sure the filler cap is closed securely after refueling. Never run the engine in a closed garage or confined area.
-
Page 8: Warning Label Location
WARNING LABEL LOCATION AWARNING I STAND CLEAR AUGER EA;; CHUTE WHILE DISCHARGE INE IS RUNNING. I DO DIRECT DISCHARGE BYSTANDERS OR WINDOW. I BEFORE LEAVING OPERATOR’S POSITION 1. DISENGAGE THROWER CLUTCH. 2. STOP ENGINE. I STOP ENGINE, WAIT FOR A11 MOVEMENT TO STOP AND REMOVE SPARK PLUG IG- NITION WIRE BEFORE SERVICING MACHINE. -
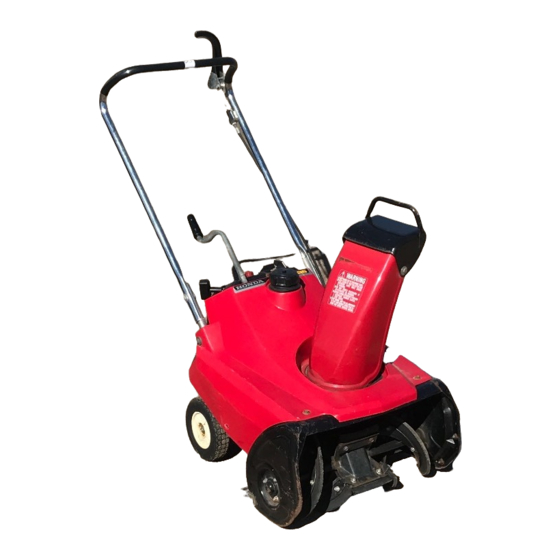
Page 9: Learn The Names Of Components And Their Operations
LEARN THE NAMES OF COMPONENTS AND THEIR OPERATIONS. Starter grip Auger clutch lever Fuel cap Chute Spark plug cover Auger rubber1 Blower rubber 1 IAuger housing guard... - Page 10 Chute guide handle Chute 1 guide Oil filler cap and dipstick...
-
Page 11: Engineswitchknob
ENGINE SWITCH KNOB Use the engine switch to START and STOP the engine. M--yON’(Op;rating Engine switch knob FUEL VALVE KNOB This knob opens and closes the fuel line leading from the fuel tank tb the carburetor. Make sure that the knob is positioned exactly on either the ON or OFF position. -
Page 12: Chokeknob
CHOKE KNOB Use the choke knob when the engine is cold or difficult to start. OPEN Choke knob CHUTE CRANK Use the chute crank to turn the snow discharge chute right or left. CHUTE CRANK To throw snow To throw snow &, to the right... -
Page 13: Starter Grip
STARTER GRIP Pull this grip to start the engine. AUGER CLUTCH LEVER When the clutch lever is squeezed, the snow throwing mechanism is put into operation, and the snow thrower moves forward. Operates stops Auge; clutch lever NOTE: Never squeeze auger clutch on cleared ground; the snow thrower will start suddenly. -
Page 14: Chuteguide
CHUTE GUIDE The chute guide controls the snow discharge angle. High and far Low and... -
Page 15: Items To Be Checked Before Starting The Engine
If spark knock or pinging persists, consult your authorized Honda dealer. Failure to do so is considered misuse, and damage caused by misuse is not covered by Honda’s... - Page 16 NOTE: Fuel system damage or engine performance problems resulting from the use of fuels that contain alcohol is not covered under the warranty. Honda cannot endorse the use of fuels containing methanol since evidence of their suitability is as yet incomplete.
-
Page 17: Engine Oil Level
Running the engine with insufficient oil can cause serious engine damage. 4-stroke, or an equivalent high detergent, premium quality motor oil HONDA certified to meet or exceed U.S.. automobile manufacturers’ requirements for service classification SE. (Motor oils classified SE will show this designation on the container.) -
Page 18: Starting Instructions
STARTING INSTRUCTIONS. 1. Turn the engine switch to the ON position. -T- \ / .---l ‘L.-l Engine switch 2. Turn the fuel valve to the ON position. Fuel valve... - Page 19 3. In cold weather and when the engine is cold, turn the choke knob to the CLOSE position. OPEN Choke knob 4. Pull starter grip lightly until you feel resistance, the? pull briskly. NOTE: Don’t allow the rope to snap back; return it ge’ntly by hand.
- Page 20 5. Let the engine warm up for several minutes. If the choke has been turned to the CLOSE position, return it gradually to the OPEN position as the engine warms up. OPEN- /-----I Choke knob...
-
Page 21: Clearing Snow - The Proper Way
CLEARING SNOW - THE PROPER WAY. Before operating the snow thrower, please read the following instructions on its safe operation: THE CORRECT PROCEDURE FOR OPERATING THE SNOW THROWER 1. Hold the handle firmly with your right hand. 2. When you squeeze the auger clutch lever with your left hand, the snow-throwing mechanism will commence operation. - Page 22 High Altitude Operation When operating this snowthrower at high altitude the air-fuel mixture becomes overly rich and engine performance may be reduced and fuel consumption creased. See your authorized HONDA dealer for high altitude adjustment.
- Page 23 5. When the temperature is high, and the snow is wet and heavy, operate at reduced speed. .\2’\ /‘,/ /* ‘/ ,\;-- ’ I \ * Walk the snow thrower slowly to remove hard or deep snow. Push handle for addi- tional traction and overlap each swath if necessary.
-
Page 24: Stopping The Engine - The Proper Way
If you always operate the snow thrower at altitudes higher than 6,000 feet above sea level, have your authorized Honda Snow Thrower dealer perform these carburetor modifications. Even with suitable carburetor jetting, engine horsepower will decrease approximately 3.5% for each 1,000 foot increase... -
Page 25: Periodic Maintenance
Check to see that the rubber parts of the auger and auger housing guard are in good condition, If there are any problems, see your authorized HONDA dealer. Rubber parts ,Auger housing guard of the auger and blower CHECK DURING THE FIRST MONTH OF OPERATION: * Check the rubber parts of the auger and blower. -
Page 26: Check Periodically
Combustion chamber (1) These parts may require more frequent inspection and replacement under heavy use. NOTE: (2) These items should be serviced by an authorized Honda dealer, unless the owner has proper tools and is mechanically proficient. Honda Shop Manual. -
Page 27: Maintenance Procedures
MAINTENANCE PROCEDURES. remove the high tension wire top the engine of the snow thrower, from the spark plug, and place it on a level surface before checking or performing maintenance service. TOOLS A spark plug wrench and handle are supplied with the snow thrower. Some of the maintenance procedures described in this manual will require a set of metric wrenches... -
Page 28: Engine Oil Change
ENGINE OIL CHANGE If the engine oil is dirty, engine wear will occur more rapidly. Change the oil at desig- nated intervals. Maintain the oil at the proper lev’el. OIL CHANGE INTERVAL: Every year, before operation. RECOMMENDED OIL: Use oil of API service classification SE, SAE 5W-30. -
Page 29: Spark Plug'- Cleaning And Adjustment
SPARK PLUG - CLEANING ADJUSTMENT The spark plug must be periodically cleaned and adjusted to provide reliable ignition. INTERVAL AT WHICH THE SPARK PLUG MUST BE CLEANED: Every year, before operation. CLEANING PROCEDURE: 1. First remove the spark plug cover and plug cap. 2. -
Page 30: Auger Clutch Cable - Adjustment
AUGER CLUTCH CABLE - ADJUSTMENT The auger clutch cable must be correctly adjusted. Otherwise, the belt will slip and the snow-throwing mechanism will not operate. ADJUSTMENT INTERVAL: Every year before operation, or when the auger will not operate when the auger clutch lever is squeezed firmly. HOW TO MAKE THE ADJUSTMENT: 1. -
Page 31: Augerrubberparts-Replacement
AUGERRUBBERPARTS-REPLACEMENT When the rubber parts of the auger wear out, the snow thrower’s efficiency will decline and it will cease to move ahead. REPLACEMENT INTERVAL: Every 5 years, or when the machine ceases to move forward or its snow throwing efficiency declines. CHECKING: When the distance from the auger shaft to the edge of the auger rubber is worn to less than 87 mm (3.4 in), replace it. - Page 32 4. Replace bolts and nuts with new ones if rusted or cross-threaded. 5. Install bolts with nuts ?n marked side, as shown on page 30. e sure to tighten bolts and nuts securely. Loose or missing fasteners can cause damage to equipment or serious personal injury. NOTE: Adjust the scraper whenever auger and auger rubbers are replaced.
-
Page 33: Auger Housing Guard - Adjustment And Replacement
AUGER HOUSING GUARD/SCRAPER ADJUSTMENT PLACEMENT If the auger housing guard and the scraper are de.formed or improperly adjusted, the snow thrower will not clear the snow evenly. REPLACEMENT INTERVAL: Replace the auger housing guard and the scraper every 5 years, or whenever the auger rubbers are replaced. -
Page 34: Preparing Snow Thrower For Storage
PREPARING SNOW THROWER FOR STORAGE. At the end of the season, before storing the snow thrower, perform the following: 1. Drain gasoline from the fuel tank and carburetor. 2. Turn the fuel valve to the ON position. 3. Place a drain pan under the rear cover as shown, and drain fuel from the fuel system by turning the carburetor drain screw counterclockwise. - Page 35 Remove the spark plug and pour three tablespoonful of clean motor oil into the cylin- der. Pull the starter rope slowly two or three times to distribute the oil. Reinstall the spark plug. Pull the starter grip until resistance is felt. This closes the valves and protects them from dust and corrosion.
-
Page 36: How To Fold The Handle Of The Snow Thrower
HOW TO FOLD THE HANDLE OF THE SNOW-THROWER. The handle can be folded to save storage space. 1. Adjust the chute to face straight ahead and raise the chute guide. 2. Loosen the bolts of the handle joints. 3. Fold the handle forward. Make sure that you don’t tangle the auger clutch cable on the lower of the handle. - Page 37 Prior to extended storage, lubricate the parts indicated.
-
Page 38: Troubleshooting
TROUBLE SHOOTING. ENGINE DOES NOT START * Is there gasoline in the fuel tank? * Are you starting the engine in accordance with instructions in the Owner’s Manual? * Does the spark plug spark? To test the plug, remove the plug cover and plug. At- tach the high-tension wire to the plug cap. - Page 39 Auger housing Adjustment (P.32) The chute is hard to move or will Disassemble and clean the chute not move at all. Apply grease * For repair work, see your authorized HONDA dealer.
-
Page 40: Ordering Replacement Parts
ORDERING REPLACEMENT PARTS. When ordering replacement parts, always specify model, serial number, part num- ber, description and quantity required. J G, \ \ \ FLANGE BOLT 6x20 95700-06020-08 2243 I-727-003 72552-730-003 72521-730-003... -
Page 41: Specifications
SPECIFICATIONS. Engine HONDA engine G 150 Model: 3.5 HP/3,600 r.p.m. Maximum output: Displacement: 144 cm3 (8.8 cu in) Bore x stroke: 64 x 45 cm (2.52 x 1.77 in) Starting method: Manual (Recoil starter) Ignition system: C.D.1 Oil capacity: 0.7 liter (0.74 US qt, 0.62 Imp qt) Fuel tank capacity: 1.3 liter (1.14 US qt, 1.37 Imp qt) - Page 42 Your purchase of a Honda product is greatly appreciated by both your dealer and American Honda Motor Co., Inc. We want assist you in every way possible to assure your complete satisfac- tion with your purchase.
- Page 43 When you write or call, please provide the following information: • Model and serial numbers • Name of the dealer who sold the Honda power equipment to you • Name and address of the dealer who services your equipment •...