Table of Contents
Advertisement
Table of Contents
Introduction . . . . . . . . . . . . . . . . . . . . . . . . . . . . . . . . . . . . . . . . . . . . . . . .2
What's in the Box? . . . . . . . . . . . . . . . . . . . . . . . . . . . . . . . . . . . . . . . . . . .2
Product Features & Specifications . . . . . . . . . . . . . . . . . . . . . . . . . . . . . . . .3
Minimum System Requirements . . . . . . . . . . . . . . . . . . . . . . . . . . . . . . . . .3
PCI Adapter Card and Break-Out Cable: . . . . . . . . . . . . . . . . . . . . . . . . . . .4
Quick Guide to Getting Started . . . . . . . . . . . . . . . . . . . . . . . . . . . . . . . . . .5
Hardware Installation . . . . . . . . . . . . . . . . . . . . . . . . . . . . . . . . . . . . . . . . .5
Audiophile 2496 Driver & Software Installation . . . . . . . . . . . . . . . . . . . . .6
Windows 98 Installation . . . . . . . . . . . . . . . . . . . . . . . . . . . . . . . . . . . .6
Windows 95 Installation . . . . . . . . . . . . . . . . . . . . . . . . . . . . . . . . . . . .7
Windows NT Installation . . . . . . . . . . . . . . . . . . . . . . . . . . . . . . . . . . .8
Macintosh Installation . . . . . . . . . . . . . . . . . . . . . . . . . . . . . . . . . . . . .8
Verifying Windows Driver Installation . . . . . . . . . . . . . . . . . . . . . . . . . . .10
Verifying Delta Control Panel Installation, PC & Mac . . . . . . . . . . . . . . . .11
Audiophile 2496 System Overview . . . . . . . . . . . . . . . . . . . . . . . . . . . . . .11
Audiophile 2496 Analog Input/Outputs . . . . . . . . . . . . . . . . . . . . . . . .11
The Digital Monitor Mixer . . . . . . . . . . . . . . . . . . . . . . . . . . . . . . . . .12
The Patchbay / Router . . . . . . . . . . . . . . . . . . . . . . . . . . . . . . . . . . . .12
Synchronization . . . . . . . . . . . . . . . . . . . . . . . . . . . . . . . . . . . . . . . . .12
Using the Audiophile 2496 with your Software Application . . . . . . . . . . .13
Audiophile 2496 Control Panel Software . . . . . . . . . . . . . . . . . . . . . . . . . .16
Monitor Mixer Page . . . . . . . . . . . . . . . . . . . . . . . . . . . . . . . . . . . . . .17
Patchbay/Router Page . . . . . . . . . . . . . . . . . . . . . . . . . . . . . . . . . . . . .19
Hardware Settings Page . . . . . . . . . . . . . . . . . . . . . . . . . . . . . . . . . . .21
S/PDIF Page . . . . . . . . . . . . . . . . . . . . . . . . . . . . . . . . . . . . . . . . . . . .24
Save, Delete, Load Buttons; H/W Installed . . . . . . . . . . . . . . . . . . . . .26
Audiophile 2496 Recording Tutorial . . . . . . . . . . . . . . . . . . . . . . . . . . . . .27
Typical Setup . . . . . . . . . . . . . . . . . . . . . . . . . . . . . . . . . . . . . . . . . . . . . .27
Transferring from DAT to Audiophile 2496 . . . . . . . . . . . . . . . . . . . .28
Audiophile 2496 MIDI Setup . . . . . . . . . . . . . . . . . . . . . . . . . . . . . . . . . .30
Troubleshooting Tips for Frequently Asked Questions . . . . . . . . . . . . . . . .31
Appendix A - Technical Specs . . . . . . . . . . . . . . . . . . . . . . . . . . . . . . . . . .33
Limited Lifetime Warranty . . . . . . . . . . . . . . . . . . . . . . . . . . . . . . . . . . . .34
. . . . . . . . . . . . . . . . . . . . . . . . . . . . . . . . . . . . . . . . . . . .26
Advertisement
Table of Contents

Related Manuals for M-Audio Delta Audiophile 2496


Summary of Contents for M-Audio Delta Audiophile 2496
-
Page 1: Table Of Contents
Table of Contents Introduction ..........2 What’s in the Box? . -
Page 2: Introduction
Introduction Congratulations on your purchase of the Audiophile 2496. The Audiophile 2496 is a part of the “Delta” series of digital recording systems and interfaces, designed and manufactured by M Audio, and therefore benefits from the same solid hardware and software driver technology as the other members of the Delta series. -
Page 3: Product Features & Specifications
The Audiophile 2496’s break-out cable also includes MIDI I/O connectors. Provided are one input and one output for use with external MIDI equipment, such as sound modules and drum machines. The MIDI I/O may also be used to synchronize your computer to external devices via MIDI time code. Within the Audiophile’s PCI chip is a hardware digital mixer. -
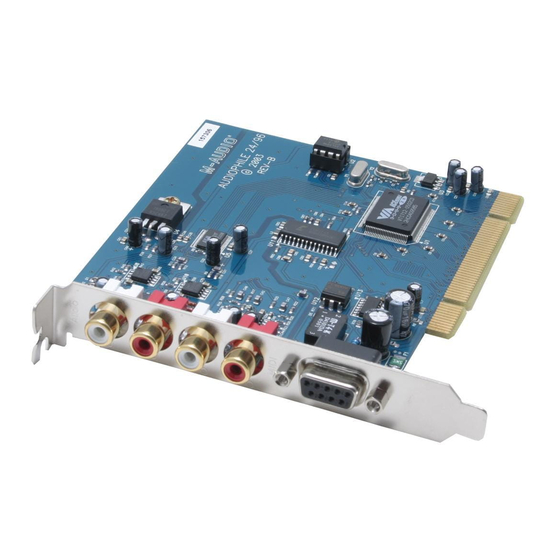
Page 4: Pci Adapter Card And Break-Out Cable
PCI Adapter Card and Break-Out Cable: 1. Analog INS 1&2: These jacks input analog audio from a variety of external sources. Each jack is female RCA, compatible with common male RCA cables. During stereo operation, the IN1 jack (with white-colored insert) is the left audio channel and IN2 (with red-colored insert) is the right audio channel. -
Page 5: Quick Guide To Getting Started
Quick Guide to Getting Started Here is what is required to get your Audiophile 2496 up and running: 1. Physically install the Audiophile 2496 card in your computer and connect the provided break-out cable (see ‘Hardware Installation’). 2. Start Windows and allow Windows’ Plug-and-Play to prompt you for the Audiophile 2496 drivers via the Add New Hardware wizard. -
Page 6: Audiophile 2496 Driver & Software Installation
6. Position the Audiophile 2496 PCI host card over the target PCI slot and fit the card loosely over it with the card in the upright position. Press the card gently but firmly downward into the slot until the card is completely and squarely seated in the slot. -
Page 7: Windows 95 Installation
2. The ‘Add New Hardware Wizard’ will now ask how to locate the driver. “Search for the best driver for your device” is already selected. Click ‘Next>’. 3. Windows will give you a selection of locations to search. Make sure that only “Choose a Path”... -
Page 8: Windows Nt Installation
Windows NT Installation 1. Power up your computer after physically installing the Audiophile 2496 card. 2. Go to Start | Settings | Control Panel and double click on ‘Multimedia.’ Click the ‘Devices’ tab, then click the ‘Add’ button. 3. “Unlisted or Updated Driver” will be highlighted at the top of the list. Click OK. 4. - Page 9 6. Go to the Apple menu |Control Panel | Sound. You should see the “built-in” sound icon, plus the Delta icon if your Audiophile 2496 is properly installed. If your music program does use ASIO, leave the Sound Manager driver set to “built-in”...
-
Page 10: Verifying Windows Driver Installation
Verifying Windows Driver Installation Windows displays the Audiophile 2496 driver status in the Device Manager page of the System Properties dialog box. The Device Manager page is opened via the Windows Start button: select Start | Settings | Control Panel | System | Device Manager. -
Page 11: Verifying Delta Control Panel Installation, Pc & Mac
Verifying Delta Control Panel Installation, PC & Mac In Windows, open the Windows Control Panel (do so via Start | Settings | Control Panel). If your Audiophile 2496 hardware and Delta Control Panel software are properly installed, the Windows Control Panel should display an “M Audio Delta H/W”... -
Page 12: The Digital Monitor Mixer
The Digital Monitor Mixer The Audiophile 2496 Digital Recording System has a hardware digital audio mixer built into its PCI controller chip. It accepts digital audio streams from all hardware inputs and all outgoing software audio devices, mixes them with 36-bit internal precision and then provides the mixed output to the analog outputs (H/W OUT1/OUT2 as a stereo pair) and/or the S/PDIF outputs. -
Page 13: Using The Audiophile 2496 With Your Software Application
For advanced users, the S/PDIF In option may be used to operate the Audiophile 2496 at non-standard sample rates. When the Audiophile is set to derive its master clock from S/PDIF In, the Audiophile’s sample rate will automatically match that of the incoming S/PDIF data stream. - Page 14 WINDOWS MME AUDIO OUTPUT DEVICES: All Audiophile 2496 analog and S/PDIF outputs may be used simultaneously for a total of 4 output channels. Within your software application(s), the names of the Audiophile 2496 audio output devices are: WavOut 1/2 Delta-AP WavOut S/PDIF Delta-AP “AP”...
- Page 15 Delta-AP1 Delta-AP2 Delta-AP S/PDIF L Delta-AP S/PDIF R Delta-AP Mon.Mixer L Delta-AP Mon.Mixer R Notice the S/PDIF In and Monitor Mixer names include “L” and “R” characters. “L” indicates the left channel of the stereo stream, while “R” indicates right channel. ASIO DRIVER OUTPUT DEVICES: The Audiophile 2496’s ASIO output devices appear in stereo pairs.
-
Page 16: Audiophile 2496 Control Panel Software
Audiophile 2496 Control Panel Software ON THE PC: Once the Audiophile 2496 is properly installed, an “M Audio Delta H/W” icon will be displayed in your Windows Control Panel. By double-clicking on that icon, you will launch the Delta Control Panel software. You may also launch the Delta Control Panel software from the desktop if you have previously created a shortcut there (see “Verifying Delta Control Panel Software Installation”... -
Page 17: Monitor Mixer Page
Monitor Mixer Page The Monitor Mixer is the first page that appears when the Delta Control Panel is opened, and controls the digital mixer built into the Audiophile 2496’s PCI controller chip. As described in previous sections, the output of this mixer may be assigned to the OUT1/OUT2 analog outputs and/or the S/PDIF Out digital output. - Page 18 PEAK METERS: Each peak meter indicates an audio signal level in “dB relative to full-scale.” This means that a full-scale signal is referred to as “0 dB” and a signal that is 12dB ‘quieter’ than full-scale is referred to as “-12dB.” The meters are vertically color-coded into three sections: green, yellow and red.
-
Page 19: Patchbay/Router Page
from the physical Audiophile 2496 hardware inputs, hence the “H/W” at the front of each name. On the Mac, these inputs are labeled “SM/ASIO”, as these software streams will be receiving their digital audio either from the Sound Manager or the ASIO driver, depending on your selection. - Page 20 hardware analog stereo pair to one of five stereo sources: 1. The default setting, “WavOut 1/2”, connects ports OUT1 and OUT2 to your music software or Windows multimedia applet. In other words, when music software plays audio to the device named “WavOut 1/2 Delta-AP” it will be routed directly to the Audiophile hardware analog output jacks.
-
Page 21: Hardware Settings Page
The next vertical column of Patchbay/Router page, “H/W Out S/PDIF,” connects the Audiophile’s hardware S/PDIF output to one of five stereo sources: 1. The default setting, “WavOut S/PDIF,” connects the S/PDIF Out port to your music software or Windows multimedia applet. In other words, when music software plays audio to the device named “WavOut S/PDIF Delta-AP”... - Page 22 S/PDIF In stream. NOTE: If “S/PDIF In” is selected as the master clock source, be sure to supply a valid S/PDIF signal to the board’s active S/PDIF input. Otherwise, erratic timing and/or improper sample rates will be experienced. Once a master clock source has been selected, its synchronization status is continually monitored and displayed below the master clock radio buttons.
- Page 23 NOTE: When S/PDIF In is the master clock source, the digital monitor mixer will run at the sample rate received at the S/PDIF Since frequency response and sample rate are directly related, the mixer frequency response will be directly related to the sample rate of the S/PDIF input data.
-
Page 24: S/Pdif Page
selection, go to the File menu and “Save as Preferences.” VARIABLE SIGNAL LEVELS: The options in this section allow the user to match the Audiophile analog output levels to the operating signal levels of external audio equipment. Two level selections are available: ‘Consumer’ and -10dBV. The ‘Consumer’... - Page 25 with both optical and coaxial S/PDIF inputs. These controls do not apply to the Audiophile 2496. DIGITAL OUTPUT FORMAT: Within the “Digital Output Format” group, you choose the digital audio format of the S/PDIF output. The default setting, “Consumer,” is a true S/PDIF format and is recognized by all consumer devices. The alternate “Professional”...
-
Page 26: About Page
you for some reason must send AC-3 in professional mode, be sure to set the Data Type to “Non-Audio” for the same reasons outlined in the above paragraph. Professional Format Advanced Settings (Emphasis): The user may choose to indicate or not indicate if pre-emphasis has been applied to the outgoing digital audio signal. -
Page 27: Audiophile 2496 Recording Tutorial
“Save,”or “Save as.” A dialog box will appear, prompting you to name the current configuration. Once you have done so, click the Save button. To save the current settings as your default, go to the File menu and choose “Save as Preferences.” In the upper right-hand corner of the control panel is a “H/W Installed”... -
Page 28: Transferring From Dat To Audiophile 2496
The example below may at first look long and laborious, but you will find that most of the settings are factory defaults and will rarely need to be modified. Transferring from DAT to Audiophile 2496 1. Connect the DAT’s coaxial S/PDIF output to the S/PDIF In of the Audiophile 2496 break-out cable, using a good quality cable. -
Page 29: Transferring From Audiophile 2496 To Dat, Monitoring With Dat
monitor mixer will be completely bypassed. Once this assignment is made, you may play the DAT material at any time and verify that it is making it into the Audiophile 2496 successfully, by listening to the sound system. This can be done regardless of whether or not your recording software is open. -
Page 30: Audiophile 2496 Midi Setup
Audiophile 2496 MIDI Setup The Audiophile’s MIDI input and output ports may be connected to external MIDI devices. The diagram below shows connection to a MIDI controller keyboard, which is also being used as a sound module. The MIDI output of the Audiophile 2496 may be used with just a sound module, while the MIDI input may alternately be used to receive MIDI timecode for synchronization purposes. -
Page 31: Troubleshooting Tips For Frequently Asked Questions
Troubleshooting Tips for Frequently Asked Questions Problem: No Sound. Possible Cause 1: The Audiophile 2496 hardware or software device drivers are not properly installed. See the installation sections of this manual for further information. Possible Cause 2: There is a resource conflict between the Audiophile 2496 and another device in your computer. - Page 32 a card calibration (sometimes called “profiling”) the first time you use the software with a new audio card. Possible Cause 3: Some accelerated graphics cards use excessive amounts of system bandwidth, preventing the recording buffer of an audio card from keeping up with demand.
-
Page 33: Appendix A - Technical Specs
Appendix A - Technical Specs Analog Audio Peak Analog Input Signal: +2dBV. Peak Analog Output Signal: +2dBV (Consumer setting), -4dBV (-10dBV setting). Max Converter Data Width: 24 bits. Dynamic Range: Outputs: 104dB (a-weighted). Inputs: 100.4dB (a-weighted). THD (at 0dBFS): less than 0.002%, Frequency Response: 22Hz - 22kHz, -0.4,-0.4dB. -
Page 34: Limited Lifetime Warranty
Limited Lifetime Warranty MIDIMAN warrants that this product is free of defects in materials and workmanship under normal use so long as the product is: owned by the original purchaser; the original purchaser has proof of purchase from an authorized MIDIMAN dealer;...