M-Audio Digital Recording Interface Delta 44 Instruction Manual
Digital recording interface
Hide thumbs
Also See for Digital Recording Interface Delta 44:
- Quick start manual (10 pages) ,
- Quick start manual (8 pages)
Table of Contents
Advertisement
Delta 44 Manual
D44-110801
version:
Table of Contents
Introduction . . . . . . . . . . . . . . . . . . . . . . . . . . . . . . . . . . . . . . . . . . . . . . . .2
What's in the Box? . . . . . . . . . . . . . . . . . . . . . . . . . . . . . . . . . . . . . . . . . . .2
Product Features & Specifications . . . . . . . . . . . . . . . . . . . . . . . . . . . . . . . .3
Minimum System Requirements . . . . . . . . . . . . . . . . . . . . . . . . . . . . .3
Break-Out Box Front Panel: . . . . . . . . . . . . . . . . . . . . . . . . . . . . . . . . .4
Break-Out Box Back Panel: . . . . . . . . . . . . . . . . . . . . . . . . . . . . . . . . .4
PCI Host Adapter Card: . . . . . . . . . . . . . . . . . . . . . . . . . . . . . . . . . . . .4
Quick Guide to Getting Started . . . . . . . . . . . . . . . . . . . . . . . . . . . . . . . . . .4
Hardware Installation . . . . . . . . . . . . . . . . . . . . . . . . . . . . . . . . . . . . . . . . .5
Delta Driver & Software Installation . . . . . . . . . . . . . . . . . . . . . . . . . . . . . .6
Windows NT 4.0 Installation . . . . . . . . . . . . . . . . . . . . . . . . . . . . . . . .7
Windows NT 3.51 Installation . . . . . . . . . . . . . . . . . . . . . . . . . . . . . . .8
Macintosh Installation . . . . . . . . . . . . . . . . . . . . . . . . . . . . . . . . . . . . .8
Verifying Windows Driver Installation . . . . . . . . . . . . . . . . . . . . . . . . . . . .9
Delta System Overview . . . . . . . . . . . . . . . . . . . . . . . . . . . . . . . . . . . . . . .10
Delta's Analog Input/Outputs . . . . . . . . . . . . . . . . . . . . . . . . . . . . . . .10
The Digital Monitor Mixer . . . . . . . . . . . . . . . . . . . . . . . . . . . . . . . . . . . .11
The Patchbay / Router . . . . . . . . . . . . . . . . . . . . . . . . . . . . . . . . . . . .11
Synchronization . . . . . . . . . . . . . . . . . . . . . . . . . . . . . . . . . . . . . . . . .12
Using the Delta 44 with your Software Application . . . . . . . . . . . . . . . . . .12
Delta 44 Control Panel Software . . . . . . . . . . . . . . . . . . . . . . . . . . . . . . . .14
Monitor Mixer Page . . . . . . . . . . . . . . . . . . . . . . . . . . . . . . . . . . . . . .15
Patchbay/Router Page . . . . . . . . . . . . . . . . . . . . . . . . . . . . . . . . . . . .17
S/PDIF Page . . . . . . . . . . . . . . . . . . . . . . . . . . . . . . . . . . . . . . . . . . .21
About Page . . . . . . . . . . . . . . . . . . . . . . . . . . . . . . . . . . . . . . . . . . . .21
Save, Delete, Load Buttons; H/W Installed . . . . . . . . . . . . . . . . . . . .22
Delta 44 Recording Tutorials . . . . . . . . . . . . . . . . . . . . . . . . . . . . . . . . . . .22
Typical Setup #1 . . . . . . . . . . . . . . . . . . . . . . . . . . . . . . . . . . . . . . . .23
Typical Setup #2 . . . . . . . . . . . . . . . . . . . . . . . . . . . . . . . . . . . . . . . .29
Troubleshooting . . . . . . . . . . . . . . . . . . . . . . . . . . . . . . . . . . . . . . . . . . . .32
Troubleshooting Tips for Frequently Asked Questions . . . . . . . . . . . .35
Appendix A - Technical Specs . . . . . . . . . . . . . . . . . . . . . . . . . . . . . . . . . .36
Appendix B -If You Use An External Mixer... . . . . . . . . . . . . . . . . . . . . . .37
Limited Lifetime Warranty . . . . . . . . . . . . . . . . . . . . . . . . . . . . . . . . . . . .39
. . . . . . . . . . . . . . . . . . . . . . . . . . . .2
. . . . . . . . . . . . . . . . . . . . . . . . . . . . . . . . . . .6
. . . . . . . . . . . . . . . . . . . . . . . . . . . . . . . . . . .7
. . . . . . . . . . . . . . . . .10
Advertisement
Table of Contents
Troubleshooting

Related Manuals for M-Audio Digital Recording Interface Delta 44


Summary of Contents for M-Audio Digital Recording Interface Delta 44
-
Page 1: Table Of Contents
Delta 44 Manual D44-110801 version: Table of Contents Introduction ..........2 What’s in the Box? . -
Page 2: Introduction
Introduction Congratulations on your purchase of the Delta 44 Digital Recording Interface designed and built by M Audio. Even if you are experienced in digital recording, please take the time to read this manual. It will give you valuable information on installing your new card and the supporting software, plus help you to fully understand the function and use of the Delta 44. -
Page 3: Product Features & Specifications
Product Features & Specifications • 4x4 24-bit/96khz full-duplex recording interface. • PCI host card with external break-out box. • 4x4 analog I/O accepts balanced or unbalanced connections on 1/4” TRS jacks. • Analog I/O configurable for +4dBu, Consumer (approximately -4dBV), and -10dBV signal levels. -
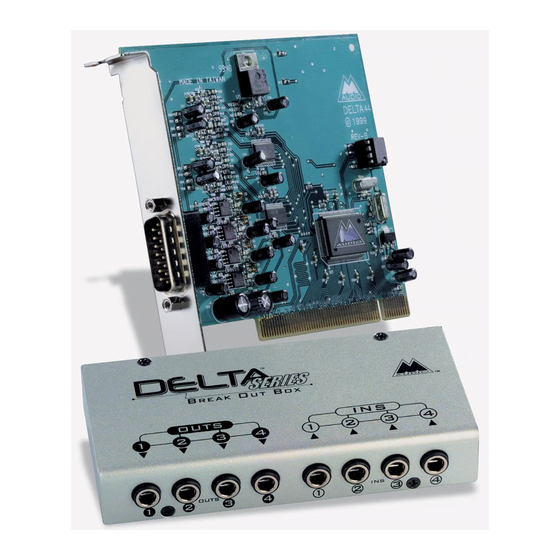
Page 4: Break-Out Box Front Panel
Break-Out Box Front Panel: 1. Analog OUTS 1-4: These jacks output analog audio to a variety of external sources. Each jack is 1/4” TRS (Tip-Ring-Sleeve) and is compatible with 1/4” TRS (balanced) or TS (Tip-Sleeve unbalanced) connections. 2. Analog INS 1-4: These jacks input analog audio from a variety of external sources. -
Page 5: Hardware Installation
2. Start Windows and allow Windows’ Plug-and-Play to prompt you for the Delta 44 drivers via the Add New Hardware wizard. Install drivers and support software (see ‘Windows Software Installation’). 3. On the Mac, drag the Delta extension to the Extensions folder, and the appropriate ASIO driver to your application’s ASIO folder. -
Page 6: Delta Driver & Software Installation
With your computer turned off: 9. Place the Delta 44 break-out box on a desktop in a convenient but secure place, or mount the unit in a 19” rack-mount chassis. accomplished with a universal rack-mount tray, using a 5mm screw through the tray and into the mounting hole on the bottom of the Delta 44 break-out box. -
Page 7: Windows 95 Installation
5. Windows is now ready to install the driver files from the specified location. Click ‘Next>’. Windows will start to copy the files and show you a progress report screen. 6. The Wizard reports that Windows has finished installing the software. Click ‘Finish’. -
Page 8: Windows Nt 3.51 Installation
Windows NT 3.51 Installation 1. Install the hardware in your system, then power up your system & boot Windows NT Ver 3.51. 2. Click and open the “Main” group. 3. Click and open the “Control Panel.” 4. Click on the “Drivers” icon. 5. -
Page 9: Verifying Windows Driver Installation
your software’s documentation) and you will be using the Sound Manager to communicate with your Delta 44, set Sound In and Sound Out to “Delta.” See the section “Hardware Settings Page” in the Delta 44 “Control Panel Software” section for information on selecting Sound Manger inputs and outputs. Your Delta 44 is now ready for use. -
Page 10: Verifying Delta Control Panel Software Installation
Verifying Delta Installation In Windows, open the Windows Control Panel (do so via Start | Settings | Control Panel ). If your Delta 44 hardware and Delta Control Panel software are properly installed, the Windows Control Panel should display an “M Audio Delta H/W” icon. By double-clicking on that icon, you may launch the Delta Control Panel software. -
Page 11: The Digital Monitor Mixer
preferred for semi-pro audio equipment and some consumer equipment that is too ‘hot’ for the ‘-10’ setting. The ‘Consumer’ setting offers approximately 6dB more headroom than does the ‘-10’ setting. Semi-pro and consumer devices’ signal levels vary from manufacturer-to-manufacturer and even product-to- product, so a little experimentation between Consumer and -10 settings may be required for optimal results. -
Page 12: Synchronization
Synchronization For proper operation, the entire Delta 44 system is always synchronized to a single master clock. This master clock is derived from the internal crystal oscillators. When a WAV file is played through the Delta drivers, the software application playing the WAV file is responsible for setting the sample rate in the sound card hardware. - Page 13 each of these stereo devices down further to “left” and “right” mono devices. Most software will handle the outputs as stereo pairs but allow you to pan audio left or right within the pair. Therefore to send a mono output to OUT1 (for example), choose WavOut 1/2, then pan that track hard left.
-
Page 14: Delta 44 Control Panel Software
Analog 1/2 Delta-44 Analog 3/4 Delta-44 WINDOWS MULTIMEDIA SETTINGS: Windows may be set up to use the Delta 44 as its default audio device, allowing system sounds to be sent out the Delta 44. This also enables you to use the Delta 44 with the sound applets included with Windows. -
Page 15: Monitor Mixer Page
Monitor Mixer Page The Monitor Mixer is the first page that appears when the Delta Control Panel is opened, and controls the digital mixer built into the Delta 44’s PCI controller chip. As described in previous sections, the output of this mixer may be assigned to the OUT1/OUT2 analog outputs. - Page 16 that is 12dB ‘quieter’ than full-scale is referred to as “-12dB.” The meters are vertically color-coded into three sections: green, yellow and red. The green section represents a safe zone, ranging from approximately -48dB to -12dB. Most audio signals should appropriately fill this section of the meter. The yellow section ranges from -12dB to -3dB as the signal approaches a ‘hotter’...
-
Page 17: Patchbay/Router Page
PAN: Each mixer input is considered “mono” and may be individually panned anywhere in the stereo output mix. A pan control is positioned directly under each input channel peak meter and has the appearance of a small vertical pointer. To make a coarse adjustment, click on the pan control with your mouse and drag it to the desired position. - Page 18 Delta 44 board. To display this page, click the “Patchbay/Router” tab of the Delta Control Panel. ON THE MAC: Please substitute the name “SM/ASIO” where referrences are made to “WavOut.” SM/ASIO are the software outputs on the Mac, while WavOut are the software outputs on the PC.
- Page 19 Hardware Settings Page The Hardware Settings page of the Delta Control Panel gives you control over miscellaneous features of the Delta 44. To display this page, click the “Hardware Settings” tab of the Delta Control Panel. MASTER CLOCK: This section displays the source of the board’s master clock: Internal Xtal (crystal).
- Page 20 MULTITRACK DRIVER DEVICES: The Delta 44 drivers may intelligently synchronize the beginning of recording and playback across all audio devices on the board. When using application software that is capable of using multiple channels simultaneously, select “Single and In-Sync” to ensure that all audio channels will begin playback and/or recording at the same time.
-
Page 21: S/Pdif Page
VARIABLE SIGNAL LEVELS: The software switches in this section allow the user to match individual input levels and global (as in ‘all’ or ‘across the board’) output levels to the operating signal levels of the external audio equipment. Three level selections are available: +4dBu, ‘Consumer,’... -
Page 22: Save, Delete, Load Buttons; H/W Installed
version. If you have Internet browsing capabilities and are currently connected to the Internet, clicking on the Midiman copyright will link you to the M Audio / Midiman web site (PC only). Save, Delete, Load Buttons; H/W Installed On the PC, at the rightmost side of the Delta Control Panel are the Save, Load and Delete buttons as well as an “installed hardware”... -
Page 23: Delta 44 Recording Tutorials
Delta 44 Recording Tutorials In this section we will explore two sample setups for recording and playback using the Delta 44 Digital Recording Interface. This is by no means an exhaustive tutorial but its intent is to help you understand most of the Delta 44’s feature set. Before beginning, you should open your music software and profile the Delta 44, enable its drivers, or otherwise setup the software for operation with the Delta 44. - Page 24 NOTE: Because improper connections may potentially make very loud noises, it’s a good idea to have all monitor levels set low or muted while hooking up audio equipment — you may even choose to turn your computer off before making the connections. 1.
- Page 25 5. Click on the Delta Control Panel on your Windows taskbar to maximize it. Click on the ‘Hardware Settings’ tab. 6. Under “CODEC Sample Rate,” verify that the “Rate Locked” checkbox is not activated. This will allow your application software to set the Delta 44 sample rate as it pleases.
- Page 26 Select the “Monitor Mixer” tab of the Delta Control Panel. The default Master Volume fader settings are 0dB and un-muted, and all other faders are set to full attenuation (-144dB) and muted. We will need to adjust these to our preference. The screen capture below shows the settings that we wish to achieve.
- Page 27 Now is the time to launch your music software and set it up to record and playback audio tracks. We’re going to speak in general terms here, since setup within software programs will vary somewhat. Minimize your Delta Control Panel so that you can easily access it from your Windows taskbar.
- Page 28 playback levels of your guitar and mic. Adjust the faders and mute controls so that you may hear the guitar and mic at the appropriate levels and mix. These are the levels at which you may monitor the pre-recorded tracks while you overdub (record other tracks while listening to the first) additional parts.
-
Page 29: Typical Setup #2
Notice that if we continue to overdub past track 4, we run out of WavOut devices to assign to. In this case, you may want to do some of your level mixing within the software application if it supports it. Most applications will allow you to assign more than one track to an output device and then set the relative levels of the tracks within the software, letting the software do the mixing. - Page 30 1. Plug the microphones into the mic inputs 1 & 2 of the pre-amps. Plug the guitars into the high impedance inputs 3 & 4 of the pre-amps. 2. Plug the outputs of the pre-amps 1-4 into the hardware inputs 1-4 of the Delta 44. Usually pre-amp outputs are balanced, so if they are, use TRS cables and set the Delta +4/Consumer/-10 input switches to the +4dB setting in the Hardware Settings page of the Delta Control Panel.
- Page 31 6. Minimize the Delta Control Panel to the Windows taskbar. 7. Open your music software program. Set up four tracks for recording: Track one — Track two — Track three — Track four — 8. Now we want to set up the output ports for the four tracks. Track one —...
-
Page 32: Troubleshooting
this were a real recording situation and you wished to add other instruments as overdubs, you might want to combine recorded tracks to one stereo pair of outputs (WavOut 1/2 Delta-44, for example). This would ‘free up’ several channels for monitoring the overdubs. - Page 33 another available PCI slot, and turn your computer back on. More often than not, this will change the IRQ assignment of the Delta 44 when you re-enter Windows. After returning to Windows, follow the steps outlined in the “Verifying Windows Driver Installation” section of this manual. It might take more than one PCI slot relocation to find an open IRQ.
- Page 34 Typically, if you move one of the conflicting cards to another PCI slot, an IRQ conflict will disappear. Address conflicts are rare amongst PCI devices, but if there is no obvious IRQ conflict, why not check for I/O Address conflicts while in the Device Manager? You may view the list of assigned I/O addresses by selecting the “Input/output (I/O)”...
-
Page 35: Troubleshooting Tips For Frequently Asked Questions
Troubleshooting Tips for Frequently Asked Questions Problem: No Sound. Possible Cause 1: The Delta 44 hardware or software device drivers are not properly installed. See the installation sections of this manual for further information. Possible Cause 2: There is a resource conflict between the Delta 44 and another device in your computer. -
Page 36: Appendix A - Technical Specs
Possible Cause 3: Some accelerated graphics cards use excessive amounts of system bandwidth, preventing the recording buffer of an audio card from keeping up with demand. This can cause clicks in the recording. Reducing or turning off the graphics card’s graphics acceleration feature often resolves this problem. -
Page 37: Appendix B -If You Use An External Mixer
Appendix B -If You Use An External Mixer... Our main objective is to get the signal we want to record to the Delta 44, and to monitor the outputs from the Delta 44. The Delta 44 has a mixer contained in its PCI chip that allows you to mix hardware inputs and software outputs and send it to an analog stereo output pair. - Page 38 Some line mixers have a number of effect or auxiliary sends for each channel. These sends will have their own individual level control and will receive the signal either pre fader or post fader, i.e. either independent or dependent on that channel’s fader level.
-
Page 39: Limited Lifetime Warranty
Limited Lifetime Warranty MIDIMAN warrants that this product is free of defects in materials and workmanship under normal use so long as the product is: owned by the original purchaser; the original purchaser has proof of purchase from an authorized MIDIMAN dealer;...