
Related Manuals for Honda EM600


Summary of Contents for Honda EM600
- Page 1 Owner’s Manual Generator EM500 EM600 Q1997 American Honda Motor Co., Inc. - All Rights Reserved I’ ’ I’...
- Page 3 Honda Motor Co., Ltd. reserves the right to make changes at any time without notice and without incurring any obligation. No part of this publication...
-
Page 4: Table Of Contents
CONTENTS CONTENTS ........1. GENERATOR SAFETY ......2. COMPONENT IDENTIFICATION ......... 3. PRE-OPERATION CHECK ......... 4. STARTING THE ENGINE USE ........5. GENERATOR ......... 6. STOPPING ENGINE ......... 7. MAINTENANCE ....... 8. TRANSPORTING/STORAGE ........9. TROUBLESHOOTING ........10. SPECIFICATIONS ll.WIRING DIAGRAM ........ - Page 5 GENERATOR SAFETY To ensure safe operation Place the generator at least 1 m (3 ft) away from buildings or other equip- ment when operating the generator. Operate the generator on a level surface. If the generator is tilted, fuel spillage may resuit. Exhaust gas contains poisonous...
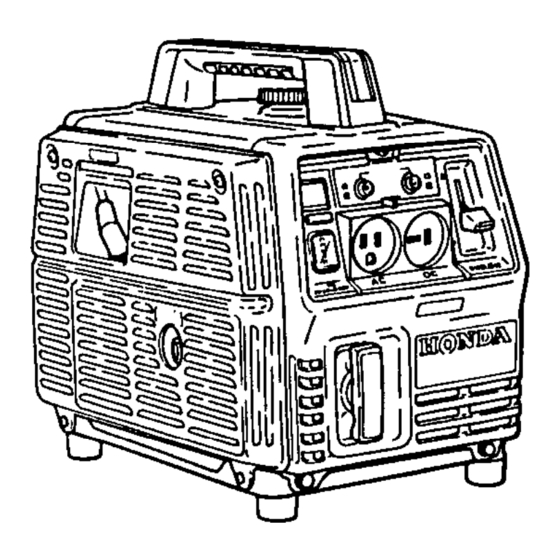
- Page 6 COMPONENT IDENTIFICATION CIRCUIT BREAKERS OIL ALERT LAMP (EM600 ONLY) PILOT LAMP SPARK PLUG CAP DC RECEPTACLE FREQUENCY METER AC RECEPTACLE EXHAUST OUTLET RiCOlL STARTER...
- Page 7 FUEL TANK CARRYING HANDLE THROTTL .AIR CLEANER COVER GROUND...
- Page 8 1. Check the engine oil level. CAUTION: Engine oil is a major factor affecting engine performance service life. Non-detergent or vegetable oils are not recommended. Use Honda 4.stroke oil, or an equivalent high detergent, premium quality motor’ certified to meet or exceed U.S.
- Page 9 100°F 40°C NOTE: The oil alert lamp (EM600 only) will light during operation before engine oil level becomes too low. If this occurs, stop the engine and fill to the top of the filler neck with the recommended oil (page 4). The oil alert lamp should always...
- Page 10 2. Check the fuel level. Use low lead or unleaded automotive gasoline with a pump octane rating of 88 or higher. Never use an oil/gasoline mixture or dirty gasoline. Avoid getting dirt, dust or water in the fuel tank. CAUTION: Gasoline substitutes recommended;...
-
Page 11: Starting The Engine
STARTING ENGINE 1. Disconnect the load from the AC or DC receptacle. 2. Move the engine switch to “ON”. ENGINE 3. Pull the starter rope lightly until resistance is felt, then pull briskly. CAUTION: Do not allow the starter grip to snap back against the generator. Return it gently to prevent damage to the housing. - Page 12 GENERATOR o prevent electrical shock from faulty appliances, the generator H?IlEQT should be grounded. Connect a length of heavy wire between the ground terminal and the ground source. GROUND TERMINAL CAUTION: Limit operation requiring maximum power (EM500: 500VA, EM600: 600VA) to 30 minutes.
- Page 13 AC operation 1. Start the engine and make sure the pilot lamp comes on. If not, the fila- ment may be burnt out. 2. Move the selector switch to the AC position. 3. Plug in the appliance. CAUTION: Be sure that appliances do not exceed the rated load for more than 30 minutes, and never exceed the maximum...
- Page 14 DC operation DC position. The DC Start the engine and move the selector switch to the receptacle may be used for charging 12 volt automotive-type batteries only. Batteries produce explosive gases. Keep sparks, flames, cigarettes away. prevent possibility of creating a spark near the battery,...
- Page 15 If you always operate the generator at altitudes higher than 6,000 feet above sea level, have your authorized Honda Generator dealer perform these carburetor modifications. Even with suitable carburetor jetting, engine horsepower...
-
Page 16: Maintenance
The exhaust contains poisonous carbon monoxide gas. CAUTION: Use only genuine HONDA parts or their equivalent. The use of replacement parts which are not of equivalent quality may damage generator, Tool kit... - Page 17 Spark arrester NOTE (1) : Service more frequently when used in dusty areas. (2) : These items should be serviced by an authorized Honda dealer, unless the owner has the proper tools and is mechanically proficient. See the Honda Shop Manual.
- Page 18 Changing oil Drain the oil while the engine is still warm to assure rapid and complete draining. 1. Remove the oil filler cap, and drain the oil. 2. Refill with the recommended oil (see page 4) and check the level. CAPACITY: 0.35P (0.37 US qt) OIL FILLER...
- Page 19 Air cleaner service A dirty air cleaner will restrict air flow to the carburetor. To prevent carburetor malfunction, service the air cleaner regularly (page 13). Service more frequently when operating the generator in extremely dusty areas. Never use gasoline or low flash point solvents for cleaning the air cleaner element.
- Page 20 Spark plug service Recommended spark plug: BPMR4A-10 (NGK) W14MPR-UIO (ND) To ensure proper engine operation, the spark plug must be properly gapped and free of deposits. 1. Remove the spark plug cap. 2. Use the wrench supplied in the tool kit to remove the spark plug. 3.
- Page 21 5. Attach the plug washer. Thread the plug in by hand to prevent cross- threading. 6. Tighten a new spark plug l/2 turn with the wrench to compress the washer. If you are reusing a plug, it should only take l/8-1/4 turn after the plug seats.
- Page 22 Spark arrester maintenance If the generator has been running, the muffler will be very hot. Allow it to cool before proceeding. CAUTION: The spark arrester must be serviced every 100 hours to maintain its efficiency. 1. Remove the four left side cover screws, and remove the cover. SCREW 2.
- Page 23 MUFFLER HEAT SHIELD SETTING BOLT EXHAUST PIPE 5. Use a brush to remove carbon deposits from the spark arrester screen. replace if damaged. Reassemble 6. Check exhaust pipe gaskets; exhaust system. See next page. The automatic choke system needs adjustment, when reinstalling.
- Page 24 Automatic choke adjustment 1. Loosen the automatic choke setting bolt. 2. Push the choke valve arm at the carburetor so the choke valve is closed. 3. Adjust distance “A” to 3 mm (0.12 in) by relocating the bimetal strip. Retighten the bolt securely.
-
Page 25: Transporting/Storage
TRANSPORTING/STORAGE When transporting the generator, turn the engine switch OFF and keep the generator level to prevent fuel spillage. Fuel vapor or spilled fuel may ignite. Before storing the unit for an extended period: 1. Be sure the storage area is free of excessive humidity and dust. -
Page 26: Troubleshooting
TROUBLESHOOTING A. When the engine will not start: 1. Is the engine switch ON? 2. Is there enough fuel? 3. Is nothing connected at the AC and DC receptacles? 4. Is gasoline reaching the carburetor? To check, remove the side cover and loosen the drain screw with fuel valve ON. - Page 27 d. Grounding the side electrode to the cover, pull the recoil starter to see if sparks jump across the gap. SPARK PLUG e. If there are no sparks, replace the plug. If OK, try to start the engine according to the instructions. 6.
-
Page 28: Specifications
SPECIFICATIONS Dimensions Length x Width x Height EM500: 355 x 250 x 325 mm (14.0 x 9.84 x 12.8 in) EM600: 365 x 250 x 325 mm (14.4 x 9.84 x 12.8 in) EM500: 18.0 kg (39.7 lb) Dry Weight EM600: 19.0 kg (41.9 lb) Engine... - Page 30 [EM6001...
- Page 31 Part Name Color Automatic Voltage Regulator Black DC Diode Blue Rotor Exciter Winding E.R. Brown Stator Exciter Winding E.S. Green Engine Switch Gray Exciter Winding Light green Frequency Meter Circuit Breaker White Field Winding Yellow Ground Terminal Ignition Coil Ignition Winding Lamp Winding Main Winding AC Output...
- Page 32 MEMO...
- Page 33 Your purchase of a Honda product is greatly appreciated by both your dealer and American Honda Motor Co., Inc. We want to assist you in every way...
- Page 34 When you write or call, please provide the following information: • Model and serial numbers • Name of the dealer who sold the Honda power equipment to you • Name and address of the dealer who services your equipment •...
- Page 35 MEMO...