Honda EB3500X Owner's Manual
Hide thumbs
Also See for EB3500X:
- Owner's manual (53 pages) ,
- Owner's manual (52 pages) ,
- Owner's manual (44 pages)
Table of Contents
Advertisement
Advertisement
Table of Contents

Related Manuals for Honda EB3500X


Summary of Contents for Honda EB3500X
- Page 2 Honda Motor Co., Ltd. reserves the right, however, to discontinue or change specifications design at any time without notice and without incurring any obligation whatever.
- Page 3 Honda servicing dealer is specially trained in servicing Honda generators. Your authorized Honda servicing dealer dedicated to your satisfaction and will be pleased to answer your questions and concerns. Best Wishes, Honda Motor Co., Ltd.
- Page 4 A FEW WORDS ABOUT SAFETY Your safety and the safety of others are very important. And using this generator safely is an important responsibility. To help you make informed decisions about safety, we have provided operating procedures and other information on labels and in this manual.
-
Page 5: Table Of Contents
CONTENTS SAFETY ....................... Safety Label Locations ............................... Safety Information ............... COMPONENT IDENTIFICATION CONTROLS ....................Engine Switch ..................Recoil Starter ..................Fuel Valve Lever ................. Choke Rod ........................Voltage Selector Switch (Dual Voltage System) ................Ground Terminal ................Oil Alert@ System ................. - Page 6 ..............TRANSPORTING/STORAGE TROUBLESHOOTING ................................WIRING DIAGRAM SPECIFICATIONS ..................OF HANGER KIT AND WHEEL KIT ......INSTALLATION WARRANTY SERVICE INFORMATION ..........INDEX .......................
-
Page 7: Safety
These labels warn you of potential hazards that can cause serious injury. Read them carefully. If a label comes off or beco lmes hard to read, contact your Honda generator dealer for a replace ment. DcntcK fO1 SPlllfO flu OR flirt LfAKS. - Page 8 You risk electric shock if you operate this generator with a faulty GFCI (ground-fault circuit-interrupter). Test GFCI before each use. If GFCI fails test, do not use your generator. See your Honda dealer. EB3500X HONDA MOTOR CO., LTD. MADE IN JAPAN CAUTION...
-
Page 9: Safety Information
SAFETY INFORMATION Honda generators are designed to give safe and dependable service if operated according to instructions. Read and understand this owner’s manual before operating your generator. can help prevent accidents by being familiar with your generator’s controls, and by... - Page 10 Fire and Burn Hazards The exhaust system gets hot enough to ignite some materials. -Keep the generator at least 3 feet (1 meter ) away from buildings and other equipment during operation. - Do not enclose the generator in any structure. - Keep flammable materials away from the generator.
-
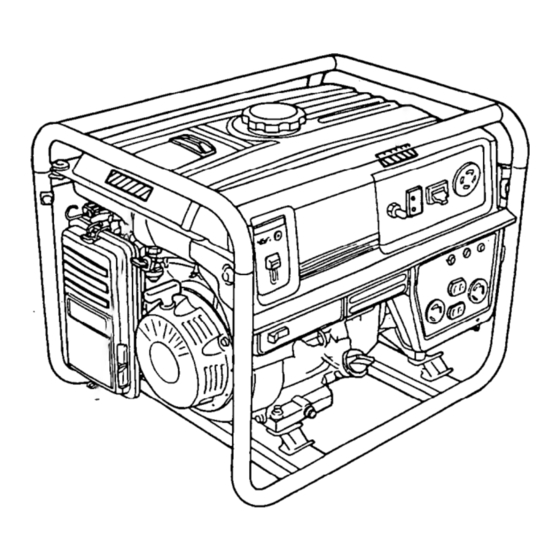
Page 11: Component Identification
COMPONENT IDENTIFICATION VOLTAGE SELECTOR SWITCH GFCI RESET BUlTON GFCI TEST BUTTON ENGINE SWITCH RCUIT BREAKER PROTECTORS FUEL VALVE RECEPTACLES AIR CLEANER ENGINE OIL FILLER CAP ENGINE OIL DRAIN PLUG AUTO-THROTTiE SWITCH ENGINE SERIAL NUMBER... - Page 12 FUEL FILLER CAP SPARK PLUG CAP SERIAL NUMBER MUFFLER *Record the engine and frame serial numbers for your future reference. Refer to these serial numbers when ordering parts, and when making technical or warranty inquiries (see page52 ). Frame serial number: Engine serial number:...
-
Page 13: Controls
CONTROLS ENGINE SWITCH To start and stop the engine. Switch position: OFF: To stop the engine. To start and run the engine. RECOIL STARTER To start the engine, pull the starter grip lightly until resistance is felt, then pull briskly. NOTICE Do not allow the starter grip to snap back against the engine. -
Page 14: Fuel Valve Lever
FUEL VALVE LEVER The fuel valve is located between the fuel tank and carburetor. When the valve lever is in the ON position, fuel is allowed to flow from the fuel tank to the carburetor. Be sure to return the fuel valve lever to the OFF position after stopping the engine. -
Page 15: Voltage Selector Switch (Dual Voltage System)
VOLTAGE SELECTOR SWITCH (DUAL VOLTAGE SYSTEM) The voltage selector switches the main power carrying windings of the generator to produce “120V ONLY” or “120/24OV”. If a 240V appliance is connected to the 4-prong receptacle, the switch must be in the “1201 24OV”... -
Page 16: Oil Alert@ System
OIL ALERT@ SYSTEM The Oil Alert@ system is designed to prevent engine damage caused by an insufficient amount of oil in the crankcase. Before the oil level in the crankcase can fall below a safe limit, the Oil Alert@ system will automatically stop the engine (the engine switch will remain in the ON position). -
Page 17: Circuit Breaker
CIRCUIT BREAKER The circuit breaker will automatically switch OFF if there is a short circuit or a significant overload of the generator at the receptacle, or if the ground-fault circuit interrupter (GFCI) detects a ground-fault current. Check the following if the circuit breaker switches OFF automatically: When the GFCI RESET button is extended (page 19 ): -Unplug... -
Page 18: Circuit Protector
CIRCUIT PROTECTOR The circuit protectors will automatically switch OFF if there is a short circuit or a significant overload of the generator at the 20A 12OV, 30A 120V locking plug, or 120/24OV locking plug receptacle. If a circuit protector is switches OFF automatically, check that the appliance working... -
Page 19: Ground Fault Circuit Interrupter (Gfci)
Ground Fault Circuit Interrupter (GFCI) Using the generator in rain, snow or near water can lead to death from electric shock. Keep the generator dry. All receptacles on the generator are protected by a ground-fault circuit interrupter (GFCI) for protection against the shock hazard of ground- fault current. - Page 20 Observe the following precautions to ensure proper GFCI operation and to reduce shock hazards: Use grounded 3-conductor extension cords, tools, and appliances, or double-insulated tools and appliances. i Inspect cords and plugs, and replace if damaged. Do not use cord lengths greater than 164 feet (50 meters), and do not use multiple tools and appliances...
- Page 21 (ground-fault circuit interrupter). Test GFCI before use. If GFCI fails test, do not use your generator. See your Honda dealer. 1. Unplug all tools and appliances from the generator. 2. Start the engine. 3. Turn the circuit breaker to the ON position.
- Page 22 RESET button is extended. If the GFCI and circuit breaker do not function as described, take the generator to an authorized Honda generator dealer for repair. GFCI RESET BUll-ON CIRCUIT BREAKER During generator use, if the GFCI RESET button...
-
Page 23: Generator Use
A transfer switch, which isolates generator power from utility power, is available through authorized Honda generator dealers. Improper connections to a building electrical system can allow electrical current from the generator to backfeed into the utility lines. -
Page 24: Ac Applications
AC APPLICATIONS Before connecting an appliance or power cord to the generator: . Make sure that it is in good working order. Faulty appliances power cords can create a potential for electrical shock. If an appliance begins to operate abnormally, becomes sluggish stops suddenly, turn it off immediately. -
Page 25: Ac Operation
AC OPERATION 1. Check GFCI operation before each use (see page 19 1. 2. Start the engine (see page30). 3. Turn the voltage selector switch to either position. With the voltage selector switch in the “120/24OV” position, you can use the 120V and 120/24OV receptacles simultaneously. -
Page 26: Ac Receptacle Selection
AC RECEPTACLE SELECTION The generator has separate main power producing circuits. These two circuits supply equal power to different receptacles shown when the voltage selector switch is in the 120/24OV position. When two or more receptacles are used; prevent overloading dividing the load between the two power circuits. -
Page 27: Auto-Throttle System
Auto-throttle System With the switch in the AUTO position, engine speed is automatically reduced when ALL loads are turned OFF or disconnected. When appliances are turned ON or reconnected, the engine returns to rated speed. In the OFF position, the auto-throttle system does not operate. -
Page 28: High Altitude Operation
HIGH ALTITUDE OPERATION At high altitude, the standard carburetor air-fuel mixture will be too rich. Performance will decrease, and fuel consumption will increase. A very rich mixture will also foul the spark plug and cause hard starting. High altitude performance can be improved by specific modifications to the carburetor. -
Page 29: Pre-Operation Check
PRE-OPERATION CHECK ENGINE OIL Engine oil is a major factor affecting engine performance and service life. Non detergent and 2-stroke engine oils will damage the engine and are not recommended. SAE Viscosity Grades Check level BEFORE EACH USE with the generator a level surface and the engine stopped. -
Page 30: Fuel
Fuel Check the fuel gauge, and refill the tank if the fuel level is low. Refuel carefully to avoid spilling fuel. Do not fill above the shoulder the fuel strainer. Gasoline is highly flammable and explosive, and you can be burned or seriously injured when refueling. - Page 31 If spark knock or pinging persists, see an authorized Honda generator dealer. Running the engine with persistent spark knock or pinging can cause engine damage. Running the engine with persistent spark knock or pinging is misuse, and the Distributor’s...
-
Page 32: Starting The Engine/Stopping The Engine
STARTING THE ENGINE/STOPPING THE ENGINE STARTING THE ENGINE 1. Make sure that the AC circuit breaker is in the OFF position. generator may be hard to start if a load is connected. 2. Turn the fuel valve lever to the ON position. 3. -
Page 33: Maintenance
Other service tasks that are more difficult, or require special tools, are best handled by professionals and are normally performed by a Honda technician other qualified mechanic. The maintenance schedule applies to normal operating conditions. -
Page 34: Maintenance Safety
Remember that your servicing dealer knows your generator best and is fully equipped to maintain and repair it. To ensure the best quality and reliability, use only new, genuine Honda parts or their equivalents for repair or replacement. -
Page 35: Emission Control System Information
The following instructions and procedures must be followed in order to keep the emissions from your Honda engine within the emission standards. Tampering and Altering Tampering with or altering the emission control system may increase... - Page 36 Problems That May Affect Emissions If you are aware of any of the following symptoms, have your engine inspected and repaired by your servicing dealer. Hard starting or stalling after starting. Rough idle. Misfiring or backfiring under load. Afterburning (backfiring). Black exhaust smoke or high fuel consumption.
- Page 37 Replacement Parts The emission control systems on your Honda engine were designed, built, and certified to conform with EPA and California emission regulations. recommend of genuine Honda parts whenever have maintenance done. These original-design replacement parts are manufactured to the same standards...
-
Page 38: Air Index
AIR INDEX An Air Index Information hang tag/label was applied to this engine in accordance with the requirements of the California Air Resources Board. The bar graph is intended to provide you, our customer, the ability to compare the emissions performance of available engines. -
Page 39: Maintenance Schedule
(2)These items should be serviced by an authorized Honda generator dealer, unless the owner has the proper tools and is mechanically proficient. See the Honda Shop Manual. (3)For commercial use, log hours of operation to determine proper maintenance intervals. -
Page 40: Engine Oil Change
ENGINE OIL CHANGE Drain the oil while the engine is warm to assure rapid and complete draining. 1. Remove the drain plug and sealing washer, remove the oil filler cap, and drain the oil. 2. Reinstall the drain plug and sealing washer. -
Page 41: Air Cleaner Service
AIR CLEANER SERVICE A dirty air cleaner will restrict air flow to the carburetor. To prevent carburetor malfunction, service the air cleaner regularly. Service more frequently when operating the generator in extremely dusty areas. Never run the generator without the air filter. Rapid engine wear will result. -
Page 42: Fuel Sediment Cup Cleaning
FUEL SEDIMENT CUP CLEANING The sediment cup prevents dirt or water which may be in the fuel tank from entering the carburetor. If the engine has not been run for a long time, the sediment cup should be cleaned. Turn the fuel valve lever to the OFF position. Remove the sediment cup, O-ring, and filter. -
Page 43: Spark Plug Service
SPARK PLUG SERVICE Recommended spark plugs: BPR5ES (NGK) WlGEPR-U (DENSO) To ensure proper engine operation, the spark plug must be properly gapped and free of deposits. If the engine has been running, the muffler will be very hot. Be careful not to touch the muffler. -
Page 44: Spark Arrester Maintenance
6.Check that the spark plug washer is in good condition, and thread the spark plug in by hand to prevent cross-threading. 7.After the spark plug is seated, tighten with a spark plug wrench compress the washer. installing a new spark plug, tighten l/2 turn after the spark plug seats to compress the washer. -
Page 45: Transporting/Storage
Change the engine oil. (page 38 ). After removal from storage, drain the stored gasoline into a suitable container, and fill with fresh gasoline before starting. *Use gasoline conditioners that are formulated to extend storage life. Contact your authorized Honda generator dealer for conditioner recommendations. - Page 46 l.Drain the carburetor by loosening the drain screw. Drain gasoline into a suitable container. Gasoline is extremely flammable and is explosive under certain conditions. Perform this task in a well-ventilated area with the engine stopped. Do not smoke or allow flames or sparks in the area during this procedure.
-
Page 47: Troubleshooting
Still r]O spark the ------) Take the generator Is there a spark & Replace authorized spark plug. from spark Honda generator plug? dealer. To check: 1) Remove spark plug cap and clean any dirt from around Be sure... - Page 48 No electricity at the AC receptacles: (When the GFCI RESET button is extended > The GFCI RESET button Unplug appliances and equipment, and in- is extended again. spect the GFCI operation. (refer to page 19 ) The GFCI RESET but- Replace electrical ton is not extended.
-
Page 50: Specifications
MAINTENANCE Spark plug gap 0.028-0.031 in (0.70-0.80 Refer to page: 41 See your authorized Valve clearance IN: 0.15+0.02 mm (cold) Honda dealer EX: 0.20+0.02 mm (cold) Other specifications No other adjustments needed NOTE: Specifications may vary according to the types,... -
Page 51: Installation Of Hanger Kit And Wheel Kit
INSTALLATION OF HANGER KIT AND WHEEL KIT Hanger Kit Installation 1. Position the hanger at the generator’s balance point, in the middle of the fuel tank. 2. Fit the end tabs of the hanger through the bracket slots, and bolt the brackets to the hanger. - Page 52 Wheel Kit Installation 1. Install the four wheels on the axle shaft. 2. Install the assembly to the generator using four bolts and nuts. Inside WHEEL STOPPER NOTE: Install the shaft with wheel stopper facing engine side.
- Page 53 Wheel Kit Installation 1. Install the two wheels on the axle shaft. 2. Install the axle assembly on the generator using four bolts and nuts. 3. Install the two stands using four bolts and nuts. 4.lnstall right and left handles on the generator upper frame using brackets and six bolts.
-
Page 54: Warranty Service Information
Honda Power Equipment Customer Relations Office. You can write to: American Honda Motor Co., Inc. Power Equipment Division Customer Relations Office 4900 Marconi Drive Alpharetta, Georgia 300059847 Or telephone: (770) 497-6400... -
Page 55: Index
INDEX ............... COMPONENT IDENTIFICATION CONTENTS ....................CONTROLS ..................................Auto-throttle System Choke Rod ................... Circuit Breaker ..................................Circuit Protector Engine Switch ..................Fuel Valve Lever ................. (GFCI) ..........Ground Fault Circuit Interrupter ................Ground Terminal ................. Oil Alert System Recoil Starter .................. - Page 56 PRE-OPERATION CHECK ................ Engine Oil ................... Fuel ...................... SAFETY ....................... Safety Information ................Safety Label Locations ................ SPECIFICATIONS ..................STARTING THE ENGINE/STOPPING THE ENGINE ....... TRANSPORTING/STORAGE ..............................TROUBLESHOOTING SERVICE INFORMATION WARRANTY ..........WIRING DIAGRAM ..................
- Page 57 MEMO...
- Page 58 MEMO...