
Related Manuals for Belkin F1DA116Z - OmniView PRO3 USB


Summary of Contents for Belkin F1DA116Z - OmniView PRO3 USB
-
Page 1: Kvm Switch
OmniView PRO3 ® KVM Switch User Manual F1DA104Zea F1DA108Zea F1DA116Zea... -
Page 2: Table Of Contents
Table of Contents Introduction ..................1 Package Contents ..............1 Overview ..................2 Feature Overview ................2 Equipment Requirements ............4 System Requirements ..............6 Unit Display Diagrams ..............7 Specifications ................9 Installation ..................10 Pre-Configuration ..............10 Mounting the PRO3 KVM Switch ..........11 Connecting the Console to the PRO3 KVM Switch ..... 14 Connecting Servers to the PRO3 KVM Switch ...... -
Page 3: Introduction
PRO3 KVM Switch packaging. Thank you for purchasing the Belkin OmniView PRO3 KVM Switch. We appreciate your business and have confidence that you will soon see for yourself why Belkin is the number-one-selling brand in KVM switches worldwide. -
Page 4: Overview
Overview Feature Overview • Hot Keys Hot-key functionality allows you to select a desired port using designated key commands. By using a simple hot-key sequence on your keyboard, you can select one server from as many as 256 servers, instantaneously. •... - Page 5 PRO3 KVM Switch. This enables your KVM Switch to maintain consistent compatibility with the latest devices and servers. Firmware upgrades are free for the life of your PRO3 KVM Switch and can be downloaded from Belkin’s support website at www.belkin.com/support.
-
Page 6: Equipment Requirements
Overview Equipment Requirements Cables: Connecting the PRO3 KVM Switch to a server requires a Belkin Dual-Port Micro-Cable Kit. Belkin Dual-Port Micro-Cable Kits: F1D9400-XX (PS/2-style) F1D9401-XX (USB-style) ���������� ������������ ���������� �����������... - Page 7 Overview Belkin PRO3 Daisy-Chain Cable: F1D108-CBL Note: Product codes and availability may vary. F1D108-CBL �������������...
-
Page 8: System Requirements
Overview System Requirements OS Platforms The PRO3 KVM Switch is compatible with CPUs running on, but not limited to, the following OS platforms • Windows , 95, 98, 2000, Me, XP, Server 2003, or Vista ® ® • Microsoft DOS 5.x and above ®... -
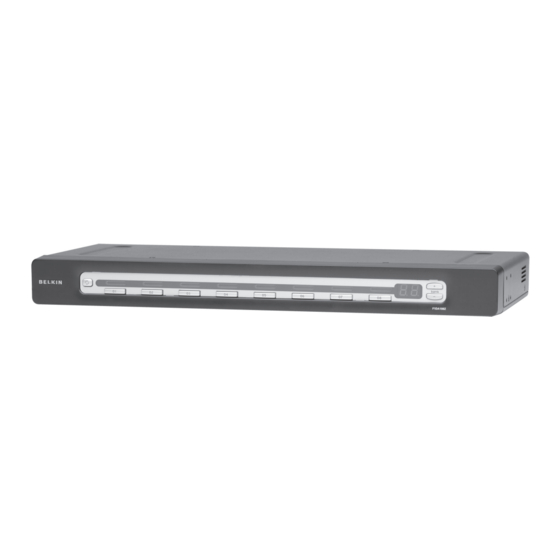
Page 9: Unit Display Diagrams
Overview Unit Display Diagrams Front View of the PRO3 KVM Switch: 7-segment LED for selected LED for selected BANK identification ����������������� ����������������� port identification � AutoScan button ��������������� ������������������� ���������������������������� Direct-access Manual BANK scroll buttons �������������� � ������������ port selector ��������������... - Page 10 Overview Unit Display Diagrams Back View of the PRO3 KVM Switch: Daisy chain out DC power jack ��������������� ������������� Bank select DIP Switch ���������������������� SCSI-50 dual-host ports ����������������������� Flash-upgrade portand DIP select ������������������ switch ��������������������� Console:VGA, PS/2 mouse/ �������� keyboard ports,USB mouse/ �������������������������������...
-
Page 11: Specifications
Overview Specifications Part No.: F1DA104Zea, F1DA108Zea, F1DA116Zea Enclosure: Metal enclosure with high-impact plastic faceplate Power: 12V DC, 1A power adapter, center-pin-positive polarity Daisy-Chain: Maximum of 16 OmniView KVM Switches No. of Servers Supported: 4, 8, and 16 respectively for 4-, 8-, and 16-port models (256 servers max. -
Page 12: Installation
Plugging and unplugging cables while servers are powered on may cause irreversible damage of the servers and/or the PRO3 KVM Switches. Belkin is not responsible for damage caused in this way. You are now ready to begin installation of your PRO3 KVM Switch. -
Page 13: Mounting The Pro3 Kvm Switch
Installation Mounting the PRO3 KVM Switch Bracket Installation (F1DA108Zea and F1DA116Zea) Eight- or 16-Port PRO3 KVM Switches include adjustable mounting brackets ideal for installation in 19-inch racks. The mounting brackets feature three adjustment positions to allow you to set the PRO3 KVM Switch’s face flush with the ends of the rails or to extend the PRO3 KVM Switch past the front of the rails. - Page 14 Installation Note: If this PRO3 KVM Switch will be daisy-chained to another KVM switch, set the BANK address prior to installing on a rack. Refer to the section in this User Manual titled “Connecting Multiple PRO3 KVM Switches (Daisy-Chaining)”. Your PRO3 KVM Switch is now mounted securely into the bracket and you are ready to connect the console.
- Page 15 Your PRO3 KVM Switch is now mounted securely to the rack and you are ready to connect the console. Note for Belkin PRO3 Generation 1 Series Owners (F1DA104Tea, F1DA108Tea, and F1DA116Tea): Installation for the PRO3 KVM Switch has changed. Please follow this installation manual completely to ensure proper installation.
-
Page 16: Connecting The Console To The Pro3 Kvm Switch
Installation Connecting the Console to the PRO3 KVM Switch You must use the same type of platform for both the keyboard and mouse. For example, if you are using a USB Keyboard, you must also connect a USB mouse to the console. Step 1 Connect the VGA monitor cable to the HDDB15 female port on the back of the PRO3 KVM Switch in the “Console”... - Page 17 Installation Step 3 Connect the PS/2 or USB mouse cable to the mouse port on the back of the PRO3 KVM Switch in the “Console” section. (Refer to diagram below.) Note: Either use all USB input devices or all PS/2 input devices when connecting to the console.
-
Page 18: Connecting Servers To The Pro3 Kvm Switch
Step 1 Make sure your server is powered off. Step 2 Using the Belkin Dual-Port Micro-Cable Kit for PS/2 (F1D9400-XX), connect the VGA connector to the monitor port on your server. (Refer to diagram below.) Step 3 Connect the PS/2 mouse and keyboard connectors to the mouse and keyboard... - Page 19 Installation Step 4 Connect the Belkin Dual-Port Micro-Cable Kit for PS/2 to the desired host ports on the PRO3 KVM Switch. (Refer to diagram below.) Step 5 Power up your server. Step 6 Repeat Steps 1 through 5 for each additional PS/2 server you wish to connect.
-
Page 20: Usb Connection
Step 1 Make sure your server is powered on. Step 2 Using the Belkin Dual-Port Micro-Cable Kit for USB (F1D9401-XX), connect the VGA connector to the monitor port on your server. (Refer to diagram below.) Step 3 Connect the USB connector to an available USB port on the server. (Refer to... - Page 21 Installation Step 4 Connect the Belkin Dual-Port Micro-Cable Kit for USB to the desired host ports on the PRO3 KVM Switch. (Refer to diagram below.) Your server should recognize the KVM-Switch connection and automatically install the HID USB driver, if necessary.
-
Page 22: Connecting Multiple Pro3 Kvm Switches (Daisy-Chaining)
BANK 00 and is referred to as the “primary” KVM switch. BANKs 01 through 15 are referred to as “secondary” KVM switches. Note: Your PRO3 KVM Switch is backward-compatible with Belkin OmniView PRO3 KVM Switches with standard cabling (F1DA104Tea, F1DA108Tea, F1DA116Tea). - Page 23 Installation How to Assign a BANK Address All PRO3 KVM Switches feature a “BANK DIP” switch. The “BANK DIP” switch is used to assign the proper BANK address to each PRO3 KVM Switch. • For a single-unit configuration, set the “BANK DIP” switch on the PRO3 KVM Switch to the “primary”...
-
Page 24: Getting Started
Installation Example of Daisy-Chain Configuration Primary unit (BANK 00) cable 1 Secondary unit ( BANK 01) cable 2 Secondary unit ( BANK 02) cable 3 Secondary unit ( BANK 03) Getting Started: Step 1: Make sure that all servers and PRO3 KVM Switches are powered off and that each PRO3 KVM Switch has been assigned a unique BANK address. - Page 25 Repeat Step 3 for additional PRO3 KVM Switches you wish to daisy-chain together. Note: Your PRO3 KVM Switch is backward-compatible with Belkin OmniView PRO3 KVM Switches with standard cabling (F1DA104T, F1DA108T, F1DA116T). In a daisy-chain configuration, the PRO3 KVM Switch with micro-cabling (F1DA104Z, F1DA108Z, F1DA116Z) must be designated as the primary KVM switch.
- Page 26 Installation Connecting the Servers: Step 1: Connect all servers to the primary and secondary KVM switches. Refer to the “Connecting Servers to the PRO3 KVM Switch” section on page 16 for instructions. Step 2: Power up the secondary KVM switches sequentially, beginning with the highest BANK, by connecting each unit’s power supply.
-
Page 27: Powering Up The Systems
Installation Powering Up the Systems Verify that all servers connected to the PRO3 KVM Switch are powered on. If any connected servers have not been powered on, it is okay to do so at this time (servers can be powered on simultaneously). The PRO3 KVM Switch emulates both a mouse and keyboard on each port and allows your server to |boot normally. -
Page 28: Using Your Pro3 Kvm Switch
Using your PRO3 KVM Switch Now that you have connected your console and servers to your PRO3 KVM Switch, it is ready for use. Select connected servers with the direct-access port selectors, located on the front panel of the PRO3 KVM Switch; through the On-Screen Display;... - Page 29 Using your PRO3 KVM Switch With a daisy-chain switch configuration, you can switch between BANKs (KVM switches) by pressing “Scroll Lock”, “Scroll Lock”, “Page Up”, to switch to the previous BANK. Press “Scroll Lock”, “Scroll Lock”, “Page Down”, to switch to the next BANK.
-
Page 30: Selecting A Server Using Direct-Access Port Selectors
Using your PRO3 KVM Switch Selecting a Server Using Direct-Access Port Selectors You can directly select which server you wish to control by pressing the direct-access port selector next to the corresponding port. The LED will illuminate to indicate the port is currently selected. If you are installing multiple PRO3 KVM Switches that are daisy-chained, use the BANK scroll keys located on the front panel of the primary KVM switch to access other servers that are connected to the secondary KVM switches. -
Page 31: Autoscan Mode
Using your PRO3 KVM Switch AutoScan Mode The AutoScan feature allows you to set your PRO3 KVM Switch to scan and monitor the activities of all connected servers one by one. The PRO3 KVM Switch remains on one server for a preset number of seconds, before switching to the next server. -
Page 32: On-Screen Display (Osd)
Using your PRO3 KVM Switch On-Screen Display (OSD) The OSD allows you to switch servers, assign names to your servers, enable and disable the AutoScan feature, set the desired scan-time interval for AutoScan, enable the password security feature, and program hot keys. To access the OSD menu, press “Scroll Lock”, “Scroll Lock”, and the space bar. - Page 33 Using your PRO3 KVM Switch To switch servers using the main OSD menu, use the arrow keys on your keyboard to navigate to the desired server, and press the “Enter” key. A “ ” symbol indicates which server is currently being accessed on your console.
-
Page 34: Port Name Edit
“Enter” to select and edit. Press “Enter” again to save the entry. The maximum characters for the name and password fields are eight characters. The default administrator name and password are: Username: admin Password: belkin... -
Page 35: Access List
Using your PRO3 KVM Switch Access List This feature allows you to discretely specify the user access at a port level. Only the administrator can set up the access list. The column on the left lists the port names. The users are listed by their number (1 to 8). Navigate to the user and port, and press the “Enter”... -
Page 36: Keyboard Hot-Key-Command Shortcuts
Using your PRO3 KVM Switch Keyboard Hot-Key-Command Shortcuts Below is a complete list of hot-key commands that can be used for your PRO3 KVM Switch: Command Function Space Bar Activate OSD Previous host Next host [01,02.,,,16] port Non-daisy-chain KVM switch [00,01.,,,15] BANK Daisy-Chain Config: First and second digit specifies BANK [01,02.,,,16] port... -
Page 37: Sun Combo And Mac Key Mapping
Using your PRO3 KVM Switch Sun Combo and Mac Key Mapping ® The USB keyboard connected to the PRO3 KVM Switch does not support the Sun keypad to perform special functions in the Sun operating-system environment. When the KVM Switch is connected to a Sun server, the KVM Switch emulates the Sun keys using a set of key combinations called “combo keys”. -
Page 38: Updating Firmware
PRO3 KVM Switch. To update your firmware, download the appropriate firmware file and utility from www.belkin.com/support/. The utility will guide you through the process of updating the firmware on your PRO3 KVM Switch. Warning! We strongly recommend that you update your firmware only if you are experiencing mouse and keyboard problems with your PRO3 KVM Switch, as reconfiguring software may lead to unexpected operational problems. -
Page 39: Frequently Asked Questions
® A: The PRO3 KVM Switch supports USB and PS/2 mice from Microsoft, Logitech , Kensington , etc., and Belkin. Please contact Belkin Technical ® ® Support for compatibility issues you may experience. Q: How does the PRO3 KVM Switch allow the user to switch between ports? A: The PRO3 KVM Switch supports three methods of port selection. - Page 40 A: No, the PRO3 KVM Switch does not require any drivers or software to be installed in your servers. Simply connect all your servers to the Belkin KVM Cable Kits, and then attach one keyboard, monitor, and mouse to the console port, and it is ready for use.
-
Page 41: Troubleshooting
Troubleshooting My server does not boot up when connected to the PRO3 KVM Switch, but works fine when I connect the keyboard, video, and mouse directly to the server. • Make sure that the keyboard and mouse cables are connected tightly between the Server Interface Module and the server. - Page 42 Troubleshooting The mouse is lost when I switch to a different port. • Check that the mouse you are using is connected properly to the console port of the PRO3 KVM Switch. • Tighten any loose cable connections. • If you are using a mouse driver that was included with your mouse, uninstall it and install the standard Microsoft mouse driver.
- Page 43 Troubleshooting I am connecting the USB Cable Kit to a USB server, and my keyboard and mouse do not work. • Prior to connecting the PRO3 KVM Switch, make sure that the HID USB driver is installed on each server. (To install the HID USB driver, connect a USB mouse and USB keyboard to the server.
-
Page 44: Glossary
Glossary The following definitions are used throughout this User Manual. AutoScan: A mode of operation where the KVM switch scans from one port to another, on an ongoing basis, as configured by the user. BANK: The address of a daisy-chained KVM switch (00–15), set by the DIP switch. -
Page 45: Information
(except for shipping charges for the product). What is not covered by this warranty? All above warranties are null and void if the Belkin product is not provided to Belkin for inspection upon Belkin’s request at the sole expense of the purchaser, or if Belkin determines that the Belkin product has been improperly installed, altered in any way, or tampered with. - Page 46 Belkin reserves the right to review the damaged Belkin product. All costs of shipping the Belkin product to Belkin for inspection shall be borne solely by the purchaser. If Belkin determines, in its sole discretion, that it is impractical to ship...
- Page 47 Information...
- Page 48 Belkin Tech Support Europe: 00 800 223 55 460 © 2007 Belkin International, Inc. All rights reserved. All trade names are registered trademarks of respective manufacturers listed. Mac OS, Mac, and Apple are trademarks of Apple Inc., registered in the U.S. and other countries.
- Page 49 Switch KVM PRO3 OmniView ® Manuel de lutilisateur F1DA104Zea F1DA108Zea F1DA116Zea...
- Page 50 Table des matières Introduction ..................1 Contenu de lemballage ...............1 Présentation ..................2 Caractéristiques .................2 Matériel requis ................4 Configuration requise ..............6 Illustrations de lappareil ..............7 Spécifications ................9 Installation ..................10 Préconfiguration ............... 10 Montage du switch KVM PRO3 ..........11 Raccordement de la console au switch KVM PRO3 ....14 Raccordement des serveurs au switch KVM PRO3 ....
-
Page 51: Introduction
Les switchs KVM PRO3 peuvent facilement être montés en série, ce qui vous permet de contrôler jusquà 256 serveurs PS/2 et/ou USB à partir dune seule console. Le switch KVM PRO3 bénéficie également de la garantie Belkin de 3 ans. Vous trouverez dans ce manuel des informations sur votre nouveau switch KVM PRO3, de son installation à... -
Page 52: Présentation
Présentation Caractéristiques • Raccourcis clavier Les raccourcis clavier permettent de sélectionner le port souhaité à laide de commandes de clavier spécifiques. En utilisant une simple combinaison de touches sur le clavier, vous pouvez choisir instantanément parmi un maximum de 256 serveurs. •... - Page 53 Les mises à niveau sont gratuites pour toute la durée de vie de votre Switch KVM PRO3 et peuvent être téléchargées sur le site dassistance technique de Belkin à ladresse www.belkin.com/support.
-
Page 54: Matériel Requis
Présentation Matériel requis Câbles : Le raccordement du switch KVM PRO3 à un serveur nécessite un kit de microcâblage double port Belkin. Kits de microcâblage double port de Belkin : F1D9400-XX (connecteurs PS/2) F1D9401-XX (connecteurs USB) ���������� ������������ ���������� �����������... - Page 55 Présentation Câble de montage en série PRO3 de Belkin : F1D108-CBL Remarque : Les références et la disponibilité des produits peuvent varier. F1D108-CBL �������������...
-
Page 56: Configuration Requise
Présentation Configuration requise Systèmes dexploitation Le switch KVM PRO3 est compatible avec les unités centrales fonctionnant sous les plates-formes suivantes (liste non exhaustive) : • Windows® NT®, 95, 98, 2000, Me, XP, Server 2003 ou VistaTM • Microsoft® DOS 5.x et versions ultérieures •... -
Page 57: Illustrations De Lappareil
Présentation Illustrations de lappareil Face avant du switch KVM PRO3 : Témoin à 7 segments Témoin didentification du BANK ����������������� ����������������� didentification � Bouton AutoScan sélectionné ��������������� ������������������� ���������������������������� du port sélectionné Sélecteur de port Boutons de défilement manuel �������������� � ������������... - Page 58 Présentation Illustrations de lappareil Face arrière du switch KVM PRO3 : Sortie de montage en série Fiche pour alimentation CC ��������������� ������������� Commutateur DIP de sélection de BANK ���������������������� SCSI-50 dual-host ports ����������������������� Port de mise à niveau Flashet ������������������ commutateur DIP ���������������������...
-
Page 59: Spécifications
Présentation Spécifications Référence : F1DA104Zea, F1DA108Zea, F1DA116Zea Boîtier : Boîtier métallique avec face plastique hautement résistante Alimentation : Adaptateur secteur 12 V CC, 1 A, avec broche centrale positive Montage en série : Maximum de 16 switchs KVM OmniView Nombre de serveurs pris en charge : 4, 8 et 16 respectivement pour les modèles à... -
Page 60: Installation
La transmission des signaux VGA est optimale jusquà 7,6 mètres. Au-delà, les risques de dégradation de la vidéo augmentent. Dès lors, Belkin recommande de ne pas utiliser de câbles de plus de 7,6 mètres entre le switch KVM PRO3 et les serveurs branchés. -
Page 61: Montage Du Switch Kvm Pro3
Installation Montage du switch KVM PRO3 Installation des fixations de montage (F1DA108Zea et F1DA116Zea) Les switchs KVM PRO3 à 8 ou 16 ports sont livrés avec des fixations de montage réglables parfaitement adaptées à une installation dans des baies de 19 pouces. Les supports de fixation proposent trois positions de réglage, ce qui permet daligner la face du switch KVM PRO3 avec les extrémités des rails ou de placer le switch de façon à... - Page 62 Installation Remarque : Si vous devez monter ce switch KVM PRO3 en série avec un autre switch KVM, réglez ladresse BANK avant de linstaller dans la baie. Reportez-vous à la section « Raccordement de plusieurs switchs KVM PRO3 (par montage en série) » de ce manuel. Le switch KVM PRO3 est maintenant solidement fixé...
- Page 63 Le switch KVM PRO3 est maintenant solidement fixé au bâti et vous pouvez procéder au branchement de la console. Remarque pour les propriétaires dun produit PRO3 Belkin de 1re génération (F1DA104Tea, F1DA108Tea et F1DA116Tea) : Linstallation du switch KVM PRO3 a changé. Veuillez suivre scrupuleusement les consignes de ce manuel pour garantir une installation adéquate.
-
Page 64: Raccordement De La Console Au Switch Kvm Pro3
Installation Raccordement de la console au switch KVM PRO3 Le même type de plate-forme doit être utilisé pour le clavier et pour la souris. Par exemple, si vous utilisez un clavier USB, vous devez également brancher une souris USB sur la console. Étape 1 Branchez le câble du moniteur VGA au port femelle HDDB15 à... - Page 65 Installation Étape 3 Branchez le câble de la souris PS/2 ou USB sur le port souris à larrière du switch KVM PRO3, dans la partie « Console » (reportez-vous à lillustration ci-dessous). Remarque : Utilisez uniquement des périphériques dentrées USB ou des périphériques dentrées PS/2 pour le branchement à...
-
Page 66: Raccordement Des Serveurs Au Switch Kvm Pro3
Étape 1 Assurez-vous que le serveur est éteint. Étape 2 À laide du Kit de microcâblage double port pour PS/2 de Belkin (F1D9400- XX), branchez le connecteur VGA au port moniteur de votre serveur (reportez-vous à lillustration ci-dessous). Étape 3 Branchez la souris et le clavier PS/2 aux ports clavier et souris du serveur (reportez-vous à... - Page 67 Installation Étape 4 Branchez le Kit de microcâblage double port pour PS/2 de Belkin aux ports hôtes du switch KVM PRO3 (reportez-vous à lillustration ci-dessous). Étape 5 Allumez le serveur. Étape 6 Répétez les étapes 1 à 5 pour chaque serveur PS/2 supplémentaire à...
- Page 68 Étape 1 Assurez-vous que le serveur est allumé. Étape 2 À laide du Kit de microcâblage double port pour USB de Belkin (F1D9401- XX), branchez le connecteur VGA au port moniteur de votre serveur (reportez-vous à lillustration ci-dessous). Étape 3 Branchez le connecteur USB sur un port USB libre du serveur (reportez- vous à...
- Page 69 Installation Étape 4 Branchez le Kit de microcâblage double port pour USB de Belkin aux ports hôtes du switch KVM PRO3 (reportez-vous à lillustration ci-dessous). Le serveur devrait reconnaître le switch KVM et, si nécessaire, installer automatiquement le pilote HID USB.
-
Page 70: Raccordement De Plusieurs Switchs Kvm Pro3
01 à 15 correspondent aux switchs « secondaires ». Remarque : Votre switch KVM PRO3 propose une rétrocompatibilité avec les switchs KVM PRO3 OmniView de Belkin munis dun câblage standard (F1DA104Tea, F1DA108Tea, F1DA116Tea). Dans une configuration en chaîne, le switch KVM PRO3 à microcâblage (F1DA104Zea, F1DA108Zea, F1DA116Zea) doit être désigné... - Page 71 Installation Comment attribuer une adresse de BANK Tous les switchs KVM PRO3 possèdent un commutateur de BANK « DIP ». Le commutateur de BANK « DIP » sert à attribuer ladresse de BANK appropriée à chaque switch KVM PRO3. • Dans une configuration composée dune seule unité, réglez le commutateur de BANK «...
- Page 72 Installation Exemple de configuration en chaîne Primary unit (BANK 00) cable 1 Secondary unit ( BANK 01) cable 2 Secondary unit ( BANK 02) cable 3 Secondary unit ( BANK 03) Pour commencer : Étape 1 : Assurez-vous que tous les serveurs et switchs KVM PRO3 sont éteints et que chaque switch KVM PRO3 possède une adresse de BANK unique.
- Page 73 à monter en série. Remarque : Votre switch KVM PRO3 propose une rétrocompatibilité avec les switchs KVM PRO3 OmniView de Belkin munis dun câblage standard (F1DA104T, F1DA108T, F1DA116T). Dans une configuration en chaîne, le switch KVM PRO3 à microcâblage (F1DA104Z, F1DA108Z, F1DA116Z) doit être désigné...
- Page 74 Installation Branchement des serveurs: Étape 1 : Branchez tous les serveurs aux switchs KVM principaux et secondaires. Consultez la section « Raccordement des serveurs au switch KVM PRO3 » à la page 16 pour plus de détails. Étape 2 : Allumez les switchs KVM secondaires dans lordre, en commençant par le BANK le plus élevé...
-
Page 75: Mise En Route Des Systèmes
Installation Mise en route des systèmes Vérifiez que tous les serveurs branchés au switch KVM PRO3 sont allumés. Si lun des serveurs branchés nest pas encore allumé, vous pouvez le faire maintenant (les serveurs peuvent être allumés simultanément). Le switch KVM PRO3 émule une souris et un clavier sur chaque port et permet au serveur de démarrer normalement. -
Page 76: Utilisation Du Switch Kvm Pro3
Utilisation du switch KVM PRO3 Maintenant que la console et les serveurs sont connectés au switch KVM PRO3, celui-ci est prêt à lemploi. Sélectionnez les serveurs à laide des sélecteurs de port à accès direct, situé sur la face avant du switch KVM PRO3 ;... - Page 77 Utilisation du switch KVM PRO3 Dans une configuration en série, vous pouvez changer de BANK (switch KVM) en appuyant sur « Arrêt défil », « Arrêt défil », « Pg préc. » pour passer au BANK précédent. Appuyez sur « Arrêt défil », « Arrêt défil », « Pg suiv. » pour passer au BANK suivant.
-
Page 78: Sélection Dun Serveur À Laide Des Sélecteurs De Port À Accès Direct
Utilisation du switch KVM PRO3 Sélection dun serveur à laide des sélecteurs de port à accès direct Vous pouvez choisir directement le serveur à contrôler en appuyant sur le sélecteur de port à accès direct à côté du port correspondant. Le témoin sallume pour indiquer que le port est correctement choisi. -
Page 79: Mode Autoscan
Utilisation du switch KVM PRO3 Mode AutoScan La fonction AutoScan vous permet dindiquer au switch KVM PRO3 danalyser et de surveiller les activités de tous les serveurs connectés, lun après lautre. Dans ce mode, le switch KVM PRO3 demeure sur un serveur pendant un nombre de secondes prédéfini avant de passer au serveur suivant. -
Page 80: Affichage À Lécran (Osd)
Utilisation du switch KVM PRO3 Affichage à lécran Le menu sur écran permet de passer dun serveur à lautre, de nommer vos serveurs, dactiver ou de désactiver la fonction AutoScan, de définir la durée danalyse de la fonction AutoScan, dactiver la fonction de protection par mot de passe et de programmer des raccourcis clavier. - Page 81 Utilisation du switch KVM PRO3 Pour passer dun serveur à lautre à partir de la page principale du menu, utilisez les touches fléchées du clavier pour sélectionner un serveur et appuyez sur la touche « Entrée ». Le symbole « »...
- Page 82 à nouveau sur « Entrée » pour enregistrer la saisie. Les noms et mots de passe peuvent se composer dun maximum de huit caractères. Par défaut, le nom et le mot de passe administrateur sont les suivants : Nom dutilisateur : admin Mot de passe : belkin...
- Page 83 Utilisation du switch KVM PRO3 Access List [Liste des accès] Cette fonction permet de définir les droits daccès des utilisateurs aux ports. Seul ladministrateur peut modifier la liste des droits daccès. La colonne de gauche présente une liste des noms de ports. Les utilisateurs sont représentés par leur numéro (1 à...
-
Page 84: Commandes Avec Raccourcis Clavier
Utilisation du switch KVM PRO3 Commandes avec raccourcis clavier Voici une liste complète des commandes de raccourci clavier pouvant être utilisées avec le switch KVM PRO3 : Commande Fonction Barre despacement Activer le menu sur écran Hôte précédent Hôte suivant [01,02,,,16] port Switch KVM non monté... - Page 85 Utilisation du switch KVM PRO3 Touches combo Sun et touches Mac® Le clavier USB branché au switch KVM PRO3 ne prend pas en charge le pavé numérique Sun pour certaines fonctions spéciales dans lenvironnement dexploitation Sun. Lorsque le switch KVM est branché à un serveur Sun, il émule les touches Sun à...
-
Page 86: Mise À Jour Du Micrologiciel
KVM PRO3. En effet, la reconfiguration du logiciel risque dentraîner des problèmes de fonctionnement imprévus. Si vous avez besoin daide, veuillez contacter lassistance technique de Belkin. Les éléments suivants sont nécessaires pour mettre le micrologiciel à jour : 1. -
Page 87: Foire Aux Questions
R : Le switch KVM PRO3 prend en charge les souris USB et PS/2 de Microsoft, Logitech®, Kensington®, etc., et Belkin. Veuillez contacter le service dassistance technique de Belkin pour tout problème de compatibilité. Q : Comment le switch KVM PRO3 permet-il à lutilisateur de changer de port ? R : Le switch KVM propose trois méthodes de sélection du port. - Page 88 Il suffit de relier tous les serveurs au switch grâce aux Kits de câblage KVM de Belkin, puis de brancher un clavier, un moniteur et une souris au port de la console. Le switch est ensuite prêt à...
-
Page 89: Dépannage
Dépannage Mon serveur ne démarre pas lorsquil est connecté au switch KVM, mais il fonctionne correctement lorsque je branche le clavier, le moniteur et la souris directement au serveur. • Assurez-vous que les câbles du clavier et de la souris sont fermement connectés sur le Module dinterface serveur et sur le serveur. - Page 90 Dépannage Je perds la souris lorsque je passe sur un autre port. • Vérifiez que la souris utilisée est correctement branchée sur le port console du switch KVM PRO3. • Enfoncez le connecteur sil nest pas correctement branché. • Si vous utilisez le pilote fourni avec votre souris, désinstallez-le, puis installez le pilote de souris Microsoft standard.
- Page 91 Dépannage Je connecte le Kit de câblage USB à mon serveur USB, mais le clavier et la souris ne fonctionnent pas. • Avant de brancher le switch KVM PRO3, assurez-vous que le pilote USB HID est installé sur tous les serveurs. (Pour installer le pilote USB HID, branchez une souris et un clavier USB sur le serveur.
-
Page 92: Glossaire
Glossaire Les définitions suivantes sont utilisées dans ce manuel : AutoScan : Mode de fonctionnement dans lequel le switch analyse les ports lun après lautre selon une base de progression définie par lutilisateur. BANK :Adresse dun switch KVM monté en série (00 à 15), défini par le commutateur DIP. -
Page 93: Information
Informations moins un port de console et plusieurs ports de serveurs. OSD : On-Screen Display. Menu écran, interface utilisateur graphique permettant de contrôler et de configurer le switch KVM. Port : Récepteur dinterface sur un serveur au moyen duquel vous pouvez connecter un périphérique ou brancher un câble de périphérique. - Page 94 Garantie limitée de 3 ans du produit de Belkin International, Inc. Couverture offerte par la garantie Belkin International, Inc. (« Belkin ») garantit à lacheteur initial de ce produit Belkin que le produit est exempt de défauts de conception, de montage, de matériau et de fabrication.
- Page 95 Copie de la preuve dachat originale. 2. Le représentant du service clientèle de Belkin vous expliquera comment nous faire parvenir votre facture et le produit Belkin, ainsi que la marche à suivre pour présenter votre réclamation. Belkin se réserve le droit dexaminer le produit Belkin endommagé. Tous les frais dexpédition du produit Belkin à...
- Page 96 Assistance technique Belkin Europe : 00 800 223 55 460 © 2007 Belkin International, Inc. Tous droits réservés. Toutes les raisons commerciales sont des marques déposées de leurs fabricants respectifs. Mac OS, Mac et Apple sont des marques de commerce dApple Computer, Inc., enregistrées aux États-Unis et dans dautres pays.
- Page 97 OmniView PRO3 ® KVM-Switch Benutzerhandbuch F1DA104Zea F1DA108Zea F1DA116Zea...
- Page 98 Inhaltsverzeichnis Einführung ..................1 Verpackungsinhalt ..............1 Übersicht ..................2 Merkmale ...................2 Systemvoraussetzungen .............4 Systemanforderungen ..............6 Bestandteile ................7 Technische Daten ...............9 Installation ..................10 Vorbereitung des Geräts ............10 Einbau des PRO3 KVM-Switch ..........11 Anschließen des PRO3 KVM-Switch an die Konsole ....14 Anschließen des PRO3 KVM-Switch an die Server .....
-
Page 99: Einführung
Problem auftreten. Einfache, kurze Installationsanweisungen finden Sie in der Installationsanleitung, die in der PRO3 KVM-Switch-Packung enthalten ist. Wir freuen uns, dass Sie sich für den PRO3 KVM-Switch von Belkin entschieden haben. Wir freuen uns über Ihre Wahl und sind davon überzeugt, dass Sie schnell erkennen werden, warum Belkin die Nr. -
Page 100: Übersicht
Übersicht Merkmale • Hot Keys (Tastaturbefehle) Sie können die gewünschte Schnittstelle mit Hilfe von Tastaturbefehlen über die Tastatur auswählen. Eine einfache Tastenfolge genügt, um aus bis zu 256 Servern einen bestimmten Rechner festzulegen. • AutoScan Mit der AutoScan-Funktion kann der Switch die Aktivitäten aller betriebsbereiten Server einzeln abfragen und überwachen, die am Switch angeschlossen sind. - Page 101 Firmware installieren können. Dadurch bleibt der KVM- Switch mit Geräten und Servern kompatibel, die künftig auf den Markt kommen. Firmware-Aktualisierungen sind für die gesamte Lebensdauer des KVM-Switch kostenlos als Download auf der Support-Website von Belkin unter www.belkin.com/support erhältlich.
-
Page 102: Systemvoraussetzungen
Übersicht Systemvoraussetzungen Kabel: Der Anschluss des KVM-Switch an einen Server erfordert einen Dual-Port- Mikrokabelsatz von Belkin. Belkin Dual-Port Mikrokabelsätze: F1D9400-xx (PS/2-Ausführung) F1D9401-xx (USB-Ausführung) ���������� ������������ ���������� �����������... - Page 103 Übersicht Belkin PRO3 Kaskadierungskabel: F1D108-CBL Hinweis: Produktbezeichnungen und Verfügbarkeit können variieren. F1D108-CBL �������������...
-
Page 104: Systemanforderungen
Übersicht Systemanforderungen Betriebssysteme Der KVM-Switch ist kompatibel mit Computern, die mit folgenden Betriebssystemen betrieben werden, ist aber nicht auf diese beschränkt. • Windows , 95, 98, 2000, Me, XP, Server 2003 oder Vista ® ® • Microsoft DOS 5.x und höher ®... -
Page 105: Bestandteile
Übersicht Bestandteile KVM-Switch-Vorderseite: 7-teilige LED zur Anzeige LED für der gewählten BANK ����������������� ����������������� Port-Erkennung � AutoScan–Taste ��������������� ������������������� ���������������������������� Direktwahltaste Manuelle BANK-Auswahltasten �������������� � ������������ �������������� ������������� (F1DA108Zea) - Page 106 Übersicht Bestandteile KVM-Switch-Rückseite: Kaskadierung aus Anschluss für Netzteil ��������������� ������������� DIP-Schalter für BANK-Auswahl ���������������������� SCSI-50 dual-host ports ����������������������� Schnittstelle für Flash-Aktualisierungund ������������������ DIP-Auswahlschalter ��������������������� Konsole:VGA-, PS/2-Maus/ �������� Tastatur-Ports,USB-Maus/ ������������������������������� Tastatur-Ports ������������������������ �������������� Kaskadierung ein...
-
Page 107: Technische Daten
Übersicht Technische Daten Artikelnr.: F1DA104Zea, F1DA108Zea, F1DA116Zea Gehäuse: Metallgehäuse mit stoßfester Kunststofffrontplatte Stromversorgung: Netzteil (12 V, 1 A), Mittenkontakt positiv Kaskadierung: Maximal 16 OmniView KVM-Switches Anzahl unterstützter Server: 4, 8, 16 bei 4-, 8-, bzw. 16-Port-Ausführung (max. 256 Server über Kaskadierung) Unterstützte Bildschirme: CRT und LCD (VGA-Unterstützung) Maximale Bildschirmauflösung:... -
Page 108: Installation
Einheiten ausschalten. Das Anschließen oder Herausziehen von Kabeln bei eingeschaltetem Server kann zu irreparablen Schäden am Server bzw. Switch führen. Belkin übernimmt keinerlei Haftung für so verursachte Schäden. Jetzt können Sie mit der Installation Ihres Switch beginnen. Auf den folgenden Seiten (S. 11-19) wird die Hardware-Installation eines... -
Page 109: Einbau Des Pro3 Kvm-Switch
Installation Einbau des PRO3 KVM-Switch Einbau in den Rack (nur F1DA108Zea und F1DA116Zea) Die 8fach- und 16fach-Switches enthalten einstellbare Halterungen für den Einbau in einen 19”-Rack. Die Halterungen ermöglichen die Einstellung von drei Befestigungspositionen, sodass Sie die Vorderseite des Switch so anbringen können, dass er entweder bündig zu den Schienen abschließt oder über die Vorderseite der Schienen herausragt. - Page 110 Installation Hinweis: Wenn der KVM-Switch mit einem anderen KVM-Switch kaskadiert werden soll, stellen Sie die BANK-Adresse vor dem Einbau ins Rack ein. Weitere Informationen hierzu finden Sie im Abschnitt „Verbinden mehrerer PRO3 KVM- Switches (Kaskadierung)”. Der KVM-Switch ist jetzt sicher am Rack befestigt. Sie können Ihn an die Konsole anschließen.
- Page 111 Der KVM-Switch ist jetzt sicher am Rack befestigt. Sie können Ihn an die Konsole anschließen. Hinweis für Benutzer von Geräten aus der PRO3-Serie (Generation 1) von Belkin (F1DA104Tea, F1DA108Tea, F1DA116Tea): Die Installation des PRO3-Switch wurde geändert. Bitte folgen Sie genau den Anweisungen in diesem Benutzerhandbuch, damit eine ordnungsgemäße Installation gewährleistet wird.
-
Page 112: Anschließen Des Pro3 Kvm-Switch An Die Konsole
Installation Anschließen des PRO3 KVM-Switch an die Konsole Sie müssen für Tastatur und Maus dieselbe Plattform verwenden. Wenn Sie beispielsweise eine USB-Tastatur verwenden, müssen Sie auch eine USB-Maus an die Konsole anschließen. Schritt 1 Schließen Sie das VGA-Bildschirmkabel an die HDDB15-Buchse im Konsolenteil (Konsole) an der Rückseite des KVM-Switch an. - Page 113 Installation Schritt 3 Verbinden Sie die PS/2- bzw. USB-Maus mit der entsprechenden Schnittstelle an der Rückseite des Switch (Bereich „Console”). (Siehe Abbildung unten.) Hinweis: Verwenden Sie in Verbindung mit der Konsole entweder nur USB-Geräte oder nur PS/2-Geräte. Eine Kombination aus USB- und PS/2-Geräten hat eine 2-sekündige Verzögerung zwischen den Geräten zur Folge.
-
Page 114: Anschließen Des Pro3 Kvm-Switch An Die Server
(PS/2-Anschluss): Schritt 1 Stellen Sie sicher, dass der Server abgeschaltet ist. Schritt 2 Verwenden Sie den Dual-Port Mikrokabelsatz für PS/2 von Belkin (F1D9400-XX) und schließen Sie den VGA-Stecker an den Monitor-Port des Servers an. (Siehe Abbildung unten.) Schritt 3 Schließen Sie die PS/2-Maus- und -Tastatur an die Maus- und... - Page 115 Installation Schritt 4 Verbinden Sie den Dual-Port Mikrokabelsatz für PS/2 von Belkin mit den entsprechenden Host-Ports am Switch. (Siehe Abbildung unten.) Schritt 5 Fahren Sie den Server hoch. Schritt 6 Wiederholen Sie Schritt 1 bis 5 für jeden weiteren anzuschließenden PS/2-Server.
- Page 116 (USB-Anschluss): Schritt 1 Stellen Sie sicher, dass der Server abgeschaltet ist. Schritt 2 Verwenden Sie den Dual-Port Mikrokabelsatz für USB von Belkin (F1D9401-XX) und schließen Sie den VGA-Stecker an den Monitor-Port des Servers an. (Siehe Abbildung unten.) Schritt 3 Schließen Sie den USB-Stecker an eine freie USB-Schnittstelle am Server an.
- Page 117 Installation Schritt 4 Verbinden Sie den Dual-Port Mikrokabelsatz für USB von Belkin mit den entsprechenden Host-Ports am Switch. (Siehe Abbildung unten.) Ihr Server sollte den Switch automatisch erkennen und automatisch den HID-USB-Treiber installieren, wenn das erforderlich ist. Schritt 5 Wiederholen Sie Schritt 1 bis 4 für jeden weiteren anzuschließenden USB-Server.
-
Page 118: Verbinden Mehrerer Pro3 Kvm-Switches (Kaskadierung)
1 Secondary unit ( BANK 01) cable 2 Secondary unit ( BANK 02) cable 3 Secondary unit ( BANK 03) Hinweis: Für jede Kaskadierung ist ein entsprechendes Kaskadierungskabel (F1D108-CBL) erforderlich. Dies erhalten Sie bei Ihrem Belkin-Händler oder online unter www.belkin.com. - Page 119 Installation Eine BANK-Adresse zuweisen Alle PRO3 KVM-Switches verfügen über einen „BANK DIP”-Schalter. Der „BANK DIP“-Schalter wird verwendet, um die richtige BANK-Adresse für jeden KVM- Switch zuzuweisen. • Wird nur ein KVM-Switch verwendet, setzen Sie seinen „BANK DIP“-Schalter in die Position „primary” (primär) (BANK-Adresse 00). Dies ist die Standard- Einstellung.
- Page 120 Installation Beispiel für eine Kaskadierung Primary unit (BANK 00) cable 1 Secondary unit ( BANK 01) cable 2 Secondary unit ( BANK 02) cable 3 Secondary unit ( BANK 03) Vorbereitungen: Schritt 1: Stellen Sie sicher, dass alle Server und KVM-Switches abgeschaltet sind und dass auf jedem Switch eine eindeutige BANK-Adresse eingestellt ist.
- Page 121 Schritt 4 Wiederholen Sie Schritt 3 für weitere KVM-Switches, die Sie miteinander kaskadieren möchten. Hinweis: Ihr KVM-Switch ist rückwärtskompatibel mit den Belkin OmniView PRO3 KVM-Switches mit Standardverkabelung (F1DA104Tea, F1DA108Tea, F1DA116Tea). In einer Kaskadierung, muss der Switch mit Mikroverkabelung (F1DA104Zea, F1DA108Zea, F1DA116Zea) als primärer Switch einrichtet werden...
- Page 122 Installation Anschluss der Server: Schritt 1: Schließen Sie alle Server an die Primär- und Sekundär-KVM-Switches an. Weitere Informationen finden Sie unter „Anschließen des PRO3 KVM-Switch an die Konsole” auf Seite 16. Schritt 2: Fahren Sie die Sekundär-Switches nacheinander hoch, indem Sie die Stecker wieder in die Netzsteckdosen stecken.
-
Page 123: Hochfahren Der Computer
Installation Hochfahren der Computer Prüfen Sie, ob alle Server, die mit dem Switch verbunden sind, angeschaltet sind Sollte der ein oder andere angeschlossene Server noch nicht hochgefahren sein, können Sie dies jetzt tun (die Server können gleichzeitig hochgefahren werden). Der Switch emuliert an jedem Port eine Tastatur und eine Maus und ermöglicht dem Server einen normalen Systemstart. -
Page 124: Verwenden Des Pro3 Kvm-Switch
Verwenden des PRO3 KVM-Switch Sie haben die Konsole und die Server an den Switch angeschlossen. Jetzt können Sie mit der Arbeit beginnen. Wählen Sie die angeschlossenen Server entweder über die Direktwahlschalter auf dem Bedienfeld des KVM-Switch, über das Bildschirmmenü oder über die Tastenbefehle der Tastatur aus. Nach dem Umschalten der Server dauert es ca. - Page 125 Verwenden des PRO3 KVM-Switch Bei einer Kaskadierung können Sie zwischen den BANKs umschalten, indem Sie die Tastenfolge „Rollen”, „Rollen”, “Bild nach oben” drücken. Dadurch gelangen Sie zur vorherigen BANK. Mit „Rollen”, „Rollen”, “Bild nach unten” schalten Sie zur nächsten BANK um. ����...
-
Page 126: Auswählen Eines Servers Über Direktwahlschalter
Verwenden des PRO3 KVM-Switch Auswählen eines Servers über Direktwahlschalter Sie können den gewünschten Server mit dem Direktwahlschalter neben dem Direktwahlschalter neben der entsprechenden Schnittstelle direkt auswählen. Die LED leuchtet auf, um anzuzeigen, dass die Schnittstelle ausgewählt ist. Wenn Sie mehrere KVM-Switches installieren und kaskadieren, können Sie mit den BANK-Auswahltasten auf dem Bedienfeld des KVM-Switches auf andere Server zugreifen, die an die Sekundär-KVM-Switches angeschlossen sind. -
Page 127: Autoscan-Modus
Verwenden des PRO3 KVM-Switch AutoScan-Modus Mit der AutoScan-Funktion kann der Switch die Aktivitäten aller betriebsbereiten Server einzeln abfragen und überwachen, die am Switch angeschlossen sind. Der Switch verbleibt für eine voreingestellte Zeit an jeder Schnittstelle, bevor er zum nächsten Server weiterschaltet. Das Zeitintervall für die Überwachung des jeweiligen Servers kann über das Bildschirmmenü... - Page 128 Verwenden des PRO3 KVM-Switch Bildschirmmenü (OSD) Über das Bildschirmmenü können Sie zwischen Servern umschalten, die Server mit Namen versehen, die AutoScan-Funktion aktivieren und deaktivieren, das gewünschte AutoScan-Intervall einstellen, den Kennwortschutz aktivieren und Tastaturbefehle einstellen. Um das Bildschirmmenü (OSD) zu öffnen, drücken Sie „Rollen”, „Rollen”, Leertaste.
- Page 129 Verwenden des PRO3 KVM-Switch Wenn Sie mit Hilfe des Hauptmenüs zwischen Servern umschalten wollen, verwenden Sie dazu die Pfeiltasten auf Ihrer Tastatur, um zu dem gewünschten Server zu navigieren und drücken Sie die Eingabetaste. Ein „ ”-Zeichen zeigt an, auf welchen Server gerade über Ihre Konsole zugegriffen wird.
- Page 130 Navigation verwenden. Wählen Sie das gewünschte Feld aus und drücken Sie die Eingabetaste, um die Angaben zu bearbeiten. Drücken Sie die Eingabetaste, um die Eingabe zu speichern. Namen und Kennwörter dürfen maximal 8 Zeichen lang sein. Der Standard-Administratorennamen und das Kennwort lauten: Benutzername: admin Kennwort: belkin...
- Page 131 Verwenden des PRO3 KVM-Switch Zugriffsliste Mit dieser Funktion können Sie den Benutzerzugriff auf einer Portebene individuell festlegen. Die Zugriffsliste kann nur vom Administrator eingerichtet werden. Die Portnamen werden in der linken Spalte aufgeführt. Die Benutzer werden nach Zahlen aufgelistet (1 bis 8). Öffnen Sie den Benutzerport und drücken Sie die Eingabetaste, um den Zugriff für jeden Benutzer und jede Port- Kombination zu erlauben/zu verweigern.
-
Page 132: Tastaturbefehle
Verwenden des PRO3 KVM-Switch Tastaturbefehle In der Tabelle unten finden Sie eine komplette Liste mit Tastaturbefehlen, die Sie für Ihren Switch verwenden können: Befehl Funktion Leertaste Aktiviert das Bildschirmmenü Vorheriger Host Nächster Host [01, 02.,,,16] Port Kein kaskadierter KVM-Switch [00, 01.,,,15] BANK Kaskadierungs-Einstellung: Erste und zweite Ziffer bezeichnet BANK [01, 02.,,,16] Port... -
Page 133: Sun Combo- And Mac-Funktionstastenbelegung
Verwenden des PRO3 KVM-Switch Sun Combo- and Mac -Funktionstastenbelegung ® Die USB-Tastatur, die an den Switch angeschlossen ist, unterstützt spezielle Funktionen des Sun-Betriebsystems, die durch die Sun-Tastatur aktiviert werden können, nicht. Wenn ein KVM-Switch mit einem Sun Server verbunden ist, emuliert der KVM-Switch die Sun-Tasten, indem es Tastenkombinationen benutzt, die als Combo-Tasten bezeichnet werden. -
Page 134: Firmware Aktualisieren
Maus oder der Tastatur feststellen, da die Neukonfigurierung der Software zu unterwarteten Problemen im Gerätebetrieb führen kann. Bitte wenden Sie sich an den technischen Support von Belkin, wenn Sie Hilfe benötigen. Zur Aktualisierung der Firmware wird Folgendes vorausgesetzt: 1. ein separater Server mit Windows 2000, XP oder Vista. Dieser Server darf NICHT mit den Serverports am PRO3 KVM-Switch verbunden sein. -
Page 135: Häufig Gestellte Fragen
, Kensington ® ® Belkin. Sollte es zu Kompatibilitätsproblemen kommen, wenden Sie sich bitte an den technischen Support von Belkin. F: Wie kann ich zwischen den verschiedenen Ports umschalten? A: Sie können Ports auf drei verschiedene Arten auswählen: Zum einen über spezielle Tastenbefehle mit der Tastatur, dann per Bildschirmmenü... - Page 136 F: Muss ich für den Switch Software installieren? A: Nein. Sie müssen weder Treiber noch andere Software installieren. Verbinden Sie einfach alle Server mit den KVM-Kabelsätzen von Belkin und schließen Sie eine Tastatur, einen Bildschirm und eine Maus an die Konsolenschnittstelle an.
-
Page 137: Fehlerbehebung
Fehlerbehebung Der Server startet nicht, wenn eine Verbindung zum KVM-Gerät besteht und arbeitet störungsfrei, wenn ich Tastatur, Monitor und Maus direkt mit dem Server verbinde. • Stellen Sie sicher, dass Tastatur- und Mauskabel korrekt am Server und am Server-Schnittstellenmodul angeschlossen sind. •... - Page 138 Fehlerbehebung Wenn ich zu einer anderen Schnittstelle umschalte, wird die Maus nicht mehr erkannt. • Überprüfen Sie, ob die verwendete Maus ordnungsgemäß an die Konsolenschnittstelle des Switch angeschlossen wurde. • Befestigen Sie lose Verbindungen. • Wenn Sie den Maustreiber verwenden, den Sie mit der Maus erhalten haben, deinstallieren Sie ihn.
- Page 139 Fehlerbehebung Ich habe den USB-Kabelsatz über USB an meinen Server angeschlossen. Tastatur und Maus funktionieren nicht. • Vor dem Anschließen des Switch müssen Sie sicherstellen, dass auf jedem Server der HID-USB-Treiber installiert ist. (Zur Installation des HID-USB- Treibers schließen Sie eine USB-Maus und eine USB-Tastatur an den Server an.
-
Page 140: Glossar
Glossar Für das Handbuch gelten die folgenden Begriffsdefinitionen: AutoScan: Betriebsmodus, bei der der KVM Switch die Schnittstellen ständig nacheinander abfragt, wie vom Benutzer vorgegeben. BANK: Die Adresse eines kaskadierten KVM-Switch (00 – 15), einzustellen mit dem DIP-Schalter. Konsole: besteht aus einer Tastatur, einem Monitor und einer Maus, die am KVM Switch angeschlossen sind. - Page 141 Garantieausschluss. Alle oben genannten Garantien verlieren ihre Gültigkeit, wenn das Belkin- Produkt Belkin auf Anfrage nicht auf Kosten des Käufers zur Überprüfung zur Verfügung gestellt wird oder wenn Belkin feststellt, dass das Belkin-Produkt nicht ordnungsgemäß installiert worden ist, und dass unerlaubte Änderungen...
- Page 142 Wie Sie Unterstützung bekommen. Um Unterstützung von Belkin zu bekommen, gehen Sie nach folgenden Schritten vor: 1. Wenden Sie sich schriftlich an Belkin International, Inc., 501 W. Walnut St., Compton CA 90220, Attn: Customer Service oder wenden Sie sich innerhalb von 15 Tagen nach dem Vorfall telefonisch unter (800)-223-5546 an Belkin.
- Page 143 In manchen Ländern sind Einschränkungen bezüglich der Dauer der Garantie nicht zulässig. Die oben erwähnten Einschränkungen treffen für Sie dementsprechend nicht zu. UNTER KEINEN UMSTÄNDEN HAFTET BELKIN FÜR ZUFÄLLIGEN, BESONDEREN, DIREKTEN, INDIREKTEN, MEHRFACHEN SCHADEN ODER FOLGESCHÄDEN WIE, ABER NICHT AUSSCHLIESSLICH, ENTGANGENES GESCHÄFT ODER PROFITE, DIE IHNEN DURCH DEN VERKAUF ODER DIE...
- Page 144 Belkin Technischer Support Europa: 00 800 223 55 460 © 2007 Belkin International, Inc. Alle Rechte vorbehalten. Alle Produktnamen sind eingetragene Marken der angegebenen Hersteller. Mac OS, Mac und Apple sind Marken der Apple Inc., die in den USA und anderen Ländern eingetragen sind.
- Page 145 OmniView PRO3 ® KVM-switch Handleiding F1DA104Zea F1DA108Zea F1DA116Zea...
- Page 146 Inhoud Inleiding ................... 1 Inhoud van de verpakking ............1 Overzicht ..................2 Productkenmerken ..............2 Systeemvereisten ...............4 Systeemvereisten ...............6 De PRO3 KVM-switch in beeld ............7 Technische gegevens ..............9 Installeren ..................10 Voorconfigureren ..............10 De PRO3 KVM-switch monteren ..........11 De console op de PRO3 KVM-switch aansluiten ......14 Servers op de PRO3 KVM-switch aansluiten ......
-
Page 147: Inleiding
Hartelijk dank voor de aankoop van onze OmniView PRO3 KVM-switch. Wij stellen uw vertrouwen in onze producten zeer op prijs. Ongetwijfeld begrijpt u al snel waarom Belkin wereldwijd het best verkochte merk op het gebied van KVM-switches is. Inhoud van de verpakking... -
Page 148: Overzicht
Overzicht Productkenmerken • Sneltoetsen Deze functie stelt u in staat de gewenste poorten met specifieke toetscombinaties te kiezen. Zo kunt u met een paar simpele toetsaanslagen in een oogwenk een bepaalde server uit maar liefst 256 servers kiezen. • AutoScan Met de AutoScan-functie kunt u ervoor zorgen dat de PRO3 KVM-switch de activiteiten van alle aangesloten servers afzonderlijk scant en bewaakt. - Page 149 PRO3 KVM-switch installeren. Zo kunt u ervoor zorgen dat uw KVM- switch compatibel blijft met de nieuwste apparaten en servers. De firmware van uw PRO3 KVM-switch kan tijdens de hele levensduur van dit product gratis worden gedownload van de support-website van Belkin op www.belkin. com/support.
- Page 150 Overzicht Vereiste apparatuur Kabels: Voor het aansluiten van de PRO3 KVM-switch op een server hebt u dual-port KVM-kabels van Belkin nodig. Belkin dual-port KVM-kabelsets: F1D9400-XX (PS/2-uitvoering) F1D9401-XX (USB-uitvoering) ���������� ������������ ���������� �����������...
- Page 151 Overzicht Belkin PRO3 daisychainkabel: F1D108-CBL Let op: Artikelnummers en beschikbaarheid kunnen variëren. F1D108-CBL �������������...
-
Page 152: Systeemvereisten
Overzicht Systeemvereisten OS-platformen De PRO3 KVM-switch is compatibel met centrale verwerkingseenheden (CPUs) die ondermeer gebruik maken van volgende OS-platformen: • Windows , 95, 98, 2000, Me, XP, Server 2003 of Vista ® ® • Microsoft DOS 5.x en hoger ® •... -
Page 153: De Pro3 Kvm-Switch In Beeld
Overzicht De PRO3 KVM-switch in beeld Vooraanzicht van de PRO3 KVM-switch: Zevendelig LED-display Statuslampje voor voor herkenning van de ����������������� ����������������� identificatie � AutoScan-toets geselecteerde BANK ��������������� ������������������� ���������������������������� van de geselecteerde poort Poortkeuzetoets Handbediende BANK scroll- �������������� � ������������ toetsen ��������������... - Page 154 Overzicht De PRO3 KVM-switch in beeld Achteraanzicht van de PRO3 KVM-switch: Aansluiting gelijkstroomvoeding Uitgang daisychain ��������������� ������������� DIP-schakelaar voor keuze van ���������������������� BANKen SCSI-50 dual-host ports ����������������������� Flash upgrade-poorten DIP- ������������������ keuzeschakelaar ��������������������� Console:VGA, PS/2-muis/ �������� toetsenbordpoorten,USB-muis/ ������������������������������� toetsenbordpoorten ������������������������ ��������������...
-
Page 155: Technische Gegevens
Overzicht Technische gegevens Artikelnummer: F1DA104Zea, F1DA108Zea, F1DA116Zea Behuizing: Metalen behuizing met slagvast kunststof front Voeding: 12V DC, 1A netvoedingsadapter met positieve polariteit op de middenpin Daisychain: Maximaal 16 OmniView KVM-switches Aantal ondersteunde servers: 4, 8 en 16 respectievelijk voor 4-, 8- en 16-poorts uitvoeringen (doorkoppeling van max. -
Page 156: Voorconfigureren
4,5 m. Bij een grotere kabellengte kunnen storingen in het USB-signaal optreden waardoor het systeem defect kan raken. Let op: Met de CAT5-extender van Belkin (artikelnummer F1D084) kunt u de afstand tot de console (toetsenbord, muis en monitor) vergroten tot 91 meter. -
Page 157: De Pro3 Kvm-Switch Monteren
Aansluiting De PRO3 KVM-switch monteren Beugels monteren (F1DA108Zea en F1DA116Zea) Acht- en zestienpoorts PRO3 KVM-switches worden geleverd inclusief verstelbare montagebeugels die zich uitstekend lenen voor de installatie in 19- inch rekken. De montagebeugels zijn op drie standen instelbaar waardoor u de frontplaat van de PRO3 KVM-switch gelijk met de raileinden kunt monteren of de PRO3 KVM-switch voorbij de kop van de rails kunt plaatsen. - Page 158 Aansluiting Let op: Als u deze PRO3 KVM-switch wilt doorverbinden naar een andere KVM- switch, moet u het BANK-adres instellen voordat u de KVM-switch in een rek monteert. Zie in deze handleiding het hoofdstuk met de titel “Meerdere PRO3 KVM-switches aansluiten (daisychaining)”. De PRO3 KVM-switch is nu stevig in de beugels bevestigd.
- Page 159 De PRO3 KVM-switch is nu stevig in de beugels bevestigd. Nu kunt u de console aansluiten. Opmerking voor bezitters van een Belkin PRO3 van serie Generation 1 (F1DA104Tea, F1DA108Tea en F1DA116Tea): De installatieprocedure van de PRO3 KVM-switch is gewijzigd. Volg daarom de aanwijzingen in deze installatiehandleiding stipt op om zeker te zijn van een correcte installatie.
-
Page 160: De Console Op De Pro3 Kvm-Switch Aansluiten
Aansluiting De console op de PRO3 KVM-switch aansluiten Voor het toetsenbord en de muis moet u hetzelfde type platform gebruiken. Als u bijvoorbeeld een USB-toetsenbord gebruikt, moet u ook een USB-muis op de console aansluiten. Stap 1 Sluit de VGA-monitorkabel aan op de female HBBB15-poort aan de achterzijde van de PRO3 KVM-switch in het consolegedeelte. - Page 161 Aansluiting Stap 3 Sluit de PS/2- of USB-muiskabel aan op de muispoort aan de achterzijde van de PRO3 KVM-switch in het consolegedeelte. (Zie onderstaande afbeelding.) Let op: Gebruik voor de aansluitingen op de console ofwel uitsluitend USB-invoerapparaten of uitsluitend PS/2-invoerapparaten. Het gebruik van een combinatie van USB- en PS/2-invoerapparaten veroorzaakt een vertraging van twee seconden tussen elke bedieningshandeling bij deze invoerapparaten.
-
Page 162: Servers Op De Pro3 Kvm-Switch Aansluiten
Stap 1 Zorg ervoor dat de server uitgeschakeld is. Stap 2 Sluit de VGA-connector met Belkin dual-port KVM-kabels voor PS/2 (F1D9400- XX) aan op de monitorpoort van de server. (Zie onderstaande afbeelding.) Stap 3 Sluit de stekkers van de PS/2-muis en het PS/2-toetsenbord aan op de muis- en... - Page 163 Aansluiting Stap 4 Sluit de Belkin dual-port KVM-kabels voor PS/2 aan op de gewenste hostpoorten van de PRO3 KVM-switch. (Zie onderstaande afbeelding.) Stap 5 Schakel de server in. Stap 6 Herhaal stap 1 t/m 5 voor elke extra PS/2-server die u wilt aansluiten.
- Page 164 Stap 1 Zorg ervoor dat de server is ingeschakeld. Stap 2 Sluit de VGA-connector met Belkin dual-port KVM-kabels voor USB (F1D9401- XX) aan op de monitorpoort van de server. (Zie onderstaande afbeelding.) Stap 3 Sluit de USB-stekker aan op een vrije USB-poort van de server. (Zie...
- Page 165 Aansluiting Stap 4 Sluit de Belkin dual-port KVM-kabels voor USB aan op de gewenste hostpoorten van de PRO3 KVM-switch. (Zie onderstaande afbeelding.) De server moet de verbinding met de KVM-switch herkennen en zonodig het HID USB- stuurprogramma automatisch installeren. Stap 5 Herhaal stap 1 t/m 4 voor elke extra USB-server die u wilt aansluiten.
-
Page 166: Meerdere Pro3 Kvm-Switches Aansluiten (In Serie Koppelen)
“primaire” KVM-switch genoemd. De BANKEN 01 tot en met 15 worden “secundaire” KVM-switches genoemd. Let op: De PRO3 KVM-switch is backward-compatibel met OmniView PRO3 KVM-switches van Belkin met standaardbekabeling (F1DA104Tea, F1DA108Tea en F1DA116Tea). In een daisychainconfiguratie moet de PRO3 KVM-switch met micro-kabeltechnologie (F1DA104Zea, F1DA108Zea en F1DA116Zea) worden aangeduid als de primaire KVM-switch. - Page 167 Aansluiting Het toewijzen van een BANK-adres Alle PRO3 KVM-switches zijn voorzien van een “BANK DIP”-schakelaar. De “BANK DIP”-schakelaar wordt gebruikt om aan elke PRO3 KVM-switch een eigen BANK-adres toe te wijzen. • Stel bij een uit één eenheid bestaande configuratie de “BANK DIP”-schakelaar van de PRO3 KVM-switch in op de “primaire”...
- Page 168 Aansluiting Voorbeeld van een daisychainconfiguratie Primary unit (BANK 00) cable 1 Secondary unit ( BANK 01) cable 2 Secondary unit ( BANK 02) cable 3 Secondary unit ( BANK 03) Voorbereiding: Stap 1: Zorg ervoor dat alle servers en KVM-switches uitgeschakeld zijn en dat u aan elke PRO3 KVM-switch een uniek BANK-adres hebt toegewezen.
- Page 169 (als daisychain) wilt doorverbinden. Let op: De PRO3 KVM-switch is backward-compatibel met OmniView PRO3 KVM-switches van Belkin met standaardbekabeling (F1DA104T, F1DA108T, F1DA116T). In een daisychainconfiguratie moet de PRO3 KVM-switch met micro- kabeltechnologie (F1DA104Z, F1DA108Z of F1DA116Z) worden aangewezen als...
- Page 170 Aansluiting De servers aansluiten: Stap 1: Sluit alle servers op de primaire en secundaire KVM-switches aan. Zie voor instructies het hoofdstuk “Servers op de PRO3 KVM-switch aansluiten” op pagina 16. Stap 2: Schakel achtereenvolgens de secundaire KVM-switches in, beginnende bij de hoogste BANK, door de voeding van elke unit aan te sluiten.
-
Page 171: De Systemen Inschakelen
Aansluiting De systemen inschakelen Controleer of alle op de PRO3 KVM-switch aangesloten servers zijn ingeschakeld. Als er aangesloten servers zijn die niet zijn ingeschakeld, mag u deze nu inschakelen (servers mogen tegelijkertijd worden ingeschakeld). De PRO3 KVM-switch emuleert op elke poort een muis en een toetsenbord en stelt de server in staat normaal op te starten. -
Page 172: De Pro3 Kvm-Switch Gebruiken
Uw PRO3 KVM-switch gebruiken Nadat u de console en de servers op de PRO3 KVM-switch hebt aangesloten, is deze klaar voor gebruik. U kunt de aangesloten servers selecteren met behulp van (a) de directe poortkeuzetoetsen op het frontpaneel van de PRO3 KVM-switch, (b) het OSD-beeldschermmenu of (c) sneltoetscombinaties op het toetsenbord. - Page 173 Uw PRO3 KVM-switch gebruiken Bij in serie gekoppelde KVM-switchconfiguraties kunt u met de toetsencombinatie “ScrollLock”, “ScrollLock”, “PageUp” naar de vorige BANK (ofwel KVM-switch) overschakelen. Met de toetscombinatie “ScrollLock”, “ScrollLock”, “PageDown” schakelt u naar de volgende BANK over. ���� ���� ���� ��...
- Page 174 Uw PRO3 KVM-switch gebruiken Servers met directe-poortkeuzetoetsen selecteren De server die u wilt besturen kunt u rechtstreeks kiezen door de poortkeuzetoets naast de betreffende poort in te drukken. Het bijbehorende statuslampje licht op ten teken dat de poort is geselecteerd. Bij het installeren van meerdere in serie geschakelde PRO3 KVM-switches kunt u de BANK-scrolltoetsen op het frontpaneel van de primaire KVM-switch gebruiken om andere servers die op de secundaire KVM-switches aangesloten zijn te openen.
-
Page 175: Autoscan-Modus
Uw PRO3 KVM-switch gebruiken AutoScan-modus Met de AutoScan-functie kunt u ervoor zorgen dat de PRO3 KVM-switch de activiteiten van alle aangesloten servers afzonderlijk scant en bewaakt. De PRO3 KVM-switch blijft gedurende een vooraf ingesteld aantal seconden op een bepaalde server ingesteld staan voordat hij naar de volgende server overschakelt. - Page 176 Uw PRO3 KVM-switch gebruiken OSD-beeldschermmenu Met behulp van het OSD-menu kunt u van de ene naar de andere server overschakelen, namen aan de servers toekennen, de AutoScan-functie in- en uitschakelen, het gewenste scantijdinterval bepalen, de wachtwoordbeveiliging sfunctie activeren en sneltoetsen programmeren. Om het OSD-menu te openen, drukt u achtereenvolgens op “ScrollLock”, “ScrollLock”...
- Page 177 Uw PRO3 KVM-switch gebruiken Om met het OSD-hoofdmenu naar een bepaalde server over te schakelen, navigeert u met de pijltoetsen op het toetsenbord naar de gewenste server en drukt u op de “Enter”-toets. Een “ “-symbool geeft aan welke server momenteel op de console wordt geopend.
- Page 178 Druk nogmaals op “Enter” om de gekozen naam en het wachtwoord op te slaan. In het naam- en het wachtwoordveld kunt u maximaal acht tekens invullen. De standaardaanduidingen voor systeembeheerder en wachtwoord zijn: Gebruikersnaam: admin Wachtwoord: belkin...
- Page 179 Uw PRO3 KVM-switch gebruiken Toegangslijst Met deze functie kunt u naar goeddunken de toegangsrechten van gebruikers op poortniveau bepalen. Alleen de systeembeheerder kan de toegangslijst samenstellen. De linker kolom bevat de poortnamen. De gebruikers worden in volgorde van hun nummers (1 t/m 8) vermeld. Navigeer naar de gebruiker en de poort en druk op de “Enter”-toets om de toegangsrechten voor elke combinatie van gebruiker en poort toe te staan of te weigeren.
-
Page 180: Sneltoetscommandos Op Het Toetsenbord
Uw PRO3 KVM-switch gebruiken Sneltoetscommandos op het toetsenbord De onderstaande tabel bevat een overzicht van de sneltoetscommandos die u voor de PRO3 KVM-switch kunt gebruiken. Commando Functie Spatiebalk OSD activeren Vorige host Volgende host [01,02.,,,16] poort Niet in serie gekoppelde KVM-switch [00,01.,,,15] BANK Configuratie van daisychain: Het eerste en tweede cijfer geven de BANK aan... - Page 181 Uw PRO3 KVM-switch gebruiken Sun Combo en Mac toetsen toewijzen ® Het USB-toetsenbord dat op de PRO3 KVM-switch is aangesloten ondersteunt niet het Sun toetsenblok voor het uitvoeren van speciale functies in de Sun besturingsomgeving. Wanneer u de PRO3 KVM-switch op een Sun server aansluit, emuleert de KVM-switch de Sun toetsen door middel van een serie toetscombinaties die “combo keys”...
-
Page 182: Firmware Bijwerken
Firmware-upgrades zijn gratis tijdens de hele levensduur van de PRO3 KVM-switch. Voor het bijwerken van de firmware moet u het betreffende firmwarebestand en firmwarehulpprogramma downloaden van www.belkin.com/support/. Het hulpprogramma begeleidt u bij de procedure van het bijwerken van de firmware op de PRO3 KVM-switch. -
Page 183: Veelgestelde Vragen
V: Ondersteunt de PRO3 KVM-switch Microsoft IntelliMouse ® A: De PRO3 KVM-switch ondersteunt ondermeer USB- en PS/2-muizen van Microsoft, Logitech , Kensington en Belkin. Als u vragen hebt over ® ® compatibiliteit kunt u contact opnemen met de afdeling Technische Ondersteuning van Belkin. - Page 184 A: Nee, de PRO3 KVM-switch heeft geen stuurprogrammas of andere software nodig die op de servers moet worden geïnstalleerd. U sluit eenvoudig alle servers aan op de Belkin KVM-kabelpakketten en vervolgens een toetsenbord, monitor en muis op de console – en uw PRO3 KVM-switch is klaar voor gebruik.
-
Page 185: Problemen Oplossen
Problemen oplossen Mijn server start niet op als hij op de PRO3 KVM-switch is aangesloten maar werkt probleemloos als ik het toetsenbord, de monitor en de muis rechtstreeks op de server aansluit. • Controleer of de toetsenbord- en muiskabels stevig op de server- interfacemodule en de server zijn aangesloten. - Page 186 Problemen oplossen De muisaanwijzer verdwijnt als ik overschakel naar een andere poort. • Controleer of de muis die u gebruikt correct op de consolepoort van de PRO3 KVM-switch is aangesloten. • Zet eventuele losse kabelverbindingen vast. • Als u de software gebruikt die bij de muis is geleverd, verwijder deze dan van de harde schijf en installeer het standaardstuurprogramma van Microsoft voor muizen.
- Page 187 Problemen oplossen Wanneer ik de USB-kabelset op een USB-server aansluit, werken mijn toetsenbord en muis niet. • Controleer voordat u de PRO3 KVM-switch aansluit of het HID USB- stuurprogramma correct op elke server is geïnstalleerd. (Om het HID USB- stuurprogramma te installeren, moet u een USB-muis en een USB-toetsenbord op de server aansluiten.
-
Page 188: Verklarende Woordenlijst
Verklarende woordenlijst De volgende definities worden in deze handleiding gebruikt: AutoScan: Modus waarin de KVM-switch continu de ene poort na de andere scant zoals door de gebruiker geconfigureerd. BANK: Adres van een in serie geschakelde KVM-switch (00-15), door de DIP- switch ingesteld. -
Page 189: Informatie
Belkin garandeert het Belkin product gedurende drie jaar. Hoe worden problemen opgelost? Productgarantie. Belkin zal het product dat een defect vertoont naar eigen keus kosteloos (met uitzondering van verzendkosten voor het product) repareren of vervangen. Wat valt buiten deze garantie? Alle hierin versterkte garanties zijn niet van toepassing als het Belkin-product op verzoek van Belkin International, Inc. - Page 190 Hoe wordt service verleend? Om voor service voor uw Belkin product in aanmerking te komen gaat u als volgt te werk: 1. Neem binnen 15 dagen na het voorval schriftelijk contact op met Belkin International, Inc., 501 W.
- Page 191 BIJKOMENDE OF MEERVOUDIGE SCHADE ZOALS ONDERMEER SCHADE TEN GEVOLGE VAN GEDERFDE WINST EN/OF GEMISTE OPBRENGSTEN VOORTKOMEND UIT DE VERKOOP OF HET GEBRUIK VAN BELKIN PRODUCTEN, ZELFS ALS DE BETROKKENE VAN DE MOGELIJKHEID VAN ZULKE SCHADE TEVOREN OP DE HOOGTE WAS GESTELD.
- Page 192 Technische ondersteuning Europa: 00 800 223 55 460 © 2007 Belkin International, Inc. Alle rechten voorbehouden. Alle handelsnamen zijn gedeponeerde handelsmerken van de betreffende rechthebbenden. Mac OS, Mac en Apple zijn handelsmerken van Apple Computer, Inc., die gedeponeerd zijn in de Verenigde Staten en andere landen.
- Page 193 Conmutador KVM PRO3 OmniView ® Manual del usuario F1DA104Zea F1DA108Zea F1DA116Zea...
- Page 194 Índice de contenidos Introducción ..................1 Contenido del paquete ...............1 Generalidades .................. 2 Esquema general de características ...........2 Requisitos del equipo ..............4 Requisitos del sistema ..............6 Diagramas de los indicadores de la unidad .........7 Especificaciones .................9 Instalación ..................10 Configuración previa ..............10 Montaje del conmutador KVM PRO3 ........
-
Page 195: Introducción
Belkin ha diseñado y desarrollado este conmutador KVM teniendo en cuenta el administrador de servidores. El resultado es un conmutador KVM que supera a cualquier otro conmutador del mercado. El conmutacor KVM PRO3 está construido para funcionar con las salas de servidores y los entornos de laboratorio más... -
Page 196: Generalidades
Generalidades Esquema general de características • Teclas de acceso directo La funcionalidad de las teclas de acceso directo le permiten seleccionar el puerto deseado utilizando determinadas combinaciones de teclas. Mediante una sencilla secuencia de teclas, podrá seleccionar un servidor de entre hasta 256 de forma instantánea. - Page 197 KVM PRO3. Así permitirá a su conmutador KVM mantener una compatibilidad constante con los más modernos dispositivos y ordenadores. Las actualizaciones de firmware son gratuitas durante toda la vida útil del conmutador KVM PRO3 y se pueden descargar de la página de asistencia de Belkin en www.belkin.com/support.
-
Page 198: Requisitos Del Equipo
Requisitos del equipo Cables: Para conectar el conmutador KVM PRO3 a un servidor se requiere un puerto doble de Belkin Kit de micro-cableado. Kits de microcableado de puerto doble de Belkin: F1D9400-XX (estilo PS/2) F1D9401-XX (estilo USB) ���������� ������������ ���������� �����������... - Page 199 Generalidades Cable para cadena margarita PRO3 de Belkin: F1D108-CBL Nota: Los números de artículo y la disponibilidad están sujetos a posibles cambios. F1D108-CBL �������������...
-
Page 200: Requisitos Del Sistema
Generalidades Requisitos del sistema Sistemas operativos El conmutador KVM PRO3 es compatible, pero no exclusivamente, con CPUs que utilizan las siguientes plataformas de sistemas operativos: • Windows , 95, 98, 2000, Me, XP, Server 2003 ó Vista ® ® • Microsoft DOS 5.x y versiones superiores ®... -
Page 201: Diagramas De Los Indicadores De La Unidad
Generalidades Diagramas de los indicadores de la unidad Vista frontal del conmutador KVM PRO3: LED de 7 segmentos para LED para la identificación del BANK ����������������� ����������������� identificación de los � Botón AutoScan seleccionado ��������������� ������������������� ���������������������������� puertos Selector de Botones de rueda para la ������������... - Page 202 Generalidades Diagramas de los indicadores de la unidad Vista posterior del conmutador KVM PRO3: Salida de encadenamiento en margarita Toma de alimentación CC ��������������� ������������� Selección de Bank Conmutador DIP ���������������������� SCSI-50 dual-host ports ����������������������� Puerto para actualización por ������������������ flashy conmutador DIP ���������������������...
-
Page 203: Especificaciones
Generalidades Especificaciones N° de artículo: F1DA104Zea, F1DA108Zea, F1DA116Zea Carcasa: Carcasa de metal con placa de cubierta de plástico de gran resistencia a impactos Alimentación: Adaptador de alimentación 12V CC, 1A con clavija central de polaridad positiva Encadenamiento de margarita: Máximo de 16 conmutadores KVM OmniView N°... -
Page 204: Instalación
Las señales VGA se transmiten con la mejor calidad a una distancia de hasta 7,6 metros. Cuando se supera esa longitud, aumenta la posibilidad de degradación de la imagen. Por esta razón, Belkin recomienda que la longitud de los cables entre el conmutador KVM PRO3 y los servidores conectados no supere los 7,6 metros. -
Page 205: Montaje Del Conmutador Kvm Pro3
Instalación Montaje del conmutador KVM PRO3 Instalación de los engarces (F1DA108Zea y F1DA116Zea) Los conmutadores KVM PRO3 de 8 ó 16 puertos incluyen engarces ajustables para montaje en bastidor apropiados para la instalación en bastidores de 19 pulgadas. Los soportes de montaje admiten tres posiciones de ajuste que le permitirán colocar la parte frontal del conmutador KVM PRO3a la altura de los carriles, o dejar que el conmutador KVM PRO3 sobresalga del bastidor. - Page 206 Instalación Nota: Si desea conectar en cadena margarita este conmutador KVM PRO3 con otro conmutador KVM, configure la dirección BANK antes de montarlo en el bastidor. Consulte la sección titulada “Conexión de múltiples conmutadores KVM PRO3 (encadenamiento margarita)” del presente manual del usuario. Ahora, su conmutador KVM PRO3 está...
- Page 207 Ahora, su conmutador KVM PRO3 está montado de manera segura en el bastidor y está listo para conectar la consola. Advertencia para los propietarios de la Serie PRO3 de Belkin (F1DA104Tea, F1DA108Tea, and F1DA116Tea): La instalación del conmutador KVM PRO3 se ha modificado. Por favor siga atentamente este manual de instalación para asegurar una instalación correcta.
-
Page 208: Conexión De La Consola Al Conmutador Kvm Pro3
Instalación Conexión de la consola al conmutador KVM PRO3 Debe utilizar el mismo tipo de plataforma tanto para el teclado como para el ratón. Por ejemplo, si está utilizando un teclado USB, también debe conectar el ratón USB a la consola. Paso 1 Conecte el cable VGA del monitor al puerto HDDB15 hembra ubicado en la parte posterior del conmutador KVM PRO3 en la sección “Consola”. - Page 209 Instalación Paso 3 Conecte el cable del ratón PS/2 o USB al puerto para ratón ubicado en la parte posterior del conmutador KVM PRO3, en la sección “Consola”. (Consulte el siguiente diagrama). Nota: Utilice o bien todos los dispositivos de entrada USB o bien todos los PS/2 al conectarse a la consola.
- Page 210 Paso 1 Asegúrese de que su servidor esté apagado. Paso 2 Mediante el kit de microcableado de puerto doble de Belkin para PS/2 (F1D9400-XX), conecte el conector VGA al puerto monitor de su servidor. (Consulte el siguiente diagrama). Paso 3 Conecte los conectores PS/2 de teclado y ratón a los puertos para teclado y...
- Page 211 Instalación Paso 4 Conecte el kit de microcableado de puerto doble de Belkin para PS/2 a los puertos deseados del host en el conmutador KVM PRO3. (Consulte el siguiente diagrama). Paso 5 Encienda su servidor. Paso 6 Repita los pasos del 1 al 5 para cada servidor PS/2 adicional que desee...
-
Page 212: Conexión De Los Servidores Al Conmutador Kvm Pro3
Paso 1 Asegúrese de que su servidor esté encendido. Paso 2 Mediante el kit de microcableado de puerto doble de Belkin para USB (F1D9401- XX), conecte el conector VGA al puerto monitor de su servidor. (Consulte el siguiente diagrama). Paso 3 Conecte el conector USB a uno de los puertos USB disponibles del servidor. - Page 213 Instalación Paso 4 Conecte el kit de microcableado de puerto doble de Belkin para USB a los puertos deseados del host en el conmutador KVM PRO3. (Consulte el siguiente diagrama). Su servidor debería reconocer la conexión del conmutador KVM e instalar automáticamente el controlador USB HID si es necesario.
-
Page 214: Conexión De Múltiples Conmutadores Kvm Pro3
3 Secondary unit ( BANK 03) Nota: Se necesita un cable para encadenamiento en margarita (F1D108- CBL) para encadenar en margarita cada conmutador KVM PRO3 y éste estará disponible en cualquier minorista que comercialice Belkin o también on-line en www.belkin.com. - Page 215 Instalación Cómo asignar una dirección BANK Todos los conmutadores OmniView KVM PRO3 incorporan un interruptor “BANK DIP”. El interruptor “BANK DIP” se emplea para asignar la dirección BANK correcta a cada conmutador KVM PRO3. • Para configurar una sola unidad, establezca para el interruptor “BANK DIP” del conmutador KVM PRO3 el ajuste “primary”...
- Page 216 Instalación Ejemplo de configuración encadenada en margarita Primary unit (BANK 00) cable 1 Secondary unit ( BANK 01) cable 2 Secondary unit ( BANK 02) cable 3 Secondary unit ( BANK 03) Para comenzar: Paso 1: Asegúrese de que todos los servidores y conmutadores KVM PRO3 se encuentren apagados y de que cada conmutador KVM PRO3 tenga asignada una sola dirección de BANK.
- Page 217 KVM PRO3 que desee. Nota: Su conmutador KVM PRO3 es compatible con versiones anteriores de los conmutadores KVM PRO3 OmniView de Belkin con cableado estándar (F1DA104T, F1DA108T, F1DA116T). En una configuración de encadenamiento en margarita, el conmutador KVM PRO3 (F1DA104Z, F1DA108Z, F1DA116Z) debe...
- Page 218 Instalación Conexión de los servidores: Paso 1: Conecte todos los servidores a los conmutadores KVM primarios y secundarios. Consulte la sección “Conexión de los servidores al conmutador KVM PRO3” que se encuentra en la página 16 para informarse sobre las instrucciones. Paso 2: Encienda los conmutadores secundarios KVM de modo secuencial, empezando por el BANK superior, conectando el suministro de alimentación de cada unidad.
-
Page 219: Encendido De Los Sistemas
Instalación Encendido de los sistemas Compruebe que todos los servidores conectados al conmutador KVM PRO3 estén encendidos. Si todavía no están encendidos todos los servidores conectados, hágalo ahora (los servidores pueden encenderse al mismo tiempo). El conmutador KVM PRO3 emula un ratón y un teclado en cada puerto y permitirá... -
Page 220: Utilización Del Conmutador Kvm Pro3
Utilización del conmutador KVM PRO3 Ahora que ha conectado la consola y los servidores al conmutador KVM PRO3, ya está listo para su utilización. Seleccione los servidores conectados mediante los selectores de puerto de acceso directo, ubicados en el panel frontal del conmutador KVM PRO3 a través de la pantalla OSD o con las teclas de acceso directo mediante el teclado de la consola. - Page 221 Utilización del conmutador KVM PRO3 Si utiliza una configuración de encadenamiento de margarita, puede cambiar de BANK (conmutadores KVM) presionando “Bloq Despl”, “Bloq Despl”, “Av Pág” para cambiar al BANK anterior. Pulse “Bloq Despl”, “Bloq Despl”, “Re Pág” para pasar al siguiente BANK. ����...
-
Page 222: Selección De Un Servidor Mediante Los Selectores De Puertos De Acceso Directo
Utilización del conmutador KVM PRO3 Selección de un servidor mediante los selectores de puertos de acceso directo Puede seleccionar directamente el servidor que desee controlar mediante el puerto de acceso directo ubicado al lado del puerto correspondiente. El LED se encenderá para indicar que el puerto está seleccionado en ese momento. Si tiene múltiples conmutadores KVM PRO3 encadenados en margarita, utilice las teclas de desplazamiento BANK ubicadas en el panel frontal del conmutador KVM primario para acceder a los servidores que están conectados a los... - Page 223 Utilización del conmutador KVM PRO3 Modo AutoScan La propiedad de búsqueda automática AutoScan le permite configurar su conmutador KVM PRO3 para escanear y controlar las actividades de todos los servidores conectados, uno por uno. El conmutador KVM PRO3 permanece en cada servidor durante un número predeterminado de segundos, luego pasa al siguiente servidor.
-
Page 224: Menú En Pantalla (Osd)
Utilización del conmutador KVM PRO3 Menú en pantalla (OSD) La visualización en pantalla u OSD le permite cambiar entre servidores, asignar nombres a los servidores, activar y desactivar la función AutoScan, establecer el intervalo deseado para la búsqueda automática, activar la función de seguridad mediante contraseña y programar las teclas de acceso rápido. - Page 225 Utilización del conmutador KVM PRO3 Para conmutar entre servidores mediante el menú principal OSD, utilice las teclas de flechas de su teclado para dirigirse al servidor deseado. Luego, pulse la tecla “INTRO”. El símbolo “ “ indica a qué servidor está accediendo en ese momento desde su consola.
-
Page 226: Ajustes Del Usuario
“Intro” para seleccionar y editar. Pulse de nuevo “Intro” para guardar el ajuste. Los caracteres máximos para los campos del nombre y de la contraseña tienen ocho caracteres. El nombre y la contraseña predeterminados del administrador son: Nombre de usuario: admin Contraseña: belkin... - Page 227 Utilización del conmutador KVM PRO3 Lista de acceso Esta opción le permite especificar el nivel de acceso del usuario al puerto. Sólo el administrador puede configurar la lista de acceso. La columna de la izquierda enumera los nombres del puerto. Los usuarios están enumerados por su nombre (del 1 al 8).
-
Page 228: Teclas De Acceso Rápido
Utilización del conmutador KVM PRO3 Teclas de acceso rápido A continuación, encontrará una lista completa de los comandos de teclado de acceso rápido que puede utilizar con el conmutador. KVM PRO3: Comando Función Barra de espaciado Activar OSD Host previo Host siguiente puerto [01,02.,,,16] Conmutador KVM no conectado en margarita... -
Page 229: Asignación De Tecla Para Sun Combo Y Mac
Utilización del conmutador KVM PRO3 Asignación de tecla para Sun Combo y Mac ® El teclado USB que está conectado al conmutador KVM PRO3 admite el teclado Sun en sus funciones especiales del entorno de sistema operativo Sun. Cuando un conmutador KVM se conecta a un servidor Sun, el conmutador KVM emula las teclas de Sun utilizando una serie de combinaciones de teclas denominadas teclas Combo. -
Page 230: Actualización Del Firmware
KVM PRO3. Para actualizar el firmware, descargue el archivo de firmware apropiado en la página www.belkin.com/support/. La utilidad le guiará a través del proceso de actualización de firmware de su conmutador KVM PRO3. ¡Atención! Recomendamos encarecidamente que actualice su firmware únicamente si tiene dificultades con su ratón o teclado al utilizar el conmutador... -
Page 231: Preguntas Frecuentes
, Kensington , etc., y Belkin. Póngase en contacto con ® ® el servicio de asistencia técnica de Belkin para consultar cualquier duda sobre la compatibilidad. P: ¿Cómo permite al usuario el conmutador KVM PRO3 la conmutación entre puertos? R: El conmutador KVM PRO3 dispone de tres métodos de selección de puerto. - Page 232 R: No, el conmutador KVM PRO3 no requiere la instalación en sus servidores de ningún tipo de controlador o software. Conecte simplemente todos sus servidores a los kits de cableado KVM de Belkin. Después, conecte un monitor, un ratón y un teclado a los puertos correspondientes para consola y su conmutador estará...
-
Page 233: Resolución De Problemas
Resolución de problemas Mi ordenador no arranca cuando está conectado al conmutador KVM PRO3, pero funciona perfectamente cuando conecto el teclado, monitor y ratón directamente al servidor. • Asegúrese de que los cables de teclado y ratón se encuentren perfectamente conectados entre el Módulo de interfaz de servidor y el servidor. - Page 234 Resolución de problemas El ratón se pierde cuando cambio a un puerto diferente. • Compruebe que el ratón que está utilizando se encuentre correctamente conectado al puerto de la consola del conmutador KVM PRO3. • Apriete las conexiones flojas. • Si está haciendo uso del controlador para ratón que venía adjunto con el mismo, desinstálelo e instale el controlador estándar para ratones de Microsoft.
- Page 235 Resolución de problemas Estoy conectando el kit de cable USB a mi servidor USB y mi teclado y ratón no funcionan. • Antes de conectar el conmutador KVM PRO3, asegúrese de que en cada servidor esté instalado el controlador HID USB. (Para instalar el controlador HID USB, conecte un ratón USB y un teclado USB al servidor.
-
Page 236: Glosario
Glosario Los términos que se definen a continuación se utilizan en este manual del usuario. AutoScan: Un modo de funcionamiento en el que el conmutador KVM rastrea de un puerto a otro, de forma constante, como ha sido configurado por el usuario. BANK:La dirección de un KVM encadenado en margarita (00–15), establecido por el interruptor DIP. -
Page 237: Información
La cobertura de la presente garantía. Belkin International, Inc. (“Belkin”) otorga una garantía al comprador original según la cual el producto Belkin no tendrá defectos en cuanto a diseño, montaje, materiales o mano de obra. Cuál es el período de cobertura. - Page 238 Cuándo compró el producto. d. Copia de la factura original. 2. El servicio de atención al cliente de Belkin le informará sobre cómo enviar el recibo y el producto Belkin y sobre cómo proceder con su reclamación. Belkin se reserva el derecho de revisar el producto Belkin dañado. Todos los gastos de envío del producto Belkin a Belkin para su inspección correrán a cargo...
- Page 239 Información Relación de la garantía con la legislación estatal. ESTA GARANTÍA CONTIENE LA GARANTÍA EXCLUSIVA DE BELKIN. NO EXISTEN OTRAS GARANTÍAS EXPLÍCITAS O IMPLÍCITAS (EXCEPTO LAS PROPORCIONADAS POR LA LEY). ESTO INCLUYE LAS GARANTÍAS IMPLÍCITAS O LAS CONDICIONES DE CALIDAD, APTITUD PARA LA VENTA O PARA CUALQUIER PROPÓSITO EN CONCRETO Y, TALES GARANTÍAS...
- Page 240 Asistencia técnica de Belkin Europa: 00 800 223 55 460 © 2007 Belkin International, Inc. Todos los derechos reservados. Todos los nombres comerciales son marcas registradas de los respectivos fabricantes mencionados. Mac, Mac OS y Apple son marcas registradas de Apple Inc., registrado en EEUU y otros países.
- Page 241 PRO3 OmniView ® Switch KVM Manuale duso F1DA104Zea F1DA108Zea F1DA116Zea...
- Page 242 Indice Introduzione ..................1 Contenuto della confezione ............1 Descrizione generale ................ 2 Descrizione generale delle caratteristiche ........2 Requisiti del sistema ..............4 Requisiti del sistema ..............6 Diagrammi di visualizzazione unità ..........7 Specifiche ..................9 Installazione ...................10 Configurazione preliminare ............10 Montaggio dello Switch KVM PRO3 ........... 11 Collegamento della console allo switch KVM PRO3 ....
-
Page 243: Introduzione
Rapida fornita nella confezione dello Switch KVM PRO3. Grazie per aver acquistato lo Switch KVM PRO3 Belkin. Ci sta a cuore il vostro tipo di attività ee siamo certi che anche voi scoprirete perché Belkin è il numero uno al mondo nel campo degli switch KVM. -
Page 244: Descrizione Generale
Descrizione generale Descrizione generale delle caratteristiche • Tasti di scelta rapida I tasti di scelta rapida consentono di selezionare la porta desiderata utilizzando i tasti di comando assegnati. Digitando dalla tastiera una semplice sequenza di tasti si possono scegliere da uno a 256 server, istantaneamente. •... - Page 245 Switch KVM PRO3. In questo modo lo switch KVM si manterrà sempre compatibile con i più recenti dispositivi e server. Gli aggiornamenti del firmware sono disponibili gratuitamente per tutta la durata dello Switch KVM PRO3 e si possono scaricare dal sito di assistenza Belkin www.belkin.com/support.
- Page 246 Descrizione generale Requisiti dellapparecchiatura Cavi: Per collegare lo Switch KVM PRO3 a un server è necessario un kit di microcavi a doppia porta Belkin Kit di microcavi a doppia porta Belkin: F1D9400-XX (PS/2) F1D9401-XX (USB) ���������� ������������ ���������� �����������...
- Page 247 Descrizione generale Belkin - Cavo per collegamento in cascata PRO3 Belkin F1D108-CBL Nota: i codici prodotto e la disponibilità sono soggetti a variazioni. F1D108-CBL �������������...
-
Page 248: Requisiti Del Sistema
Descrizione generale Requisiti di sistema Piattaforme OS Lo switch Switch KVM PRO3 è compatibile con le CPU collegate, tra le altre, alle seguenti piattaforme OS: • Windows , 95, 98, 2000, Me, XP, Server 2003, o Vista ® ® • Microsoft DOS 5.x e successive ®... - Page 249 Descrizione generale Diagrammi di visualizzazione dellunità Vista anteriore dello switch KVM PRO3: LED per lidentificazione LED a 7 segmenti per ����������������� ����������������� delle � Pulsante AutoScan identificare il BANCO selezionato ��������������� ������������������� ���������������������������� porte selezionate Selettori porta Pulsanti di scorrimento manuale ��������������...
- Page 250 Descrizione generale Diagrammi di visualizzazione dellunità Vista posteriore dello switch KVM PRO3: Configurazione daisy-chain in uscita Presa di alimentazione CC ��������������� ������������� Selezione di BANCO Switch DIP ���������������������� SCSI-50 dual-host ports ����������������������� Porta di aggiornamento immediatoe selezione ������������������ dello Switch DIP ���������������������...
-
Page 251: Specifiche
Descrizione generale Specifiche Cod. prod.: F1DA104Zea, F1DA108Zea, F1DA116Zea Rivestimento: Telaio in metallo con lato frontale in plastica resistente agli urti Alimentazione: adattatore di corrente da 12V CC, 1 A con polarità positiva al contatto centrale Collegamento a catena: Fino a un massimo di 16 switch KVM OmniView Nº... -
Page 252: Installazione
I segnali VGA si trasmettono in maniera eccellente fino a 7.6 metri di distanza. Superata questa distanza, le probabilità di un peggioramento della qualità video aumentano. Per questo motivo, Belkin consiglia che la lunghezza dei cavi tra lo switch KVM PRO3 e i server collegati non superiori ai 7.6 metri. -
Page 253: Montaggio Dello Switch Kvm Pro3
Installazione Montaggio dello Switch KVM PRO3. Installazione delle staffe (F1DA108Zea and F1DA116Zea) Gli switch KVM PRO3 a 16 porte comprendono staffe regolabili ideali per il montaggio su rack da 19 pollici. Le staffe di montaggio prevedono tre posizioni di regolazione per consentire una collocazione dello Switch KVM PRO3 da portarlo a livello con le estremità... - Page 254 Installazione Nota: Se lo Switch KVM PRO3 deve essere collegato in cascata con un altro switch KVM, impostare lindirizzo BANCO prima di procedere allinstallazione su rack. Vedere la sezione dal titolo “Collegamento di diversi Switch KVM PRO3 (in collegamento a cascata)” in questo Manuale Utente. Lo Switch KVM PRO3 a questo punto è...
- Page 255 Lo Switch KVM PRO3 ora è montato correttamente sul rack e si può collegare alla console. Nota per i possessori della serie Belkin PRO3 di prima generazione (F1DA104Tea, F1DA108Tea, and F1DA116Tea): La procedura di installazione dello switch KVM PRO3 è cambiata. Per una corretta installazione seguire attentamente le istruzioni in questo manuale.
-
Page 256: Collegamento Della Console Allo Switch Kvm Pro3
Installazione Collegamento della console allo switch KVM PRO3. E necessario utilizzare lo stesso tipo di piattaforma sia per la tastiera sia per il mouse. Ad esempio, se si utilizza una tastiera USB è necessario collegare anche il mouse USB alla console. Fase 1 Collegare il cavo VGA del monitor alla porta femmina HDDB15 sul retro dello Switch KVM PRO 2 nella sezione “Console”. - Page 257 Installazione Fase 3 Collegare il cavo PS/2 o USB della tastiera alla porta per tastiera sul retro dello Switch KVM PRO3 nella sezione “Console”. (vedere lo schema riportato di seguito). Nota: Utilizzare le periferiche di ingresso USB o PS/2 per collegarsi alla console.
-
Page 258: Collegamento Dei Server Allo Switch Kvm Pro3
Fase 1 Assicurarsi che il server sia spento. Fase 2 Utilizzando il kit di microcavi a doppia porta di Belkin per PS/2 (F1D9400-XX), collegare il connettore VGA alla presa per il monitor prevista sul server. (vedere lo schema riportato di seguito). - Page 259 Installazione Fase 4 Collegare il kit di microcavi a doppia porta PS/2 Belkin alle porte host desiderate presenti nello Switch KVM PRO3. (vedere lo schema riportato di seguito). Fase 5 Accendere il server. Fase 6 Ripetere le fasi da 1 a 5 per ogni altro server PS/2 che si desidera collegare.
- Page 260 Fase 1 Assicurarsi che il server sia acceso. Fase 2 Utilizzando il kit di microcavi a doppia porta di Belkin per PS/2 (F1D9400-XX), collegare il connettore VGA alla presa per il monitor prevista sul server. (vedere lo schema riportato di seguito).
- Page 261 Nota: E consigliabile fissare una estremità del kit di microcavi a doppia porta Belkin a una porta USB diposnibile del server. Nota: Quando il kit di microcavi a doppia porta Belkin è collegato ad un server Sun, il modulo di interfaccia server emula i tasti Sun utilizzando una serie di combinazioni chiamate Tasti Combo.
-
Page 262: Collegamento Di Diversi Switch Kvm Pro3
“primario”. I BANCHI da 01 a 15 sono definiti switch KVM “secondari”. Nota:Lo Switch KVM PRO3 è compatibile con le versioni precedenti degli Switch KVM OmniView PRO3 Belkin con cablaggio standard (F1DA104Tea, F1DA108Tea, F1DA116Tea). Nella configurazione daisy-chain, lo Switch KVM PRO3 con tecnologia a micro-cavi (F1DA104Zea, F1DA108Zea, F1DA116Zea) deve essere designato come Switch KVM primario. - Page 263 Installazione Procedura di assegnazione di un indirizzo BANCO Tutti gli Switch KVM PRO3 sono dotati di uno switch “BANK DIP” Lo switch “BANK DIP” è usato per assegnare un indirizzo BANCO corretto ad ogni switch KVM. • Per una configurazione a unità singola, impostare lo switch BANK DIP sullo Switch KVM PRO3 su “primary”...
- Page 264 Installazione Esempio di configurazione in cascata Primary unit (BANK 00) cable 1 Secondary unit ( BANK 01) cable 2 Secondary unit ( BANK 02) cable 3 Secondary unit ( BANK 03) Operazioni preliminari: Fase 1: Accertarsi che la console, tutti i server e gli Switch KVM PRO3 siano spenti e che ad ogni switch KVM sia stato assegnato un indirizzo BANCO unico.
- Page 265 Nota: Lo Switch KVM PRO3 è compatibile con le versioni precedenti degli Switch KVM OmniView PRO3 Belkin con cablaggio standard (F1DA104T, F1DA108T, F1DA116T). Nella configurazione daisy-chain, lo Switch KVM PRO3 con tecnologia a micro-cavi (F1DA104Z, F1DA108Z, F1DA116Z) deve essere...
- Page 266 Installazione Collegamento dei server: Fase 1: Collegare tutti i server agli switch KVM primari o secondari. Vedere la sezione “Collegamento del server allo Switch KVM PRO3” a pagina 16 per istruzioni in merito. Fase 2: Accendere gli switch KVM secondari in sequenza, a partire dal BANCO più alto, collegando lalimentatore di ciascuna unità.
- Page 267 Installazione Accensione dei sistemi Accertarsi che tutti i server collegati allo switch KVM PRO3 siano accesi. Eventuali server collegati non ancora accesi, si possono accendere anche adesso (i server si possono accendere contemporaneamente). Lo Switch KVM PRO3 emula un mouse e una tastiera per ciascuna porta e consente al server di eseguire uninizializzazione normale.
-
Page 268: Utilizzo Dello Switch Kvm Pro3
Utilizzo dello Switch KVM PRO3 A questo punto la console ed i server sono collegati allo switch KVM PRO3 e sono pronti ad essere utilizzati. Selezionare i server connessi mediante i selettori di porta ad accesso diretto previsti sul pannello anteriore dello switch KVM PRO3, utilizzando lOn-Screen Display oppure attraverso i tasti di scelta rapida della tastiera della console. - Page 269 Utilizzo dello Switch KVM PRO3 Nel caso gli switch siano configurati in struttura daisy-chain, si può passare da un BANCO allaltro (switch KVM) premendo “Bloc Scorr”, “Bloc Scorr”, “Pag su” per passare al BANCO precedente. Premere “Bloc Scorr”, “Bloc Scorr”, “Pag giù”...
-
Page 270: Selezione Di Un Server Utilizzando I Selettori Di Porta Ad Accesso Diretto
Utilizzo dello Switch KVM PRO3 Selezione di un server utilizzando i selettori di porta ad accesso diretto Si può selezionare direttamente quale server controllare, premendo il selettore ad accesso diretto della porta accanto alla rispettiva porta. Il LED si accende per indicare che la porta è... -
Page 271: Modalità Di Scansione Automatica
Utilizzo dello Switch KVM PRO3 Modalità di scansione automatica La funzione AutoScan consente di impostare lo switch KVM PRO3 in modo tale da poter eseguire la scansione ed il controllo delle attività di tutti i computer collegati, uno per uno. Lo switch KVM PRO3 rimane impostato su un server per un numero di secondi predefinito prima di passare al server successivo. -
Page 272: On-Screen Display (Osd)
Utilizzo dello Switch KVM PRO3 On-Screen Display (OSD) Il menu delle funzioni On-Screen Display consente di cambiare server, assegnare nuovi nomi ai propri server, attivare e disattivare la funzione AutoScan, impostare lintervallo di scansione desiderato per lAutoScan, attivare la funzione di protezione password e programmare i tasti di selezione rapida. - Page 273 Utilizzo dello Switch KVM PRO3 Per alternare da un server allaltro utilizzando il menu OSD, utilizzare i tasti freccia della tastiera e spostarsi fino al server desiderato, quindi premere il tasto “ENTER” (Invio). Un simbolo “ ” indica quale sia il server al quale si sta accedendo dalla console.
- Page 274 “Enter” (Invio ) per salvare la voce. Premere “Enter” (Invio) nuovamente per salvare la voce. Il numero massimo dei caratteri consentito per i campi nome utente e password è otto. Il nome predefinito dellamministratore è: Nome utente: admin La password è: belkin...
- Page 275 Utilizzo dello Switch KVM PRO3 Elenco di acesso Questa funzione consente di specificare ogni singolo accesso da parte dellutente alla porta.**?** Laccesso allelenco è consentito solo allamministratore. La colonna di sinistra elenca i nomi delle porte. Gli utenti sono elencati in base al loro numero (da 1 a 8).
- Page 276 Utilizzo dello Switch KVM PRO3 Tasti di scelta rapida della tastiera Di seguito è riportato un elenco completo dei tasti di selezione rapida utilizzabili con lo Switch KVM PRO3: Comando Funzione Barra spaziatrice Attivazione OSD Host precedente Host successivo [01,02.,,,16] porte Switch KVM non abilitato per configurazione in daisy-chain [01,02.,,,15] BANCO Configurazione in cascata: La prima e la seconda cifra indicano il...
- Page 277 La tastiera USB collegata allo switch KVM PRO3 non supporta la tastiera Sun per lesecuzione di alcune funzioni specifiche previste nel sistema operativo Sun. Quando il kit di microcavi a doppia porta Belkin è collegato ad un server Sun, il modulo di interfaccia server emula i tasti Sun utilizzando una serie di combinazioni chiamate Tasti Combo.
-
Page 278: Aggiornamento Del Firmware
KVM PRO3. Per eseguire laggiornamento del firmware, scaricare il rispettivo file e la utility da www.belkin.com/support/ La utility vi guiderà attraverso il processo di aggiornamento del firmware sullo Switch KVM PRO3. Avvertenza: Si consiglia vivamente di aggiornare il proprio firmware... -
Page 279: Domande Frequenti
A: Lo Switch KVM PRO3 supporta i mouse Microsoft, Logitech PS/2 USB ® Kensington , ecc., e Belkin. Qualora si presentino problemi di compatibilità, ® contattare il servizio di assistenza tecnica Belkin. Q: In che modo lo Switch KVM PRO3 esegue la commutazione delle porte? A: Lo Switch KVM PRO3 supporta tre metodi per la selezione delle porte. - Page 280 A: No, con lo Switch KVM PRO3 non occorre installare alcun driver o software nei server. È sufficiente collegare tutti i server attraverso il Kit di cavi per KVM Belkin, quindi collegare una tastiera, un monitor e un mouse alla porta della console, a questo punto lo switch è pronto alluso.
-
Page 281: Risoluzione Dei Problemi
Risoluzione dei problemi Il computer non si avvia quando è collegato allo Switch KVM PRO3 e funziona quando la tastiera, il monitor e il mouse sono collegati direttamente. • Accertarsi che i cavi di tastiera e mouse siano collegati a fondo tra il modulo di interfaccia server ed il server. - Page 282 Risoluzione dei problemi Quando passo ad una porta diversa, non vedo più il cursore del mouse. • Assicurarsi che il mouse sia ben collegato alla porta della console dello switch KVM PRO3. • Stringere eventuali collegamenti lenti. • Se si sta usando il software in dotazione con il mouse, disinstallarlo ed installare il driver mouse standard della Microsoft.
- Page 283 Risoluzione dei problemi Sto collegando il mio kit di cavi USB al mio server USB, ma la tastiera e il mouse non funzionano. • Prima di collegare lo Switch KVM PRO3, accertarsi che il driver HID USB sia installato su ciascun server. (Per installare il driver HID USB, collegare un mouse USB ed una tastiera USB al server.
-
Page 284: Glossario
Glossario In questo manuale vengono utilizzate le seguenti definizioni: AutoScan (Scansione automatica): Una modalità di funzionamento in cui lo switch KVM esegue una ricerca da una porta allaltra, su base costante, secondo le configurazioni dellutente. BANCO: Lindirizzo di uno switch KVM collegato in cascata (da 0 a 15), impostato dal DIP switch. -
Page 285: Informazioni
Informazioni console e diverse porte per i server. OSD: On-Screen Display, uninterfaccia grafica che può essere utilizzata dallutente per controllare e configurare lo switch KVM. Porta: Una presa di interfaccia su un server attraverso la quale si può collegare un dispositivo o il cavo di un dispositivo. Switch KVM primario: Lo switch KVM collegato alla console e impostato sul BANCO con indirizzo 00. - Page 286 Belkin per essere sottoposto alle necessarie verifiche dietro espressa richiesta di Belkin e a spese del cliente, oppure nel caso in cui la Belkin dovesse stabilire che il prodotto non è stato correttamente installato o che sia stato in qualche modo alterato o manomesso.
- Page 287 2. Il rappresentante del Servizio Clienti Belkin vi spiegherà come inviare la ricevuta e il prodotto Belkin e come procedere con il reclamo. Belkin si riserva il diritto di riesaminare il prodotto Belkin danneggiato. Tutte le spese di spedizione per il prodotto Belkin restituito alla Belkin sono a carico dellacquirente.
- Page 288 Assistenza tecnica Belkin Europa: 00 800 223 55 460 © 2007 Belkin International, Inc. Tutti i diritti riservati. Tutti i nomi commerciali sono marchi commerciali registrati dei rispettivi produttori indicati. Mac OS e Apple sono marchi della Apple Inc., registrati negli USA e in altri Paesi.