
Related Manuals for Memorex MSP-PH2400


Summary of Contents for Memorex MSP-PH2400
-
Page 1: Operating Instructions
® 2.4GHz CORDLESS TELEPHONE MODEL: MSP-PH2400 BEFORE OPERATING THIS PRODUCT, PLEASE READ THESE INSTRUCTIONS COMPLETELY. OPERATING INSTRUCTIONS 12/16/01, 12:28 PM... -
Page 2: Important Safety Precautions
IMPORTANT SAFETY PRECAUTIONS CAUTION RISK OF ELECTRIC SHOCK DO NOT OPEN CAUTION: TO REDUCE THE RISK OF ELECTRIC SHOCK, DO NOT REMOVE COVER (OR BACK). NO USER-SERVICEABLE PARTS INSIDE. REFER SERVICING TO QUALIFIED SERVICE PERSONNEL. DANGEROUS VOLTAGE: Uninsulated Dangerous Voltage, that may be of sufficient magnitude to constitute a risk of electric shock to persons is present within this product's enclosure. - Page 3 IMPORTANT SAFETY PRECAUTIONS (CONTINUED) Do not place this product on an unstable cart, stand, tripod, bracket, or table. The product may fall, causing serious injury and serious damage to the product. Slots and openings in the cabinet and in the back or bottom are provided for ventilation and to ensure reliable operation of the product and to protect it from overheating.
-
Page 4: Save These Instructions
IMPORTANT SAFETY PRECAUTIONS (CONTINUED) SAVE THESE INSTRUCTIONS BATTERY PRECAUTIONS To reduce the risk of fire or injury to persons, read and follow these instructions: 1. Use only the battery pack type provided with the unit. 2. Do not dispose of the battery in a fire, the cell may explode. Check with local codes for possible special disposal instructions. - Page 5 IMPORTANT SAFETY PRECAUTIONS (CONTINUED) The REN is used to determine the quantity of devices which may be connected to the telephone line. Excessive REN's on the telephone line may result in the devices not ringing in response to an incoming call. In most, but not all areas, the sum of the REN's should not exceed five (5.0).
-
Page 6: Table Of Contents
CONTENTS Important Safety Precautions ..1 Using the Redial (DEL/RE-PA) Button..........24 Contents..........5 Out of Range Warning ....26 MSG Waiting (Voice Mail Location of Controls .....6 Messages)........26 Using the Base Page Button ..26 Installation Instructions....7 Using the Flash Button....26 Installation of the Rechargeable Tone/Pulse Switch ......26 Battery ..........8 Using the Tone Button ....27... -
Page 7: Location Of Controls
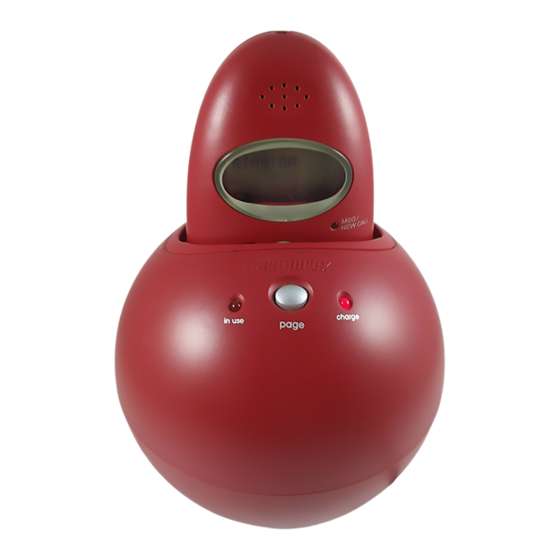
LOCATION OF CONTROLS HANDSET HANDSET: Display TALK Button OPTION/SCAN Button Down Button/Volume Down Key Buttons (0-9,*,#) MENU/MUTE Button MEMO/SAVE Button MSG/NEW CALL Indicator Up Button/Volume Up 10. CALL Button 11. Headset Jack (Side of Unit) 12. DEL/RE-PA (Delete/Redial/ Pause) Button 13. -
Page 8: Installation Instructions
INSTALLATION INSTRUCTIONS 1. Carefully unpack and remove your unit from the box. 2. Make sure all the items have been included: Base Unit AC Adapter Handset Unit Telephone Cord Rechargeable Ni-Cd Battery Pack Belt Clip Make sure the Rechargeable Battery is installed or install the Rechargeable Battery as described on the next page. -
Page 9: Installation Of The Rechargeable Battery
INSTALLATION INSTRUCTIONS (CONTINUED) Installation of the Rechargeable Battery Remove the battery cover located on If replacing an old battery pack, the rear of the handset by sliding it unplug the battery connector and downward. remove it from the battery compartment. Plug the new battery into the Put the battery cover back on by rechargeable battery plug and... -
Page 10: Set-Up Instructions
SET-UP INSTRUCTIONS SETTING THE RINGER This will enable you to turn the ringer On or Off. While in the Standby mode, press and Press the Key button 1 , or the hold the MENU/MUTE button. Up/Down buttons to select the Ringer setting. -
Page 11: Setting The Language
SET-UP INSTRUCTIONS (CONTINUED) SETTING THE LANGUAGE Set the language (ENGLISH, SPANISH, FRENCH) as follows: While in the Standby mode, press and Press the Key button 2 , or the hold the MENU/MUTE button. Up/Down buttons to select the Language setting. Press the EDIT/FLASH button Press the MEMO/SAVE button when Press the Up/Down buttons... -
Page 12: Setting The First Ring Mode
SET-UP INSTRUCTIONS (CONTINUED) SETTING THE FIRST RING MODE You can set to turn Off the first ring of the telephone until the caller ID informa- tion has been displayed. While in the Standby mode, press Press the Key button 3 , or the and hold the MENU/MUTE button. -
Page 13: Setting The Time
SET-UP INSTRUCTIONS (CONTINUED) SETTING THE TIME It is necessary to set the internal clock time of the phone to display the time in the Caller ID display when incoming calls are received. If you subscribe to Caller ID, the time and date are automatically set when the first call is received. If the time is not automatically set, follow the steps below: While in the Standby mode, press Press the Key button 4... -
Page 14: Setting The Area Code
SET-UP INSTRUCTIONS (CONTINUED) SETTING THE AREA CODE Set the phone to your local area code as described below. If you live in a town with more than one area code, do not enter an area code for this option. While in the Standby mode, press Press the Key button 5 , or the and hold the MENU/MUTE button. -
Page 15: Setting The Lcd Contrast
SET-UP INSTRUCTIONS (CONTINUED) SETTING THE LCD CONTRAST There are three contrast levels for this telephone. Set the level as follows: While in the Standby mode, press Press the Key button 6 , or the and hold the MENU/MUTE button. Up/Down buttons to select the LCD Contrast setting. -
Page 16: Setting The Pbx Number
SET-UP INSTRUCTIONS (CONTINUED) SETTING THE PBX NUMBER This telephone enables you to preset the PBX number (such as 8 or 9), while you are using a switchboard system. While in the Standby mode, press Press the Key button 7 , or the and hold the MENU/MUTE button. -
Page 17: Setting The Pbx Mode
SET-UP INSTRUCTIONS (CONTINUED) SETTING THE PBX MODE This telephone enables you to turn the PBX system On or Off, depending on the telephone system being used. While in the Standby mode, press Press the Key button 8 , or the and hold the MENU/MUTE button. -
Page 18: Setting The Pause Time
SET-UP INSTRUCTIONS (CONTINUED) SETTING THE PAUSE TIME This telephone enables you to adjust the pause time when placing a call using a switchboard system or dialing long distance calls . While in the Standby mode, press Press the Key button 9 , or the and hold the MENU/MUTE button. -
Page 19: Setting The Msg (Message) Waiting
SET-UP INSTRUCTIONS (CONTINUED) SETTING THE MSG (MESSAGE) WAITING This will enable to you to turn off the Message Waiting Indicator. While in the Standby mode, press Press the Key button 0 , or the and hold the MENU/MUTE button. Up/Down buttons to select the MSG Waiting setting. -
Page 20: Setting The Auto Answer Mode
SET-UP INSTRUCTIONS (CONTINUED) SETTING THE AUTO ANSWER MODE This will enable you to turn the auto answer On or Off. In On mode, the telephone will automatically answer an incoming call when the handset is lifted from the base . While in the Standby mode, press Press the Key button * , or the... -
Page 21: Setting The Private Ring Mode
SET-UP INSTRUCTIONS (CONTINUED) SETTING THE PRIVATE RING MODE You can set to turn On or Off the ring for all calls with blocked Caller ID. While in the Standby mode, press Press the Down button twice , or and hold the MENU/MUTE button. the Up/Down buttons to select the Private Ring mode setting. -
Page 22: Setting The Unavailable Ring Mode
SET-UP INSTRUCTIONS (CONTINUED) SETTING THE UNAVAILABLE RING MODE You can set to turn On or Off the ring for all calls with unavailble Caller ID information. While in the Standby mode, press Press the Down button once , or and hold the MENU/MUTE button. the Up/Down buttons to select the Unavailable Ring mode setting. -
Page 23: Basic Operation
BASIC OPERATION PLACING A CALL After the battery has been fully charged, Press the Key buttons (0-9) to dial press the TALK button and listen for a the phone number you wish to call. dial tone; the IN USE indicator on the The display will show the amount of base will light and “TALK”... -
Page 24: Receiving A Call
BASIC OPERATION (CONTINUED) RECEIVING A CALL The last 40 incoming calls are saved in the Caller ID log. Make sure that the Caller ID service is turned on by your phone company. When you receive a call, the display will show the name of the caller, number, time and date of the call. -
Page 25: Ending A Call
BASIC OPERATION (CONTINUED) ENDING A CALL CHANNEL SELECTION To end a call, simply return the This telephone allows you to select a handset to the base, or press the channel from the 40 frequencies TALK button on the handset; the IN available to transmit signals from the USE indicator will turn off on the base unit to the handset. -
Page 26: Out Of Range Warning
BASIC OPERATION (CONTINUED) OUT OF RANGE WARNING The handset and base communicate up to a maximum range. The distance can be affected by the weather, power lines or other cordless telephones. If you move the handset too far away from the base unit, the handset will beep and the display will show, "OUT RANGE". -
Page 27: Using The Base
BASIC OPERATION (CONTINUED) USING THE BASE PAGE USING THE FLASH BUTTON BUTTON Press the PAGE button on the base to Press the EDIT/FLASH button to locate the handset when not in use; momentarily hang up. This is useful for the handset will beep for 20 seconds. custom calling features, such as Call Press again to end the paging feature. -
Page 28: Using The Tone Button
BASIC OPERATION (CONTINUED) USING THE TONE BUTTON CALL WAITING If you are in a Pulse dialing area you If you subscribe to Call Waiting through may still take advantage of touch-tone your local phone company, and you services after dialing to respond to receive another phone call, the phone touch-tone prompts. -
Page 29: Deleting One Name/Number From The Caller Id Log
BASIC OPERATION (CONTINUED) DELETING ONE NAME/NUMBER FROM THE CALLER ID LOG Scroll through the calls to select a Press the DEL/RE-PA button . The dis- number to delete by pressing the CALL play will show “ERASE ITEM?”. button followed by the Down button Press the DEL/RE-PA button again to view the latest calls, or pressing the The display will show “ERASED”... -
Page 30: Dialing A Number In The Caller Id Display
BASIC OPERATION (CONTINUED) DIALING A NUMBER IN THE CALLER ID DISPLAY You can automatically call a number from the caller ID log as follows: Scroll through the calls to select a Press the OPTION button repeatedly number to dial by pressing the CALL until the desired prefixes appear. -
Page 31: Adding A Directory Entry
BASIC OPERATION (CONTINUED) ADDING A DIRECTORY ENTRY The directory can store up to 20 name/telephone numbers. Press the MEMO/SAVE button. Press the EDIT/FLASH button. Using the Key buttons (0-9, *, #) Using the Key buttons (0-9, *, #) enter the name as described on page enter the telephone number, then 31, then press the Down button press the MEMO/SAVE button... -
Page 32: Entering A Name Using The Key Buttons
BASIC OPERATION (CONTINUED) ENTERING A NAME USING THE KEY BUTTONS When entering names into the directory, you must use the Key buttons (0-9,*,#). To use the buttons to add names, perform the following steps: Follow steps one and two on the See the chart below and using the Key previous page to program the buttons (0-9,*,#) -
Page 33: Dialing A Number From The Directory
BASIC OPERATION (CONTINUED) DIALING A NUMBER FROM THE DIRECTORY To select and dial a number from the directory, follow the steps below: Press the MEMO/SAVE button. Press the Up or Down button to locate the number you would like to call, then press the TALK button 12/16/01, 12:30 PM... -
Page 34: Preferred Calls (Vip)
BASIC OPERATION (CONTINUED) PREFERRED CALLS (VIP) You can assign a VIP, which will generate a special second ring. Press the MEMO/SAVE button Press the MENU/MUTE button ; the followed by the Up or Down display will show the VIP indicator. button to find the desired Press the MEMO/SAVE button name/number. -
Page 35: Editing A Directory Entry
BASIC OPERATION (CONTINUED) EDITING A DIRECTORY ENTRY To select and edit a name/number from the directory, follow the steps below: Press the MEMO/SAVE button , fol- Press the EDIT/FLASH button to edit lowed by the Up or Down button to the name. -
Page 36: Deleting One Name/Number From The Directory
BASIC OPERATION (CONTINUED) DELETING ONE NAME/NUMBER FROM THE DIRECTORY To delete a name/number from the directory, follow the steps below: While in the Standby mode, press the Press the DEL/RE-PA button . The dis- MEMO/SAVE button , followed by play will show “ERASE ITEM?”. the Up or Down button to find the... -
Page 37: Troubleshooting Guide
TROUBLESHOOTING GUIDE SYMPTOM SOLUTION No dial tone. Make sure the telephone line cord is connected properly to the modular wall jack. No power on the Make sure the battery pack is properly connected handset. inside the handset. The handset may need recharging, recharge handset. Handset does not Make sure the charging contacts on both the base and charge. -
Page 38: Care And Maintenance
CARE AND MAINTENANCE 1. Clean your phone with a damp (never wet) cloth. Solvent or detergent should never be used. 2. Avoid operating your unit under direct sunlight or in hot, humid or dusty places. 3. Keep your unit away from heating appliances. 4. - Page 39 NOTE: 12/16/01, 12:30 PM...
- Page 40 Memcorp, Inc. Weston, FL Printed in China Visit our website at www.memcorpinc.com 09172C-1 12/16/01, 12:30 PM...