Table of Contents
Advertisement
Quick Links
Download this manual
See also:
User Manual
t600
Copyright
All mobile products by GIGA-BYTE Communications mentioned in this document, including the
device, accessories, software, text, music, and pictures, are owned by, or authorized by original
manufacturers to GIGA-BYTE Communications. Reproduction, transfer, distribution, or storage of
part or all of the contents in this document in any form without the prior written permission of
GIGABYTE Communications Inc. is prohibited.
GIGA-BYTE Group, GIGA-BYTE Communications Inc.
2 0 0 7. 0 4
1
t600
Advertisement
Table of Contents

Related Manuals for Gigabyte GSmart t600


Summary of Contents for Gigabyte GSmart t600
- Page 1 GIGA-BYTE Communications. Reproduction, transfer, distribution, or storage of part or all of the contents in this document in any form without the prior written permission of GIGABYTE Communications Inc. is prohibited. GIGA-BYTE Group, GIGA-BYTE Communications Inc. 2 0 0 7. 0 4...
-
Page 2: Safety Information
t600 Safety Information This chapter contains important information on safe and efficient operation. Please read this information before using the device. Exposure to Radio Frequency (RF) Energy The device contains a transmitter and a receiver. When it is ON, it receives and transmits RF energy. -
Page 3: General Information
t600 General Information This chapter contains important information on safe and efficient operation. Please read this information before using the device. Ignorance of the following notices may lead to violations of the law. Before using the device, please make sure you have fully charged the battery. Do NOT remove the battery from the device during charging. -
Page 4: Table Of Contents
t600 Table of Contents Copyright…………………………………………………………………………………………..…………1 Safety Information…………………………………………………………………………………………..2 General Information…………………………………………….…………………………………….…….3 Chapter 1 Getting Started……………………………………………………………………………1-1 1.1 Getting to Know Your Device ……………………………………………………………………….1-1 1.2 Key Definition…………………………………………………………………………………………1-3 1.3 Accessory……………………………………………………………………………………………..1-3 1.4 Install and Charge Battery…………………………………………………………………………..1-3 1.5 Using Stylus ………………………………………………………………………………………….1-4 1.6 Screen Alignment and Settings……………………………………………………………………..1-4 1.7 Time and Date Settings………………………………………………………………………………1-4 1.8 Power On/Off, Sleep Mode………………………………………………………………………….1-4 1.9 My Information Setup ………………………………………………………………………………..1-5 1.10 Password Setup……………………………………………………………..………………………1-5... - Page 5 t600 4.4 Wise Talk..........................4-1 4.5 Change Settings........................4-3 4.6 Hints or Alert ........................4-3 4.7 Power Setup ........................4-3 4.8 Backlight ..........................4-3 4.9 Search for a File or Information....................4-3 4.10 Pop-Up Menu ........................4-4 4.11 Shortcut Key........................4-4 4.12 Phone Settings ........................4-4 Chapter 5 ActiveSync Synchronization Tool ................5-1 5.1 Install and Use ActiveSync ....................5-1 5.2 Synchronize via Bluetooth ....................5-2 Chapter 6 Connections .......................6-1...
- Page 6 t600 Chapter 10 Embedded Programs ...................10-1 10.1 Calendar..........................10-1 10.2 Contacts ..........................10-1 10.3 Tasks ..........................10-2 10.4 Notes ...........................10-3 10.5 Word Mobile ........................10-3 10.6 Excel Mobile........................10-4 10.7 PowerPoint Mobile ......................10-4 10.8 Windows Media Player.......................10-4 10.9 Internet Explore........................10-5 10.10 Calculator...........................10-6 10.11 Games..........................10-6 10.12 STK (SIM Tool Kit) ......................10-6 10.13 ZIP..........................10-6 10.14 SD Add-Ons........................10-6...
-
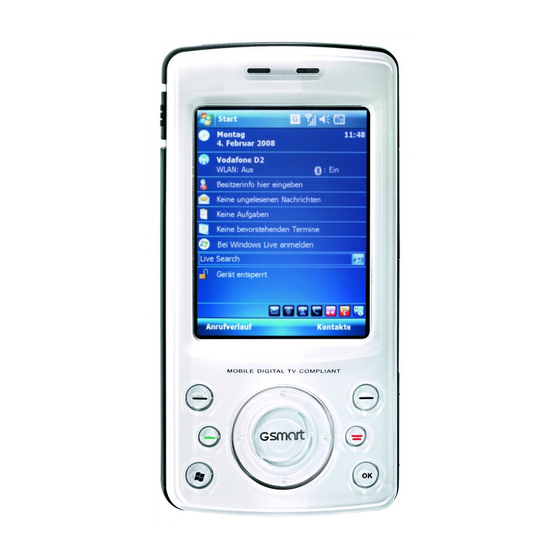
Page 7: Chapter 1 Getting Started
1 Getting Started 1.1 Getting to Know Your Device This chapter introduces you to the hardware of the device and its function keys. Item Function Press and hold the Power On / power button for a few seconds to turn on / off your device. - Page 8 Receive your voice 12 Microphone and conversation Connect a charger adaptor to this slot to start charging. This slot is also a USB slot. You may connect the Mini USB2.0/ device to computers or Charging Slot other devices with USB cable and transfer files between the device and that device.
-
Page 9: Key Definition
1.2 Key Definition 1.3 Accessory Function No Item Function 5-Way Navigation Move cursor up Key - Up Provide power to Battery your device. 5-Way Navigation Move cursor down Key - Down Charger Charges the battery 5-Way Navigation Move cursor to the left Press the button on Key - Left the headset to... -
Page 10: Using Stylus
screen shows the battery status. You may also check the battery status in Start > 1.7 Time and Date Settings Settings > System Tab > Battery Tab When using the device for the first time, you 1.5 Using Stylus are required to set your time zone, time, and date. -
Page 11: My Information Setup
• Tap Start > Settings > System 6. Tap “OK”, a pop-up window will appear to Tab > Power > Advanced Tab. confirm “Do you want to save password • Check “Turn off device if not settings changes?” used for” Please select “On 7. -
Page 12: Protect Your Screen
button on the lower right side of the device that you have turned your device into the to reboot your system. flight mode. 7. Make sure you have brought a specific System Reset: adapter for the country you are traveling. When executing system reset, you are performing a clean boot on the device. -
Page 13: Chapter 2 Using The Mobile Device
2 Using the Mobile Device 2.1 Today Screen Icon Description All sound alerts are on. 1. Start Menu: Tap to open the start menu list. 2. Battery Status: Shows the current battery Sound alerts off. status. 3. Connection Status: Shows the connection No SIM card. -
Page 14: Start Menu List
you may touch on the application icon that you Note: There are several shortcuts on the desired to use to execute the applications. bottom right of Today screen. You can choose to show or hide these shortcuts. Icon Programs Description To show or hide the shortcuts, select: Audio Mixer, Start >... -
Page 15: Settings
Select Start > Settings > System Tab This is your Windows gateway to help Program Description Live with Live Contains information of the Search. About device. Download updates for Backlight Settings for backlight. Windows Windows Mobile setup. Identifies the device to Update To help keep Certification... -
Page 16: Input Method
1. On your screen keyboard, tap the arrow Wi-Fi Configurations for Wi-Fi. icon next to the keyboard icon for more input methods. On the pop-up list, tap Block Use the device as a Micro Recognizer. SD card reader. 2. Write letters numbers Wireless... - Page 17 (Philippines), English (South Africa), English (Trindad), English (United Kingdom), English (United States), English (Zimbabwe), Estonian, Faroese (Faroe Islands), Finnish, French (Belgium), French (Canada), French (France), French (Luxembourg), French (Monaco), French (Switzerland), FYRO Macedonian, German (Austria), German (Germany), German (Liechtenstein), German (Luxembourg), German (Switzerland), Greek, Hebrew, Hungarian, Icelandic, Italian (Italy), Italian...
-
Page 18: Chapter 3 Phone Functions
3 Phone Functions 4. You can also use the navigation key to Press call key, to enter phone function. select a contact you want to call on the Please insert a SIM card before using phone. speed dial screen, and then press Call Key to call. -
Page 19: Contacts
2. Press the volume adjustment key on the side manually or tap to adjust incoming call volume. 3. If you press the volume adjustment key on the side of this device or tap > icons during a call, you may adjust the in - call volume of the phone. -
Page 20: Set Ringtone And Password
items. use ActiveSync program in computer and 1. Under Today screen, tap “Call History” on copy the ringtone file to Application Data / bottom left of screen. Sounds folder in this device. The ringtone 2. Tap “Menu” on the bottom right of screen. files will be added as the options. - Page 21 t600...
-
Page 22: Chapter 4 Personal Settings
4 Personal Settings Effect, choose preferred background effect 4.1 Restore to Factory Settings sound, or adjust volume. 4. Phone Record Tab: You may turn on/off You can restore the system to factory settings phone recording, or choose a file location. by tapping this program. - Page 23 machine greeting or record your own Canned Sound Effects greeting. 1. Select Start > Settings > Personal tab > 2. Select a style to be your greeting message. Wise Talk > Background Effects tab 3. Tap the record button to record your own 2.
-
Page 24: Change Settings
Calendar, job deadlines in Task bar, or alarm Phone Setting setup in Clock & Alarms, then this device will Select Start > Settings > Personal tab > Wise alert you according to your settings. You may Talk > Phone Setting tab select the following alert methods: Auto Answer: The phone will automatically Display message dialog on screen... -
Page 25: Pop-Up Menu
start searching the file. Phone tab: Settings include ring type, ring tone, keypad tone and security PIN. You may also use “File Explorer” to search for Services tab: Settings include Call Barring, files. Caller ID, Call Forwarding, Call waiting, Voice 1. -
Page 26: Chapter 5 Activesync Synchronization Tool
5 ActiveSync Synchronization Tool Microsoft ActiveSync device already has built-in ActiveSync. synchronize data in this device with personal 2. Hardware Installation: computer. Connect this device with your personal • You can synchronously update Outlook computer by using the USB cable. data in this device and in your personal 3. -
Page 27: Synchronize Via Bluetooth
5.2 Synchronize Via Bluetooth Instead of using a USB cable, you may also synchronize data via Bluetooth. Select Start > Programs > ActiveSync > Menu, then select “Connect via Bluetooth” and tap ”Synchronize” in this device to process synchronization. For descriptions regarding synchronization through Bluetooth device,... -
Page 28: Chapter 6 Connections
6 Connections When using GPRS and Internet connection, you will not be able to answer a call. If you want to make a call, your device will automatically disconnect to the Internet and reconnect to the Internet at the end of conversation. -
Page 29: Gprs Wizard
4. Or you may select Start > Settings > If you want to connect this device with your Connections tab > Connections > Tasks personal computer, please see “Chapter 5 tab > Manage Existing Connection; tap and ActiveSync Synchronization Tool”. hold on a connection to open pop-up menu and select “Connect”. -
Page 30: Wi-Fi
Note: Reboot is required when you change the address Start > Settings > Connections Tab > Wi-Fi > Network Adaptors tab > Tap an adapter to modify settings. 6.9 USB You may use the device as a mass storage device or a Micro SD card reader. 1. -
Page 31: Chapter 7 Receive And Send Message
7 Receive and Send Message 7.1 Email & Message Before receiving and sending your email or message, please make sure that this device has connected to a network. When you are connected to a network, you may go to “Messaging” to receive and send your email or message. -
Page 32: Directly Connect To Email Server
attachments less than specific file size. To Inbox synchronization process rules: make these settings, select Start > Messaging 1. See “6.1 Internet Access”. Please select a > Menu > Tools > Options, and change email desired cooperation relationship on “New account setup by requirement. -
Page 33: Use Email And Message
2. See “ 6.1 Internet Access ” to connect this 6. Select on the bottom center of the device to a network and start receiving and screen to activate or disable screen sending email and messages. keypad. 7. Select “Menu” to view menu. Connect with Email Server: 1. -
Page 34: How To Use Push Email
Read and reply mail: Select Messaging > Menu, and then select “Send/ Receive” to start sending and receiving new mail. Select “Inbox” on the top left of screen to view Inbox. Tap on any unread mail to view its content. When reading mail, you can: 1. -
Page 35: How To Use Mms
4. In ActiveSync on your device, select Menu 2. Tap “ Subject” field to input a subject for > Schedule your new message. 5. Set the Peak times to “As items arrive” and 3. Tap “ Insert picture / video…” or ”Insert the Off-peak times sync time to “As items audio…”... -
Page 36: Messenger
Adding text: (Play/Pause and Stop controls are You can either enter in new text with the available.) keyboard, or use "My Text" to add text to any - Tap this button to activate controls that slide. You can also insert an emotion icon or a allow you to record new audio: favorite website link into your message. - Page 37 Hotmail: Compose Hotmail: 1. After signing in Messenger, wait for the 1. After signing in Messenger, wait for the sync to finish and then select Start > sync to finish and then select Start > Messaging. Messaging. 2. Select Windows Live Inbox from the drop 2.
-
Page 38: Chapter 8 Using Bluetooth
8 Using Bluetooth When you want to form connection through Bluetooth, please make sure the device you would like to make connections with is also equipped with Bluetooth. 8.1 Bluetooth Connection Settings When Bluetooth is activated, tap icon on Today screen, and you will see icon in the pop-up window. -
Page 39: Com Ports
6. On Devices tab screen, select the device to be connected, and then select “Next“. The screen will prompt for password. After inputting password on password input screen, select “Next“. 7. If the password entered is correct, the connection will be formed. 8.2 COM Ports For example, when you purchase Bluetooth GPS supported navigation software;... -
Page 40: Chapter 9 Multimedia
For instructions on how to get started, please refer Pictures & Videos: view your photos to GSmart t600 Mobile Digital TV & Radio here. User Guide included in your package. Camera Settings: to open the menu for Note: camera settings. -
Page 41: Recorder
video recorder to record memorable moments 1. 1. Select Start > Programs > Multimedia > of your life. Recorder. 2. Tap on to activate sound recording 1. Select Start > Programs > Multimedia > function. 3. Tap on to stop recording sound. Camera >... -
Page 42: Pictures & Videos
9.6 JAVA This device supports JAVA, providing you the freedom of using JAVA applications and 9.5 Pictures & Videos games. You may use ”Pictures & Videos” function to 9.7 Audio Mixer manage your photos or videos. In ”Pictures & Videos”> “Options”, you may resize the picture. In “Menu”, you can also perform functions such Audio Mixer enables you to configure bass, as “Set As Today Background”, “... -
Page 43: Chapter 10 Embedded Programs
10 Embedded Programs View and Update Calendar: 10.1 Calendar Select an appointment on the calendar to view appointment summary. If you want to change Appointments and Meetings: the details of an appointment, select “Edit”. “Calendar” arrange appointments, meetings, and other events. Send Meeting Notice: You may view your appointments in different You may use “Calendar”... -
Page 44: Tasks
letter search for contacts that starts with that 10.3 Tasks letter. 3. Tap on contact’s name or phone number to You may use “Tasks” to help you track view or edit contact’s details. unfinished tasks. 4. Tap on any contact and hold to open pop-up 1. -
Page 45: Word Mobile
record information. You may also record voice time. in “Notes”. If a note file contains voice notes in When you open a second document at the addition to text, a small icon representing voice same time, this device will ask you to save the notes will appear in the content area of the first document first. -
Page 46: Powerpoint Mobile
documents like Statement of Income and 5. Select “Open” to open a file. Expenditure. 6. Select “Menu” for options. If you want to create a new Excel file, tap Start > Office Mobile > Excel Mobile > New, and the 10.8 Windows Media Player screen will open a new Excel file. -
Page 47: Internet Explore
field to go to the link You may use navigation keys or the scroll on browser screen to adjust your screen browsing content. Tap to return to previous page Tap “Menu” to open Menu. Select and hold any location of website content to open pop-up menu. -
Page 48: Calculator
without saving any changes. ˙ Set a password, which will be asked for when you unzip the file. Note: 4. Select compression to start compressing the When you check or uncheck “Menu file. Magnifier” the new settings will take effect after a system reboot. -
Page 49: Sim Manager
Device”. 9. Tap “Transmit” to deliver those files to the other device. 10.16 SIM Manager To change contact information on your SIM card, tap Start > Programs > SIM Manager, then tap a SIM contact and edit it. To copy SIM contacts to your device: 1. -
Page 50: Chapter 11 Device Maintenance
11 Device Maintenance Select Start > Internet Explorer > Menu > Tools 11.1 Memory management > Options > Memory tab. Select “Clear History” and “Delete File” to delete browsed web page related records. Select Start > Settings > System tab > Memory 11.3 Add or Remove Programs Main tab:... - Page 51 You must move this program to this device from the pop-up menu. manually. If you cannot find any installation instructions for this program, please use ‘Browse’ function of ActiveSync to copy program file to Program Files folder in this device. After completing installation, select Start >...
-
Page 52: Chapter 12 Specifications
12 Specifications Item Specification System Information Operating System Windows Mobile 6 Professional Processor Marvell PXA 270 520 MHz Memory 256 MB ROM, 64MB RAM Size Dimensions (mm) 110 x 55.5 x 18.5 mm Weight (in grams) 140 g (Including Battery) Batteries Battery Capacity Li-Ion 1300 mAh... - Page 53 Resolution 480*640 pixels Band Band GSM 850/900/1800/1900 Connectivity Bluetooth Bluetooth 2.0 Modulation: GFSK Band:2.4 - 2.4835GHz Output power:0dbm (Typical) WLAN WLAN 802.11b/g Wireless Technology: OFDM and DSSS Operating frequency: 2.412 - 2.462GHz Output power:12dbm (Typical) GPRS GPRS Class B, Class 10 WAP 2.0 Modem dial-up Mini USB 2.0...
-
Page 54: Ring Tone
Max Size (per) Depends on available RAM Audio Format WMA, MP3, MID, AMR, WAV,AAC, eAAC, AAC+ Max Size Depends on available RAM Video Format 3GP, MPEG4, WMV Max Size Depends on available RAM Phonebook Size Depends on available RAM Ring tone Type MP3, WMA, AMR Polyphone... -
Page 55: External Memory
Macro Mode Video Recording Message Windows Live E-Mail Messenger External Memory Type Micro SD Card Max Size No Limit Operating Temperature -10℃~45℃ Temperature Note: Not all specifications described are available in all regions. Availability of TV/Radio may vary according to different broadcasting 12-4 t600... -
Page 56: Chapter 13 Faq
13 FAQ Why can’t I turn on the device? This is a power saving mechanism. You can change this setting in Start > Settings > Please make sure that the device has sufficient System tab >Backlight> Battery Power tab & power, and that the battery is secured in the External Power tab. - Page 57 Make sure that you are not running another program that is using the same serial port. Thank you for selecting the If the connection still fails, remove ActiveSync on your computer and reinstall. GIGA-BYTE COMMUNICATIONS INC. 8F,No. 43, Fu-Hsin Road, Hsin-Tien, Taipei How do I take out the Micro SD card from Hsien, Taiwan the SD adapter?