Advertisement
Advertisement
Table of Contents

Related Manuals for Sangean DT-200X


Summary of Contents for Sangean DT-200X
- Page 1 User Manual DT-200X...
-
Page 2: Limited Warranty
Should service be necessary for any reason due to manufacturing defect or malfunction during the warranty period Sangean America, Inc. will repair or replace at its description, the defective merchandise at no charge (except for small charge for handling, packing, return postage and insurance), upon delivery of this product to Sangean America, Inc. - Page 3 No other warranties, whether expressed or implied shall apply to this product thereafter. Sangean America, Inc. is not liable for any loss or damage, direct or consequential arising out of the use of, or inability to use this product. (Some states...
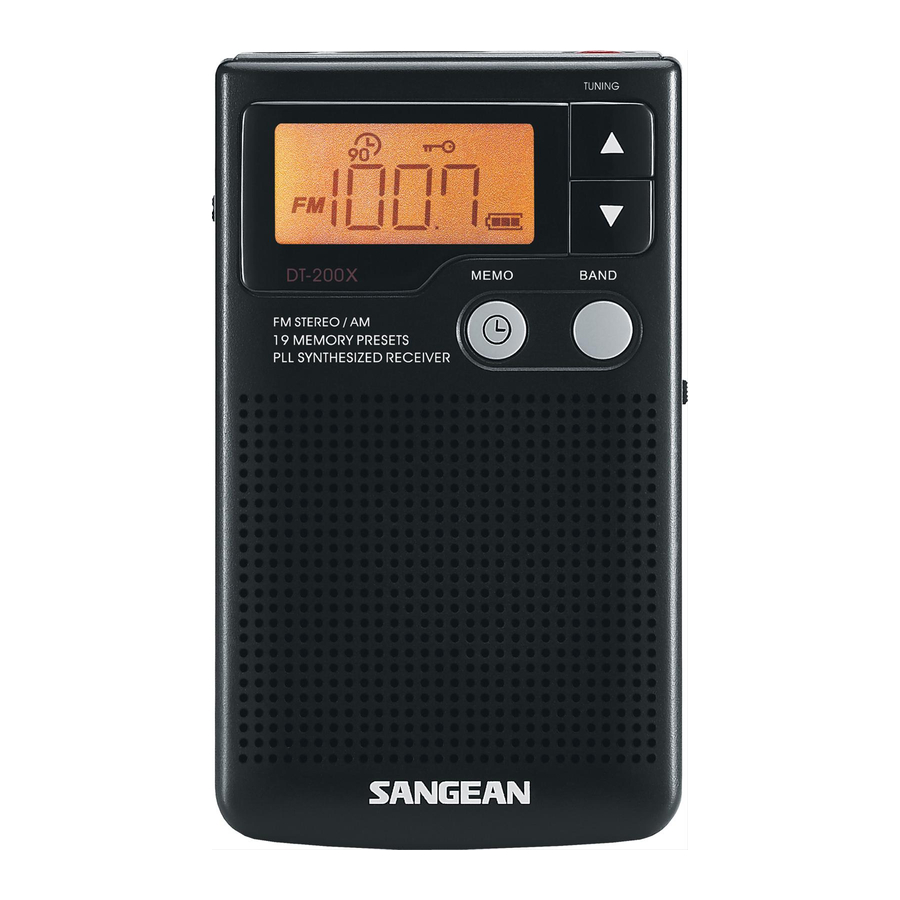
- Page 5 Headphone/Antenna Jack Note: To improve reception during speaker use, leave headphones or external antenna device plugged in through earphone jack. Volume Control You can rotate the volume control wheel located on the top of the unit clockwise to increase volume, counter-clockwise to decrease volume. Deep Bass Boost The deep bass boost selector switch located on the top back of the unit provides better bass...
- Page 7 Speaker/Headphone Selector On the top left side of the radio you will find the output selector switch. With this selector switch you can choose to use the built-in speaker, or headphones. To use speaker: Set selector switch to SP. Selection To use Headphones: •...
- Page 9 My Favorites Lock Switch The lock switch prevents accidental changing of any of the radio settings. • To enable the lock function slide the lock button located on the right side of the unit to the up position. When lock is activated there will be this symbol located on the top of the display.
-
Page 10: Battery Installation
Battery Installation NOTE: A flashing “E” appearing on the LCD display indicates a weak battery and that replacement of batteries is required. • Turn radio off. • Prepare replacement batteries to ensure a quick and easy change. Failure to change batteries within 1 minute will reset presets and clock settings. - Page 11 Manual Step Tuning • Turn radio on using the On/Off button located on the top of the radio. • Select desired band by pressing the “Band” selector on the front of the unit. • Press the desired tuning button (Up/Down) repeatedly until desired frequency is found.
-
Page 12: Setting The Clock
Setting the Clock This unit features a clock that will display the current time while off. To set the clock: • Turn unit off by depressing the power button located on the top of the radio. • Press and hold MEMO or CLOCK button until the hour setting begins blinking and the colon is no longer blinking. -
Page 13: Specifications
SPECIFICATIONS Band Frequency: AM 520 - 1710 kHz FM 87.5 - 108 MHz Earphone Jack: 3.5mm mini-plug 16 ohm impedance (stereo) Output Power: 60mW (10% THD) via built-in speaker 16 ohm impedance (stereo) Speaker: 1 inch diameter, 4 ohms impedance External Power: Speaker Earphones...