
Related Manuals for Asus T4-P5P43


Summary of Contents for Asus T4-P5P43
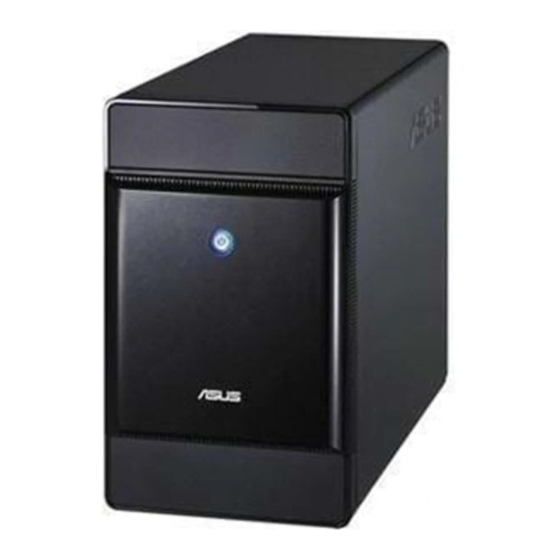
- Page 1 T-P5P43 ASUS PC (Desktop Barebone) T3-P5P43 T4-P5P43* * Only some of the T4 models have the Time and IR LED display.
- Page 2 Product warranty or service will not be extended if: (1) the product is repaired, modified or altered, unless such repair, modification of alteration is authorized in writing by ASUS; or (2) the serial number of the product is defaced or missing.
-
Page 3: Table Of Contents
System package contents ................x Chapter 1: System introduction 1.1 Welcome! ..................1-2 1.2 Front panel ................... 1-2 1.2.1 T3-P5P43 front panel ............1-2 1.2.2 T4-P5P43 front panel ............1-4 1.3 Rear panel ..................1-6 1.4 Internal components ..............1-8 Chapter 2: Basic installation 2.1 Preparation ................... 2-2 2.2 Before you proceed .............. - Page 4 Connectors ................... 4-5 Chapter 5: BIOS setup 5.1 Managing and updating your BIOS ..........5-2 5.1.1 Creating a bootable floppy disk ........5-2 5.1.2 ASUS EZ Flash 2 utility ........... 5-3 5.1.3 AFUDOS utility ..............5-4 5.1.4 ASUS CrashFree BIOS 3 utility ........5-6 5.1.5 ASUS Update utility ............5-8 5.2...
- Page 5 Boot Device Priority ............5-29 5.6.2 Boot Settings Configuration .......... 5-30 5.6.3 Security ................. 5-31 5.7 Tools menu ................. 5-33 5.7.1 ASUS EZ Flash 2 ............5-33 5.7.2 Express Gate ..............5-34 5.7.3 LED Poster Configuration ..........5-35 5.8 Exit menu ..................5-36 Appendix A.1...
-
Page 6: Notices
Notices Federal Communications Commission Statement This device complies with Part 15 of the FCC Rules. Operation is subject to the following two conditions: • This device may not cause harmful interference, and • This device must accept any interference received including interference that may cause undesired operation. -
Page 7: Safety Information
Safety information Electrical safety • To prevent electrical shock hazard, disconnect the power cable from the electrical outlet before relocating the system. • When adding or removing devices to or from the system, ensure that the power cables for the devices are unplugged before the signal cables are connected. •... -
Page 8: About This Guide
How this guide is organized This guide contains the following parts: Chapter 1: System introduction This chapter gives a general description of ASUS T-P5P43. The chapter lists the system features, including introduction on the front and rear panel, and internal components. Chapter 2: Basic installation This chapter provides step-by-step instructions on how to install components in the system. - Page 9 ASUS Websites The ASUS websites worldwide provide updated information on ASUS hardware and software products. Refer to the ASUS contact information. Optional Documentation Your product package may include optional documentation, such as warranty flyers, that may have been added by your dealer. These documents are not...
-
Page 10: System Package Contents
System package contents Check your T-P5P43 system package for the following items. If any of the items is damaged or missing, contact your retailer immediately. Item description ASUS T-P5P43 barebone system with • ASUS motherboard • 250 W PFC power supply unit • Front I/O card and 3-in-1 storage card reader Cables •... - Page 11 Chapter 1 This chapter gives a general description of ASUS T-P5P43. The chapter lists the system features including introduction on the front and rear panel, and internal components. T3-P5P43 T4-P5P43* * Only some of the T4 models have the Time and IR LED display.
-
Page 12: Chapter 1: System Introduction
Thank you for buying an ASUS T-P5P43! ASUS T-P5P43 is an all-in-one barebone system with a versatile home entertainment feature. The system comes in a stylish mini-tower casing, and powered by an ASUS motherboard that supports the Intel processor in the 775-land package with ®... - Page 13 . This port connects a headphone with a stereo mini- plug. 11. Secure Digital™/MultimediaCard/Memory Stick (MS) slot . This slot is for a Secure Digital™/MultimediaCard/Memory Stick storage card. The information provided is intended as a general guide for reference. Specifications depend on the barebone system you purchased. ASUS T-P5P43...
-
Page 14: T4-P5P43 Front Panel
1.2.2 T4-P5P43 front panel External Internal Drive door. Open this door to access the optical drive. Front panel I/O cover. Push downwards to open the front panel cover and display the input/output ports. Time and IR LED display (optional) When your PC boots up, it displays the time of the Operating System. There may be an advance or a late than the current time. - Page 15 . This port connects a headphone with a stereo mini- plug. 11. Secure Digital™/MultimediaCard/Memory Stick (MS) slot . This slot is for a Secure Digital™/MultimediaCard/Memory Stick storage card. The information provided is intended as a general guide for reference. Specifications are subject to the barebone system you purchased. ASUS T-P5P43...
-
Page 16: Rear Panel
Rear panel The system rear panel includes the power connector and several I/O ports that allow convenient connection of devices. T3-P5P43/T4-P5P43 12. Expansion slot covers. Remove these covers when installing expansion cards. 13. Expansion slots. Use this slot when installing expansion card. 14. Rear speaker Out port (black). This port connects the rear speakers on a 4-channel, 6-channel, or 8-channel audio configuration. - Page 17 29. Power switch. This switch allows you to turn your PC on/off. 30. 6-pin IEEE 1394a port . This port provides high-speed connectivity for IEEE 1394a-compliant audio/video devices, storage peripherals, and other PC devices. 31. LAN port. This port allows connection to a Local Area Network (LAN) through a network hub. ASUS T-P5P43...
-
Page 18: Internal Components
The installed components are labeled for your reference. Proceed to Chapter 2 for instructions on installing additional system components. The illustration shows an open chassis lifted at a 90 angle. T3-P5P43 T4-P5P43 Chapter 1: System introduction... - Page 19 ASUS motherboard LGA775 socket with PnP cap DIMM sockets for DDR2 DIMM sockets for DDR3 Serial ATA connectors PCI Express™ x16 slot for discrete graphics card PCI slot Expansion card slot Power supply unit ASUS T-P5P43...
- Page 20 1-10 Chapter 1: System introduction...
- Page 21 Chapter 2 This chapter provides step-by-step instructions on how to install components in the system. T3-P5P43 T4-P5P43* * Only some of the T4 models have the Time and IR LED display.
-
Page 22: Chapter 2: Basic Installation
Preparation Before you proceed, ensure that you have all the components you plan to install in the system. Basic components to install 1. Central Processing Unit (CPU) 2. DDR2 / DDR3 Dual Inline Memory Module (DIMM) 3. Expansion card(s) 4. Hard disk drive 5. -
Page 23: Removing The Cover
Use a Phillips screw driver to remove the cover screws. Keep the screws for later use. Slightly pull the cover toward the rear panel until the side tabs are disengaged from the chassis. Lift the cover, then set aside. ASUS T-P5P43... -
Page 24: Power Supply Unit
Power supply unit You need to turn over the power supply unit (PSU) section on the side before you can install a central processing unit (CPU) and other system components. To turn over the PSU: Lay the system chassis on its side on a flat and stable surface. -
Page 25: Cpu Installation
ASUS will shoulder the cost of repair only if the damage is shipment/transit-related. • Keep the cap after installing the motherboard. ASUS will process Return Merchandise Authorization (RMA) requests only if the motherboard comes with the cap on the LGA775 socket. - Page 26 Lift the load lever in the direction of PnP cap the arrow to a 135º angle. Load plate Lift the load plate with your thumb and forefinger to a 100º angle (4A), then push the PnP cap from the load plate window to remove (4B). Position the CPU over the socket, CPU notch ensuring that the gold triangle is on...
-
Page 27: Installing Cpu Fan And Heatsink Assembly
When the fan and heatsink assembly is in place, connect the CPU fan cable to the connector on the motherboard. CPU_FAN Do not forget to connect the CPU fan connector! Hardware monitoring errors can occur if you P5Q18L fail to plug this connector. P5Q18L CPU fan connector ASUS T-P5P43... -
Page 28: Installing A Dimm
Installing a DIMM The system motherboard comes with two Double Data Rate 2 (DDR2) Dual Inline Memory Module (DIMM) sockets (DIMM_A1 and DIMM_B1, Yellow) and two Double Data Rate 3 (DDR3) DIMM sockets (DIMM_A2 and DIMM_B2, Black). The following figure illustrates the location of the sockets: DIMM_A1 DIMM_A2 P5Q18L... - Page 29 K4B1G0846D(ECC) • • 2048MB Transcend TS256MLK64V3U K4B1G0846D • • 1024MB Aeneon AEH760UD00-13H AEH93R13H • • 1024MB BUFFALO FSX1333D3G-1G Heat-Sink Package • • 2048MB BUFFALO FSX1333D3G-2G Heat-Sink Package • • 1024MB (kit of 2) Patriot PDC32G1333LLK Heat-Sink Package • ASUS T-P5P43...
- Page 30 DDR3 (1066 MHz) Qualified Vendors List DIMM support SS/ Size Vendor Chip No. Part No. 1024MB A-DATA M3OEL3G3I4130A1B5Z J5308BASE-AE-E-S • • 1024MB CORSAIR CM3X1024-1066C7 Heat-Sink Package • • 1024MB Crucial CT12864BA1067.8SFB Z9HWQ • • 1024MB ELPIDA EBJ11UD8BAFA-AG-E J5308BASE-AC-E • • 2048MB(kit of 2) G.SKILL F3-8500CL6D-2GBHK Heat-Sink Package • •...
- Page 31 1024MB PQE2648S19R • • Team “BoxP/N:TXDD2048M1066HC5DC 2048MB(Kit of 2) Heat-Sink Package 5-5-5-15 • • (TXDD1024M1066HC5)” Team “BoxP/N:TXDD2048M1066HC5DC-D 2048MB(Kit of 2) Heat-Sink Package 5-5-5-15 • • (TXDD1024M1066HC5-D)” Team “BoxP/N:TXDD4096M1066HC5DC-D 4096MB(Kit of 2) Heat-Sink Package 5-5-5-15 • • (TXDD2048M1066HC5-D)” ASUS T-P5P43 2-11...
- Page 32 DDR2 (800 MHz) Qualified Vendors List DIMM support SS/ Size Vendor Chip No. Part No. 2048MB A-DATA M2OAD6H3J4171Q1E52 AD20908A8A-25EG • • 1024MB Apacer 78.01GA0.9K5 AM4B5808CQJS8E • • 512MB Apacer 78.91G9I.9K5 AM4B5708JQJS8E • • 2048MB Apacer 78.A1GA0.9K4 AM4B5808CQJS8E • • 4096MB(Kit of 2) CORSAIR “Box P/N:TWIN2X4096-6400C5(CM2X2048-6400C5)” Heat-Sink Package • •...
- Page 33 PSD2 51280081 PM64M8D2BU-25EC • • 2048MB Patriot PSD22GB002 PM128M8D2BU-25KC • • 1024MB Team TEDD1024M800HC5 Heat-Sink Package • • 2048MB Team TEDD2048M800HC5 Heat-Sink Package • • 1024MB UMAX U2S12D30TP-8E D48001GP3-63BJU • • 2048MB UMAX U2S24D30TP-8E D48002GP0-73BCU • • ASUS T-P5P43 2-13...
- Page 34 DDR2 (667 MHz) Qualified Vendors List DIMM support SS/ Vendor Part No. Size Chip No. Brand Apacer 78.01G9O.9K5 1024MB AM4B5808CQJS7E APACER • • Apacer 78.91G92.9K5 512MB AM4B5708JQJS7E APACER • • Apacer 78.A1G9O.9K4 2048MB AM4B5808CQJS7E APACER • • CORSAIR VS 512MB667D2 512MB 64M8CFEG • • CORSAIR VS1GB667D2 1024MB 64M8CFEG •...
- Page 35 • B*: Supports one pair of modules inserted into either the yellow slots as one pair of Dual-channel memory configuration. Visit the ASUS website for the latest DDR3-1333 / 1066 MHz, and DDR2- 1066/800/667 MHz QVL. ASUS T-P5P43 2-15...
-
Page 36: Dimm Installation
2.6.2 DIMM installation To install a DDR2/DDR3 DIMM: Locate the two DIMM sockets on the motherboard. Unlock a socket by pressing the retaining clips outward. Align a DIMM on the socket such that the notch on the DIMM matches the break on the socket. Firmly insert the DIMM into the socket until the retaining clips snap back in place and the DIMM is properly seated. -
Page 37: Installing An Expansion Card
PCI Express™ specifications. The figure shows a graphics card installed on the PCI Express™ x16 slot. The chassis supports PCI Express x 16 cards with 192 mm x 19 mm or smaller dimensions only. ASUS T-P5P43 2-17... -
Page 38: Expansion Card Installation
2.7.2 Expansion card installation To install an expansion card: Before installing the expansion card, read the documentation that came with it and make the necessary hardware settings for the card. Locate and remove one metal bracket lock screw. Remove the metal bracket lock. Align the card connector with the slot, then press firmly. -
Page 39: Installing An Optical Drive
Secure the optical drive with four screws on both sides of the bay. Connect the IDE and the power plugs to the connectors at the back of the drive. ASUS T-P5P43 2-19... -
Page 40: Installing A Serial Ata Disk Drive
Installing a Serial ATA disk drive The system supports one Serial ATA hard disk drive. To install a Serial ATA hard disk drive: Connect the SATA power cable to the plug of the power supply unit. Connect the SATA signal cable and the power plugs to the connectors at the back of the drive. -
Page 41: 2.10 Replacing The Power Supply Unit
If the voltage supply in your area is 100-127 V, set the switch to 115 V. If the voltage supply in your area is 200-240 V, set the switch to 230 V. Setting the switch to 115 V in a 230 V environment will seriously damage the system! ASUS T-P5P43 2-21... -
Page 42: 2.11 Replacing The Cover
2.11 Replacing the cover To replace the cover: Turn the chassis upright. Position the front edge of the cover at least two inches from the front panel cover. Fit the cover tabs with the chassis rail and the front panel tabs. - Page 43 Chapter 3 This chapter helps you power up the system and install drivers and utilities from the support CD. T3-P5P43 T4-P5P43* * Only some of the T4 models have the Time and IR LED display.
-
Page 44: Chapter 3: Starting Up
The system power button is located on the front panel. Press the system power button ( ) to enter the OS. Press to enter the system OS T3-P5P43 T4-P5P43 In Windows OS, pressing the button shuts down, restarts, or puts the ® system in sleep mode (S3) depending on the OS setting. -
Page 45: Support Cd Information
• The contents of the support CD are subject to change at any time without notice. Visit the ASUS website for updates. 3.3.1 Running the support CD To begin using the support CD, place the CD in your optical drive. The CD automatically displays the Drivers menu if Autorun is enabled in your computer. -
Page 46: Drivers Menu
3.3.2 Drivers menu The drivers menu shows the available device drivers if the system detects installed devices. Install the necessary drivers to activate the devices. ASUS InstAll - Drivers Installation Wizard Allows you to easily install all necessary drivers for your system. Intel(R) Chipset INF Update Program Installs the Intel Chipset INF Update Program. -
Page 47: Utilities Menu
Portable Dodument Format (PDF). ASUS Update Installs the ASUS Update that allows you to update the motherboard BIOS and drivers. This utility requires an Internet connection either through a network or an Internet Service Provider (ISP). See page 5-8 for details. -
Page 48: Make Disk Menu
3.3.4 Make Disk menu The Make Disk menu contains items to create Intel ICH10 AHCI driver disk. 3.3.5 ASUS contact information The Contact tab displays the ASUS contact information. Chapter 3: Starting up... -
Page 49: Software Information
ASUS Express Gate ASUS Express Gate is an instant-on environment that gives you quick access to the Internet. Within a few seconds of powering on your computer, you will be at the Express Gate menu where you can start the web browser, Skype, or other Express Gate softwares. - Page 50 Select the target disk volume for you to install Express Gate. If you have multiple volumes and OS installed in your hard drive, it is recommended to install Express Gate in Volume C. Click Next to continue. Follow the screen instructions to complete installation.
- Page 51 Enter BIOS setup Enter Boot selection pop-up In the Express Gate Environment: Function <Alt> + <Tab> Switch between softwares <Ctrl> + <Alt> + <Del> Bring up Power-Off dialog box <Ctrl> + <Alt> + <Print Screen> Save screen snapshot as picture to file ASUS T-P5P43...
- Page 52 Using the Configuration Panel Use the configuration panel to change various Express Gate settings. Click on an icon to open a particular configuration tool. The following tools are available: Date and Time: set current date and time as well as time zone. • Input Method: choose your preferred input language and method. •...
- Page 53 USB drive. If a USB device is detected, the icon contains a green arrow. ASUS Express Gate supports file uploading from SATA HDDs, ODDs and USB drive and downloading to USB drives only. Shows network status; click to configure network.
- Page 54 Click to change LaunchBar options (auto-hide, docking position, etc). Click to show the “ASUS Utility” panel (if supported). Click to show “About Express Gate.” Click to open Express Gate Help. Click to bring up power options window to boot to OS, restart or power down.
- Page 55 LAN port. Then enter the username and password for your dial-up account. Click OK to enable xDSL/cable dial-up and establish the PPPoE connection. When PPPoE is enabled, the port it uses will automatically be unchecked and grayed out. ASUS T-P5P43 3-13...
- Page 56 View mode selection Shows the image folder(s) found in your hard drive or external devices Shows user- created image album(s) Image control ASUS Express Gate supports HDDs connected to motherboard chipset- controlled onboard SATA ports only. All onboard extended SATA ports and external SATA ports are NOT supported. 3-14 Chapter 3: Starting up...
- Page 57 Express Gate software will be released regularly, adding refinements or new applications. You can find original version of the software on the support DVD or download new versions from the ASUS support website. To update Express Gate Double-click the Express Gate setup file to start software update.
- Page 58 3-16 Chapter 3: Starting up...
- Page 59 Chapter 4 This chapter gives information about the motherboard that comes with the system. This chapter includes the motherboard layout, jumper settings, and connector locations. T3-P5P43 T4-P5P43* * Only some of the T4 models have the Time and IR LED display.
-
Page 60: Chapter 4: Motherboard Info
Introduction The motherboard comes already installed in ASUS T-P5P43 system. This chapter provides technical information about the motherboard for future upgrades or system reconfiguration. Motherboard layout 26.7cm(10.5in) PCI1 BUZZER Super CLRTC PWR_FAN BIOS CPU_FAN VT6308S PCIEX16_1 FRONT_CON Lithium Cell CMOS Power... -
Page 61: Jumpers
6. Hold down the <Del> key during the boot process and enter BIOS setup to re-enter data. Except when clearing the RTC RAM, never remove the cap on CLRTC jumper default position. Removing the cap will cause system boot failure! CLRTC Normal Clear RTC (Default) P5Q18L P5Q18L Clear RTC RAM ASUS T-P5P43... - Page 62 Keyboard/Mouse power (3-pin USB_KBMS_PW) This jumper allows you to enable or disable the keyboard / mouse wake-up and Wake-On-LAN feature. Set this jumper to pins 2-3 (+5VSB) to wake up the computer when you press a key on the keyboard (the default is the Space Bar), or click the mouse buttons.
-
Page 63: Connectors
P5Q18L CPU fan connector Do not forget to connect the fan cable to the fan connector. Insufficient air flow within the system may damage the motherboard components. These are not jumpers! DO NOT place jumper caps on the fan connectors! ASUS T-P5P43... - Page 64 ATX power connectors (24-pin EATXPWR, 4-pin ATX12V) These connectors are for the 24-pin and 4-pin power plugs from the power supply unit. The plugs from the power supply unit are designed to fit these connectors in only one orientation. Find the proper orientation and push down firmly until the connectors completely fit.
- Page 65 Slave Data Disk right angle side Connect the right-angle side of SATA signal cable to SATA device. Or you may connect the right-angle side of SATA cable to the onboard SATA port to avoid mechanical conflict with huge graphics cards. ASUS T-P5P43...
- Page 66 Optical drive audio connector (4-pin CD) These connectors allow you to receive stereo audio input from sound sources such as a CD-ROM, TV tuner, or MPEG card. Right Audio Channel Left Audio Channel P5Q18L P5Q18L Internal audio connector Digital audio connector (4-pin SPDIF_OUT) This connector is for the S/PDIF audio module to allow digital sound output. Connect one end of the S/PDIF audio cable to this connector and the other end to the S/PDIF module.
- Page 67 Chapter 5 This chapter tells how to change system settings through the BIOS Setup menus and describes the BIOS parameters. T3-P5P43 T4-P5P43* * Only some of the T4 models have the Time and IR LED display.
-
Page 68: Chapter 5: Bios Setup
The following utilities allow you to manage and update the motherboard Basic Input/ Output System (BIOS) setup. ASUS EZ Flash 2: Updates the BIOS using a floppy disk, USB Flash, or the motherboard support CD during POST. ASUS AFUDOS: Updates the BIOS in DOS mode using a bootable floppy disk. -
Page 69: Asus Ez Flash 2 Utility
5.1.2 ASUS EZ Flash 2 utility The ASUS EZ Flash 2 feature allows you to update the BIOS without having to go through the long process of booting from a floppy disk and using a DOS-based utility. The EZ Flash 2 utility is built-in the BIOS chip so it is accessible by pressing <Alt>... -
Page 70: Afudos Utility
Extension name Press <Enter>. The utility copies the current BIOS file to the floppy disk. A:\>afudos /oOLDBIOS1.rom AMI Firmware Update Utility - Version 1.19(ASUS V2.26(06.08.28BB)) Copyright (C) 2003 American Megatrends, Inc. All rights reserved. Reading flash ..done Write to file..ok A:\>... - Page 71 Updating the BIOS file To update the BIOS file using the AFUDOS utility: Visit the ASUS website (www.asus.com) and download the latest BIOS file for the motherboard. Save the BIOS file to a bootable floppy disk. Write the BIOS filename on a piece of paper. You need to type the exact BIOS filename at the DOS prompt.
-
Page 72: Asus Crashfree Bios 3 Utility
5.1.4 ASUS CrashFree BIOS 3 utility The ASUS CrashFree BIOS 3 is an auto recovery tool that allows you to restore the BIOS file when it fails or gets corrupted during the updating process. You can update a corrupted BIOS file using the motherboard support CD , the floppy disk or the USB flash disk that contains the updated BIOS file. - Page 73 Restart the system after the utility completes the updating process. • Only the USB flash disk with FAT 32/16 format and single partition can support ASUS CrashFree BIOS 3. The device size should be smaller than 8GB. • DO NOT shut down or reset the system while updating the BIOS! Doing so...
-
Page 74: Asus Update Utility
5.1.5 ASUS Update utility The ASUS Update is a utility that allows you to manage, save, and update the motherboard BIOS in Windows environment. The ASUS Update utility allows you ® • Save the current BIOS file • Download the latest BIOS file from the Internet •... - Page 75 Updating the BIOS through the Internet To update the BIOS through the Internet: desktop by clicking Start Launch the ASUS Update utility from the Windows ® > Programs > ASUS > ASUSUpdate > ASUSUpdate. The ASUS Update main window appears. Select Update BIOS from Select the ASUS FTP site nearest the Internet option from the you to avoid network traffic, or drop-down menu, then click Next.
- Page 76 Updating the BIOS through a BIOS file To update the BIOS through a BIOS file: desktop by clicking Start Launch the ASUS Update utility from the Windows ® > Programs > ASUS > ASUSUpdate > ASUSUpdate. The ASUS Update main window appears. Select Update BIOS from a file option from the drop-down menu, then click Next.
-
Page 77: Bios Setup Program
The BIOS setup screens shown in this section are for reference purposes only, and may not exactly match what you see on your screen. • Visit the ASUS website (www.asus.com) to download the latest BIOS file for this motherboard. ASUS T-P5P43... -
Page 78: Bios Menu Screen
• The BIOS setup screens shown in this chapter are for reference purposes only, and may not exactly match what you see on your screen. • Visit the ASUS website (www.asus.com) to download the latest BIOS information. 5.2.3 Navigation keys At the bottom right corner of a menu screen are the navigation keys for that particular menu. -
Page 79: Menu Items
MPS Revision [1.4] Save and Exit Exit Down> keys to display the other items on the screen. Pop-up window 5.2.9 General help Scroll bar At the top right corner of the menu screen is a brief description of the selected item. ASUS T-P5P43 5-13... -
Page 80: Main Menu
Main menu When you enter the BIOS Setup program, the Main menu screen appears, giving you an overview of the basic system information. Refer to section “5.2.1 BIOS menu screen” for information on the menu screen items and how to navigate through them. Use [ENTER], [TAB] System Time [04: 49 : 02]... -
Page 81: Sata1, Sata2, Sata3, And Sata4
When set to [Disabled], the data transfer from and to the device occurs one sector at a time. Configuration options: [Disabled] [Auto] ASUS T-P5P43 5-15... -
Page 82: Configure Sata As
PIO Mode [Auto] Selects the PIO mode. Configuration options: [Auto] [0] [1] [2] [3] [4] DMA Mode [Auto] Selects the DMA mode. Configuration options: [Auto] SMART Monitoring [Auto] Enables or disables the S.M.A.R.T. (Self Monitoring and Reporting Technology) capability of your hard drive. This features allows your system to report read/write errors of the hard drive and to issue warnings when a third party hardware monitor utility is installed. -
Page 83: System Information
Processor Type : Intel(R) Core(TM)2 CPU 6300 @ 1.86GHz Speed : 1866MHz Count System Memory Usable Size : 512MB AMI BIOS Displays the auto-detected BIOS information Processor Displays the auto-detected CPU specification System Memory Displays the auto-detected system memory ASUS T-P5P43 5-17... -
Page 84: Advanced Menu
Advanced menu The Advanced menu items allow you to change the settings for the CPU and other system devices. Take caution when changing the settings of the Advanced menu items. Incorrect field values can cause the system to malfunction. Configure CPU. CPU Configuration Chipset Onboard Devices Configuration... -
Page 85: Cpu Configuration
Allows you to determine whether to limit CPUID maximum value. Set this item to [Disabled] for Windows XP operating system; set this item to [Enabled] for legacy operating system such as Windows NT4.0. (Default: Disabled) Configuration options: [Disabled] [Enabled] ASUS T-P5P43 5-19... - Page 86 CPU TM Function [Enabled] Enables or disables Intel CPU Thermal Monitor (TM) function, a CPU overheating ® protection function. When enabled, the CPU core frequency and voltage are reduced when the CPU overheats. Configuration options: [Disabled] [Enabled] Execute Disable Bit [Enabled] Enables or disables Intel Execute Disable Bit function. This function enhance ®...
-
Page 87: Chipset
Selecting a very high DRAM frequency may cause the system to become unstable if this happens, revert to the default setting. Initiate Graphic Adapter [PEG/PCI] Allows you to select the graphics controller as the primary boot device. Configuration options: [PCI/PEG] [PEG/PCI] ASUS T-P5P43 5-21... -
Page 88: Onboard Devices Configuration
5.4.3 Onboard Devices Configuration Enabled or Disable Onboard Devices Configuration High Definition Audio Controller. High Definition Audio [Enabled] Athero GigaBit LAN [Enabled] LAN Boot ROM [Disabled] VIA Firewire 1394 [Enabled] J-Micron PATA Controller [Enabled] High Definition Audio [Enabled] Allows you to enable or disable the High Definition Audio Controller. The following item appears only when you enable this item. -
Page 89: Usb Configuration
The USB 2.0 Controller Mode item appears only when you enable the USB 2.0 Controller item. USB 2.0 Controller Mode [HiSpeed] Allows you to configure the USB 2.0 controller in HiSpeed (480 Mbps) or Full Speed (12 Mbps). Configuration options: [Full Speed] [HiSpeed] ASUS T-P5P43 5-23... - Page 90 BIOS EHCI Hand-Off [Enabled] Allows you to configure the BIOS EHCI Hand-Off. Configuration options: [Disabled] [Enabled] Legacy USB Support [Auto] Allows you to enable or disable support for Legacy USB storage devices, including USB flash drives and USB hard drives. Setting to Auto allows the system to detect the presence of USB devices at startup.
-
Page 91: Power Menu
Allows you to decide whether to invoke VGA BIOS post on S3/STR resume. Configuration 0ptions: [No] [Yes] 5.5.3 ACPI 2.0 Support [Disabled] Allows you to add more tables for Advanced Configuration as per ACPI 2.0 specifications. Configuration options: [Disabled] [Enabled] ASUS T-P5P43 5-25... - Page 92 5.5.4 ACPI APIC Support [Enabled] Allows you to enable or disable the Advanced Configuration and Power Interface (ACPI) support in the Application-Specific Integrated Circuit (ASIC). When set to Enabled, the ACPI APIC table pointer is included in the RSDT pointer list. Configuration options: [Disabled] [Enabled] 5.5.5 APM Configuration APM Configuration...
- Page 93 When set to [Enabled], this parameter allows you to use the PS/2 mouse to turn on the system. This feature requires an ATX power supply that provides at least 1A on the +5VSB lead. Configuration options: [Disabled] [Enabled] ASUS T-P5P43 5-27...
-
Page 94: Hardware Monitor
5.5.6 Hardware Monitor Hardware Monitor CPU Temperature CPU Temperature [45ºC/113ºF] MB Temperature [41ºC/105.5ºF] CPU Fan Speed [1190RPM] Smart Q-Fan Control [Enabled] VCORE Voltage [ 1.232V] 3.3V Voltage [ 3.344V] 5V Voltage [ 5.107V] 12V Voltage [12.267V] CPU Temperature [xxxºC/xxxºF] MB Temperature [xxxºC/xxxºF] The onboard hardware monitor automatically detects and displays the CPU / MB temperature. -
Page 95: Boot Menu
Change Option General Help The number of device items that appears on the screen depends on the number Save and Exit Exit of devices installed in the system. Configuration options: [Removable Dev.] [Hard Drive] [ATAPI CD-ROM ] [Disabled] ASUS T-P5P43 5-29... -
Page 96: Boot Settings Configuration
This allows you to enable or disable the full screen logo display feature. Configuration options: [Disabled] [Enabled] Set this item to [Enabled] to use the ASUS MyLogo 2™ feature. Add On ROM Display Mode [Force BIOS] Sets the display mode for option ROM. Configuration options: [Force BIOS] [Keep... -
Page 97: Security
Real Time Clock (RTC) RAM. See section “4.3 Jumpers” for information on how to erase the RTC RAM. After you have set a supervisor password, the other items appear to allow you to change other security settings. ASUS T-P5P43 5-31... - Page 98 Security Settings Supervisor Password : Not Installed User Password : Not Installed Change Supervisor Password User Access Level [Full Access] Change User Password Clear User Password Password Check [Setup] Select Screen Select Item Change Option General Help Save and Exit Exit User Access Level [Full Access] This item allows you to select the access restriction to the Setup items.
-
Page 99: Tools Menu
LED POSTER CONFIGURATION 5.7.1 ASUS EZ Flash 2 Allows you to run ASUS EZ Flash 2. When you press <Ok>, a confirmation message appears. Use the left/right arrow key to select between [Yes] or [No], then press <Ok> to confirm your choice. ASUSTek EZ Flash 2 BIOS ROM Utility V3.25... -
Page 100: Express Gate
5.7.2 Express Gate Allows you to enable or disable the ASUS Express Gate feature. The ASUS Express Gate feature is a unique instant-on environment that provides quick access to the Internet browser and Skype. Refer to section 3.4 Software information for details. Configuration options: [Enabled] [Disabled] The following items appear only when the Express Gate item is set to [Enabled]. -
Page 101: Led Poster Configuration
[Disable of S hutdown]: The LED Timer is displayed when the system is turned on. When the system is turned off, the LED Timer is not displayed. LED Poster Backlight [100%] Allows you to set the LED poster backlight. Configuration options: [25%] [50%] [75%] [100%] ASUS T-P5P43 5-35... -
Page 102: Exit Menu
Exit menu The Exit menu items allow you to load the optimal or failsafe default values for the BIOS items, and save or discard your changes to the BIOS items. Exit system setup Exit Options after saving the changes. Exit & Save Changes Exit &... -
Page 103: Appendix
Appendix The Appendix includes the power supply unit specification, remote control for this system, as well as the integrating Windows XP installation ® T3-P5P43 T4-P5P43* * Only some of the T4 models have the Time and IR LED display. -
Page 104: Power Supply Specifications
A.1 Power supply specifications Output characteristics Output Load range Surge Regulation Ripple and noise voltage <10ms Vpp & noise 0.3A -5% ~ +5% 50mV 70mV +3.3V 0.3A -5% ~ +5% 50mV 70mV +12V1 -5% ~ +5% 150mV 150mV +12V2 -5% ~ +5% 150mV 150mV -12V 0.3A -10% ~ +10% 200mV 200mV +5VSB... -
Page 105: Using The Remote Control (Optional
Refer to the table below to familiarize yourself with the functions of the remote control buttons. Button Description Press to turn on/off the power of the screen and the Power speakers. Pause Press to pause a playback. Stop Press to stop playing a media file. (continued on the next page) ASUS T-P5P43... - Page 106 Button Description Fast-foward Press to fast-forward a media file. Next track Press to go to the next track. Press to display program information under Media Information Center or other menu options. Four-way navigation keys Press to scroll through on-screen display menus. Windows®...
-
Page 107: Integrating Ahci Driver To Windows Xp Installation
English. Click Browse and select the WinXP folder containing the Windows XP installation files, ® then click OK. Click Next. Click Next. From the Task Selection window, select Drivers and Bootable ISO, then click Next. ASUS T-P5P43... - Page 108 Click Insert > Multiple driver folder to select the AHCI folder, then click OK. Select the driver path and click OK. Select Intel(R) ICH10R SATA AHCI Controller and click OK, then click Next. From the confirmation message, click Yes. When the process is finished, click Next. From the Mode dropdown list, select Create Image and click the Make ISO button, then select the place...