Table of Contents
Advertisement
Quick Links
Advertisement
Table of Contents

Related Manuals for Asus Tinker System 2 Series


Summary of Contents for Asus Tinker System 2 Series
- Page 1 Tinker System 2 Series User Manual...
-
Page 2: Using Your Tinker System
Copyright © 2022 ASUSTeK COMPUTER INC. All Rights Reserved. LIMITATION OF LIABILITY Circumstances may arise where because of a default on ASUS’ part or other liability, you are entitled to recover damages from ASUS. In each such instance, regardless of the basis on which you are entitled to claim damages from ASUS, ASUS is liable for no more than damages for bodily injury (including death) and damage to real property and tangible personal property;... -
Page 3: Table Of Contents
Contents About this manual .........................4 Conventions used in this manual ..................4 Product Overview ........................5 Tinker System 2 Series specifications summary ............5 Package contents ........................6 Getting to know your Tinker System 2 Features .............................8 Front view ..........................8 Left view ...........................10 Rear view ..........................11 Single Board Computer Overview ...................12... -
Page 4: About This Manual
NOTE: This message contains additional information and tips that can help complete tasks. WARNING! This message contains important information that must be followed to keep you safe while performing certain tasks and prevent damage to your Tinker System 2's data and components. ASUS Tinker System 2 Series... -
Page 5: Product Overview
Product Overview Tinker System 2 Series is more than a dream for the DIY-obsessed: it’s a gateway to new ideas and new relationships. Experienced makers will love Tinker Board’s performance-to-price ratio and strong brand heritage, while novices and younger users will appreciate its accessibility and ease of use. -
Page 6: Package Contents
• If the device or its components fail or malfunction during normal and proper use within the warranty period, bring the warranty card to the ASUS Service Center for replacement of the defective components. ASUS Tinker System 2 Series... -
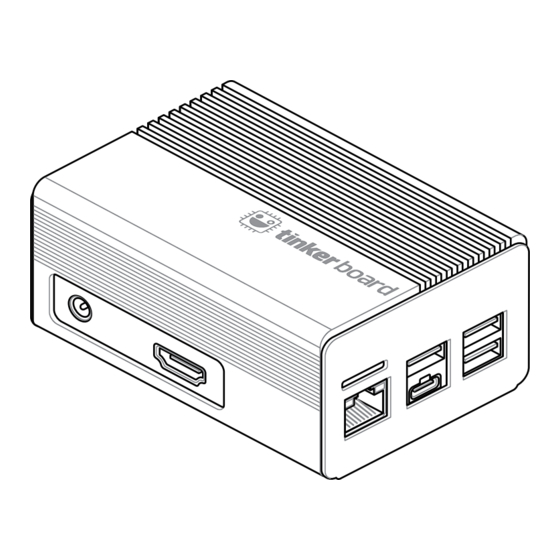
Page 7: Getting To Know Your Tinker System
Getting to know your Tinker System 2... -
Page 8: Features
Speed LED Status Description Status Description No link 10 Mbps connection Yellow Linked Orange 100 Mbps connection Yellow (blinking) Data activity Green 1 Gbps connection Yellow (blinking Ready to wake then steady) up from suspend mode ASUS Tinker System 2 Series... - Page 9 Support for DP 1.2 with a resolution of up to 4096 x 2160 @60Hz. USB 3.2 Gen 1 port The USB 3.2 Gen 1 (Universal Serial Bus) port provides a transfer rate up to 5 Gbit/s. ASUS Tinker System 2 Series...
-
Page 10: Left View
NOTE: When using only this port as a display output source, this port will support a resolution of up to 4096 x 2160 @60Hz. The resolution may also be affected by the cabling and output device. ASUS Tinker System 2 Series... -
Page 11: Rear View
Status LEDs The Status LEDs indicate the current status of your Tinker System 2. Status LED Indication Power LED Color Power Disk Activity LED Disk Activity Green Reserved LED Reserved (programmable) Yellow (Programmable) ASUS Tinker System 2 Series... -
Page 12: Single Board Computer Overview
Single Board Computer Overview ASUS Tinker System 2 is an Embedded Computer based on the Tinker Board 2S. Refer to the Layout contents table for the page numbers of the numbered items. WARNING! • Unplug the power cord from the wall socket before touching any components. - Page 13 GPIO header SOC RK3399 Debug UART header Reset header MIPI DSI connector DC Fan header Power-on header and Maskrom jumper Status LEDs MIPI CSI-2 connector RTC Battery header M.2 Wi-Fi slot Micro SD Card slot ASUS Tinker System 2 Series...
- Page 14 A power rating value that exceeds the rating valued mentioned, or an unstable power source may result in damage to your system or hardware. Please refer to the Top view illustration for the location of the pins. ASUS Tinker System 2 Series...
- Page 15 GPIO3_D3/I2S0_SDI0 GPIO3_D7/I2S0_SDO0 2. SOC RK3399 This ARM® system on a chip (SoC) features the new 64-bit Armv8 architecture and Arm® big.LITTLE™ technology’s 6-core processor, provides improved performance and comes bundled with Arm® Mali®-T860 MP4 GPU. ASUS Tinker System 2 Series...
- Page 16 The Reset header allows you to connect an external reset button. 5. MIPI DSI connector The MIPI DSI connector is used to connect a MIPI display module via a 4 lane MIPI-DSI cable. This connector supports up to 6 Gbps connection speed. ASUS Tinker System 2 Series...
- Page 17 The Power On header allows you to connect an external power button. The Maskrom jumper allows you to mask the eMMC (rom) for recovery. This will allow you to enter developer mode due to the indetected storage and rewrite the eMMC. ASUS Tinker System 2 Series...
- Page 18 MIPI-CSI2 cable. This connector supports up to 3 Gbps connection speed. WARNING! Ensure the cable for MIPI CSI is connected in the correct orientation with the gold fingers facing towards the rear of the Single Board Computer. ASUS Tinker System 2 Series...
- Page 19 The M.2 Wi-Fi slot allows you to install an M.2 Wi-Fi module (E-key, type 2230). WARNING! Disconnect all power (including redundant PSUs) before you add or remove a memory card, and then reboot the system to access the memory card. ASUS Tinker System 2 Series...
- Page 20 * The Micro SD Card slot is located under the dust cover on the right side of the device. ASUS Tinker System 2 Series...
- Page 21 Using your Tinker System 2...
-
Page 22: Getting Started
Before powering up your system for the first time, you need to first install the operating system. To install the operating system on your Tinker System 2: Connect Tinker System 2 to a PC using a USB Type-C® cable, and wait for the PC to recognize the device. ASUS Tinker System 2 Series... - Page 23 Go to the Tinker Board website (https://tinker-board.asus.com/ download.html) and click DOWNLOAD. Select Tinker Board 2S from the dropdown menu. From the list of available downloads, select the Tinker OS image that you want to install, and click DOWNLOAD. Once the image file is downloaded, burn it to the Tinker System 2’s eMMC using a third-party ISO software, such as Win32DiskImager or Etcher.
-
Page 24: Connect A Display To Your Tinker System 2
Supports DP 1.2 with a resolution of up to 4096 x 2160 @60Hz. * The ports may vary depending on the model. Refer to the Features section for the location of the ports. ** The maximum resolution may be affected by the cabling and output device. ASUS Tinker System 2 Series... - Page 25 Tinker System 2’s HDMI™ or USB 3.2 Gen 1 Type-C® OTG port. Connect display via HDMI™ port Connect display via USB 3.2 Gen 1 Type-C® OTG ASUS Tinker System 2 Series...
-
Page 26: Connect Keyboard And Mouse
System 2. You can also connect a USB dongle for a wireless keyboard and mouse set. To connect a keyboard and mouse to your Tinker System 2: Connect the USB cable from your keyboard and mouse to any of the USB ports of your Tinker System 2. ASUS Tinker System 2 Series... -
Page 27: Connect An Ac Power Adapter
NOTE: Ensure that the power adapter that you use meet the following specifications: • Input voltage: 100-240 Vac • Input frequency: 50-60 Hz • Rating output current: 3.75-2.31A (45.0 W) • Rating output voltage: 12-19.5 Vdc ASUS Tinker System 2 Series... - Page 28 ASUS Tinker System 2 Series...
-
Page 29: Appendix
Appendix... -
Page 30: Safety Information
Replace only with the same or equivalent type recommended by the manufacturer. Dispose of used batteries according to the manufacturer’s instructions. NO DISASSEMBLY The warranty does not apply to the products that have been disassembled by users ASUS Tinker System 2 Series... -
Page 31: Setting Up Your System
– Liquid has been spilled into the system. – The system does not function properly even if you follow the operating instructions. – The system was dropped or the cabinet is damaged. – The system performance changes. ASUS Tinker System 2 Series... -
Page 32: Restricted Access Location
Safety Precautions Accessories that came with this product have been designed and verified for the use in connection with this product. Never use accessories for other products to prevent the risk of electric shock or fire. ASUS Tinker System 2 Series... -
Page 33: Regulatory Notices
Increase the separation between the equipment and receiver. • Connect the equipment to an outlet on a circuit different from that to which the receiver is connected. • Consult the dealer or an experienced radio/TV technician for help. ASUS Tinker System 2 Series... - Page 34 This device must accept any interference, including interference that may cause undesired operation of the device. HDMI Trademark Notice The terms HDMI, HDMI High-Definition Multimedia Interface, and the HDMI Logo are trademarks or registered trademarks of HDMI Licensing Administrator, Inc. ASUS Tinker System 2 Series...
- Page 35 CAN ICES-003(B)/NMB-003(B) Wireless Operation Channel for Different Domains N. America 2.412-2.462 GHz Ch01 through CH11 Japan 2.412-2.484 GHz Ch01 through Ch14 Europe ETSI 2.412-2.472 GHz Ch01 through Ch13 ASUS Tinker System 2 Series...
- Page 36 ASUS products sold in Vietnam, on or after September 23, 2011,meet the requirements of the Vietnam Circular 30/2011/TT-BCT. Các sản phẩm ASUS bán tại Việt Nam, vào ngày 23 tháng 9 năm2011 trở về sau, đều phải đáp ứng các yêu cầu của Thông tư 30/2011/TT-BCT của Việt Nam.
- Page 37 Turkey RoHS AEEE Yönetmeliğine Uygundur ASUS Recycling/Takeback Services ASUS recycling and takeback programs come from our commitment to the highest standards for protecting our environment. We believe in providing solutions for you to be able to responsibly recycle our products, batteries, other components as well as the packaging materials.
- Page 38 The Radio Equipment Regulations 2017 (S.I. 2017/1206). Full text of UKCA declaration of conformity is available at https://www.asus.com/support/. The WiFi operating in the band 5150-5350 MHz shall be restricted to indoor...
- Page 39 This device complies with part 15 of the FCC Rules. Operation is subject to the following two conditions: (1) This device may not cause harmful interference, and (2) this device must accept any interference received, including interference that may cause undesired operation. Ver. 180620 ASUS Tinker System 2 Series...
-
Page 40: Service And Support
Service and Support Visit our multi-language website at https://www.asus.com/support/. ASUS Tinker System 2 Series...