Dell 2300 Quick Start & Connections
Dell manual projector 2300
Hide thumbs
Also See for 2300:
- Installation and troubleshooting manual (199 pages) ,
- User manual (170 pages) ,
- Owner's manual (128 pages)
Advertisement
Quick Links
Dell 2300 Projectors
Projectors are being provided and assigned to each classroom for educational
purposes (i.e., not for home use). They should receive the same degree of attention
to security as other materials and equipment in the classroom with regards to safety
and theft. The projector should remain in the assigned room; and if for some reason
it is moved from the assigned classroom, the Tech Assistant should be notified.
*
*
*
*
*
*
*
*
*
*
*
*
*
*
For more detailed use information, use the following web link
http://support.dell.com/support/edocs/acc/2300MP/en/index.htm
Part A: Equipment
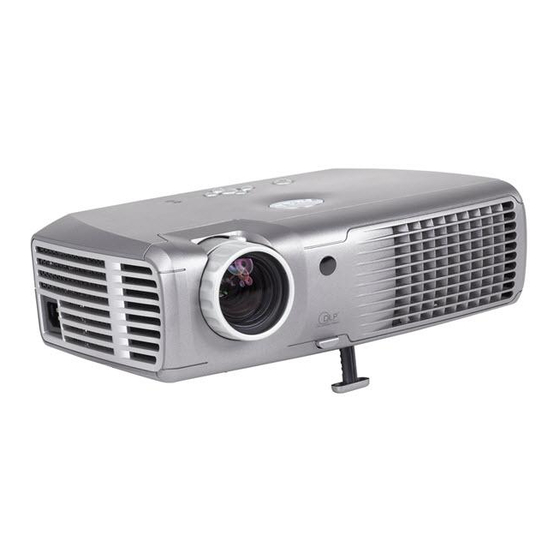
Your projector comes with all the items shown below. Please place the unused cables in the
projector case and store in your room. Keeping the entire box is optional.
Main unit
1.8m Power cord
1.8m VGA cable (Blue)
(3.0m in Americas)
(D-sub to D-sub)
2.0m S-video cable
1.8m USB cable
1.8m Composite Video cable
1.8m D-sub to YPbPr cable
1.8m RCA to Audio cable
1.8m mini pin to mini pin cable
Remote control
Dell 2300MP Projector
Dell 2300MP Projector Quick Start
User's Guide
Card
Batteries (2)
Owner's Manual
Carrying case
Instructional Technology Department
4/22/2005
Advertisement

Related Manuals for Dell 2300


Summary of Contents for Dell 2300
- Page 1 For more detailed use information, use the following web link http://support.dell.com/support/edocs/acc/2300MP/en/index.htm Part A: Equipment Your projector comes with all the items shown below. Please place the unused cables in the projector case and store in your room. Keeping the entire box is optional. Main unit 1.8m Power cord...
-
Page 2: Top View
TOP VIEW 1 Power button 2 Source 3 Keystone adjustment 4 Resync 5 Temperature warning light 6 Lamp warning light 7 Four directional keys 8 Keystone adjustment 9 Menu SIDE VIEW 1 Control panel 2 Elevator button 3 Remote control receiver 4 Lens 5 Focus ring 6 Zoom tab... -
Page 3: Remote Control
Source button 10 Four Direction buttons 11 Previous Page button (page up) 12 Power button 13 Light Part B: Hooking up the Projector Connecting to a laptop computer REMOTE CONTROL 1 = Power Cord 2 = VGA cable (Blue) 3 = USB to USB (Optional for using... -
Page 4: Connecting To A Desktop
2. Plug in the power cord and appropriate signal cable. The power button light will blink green. 3. Press the power. The Dell logo will be displayed for 30 seconds. 4. Turn on your source (computer, notebook, DVD, etc.). The projector automatically detects your source. - Page 5 To raise the projector 1. Press the elevator button. 2. Raise the projector to the desired display angle, and then release the button to lock the elevator foot into position. 3. Use the tilt adjustment wheel on the underside of the projector to fine-tune the display angle.