Table of Contents
Advertisement
Quick Links
ENGLISH
ENGLISH
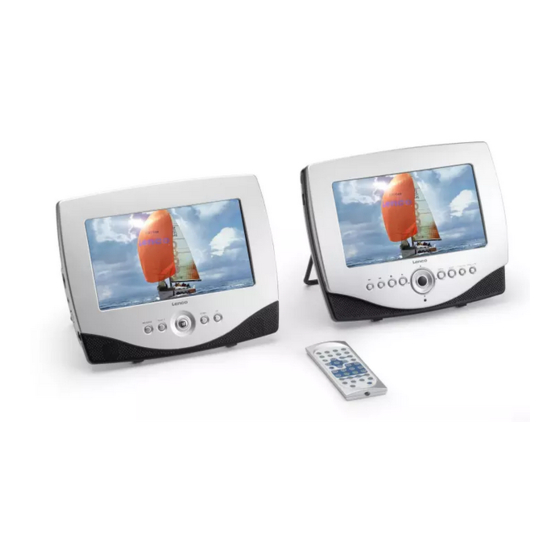
DUAL SCREEN PORTABLE DVD PLAYER
DUAL SCREEN PORTABLE DVD PLAYER
DUAL SCREEN PORTABLE DVD PLAYER
DUAL SCREEN PORTABLE DVD PLAYER
OWNER`S MANUAL
For information and support, www.lenco.eu
Please read this manual before operating
ENTER
SETUP
DVD USB
MENU PB C
REVERSE
16:9/4:3
DOWN
UP
MES-330
Advertisement
Table of Contents

Related Manuals for LENCO MES-330


Summary of Contents for LENCO MES-330
- Page 1 ENGLISH ENGLISH DUAL SCREEN PORTABLE DVD PLAYER DUAL SCREEN PORTABLE DVD PLAYER DUAL SCREEN PORTABLE DVD PLAYER DUAL SCREEN PORTABLE DVD PLAYER OWNER`S MANUAL For information and support, www.lenco.eu ENTER SETUP DVD USB MENU PB C REVERSE 16:9/4:3 DOWN Please read this manual before operating...
-
Page 3: Table Of Contents
Table of Contents Table of Contents...................................1 Safety Information.................................2 Remote Control..................................3 Description of the Player................................4 Description of the LCD Screen..............................5 Placing the DVD Player or LCD Screen............................6 Using the Remote Control...............................7 Connecting the LCD Screen to the Player..........................8 Connecting Earphones (Optional Accessory) to the Player or LCD screen ...................9 Using USB Port..................................10 Using the AC Adaptor................................11 Mounting the Player / Screen for In-Car Use..........................12... -
Page 4: Safety Information
Safety Information Please read all of the safety and operating instructions before operating this Player, follow all warnings placed on the Player and in the user's manual. These safety and operating instructions should be retained for future reference. Safety Information Do not expose the system to excessive moisture, rain, sand, or heat sources. -
Page 5: Remote Control
Remote Control Remote Control 14. DVD/USB Button 1. MENU/PBC Button Switches between DVD and USB Brings up the disc menu. mode. 2. L/R Button 15. DISPLAY Button Selects left, right and stereo Displays the current disc playback sound tracks. information. 3. -
Page 6: Description Of The Player
Description of the Player ENTER SETUP DVD USB MENU PBC 6 7 8 9 13 14 1. DISC COVER 11. LED 21 12 V DC Power Input REMOTE CONTROL SENSOR 2. USB slot 22 Power/AV Signal output Jack: connection to Rubber pads 13. -
Page 7: Description Of The Lcd Screen
Description of the LCD Screen REVERSE 16:9/4:3 DOWN 1. LCD Speaker volume dial. 2. SPEAKER 9. EARPHONE JACK 3. REVERSE button: flip the image 180 degrees 10. Power On/Off switch 4.16:9/4:3 button Power/AV signal input jack. 5. MODE button 12. Stand 6. -
Page 8: Placing The Dvd Player Or Lcd Screen
Placing the DVD Player or LCD Screen The Stand/Hanger allows you to place this DVD Player or LCD Screen on table top or hang it on the wall. On the Surface On the Wall ENTER SETUP DVD USB MENU PBC ~ 6 ~... -
Page 9: Using The Remote Control
Using the Remote Control Installing the battery * Never short circuit battery terminals. * Always remove used batteries from the appliance case. 1. Open the battery compartment cover using a coin. * Do not try to open the batteries. * Do not mix up different kind of batteries or new and already used batteries together. -
Page 10: Connecting The Lcd Screen To The Player
Connecting the LCD Screen to the Player The power for the screens is provided by the DVD player through the provided cables which also provide the audio/video signal from the player to the screen. Follow these steps to make the connection. 1. -
Page 11: Connecting Earphones (Optional Accessory) To The Player Or Lcd Screen
Connecting Earphones (Optional Accessory) to the Player and LCD screen You can attach an earphone with a stereo mini-jack plug to the earphone jack on the DVD Player or Earphone Jack on the 2nd screen for private listening. The volume can be adjusted using VOL + and VOL - on the remote control or use the speaker VOLUME dial on the Player and 2nd screen to adjust the volume . -
Page 12: Using Usb Port
Using USB Port The player accepts most USB devices such as MP3, DSC, USB- drive, Digital Camcorder etc. The USB in this Player supports version 1.1/2.0. USB slot Connecting a USB device Plug in the USB device to the USB port on the Player. Removing a USB device You can remove the USB device anytime even when it is playing. -
Page 13: Using The Ac Adaptor
Using the AC Adaptor This portable DVD player can be powered by AC through the supplied switching power AC adaptor. DC IN 12V To DC12V IN on the DVD player To home power outlet Important ! Always turn off the DVD Player before connecting or disconnecting the AC cord. Only use the AC adaptor supplied with this player . -
Page 14: Mounting The Player / Screen For In-Car Use
Mounting the Player / Screen for In-Car Use You can mount the Player to the head rest of your car using the provided straps. 1. Use hoop and loop fastener to fix elastic straps on the stands 3. Connect the Car Adaptor between your car cigarette lighter of main unit as below. -
Page 15: Playing A Disc
Playing a Disc Play Turning ON /OFF the player 1.To Turn On the Player Press (on the remote control) or (on the Player) to start play. Slide POWER on the Player to ON, the LED lights and if there is a disc in the disc compartment, playing will start Pause automatically. - Page 16 Playing a Disc Repeat Playback Skip You can play a chapter, a track, a title, a file or the entire disc You can skip chapters on DVD-Video, tracks on CDs, and repeatedly. Video CDs. 1. During playback, repeatedly press REPEAT to choose a 1.
- Page 17 Playing a Disc Displaying disc's MENU GOTO During DVD playback, press MENU/PBC to return to the disc's You can go directly to a desired chapter and play, or play at a desired point of time. Follow these steps: Start Menu. If the disc does not have the Start Menu, or discs (A)To play a specific chapter that refuse MENU function, appears.
-
Page 18: Playing A Disc
Playing a Disc Angle Repeatedly press ANGLE during DVD playback to change the camera angle if the disc has different camera angles. This function is only valid for DVDs. TITLE Press TITLE, it takes you to the very beginning of the title and play, or to the MENU if it has a title menu. -
Page 19: Playing Mp3 And Regular Audio Cd
Playing MP3 and Regular Audio CD Valid MP3 CD Your MP3 files should be ISO 9660 or JOLIET format. Play In most cases, when a MP3 or audio disc is placed into the player, the first song file of the first folder plays. In other cases, the file manager appears. -
Page 20: Playing Picture Cd
Playing Picture CD Valid Picture Rotate The picture can be rotated and flipped. The player can play both a Kodak Picture CD that you order 1. During playback, use the direction keys ( ) to from photo processing store, and a home-made CD by burning JPEG files onto a CD-R or CD-RW disc. -
Page 21: Changing Settings
Changing Settings You can make changes on the Player's settings such as OSD language, audio/video output etc, follow these steps: 1. Press SETUP on the remote control, a list of setup pages appears on top of the screen. -- General Setup Page -- TV Display Normal/ PS Angle Mark... - Page 22 Changing Settings Video Setup Page Panel Quality Set the panel's Sharpness, Brightness, Contrast, Hue and Color Sautration Panel Inverse Turn the image 180 degree Preference Page (This setup only available when the Player is not in playback mode) TV Type Set TV system (PAL, AUTO, NTSC) that you will connect the Player to Set PBC (Playback Control) on/off .
-
Page 23: Adjusting Lcd Screen
Aanpassen LCD Scherm Op het LCD Scherm Volg deze stappen om de LCD kwaliteit tijdens het afspelen of tijdens pauze aan te passen. 1. Druk herhaaldelijk op MODE in het scherm paneel om de parameters in het menu te selecteren. U kunt HELDERHEID, CONTRAST, SCHERPTE, KLEUR en TINT veranderen. -
Page 24: Troubleshooting
If you have questions regarding the warranty, the length of warranty and the working method of it, you can find the information on our site www.lenco.eu or you can directly contact the place where you purchased your product. ~ 22 ~... -
Page 25: Specifications
Specifications Power Adaptor Requirements Input AC 100V~240V, 50/60 Hz, Output DC 12V General Power Consumption > (9”) 950g (8.5”) 872g Weight DVD Player (9”) 644g (8.5”) 558g LCD Screen 244mm(W) x 194mm(D) x 50mm(H) DVD Player Dimensions 244mm(W) x 194mm(D) x 37mm(H) LCD Screen Operating T emperature Range +10 C~ +40 C... - Page 26 If at any time in the future you should need to dispose of this product please note that: Waste electrical products should not be disposed of with household waste. Please recycle where facilities exist. Check with your Local Authority or retailer for recycling advice. (Waste Electrical and Electronic Equipment Directive) For information and support, www.lenco.eu...