Advertisement
Advertisement
Table of Contents

Related Manuals for Philips Norelco G290


Summary of Contents for Philips Norelco G290
- Page 1 PROFESSIONAL GROOMING KIT G290 Rechargeable Cordless 4203 000 54182...
-
Page 2: Important Safety Instructions
2. Use this Groomer for its intended household use as described in this manual. Do not use attachments not recommended by Philips Electronics North America Corporation. 3. Never operate this Groomer if it has a damaged cord or plug, if it is not working properly, if it has been dropped, damaged, or dropped into water. - Page 3 SAVE THESE INSTRUCTIONS IMPORTANT:YOUR GROOMER CONTAINS A NICKEL-CADMIUM RECHARGEABLE BATTERY. See Battery Removal instruction sheet. IMPORTANT:The power plug contains a transformer. Do not cut off the power plug to replace it with another plug as this will cause a hazardous condition. Put It To The Test Like many new products, your Norelco Personal Groomer may take a little getting used to.
-
Page 4: Features
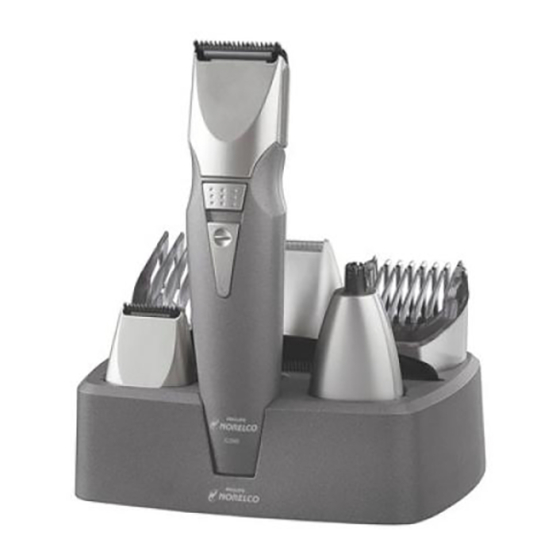
Features fig. 1 A Neckline & Sideburn Trimmer Attachment B Full Width Trimmer Attachment C Lifetime Self-Sharpening 3-Dimensional Rounded Stainless Steel Cutter Blades D AccuControl Beard & Moustache Trimmer Guide Comb E Hair Clipping Comb F 9 Position Hair Length Selector G Release Button H On/Off Slide Switch Socket for appliance plug... - Page 5 in./ in./...
- Page 6 To Charge/Recharge ◗ Fully charge Groomer before using for the first time or after non-use for a long period of time. ◗ Battery performance is best if you recharge only when the battery is (almost) completely empty. ◗ Charging or recharging at temperatures below 40˚F or higher than 95˚F adversely affects lifespan of the battery.
-
Page 7: Cordless Trimming
Cordless Trimming Charge according to directions. Unplug Personal Groomer from outlet. Slide ON/OFF switch ON to begin trimming. If the battery is empty and you want to trim your beard, charge the Groomer for at least 3 hours and you will have enough power for one use (10 minutes). - Page 8 ◗ If you are trimming for the first time, start by using the AccuControl comb at the maximum trimming length setting (#9) to prevent accidentally trimming hairs too short. As you become familiar with the settings, adjust Hair Length Selector to desired trimming length. Selector will "click"...
- Page 9 Beard Trimming Without AccuControl Guide Comb Remove AccuControl guide comb if you are: ◗ Defining hair lines ◗ Trimming nape of neck ◗ Removing single, unwanted hairs Be certain the Groomer is in the OFF position. Remove the AccuControl comb attachment by pressing and sliding the Hair Length Selector upwards (fig.
- Page 10 Trimming Nose Hair ◗ Make sure nasal passages are clean. Place nose, ear and eyebrow attachment on Groomer. Switch the Groomer on and insert the tip of the attachment into one nostil (fig. 14). CAUTION: Do Not insert the tip more than 3/16 in./5mm into your nostril.
- Page 11 Shaving With Micro Shaver Attachment Put the micro shaver attachment on the groomer (fig. 18). Use the narrow micro shaver to shave along contoured edges to remove any stubble while creating a smooth well- defined beard line. Before using the micro shaver, always check it for wear and damage.
- Page 12 The setting selected will appear in the window to the left of the Hair Length Selector (fig. 20). When you are clipping for the first time, start at the maximum clipping length setting (#9) to familiarize yourself with the appliance and prevent accidentally trimming hairs too short.
- Page 13 Contouring without the hair clipping comb attachment Remove the hair comb by pressing and sliding the Hair Length Selector upwards (fig. 24). Be careful when you are clipping without comb attachment as when the appliance is turned on it will trim every hair it touches. Tilt the appliance in such a way that only one edge of the trimming attachment touches the hair ends when you shape the...
- Page 14 Replace the shaving foil immediately. A worn or damaged shaving foil should only be replaced with an original Philips shaving foil, which is available at an authorized Norelco Service Location. Remove the detachable shaving head by pulling it from the appliance (fig.
- Page 15 Replace the shaving foil immediately. A worn or damaged shaving foil should only be replaced with an original Philips shaving foil, which is available at an authorized Norelco Service Location. Remove the detachable shaving head by pulling it from the appliance (fig.
-
Page 16: Day Money-Back Guarantee
Send dated sales receipt, your complete name and address as indicated below, and the Groomer, prepaid to: Philips Domestic Appliances and Personal Care Company A Division of Philips Electronics North America Corporation 450 North Medinah Road, Dock 16 Roselle, IL 60172-2329 Please allow 4-6 weeks for delivery of check. -
Page 17: Battery Removal
Full Two-Year Warranty Philips Electronics North America Corporation warrants each new Norelco product, Model G290, against defects in materials or workmanship for a period of two years (cutters for up to five years) from the date of purchase, and agrees to repair or replace any defective product without charge.