Table of Contents
Advertisement
Advertisement
Table of Contents

Related Manuals for Motorola QIP7200 Series


Summary of Contents for Motorola QIP7200 Series
- Page 1 O PE RA T ION M A NUAL QIP7200 Series User Guide...
- Page 3 IMPORTANT SAFETY CONSIDERATIONS WARNING - to reduce the risk of fire or electric shock, do not expose this apparatus to rain or moisture. The QIP7200 requires careful handling to avoid potential damage to its internal hard disk drive or the loss of recorded data.
- Page 4 To prevent the temporary loss of guide data and cause a temporarily non-responding terminal, do not plug the AC power cord into a switched power outlet. • To avoid shock and vibration damage to the internal hard drive, do not move the terminal while it is plugged in. •...
- Page 5 FCC DECLARATION OF CONFORMITY Motorola Inc., Connected Home Solutions, 101 Tournament Drive, Horsham, PA 19044, 1-215-323- 1000, declares that the QIP7200 receiver complies with 47 CFR Parts 2 and 15 of the FCC rules as a Class B digital device.
- Page 6 TRANSFER the Software (including all component parts and printed materials) permanently to another person, but only if the person agrees to accept all of the terms of this License. If you transfer the Software, you must at the same time transfer the Product and all copies of the Software (if applicable) to the same person or destroy any copies not transferred.
- Page 7 Motorola, Inc., Connected Home Solutions, 101 Tournament Drive, Horsham, PA 19044. © 2008 Motorola, Inc. All rights reserved. No part of this publication may be reproduced in any form or by any means or used to make any derivative work (such as translation, transformation, or adaptation) without written permission from Motorola, Inc.
-
Page 9: Table Of Contents
Connecting Your QIP Receiver to a Stereo TV (SDTV) and Stereo VCR ..........25 Connecting a Stereo TV (SDTV) and Stereo VCR...................25 Connecting your QIP Receiver to an A/V Receiver, Stereo TV (SDTV), and Stereo VCR ....26 Connecting an A/V Receiver, TV, and VCR ....................27 7 Recording Your Connections .........................29... - Page 10 viii...
-
Page 11: Introduction
Video on Demand (VOD), and commercial-free, CD quality music — with the flexibility of a dual tuner digital video recorder (DVR) and the incredible picture quality and sound of High-Definition TV (HDTV). This receiver includes an “Entertainment Package” that enables a direct digital connection to consumer audio and video devices through IEEE-1394-DTV and ™... -
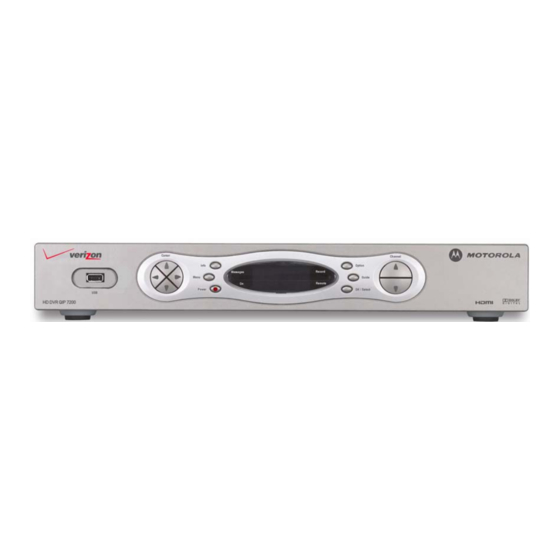
Page 12: Front Panel
Messages — indicator is lit when a message is waiting On —indicates power is on when lit Remote — indicator is lit when remote control is in use Record — indicator is lit when the DVR is recording Select — used for selecting menu options Option —... -
Page 13: Rear Panel
1 INTRODUCTION Rear Panel Cable In — Connects to cable signal from your service provider RF Out — Ch 3/4 modulated audio/video (SDTV) to TV or VCR IR remote input M-Card — Inserted M-Card Serial — Service only ® Digital Audio (S/PDIF) — Provides Dolby Digital 5.1 audio or PCM output... -
Page 15: Operation
CHANNEL + – control to step through the channel selection. • Enter the number of the channel you wish to view using the number keys on the remote control. • Select the channel in the Interactive Program Guide. Adjusting the Volume Press on the remote control to adjust the volume. -
Page 17: Digital Video Recorder (Dvr)
With the QIP7200 receiver, you can: Record Programming. The total hours of recorded content will vary based on the storage capacity of your specific QIP model and type of content (digital SD or HD) being recorded. Maintain a Personal Program Library. Accessed by using the Interactive Program Guide (IPG). -
Page 19: Optimizing Your Qip Receiver For High-Definition Tv
If you use the IEEE-1394 output, no adjustments to the settings are required. For a TV with an HDMI connection, be sure the TV is on and connected to the QIP receiver’s HDMI out connector before adjusting the settings. Motorola recommends using HDMI cables less than 20 meters long. -
Page 20: User Settings
Some televisions may only support certain video formats. Please consult your television’s user manual for more information on format compatibility. The QIP receiver can detect when the HDMI connection is in use. If you are not using the HDMI connection on the QIP receiver, the HDMI/YPbPr Output setting will display as YPbPr Output in the User Settings Menu. - Page 21 Sets the default settings for closed captions (AUTO) or the settings you have configured (USER). Defaults to AUTO. Options are AUTO or USER. To reset all User Settings to their defaults, select this option and press the ► key. Restore All...
-
Page 23: On-Screen Graphics
5 ON-SCREEN GRAPHICS Your QIP receiver can generate graphics that overlay the video programming or fill the entire television screen. Common examples include on-screen menus (such as the User Setting menu), closed captions, and interactive program guides. The QIP receiver overlays these graphics whenever you open a menu, enable closed captions, or scroll through a program grid. -
Page 25: Connecting Your Qip Receiver
For information on connecting to an HDTV, see “Video Connection Options” on the next page. CAUTION! Do not place anything on top of your QIP receiver, especially other home entertainment components. Be sure to provide adequate ventilation to prevent overheating. -
Page 26: Video Connection Options
• RF Output — SDTV If no other input is available on your TV, the RF Output of the QIP7200 can be connected to the Antenna or Cable Input on your TV. The RF Output carries both video and audio. Set your TV to channel 3 or 4. -
Page 27: Connecting Your Qip Receiver To An Hdtv - Video Only
6 CONNECTING YOUR QIP RECEIVER Connecting Your QIP Receiver to an HDTV — Video Only Note: Only (1) HDTV video connection needs to be made to an HDTV. -
Page 28: Connecting Hdtv - Video
TV. HDMI If your TV has an HDMI input, this is for both audio and video if you are using the TV speakers. Connect an HDMI cable to the TV and to the HDMI connector on your QIP receiver. -
Page 29: Connecting Your Qip Receiver To An Hdtv - Audio
Note: Only (1) audio connection needs to be made to an HDTV. Connecting HDTV — Audio Note: These connections are not required if you are using your TV’s speakers and HDMI or IEEE-1394 connections. If your TV does not have digital audio inputs: •... - Page 30 If your TV supports a digital audio input: • If your equipment supports it, use the digital audio OPTICAL S/PDIF COAXIAL outputs instead of the outputs. In most cases, S/PDIF S/PDIF AUDIO L ® offers better audio quality, including support for Dolby Digital 5.1 audio.
-
Page 31: Connecting Your Qip Receiver To An A/V Receiver - Audio
6 CONNECTING YOUR QIP RECEIVER Connecting Your QIP Receiver to an A/V Receiver — Audio Note: Only (1) audio connection needs to be made to an A/V Receiver. Connecting an A/V Receiver — Audio There are several options available for audio connections to your A/V receiver: •... - Page 32 If your A/V receiver supports it, the optical (OPTICAL S/PDIF), coaxial (S/PDIF), or HDMI audio outputs may be used in place of the stereo audio outputs (AUDIO L and R). In most cases these outputs offer a higher level of audio quality, including support for Dolby Digital 5.1 audio.
-
Page 33: Connecting Your Qip Receiver To A Stereo Tv (Sdtv)
2. If the TV has no S-Video input, use the composite video and audio connectors on the QIP receiver. 3. If the TV has an RF input only, use the RF out connector on the QIP receiver. The RF connection carries video and audio. -
Page 34: Connecting A Stereo Tv (Sdtv)
Connecting a Stereo TV (SDTV) 1. Connect the stereo audio cable to the AUDIO L and R connectors on the QIP receiver and the AUDIO LEFT and AUDIO RIGHT connectors on the Stereo TV (SDTV). 2. Connect a video cable to the VIDEO OUT connector on the QIP receiver and the INPUT VIDEO on the TV or an S-video cable to the S-VIDEO connectors on the QIP receiver and the TV. -
Page 35: Connecting Your Qip Receiver To A Stereo Tv (Sdtv) And Stereo Vcr
Connecting Your QIP Receiver to a Stereo TV (SDTV) and Stereo VCR Connecting a Stereo TV (SDTV) and Stereo VCR 1. Connect a stereo audio cable to the AUDIO OUT L and R connectors on the QIP7200 receiver and the INPUT AUDIO L and R connectors on the stereo VCR. -
Page 36: Connecting Your Qip Receiver To An A/V Receiver, Stereo Tv (Sdtv), And Stereo Vcr
Connecting your QIP Receiver to an A/V Receiver, Stereo TV (SDTV), and Stereo... -
Page 37: Connecting An A/V Receiver, Tv, And Vcr
2. Connect a video cable to the video out connector on the QIP receiver and the cable/TV video connector on the A/V receiver. 3. Connect a stereo audio cable to the VCR AUDIO OUT L and R connectors on the A/V receiver and the INPUT AUDIO L and R connectors on the stereo VCR. -
Page 39: Recording Your Connections
7 RECORDING YOUR CONNECTIONS Use this diagram to record connections between your home entertainment components. You can use this diagram to reconnect your system if you move the equipment or add new equipment. Disconnect the power from the QIP receiver before connecting or changing cable connections. -
Page 40: Data Devices
Advanced data features require the proper application and network infrastructure to operate. Data Features In addition to high-quality audio and video, the QIP receiver has the capability to deliver high-speed data services such as Internet access, e-mail, IP telephony, e-commerce, and home banking. -
Page 41: Troubleshooting
Problem Possible Solution The QIP receiver will The QIP receiver may have received a software update and may not power on while not power on the new software is being installed. Try again in a few minutes. •... - Page 42 Note: Closed captioning may not be available on the current program. There are black bars to Wide screen TVs display 4:3 programs in this format unless set to Stretch. Turn on the the right and left of the 4:3 OVERRIDE feature in the User Settings menu. This enables most wide screen TVs...
- Page 43 Possible Solution There are black bars on This may occur on a 4:3 TV if the 4:3 OVERRIDE setting is OFF. To set 4:3 SD all four sides of the programming to fill the screen, depending on the capabilities of the TV, set picture 4:3 OVERRIDE to 480i or 480p.
- Page 45 Motorola, Inc. 101 Tournament Drive Horsham, PA 19044 U.S.A. http://www.motorola.com 548219-001-c 04/08...