Pioneer DJM-350 Operating Instructions Manual
Owner's manual
Hide thumbs
Also See for DJM-350:
- Operating instructions manual (116 pages) ,
- Service manual (91 pages) ,
- Manual del instrucción (20 pages)
Table of Contents

Related Manuals for Pioneer DJM-350


Summary of Contents for Pioneer DJM-350
-
Page 1: Operating Instructions
DJ MIXER DJM-350 http://www.prodjnet.com/support/ The Pioneer website listed above provides answers to frequently asked questions, information about software, and other up-to-date data of assistance to our customers. Operating Instructions... - Page 2 After you have finished reading the instructions, put them away in a safe place for future reference. In some countries or regions, the shape of the power plug and power outlet may sometimes differ from that shown in the explanatory drawings.
-
Page 3: Operating Environment
Operating environment temperature and humidity: product may expose you to chemicals listed on +5 °C to +35 °C (+41 °F to +95 °F); less than 85 %RH proposition 65 known to the State of California and (cooling vents not blocked) - Page 4 Electronics Group want you to get the most out of Quiet library, soft whispers your equipment by playing it at a safe level. One that Living room, refrigerator, bedroom away from traffic lets the sound come through loud and clear without...
-
Page 5: Table Of Contents
Contents How to read this manual The names of displays, menus, and buttons in this manual are enclosed in brackets. (e.g. [MASTER] channel, [ON/ OFF], [File] menu) Before start Features .......................6 System setup example ................6 What’s in the box ..................6 Connections Names of terminals..................7... -
Page 6: Before Start
Features This unit is a DJ mixer that carries over the technology of the Pioneer DJM series, the world standard in club sound. It is a standard type unit equipped with the basic functions required for mixing, enabling full-fledged DJ play easily. -
Page 7: Connections
Connections Be sure to turn off the power and unplug the power cord from the power outlet whenever making or changing connections. Refer to the operating instructions for the component to be connected. Connect the power cord after all the connections between devices have been completed. -
Page 8: Connecting The Input/ Output Terminals
Connecting the input/ output terminals ! When creating a DVS (Digital Vinyl System) combining a computer, audio interface, etc., be careful in connecting the audio interface to this unit’s input terminals and in the settings of the input selector switches. -
Page 9: Operations
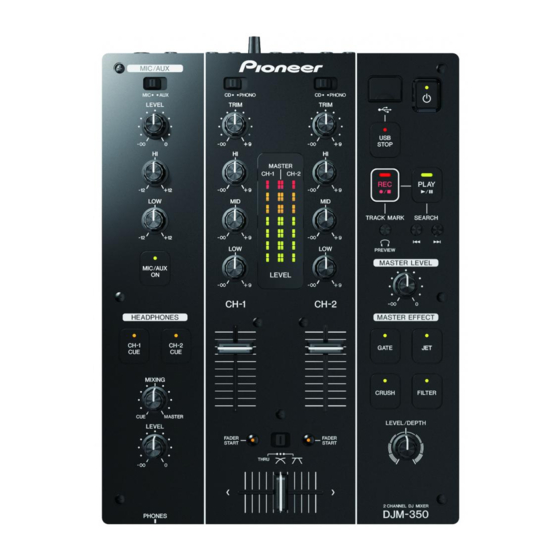
Master effect section 1 u (Power switch) (page 10) Mixer section 2 MASTER LEVEL (page 10) Two sets of audio signals can be adjusted separately for basic DJ mixing (page 10). MIC/ AUX section b CD, PHONO (input selector switch) -
Page 10: About The Power Switch Of This Unit
Adjust [TRIM] so that the orange indicator lights at the point in the track where the volume is loudest (the climax, etc.). Be careful that the red indicator does not light, or the sound could be distorted. Move the [CH-1] 1 channel fader g to the back side. - Page 11 Press [FADER START] h. Turn the fader start function on. Prepare the unit in advance so that the sound of [CH-1] 1 is being out- put from the speakers. For instructions on preparation, see Outputting Move the channel fader g all the way to the front.
-
Page 12: Monitoring The Sound Over Headphones (Headphones Section)
CH-1 CH-2 The effect differs for the different buttons. For details on the different effects, see the table below. MIXING ! When a button that is flashing is pressed again, the effect is turned off. MASTER LEVEL Effect Name Descriptions... -
Page 13: Recording The Performance (Usb Recording Section)
2] terminals can be recorded as a WAV file on a USB device. Press the [p] to move to the beginning of the next track. ! The name of the files created when the sound is recorded is in the Press [o] once to move to the beginning of the currently playing format [REC***.WAV] (*** is a 3-digit number). - Page 14 Set the time until the standby mode is set. The set time switches each time the button is pressed. The points on the master level indicator light according to the set time (not including the topmost point). — Off — 20 minutes — 40 minutes — 60 minutes —...
-
Page 15: Additional Information
Pioneer authorized service center or your dealer to carry out repair work. ! This unit may not operate properly due to static electricity or other external factors. In this case, normal operation may be restored by unplug- ging the power cord, waiting about 5 seconds or more, then plugging the power cord back in. -
Page 16: About Errors
About errors If this unit cannot operate normally, the [u] (the power switch), [USB STOP] and [PLAY f] indicators flash to indicate an error. Check the table below and take the measures indicated. If the same error is indicated after the measures have been taken, contact your store of purchase or nearby Pioneer service station. -
Page 17: About The Exemption Clauses
Power consumption (standby) ............0.4 W Main unit weight ..............3.2 kg (7.1 lb) Max. dimensions ..... 218 mm (W) × 107 mm (H) × 301 mm (D) (8.6 in. (W) × 4.2 in. (H) × 11.9 in. (D)) Tolerable operating temperature ..+5 °C to +35 °C (+41 °F to +95 °F) Tolerable operating humidity ....5 % to 85 % (no condensation) -
Page 19: Limited Warranty
Pioneer, without charge to you for parts or labor for actual repair work if such products fail to function properly under normal use due to a manufacturing defect. - Page 20 URLs : Pour enregistrer votre produit, trouver le service après-vente agréé le plus proche et pour acheter des pièces de rechange, des modes d’emploi ou des accessoires, reportez-vous aux URL suivantes : In the USA/Aux Etats-Unis http://www.pioneerelectronics.com...