Table of Contents
Advertisement
We advise you to read this manual carefully, which contains all the instructions for
maintaining the appliance's aesthetic and functional qualities.
For further information on the product: www.smeg.com
Contents
26
26
26
26
26
27
27
27
28
28
28
29
29
31
31
31
31
32
34
35
38
38
38
38
38
38
39
39
40
41
42
44
44
44
45
25
Advertisement
Table of Contents

Related Manuals for Smeg SFP372X


Summary of Contents for Smeg SFP372X
-
Page 1: Table Of Contents
4.10 Extraordinary maintenance 5 Installation 5.1 Electrical connection 5.2 Cable replacement 5.3 Positioning We advise you to read this manual carefully, which contains all the instructions for maintaining the appliance's aesthetic and functional qualities. For further information on the product: www.smeg.com... -
Page 2: Instructions
Instructions 1 Instructions 1.2 This user manual This user manual is an integral part of the 1.1 How to read the user manual appliance and must therefore be kept in its This user manual uses the following reading entirety and in an accessible place for the whole working life of the appliance. -
Page 3: Manufacturer Liability
• Cut the power supply cable and remove • Do not rest any weight or sit on the open it along with the plug. door of the appliance. • Take care that no objects are stuck in the Power voltage doors. -
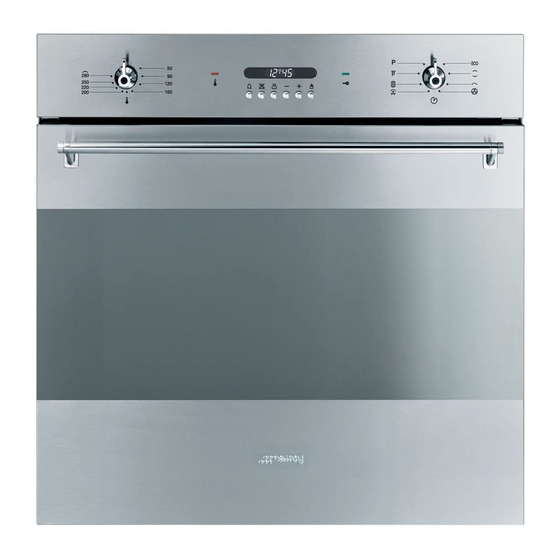
Page 4: Description
4 Door 2.2 Control panel Temperature knob (1) Thermostat indicator light (2) This knob allows you to select the cooking When the indicator light is flashing, it temperature. indicates that the oven is heating up to reach the set temperature. Once the... -
Page 5: Other Parts
Tray rack The fan cools the oven and comes into operation during cooking. to be placed over the top of the oven tray; The fan causes a steady outflow of air from for cooking foods which may drip. above the door which may continue for a brief period of time even after the appliance has been turned off. - Page 6 Deep tray useful for collecting fat from foods placed on the rack above and for cooking pies, pizzas and baked desserts. The oven accessories intended to come into contact with food are made of materials that comply with the provisions of current legislation.
-
Page 7: Use
Risk of damage to enamelled 3.1 Instructions surfaces High temperature inside the oven • Do not cover the bottom of the oven with during use aluminium or tin foil sheets. Danger of burns • If you wish to use greaseproof paper, place it so that it will not interfere with the •... -
Page 8: Using The Oven
Tray rack The tray rack has to be inserted into the tray. In this way fat can be collected separately from the food which is being cooked. 3.4 Using the oven Switching on the oven To switch the oven on: 1. - Page 9 When this function is set, the oven executes a pyrolysis at 500°C for Fan-assisted circular an hour and a half. For use in the The combination of the fan and the case of ovens which are not too circular element (incorporated in the dirty.
-
Page 10: Cooking Advice
• Use a meat thermometer when roasting first shelf of the oven. meat, or simply press on the roast with a spoon. If it is hard, it is ready; if not, it • Avoid overlapping the food. needs another few minutes cooking. -
Page 11: Programming Clock
Hold down and simultaneously use Setting the time to set the required number of minutes. On the first use, or after a power failure, Press key. The sum of the current time will be flashing on the appliance's plus the preset cooking duration will display. - Page 12 End of cooking Adjusting the buzzer volume At the end of cooking the oven will switch The buzzer volume can be set to 3 different off automatically and simultaneously a levels. When the buzzer is in operation, buzzer will start to sound intermittently. After press to change the setting.
-
Page 13: Cooking Information Table
150 - 160 45 - 50 Rice pudding Circular/Static 160 - 170 50 - 60 Brioche Circular 25 - 30 Apple pie Static The times indicated in the table do not include preheating times and are provided as a guide only. -
Page 14: Cleaning And Maintenance
Cleaning and maintenance 4 Cleaning and maintenance Do not allow residues of sugary foods (such as jam) to set inside the oven. If left to set for 4.1 Instructions too long, they might damage the enamel lining of the oven. -
Page 15: Cleaning The Door Glazing
Cleaning and maintenance and once it is in place remove the pins detach from their housings in the oven from the holes in the hinges. door. 3. Some multifunction models have an 4.6 Cleaning the door glazing intermediate glass panel. Remove the... -
Page 16: Cleaning The Inside Of The Oven
To remove the guide frames: pull the frame towards the inside of the oven to unhook it from its groove A, then slide it out of the seats B at the back. When cleaning is complete, repeat the above procedures to put the guide frames back in. -
Page 17: Pyrolysis Setting
1 hour and 30 minutes to a maximum of 3 hours. Improper use Risk of damage to surfaces Recommended pyrolysis duration: •... -
Page 18: Extraordinary Maintenance
Cleaning and maintenance 4.10 Extraordinary maintenance 7. At the end of the pyrolysis cycle, the door remains locked as long as the Live parts temperature inside the oven returns to Danger of electrocution safety levels. 8. At the end of the pyrolysis cycle, wait for •... - Page 19 To permit thorough cleaning of the oven, the door. door seal may be removed. There are fasteners on all four sides to attach it to the 7. Press the cover completely down so that edge of the oven. Pull the 4 edges of the it attaches perfectly to the bulb support.
-
Page 20: Installation
• Have the electrical connection performed by authorised technical Connection with plug and socket personnel. Make sure that the plug and socket are of • The appliance must be connected to the same type. earth in compliance with electrical Avoid use of adapters and shunts as these system safety standards. -
Page 21: Positioning
Pressure on the open door Risk of damages to the appliance Cover the bushings with the covers • Never use the oven door to lever the removed previously. appliance into place when fitting. • Avoid exerting too much pressure on the oven door when open. - Page 22 Installation Mounting under worktops (mm) Mounting into a column (mm) Make sure that the piece of furniture rear/bottom part has an opening of approx. 60 mm. Make sure that the piece of furniture top/rear part has an opening of approx. 35-40 mm...