Technics SB-G90M2 - Speaker System Manual
- Owner's manual (192 pages) ,
- Owner's manual (192 pages) ,
- Owner's manual (194 pages)
Advertisement
Accessories
- 4 Spikes
(TBLA40861A)
![]()
- 4 Rubber feet
(TBLG32691)
![]()
- 2 Base plates A
(TBLA40852)
![]()
- 4 Spacers
(TMKK653)
![]()
- 2 Short wires
(TXJ001BP3E)
![]()
- 4 Spike shoes
(TYL0079-A)
![]()
- 12 Base plate screws
(THEL168)
![]()
- 2 Base plates B
(TBLA41091)
![]()
- 1 Speaker net
(TTJ0006-A)
![]()
- 1 Cleaning cloth
(TXFPE01LHUU)
![]()


Before use, be sure to attach the base plates and either the spikes or the rubber feet.
- Keep small accessories out of reach of children to prevent swallowing.

- Product numbers provided in this Owner's Manual are correct as of July 2021. These may be subject to change.
- The speakers are not supplied with speaker cables. For connection, use commercially-available speaker cables.
About this unit
Features of the unit
- Newly-developed two-way coaxial cone units enable precise sound localisation and deliver smooth and rich sound
In pursuit of their point source of sound and linear phase concepts, in these new coaxial units Technics has employed smooth edges, from the uniquely shaped phase plugs, slim mid-range diaphragms, right through to the baffles. These generate spherical waves with clean wave fronts that reproduce the sound being played back so that it possesses smooth and rich quality and precise sound localisation. - Balanced Driver Mounting Architecture ensures reduced sound distortion and degradation of sound quality
By installing the speaker unit on a speaker mounting baffle at the center of gravity in the cabinet, we were able to suppress the vibrations being transmitted from the speaker unit to the baffle. The base plate has been further strengthened, with the speaker mount baffle for the woofer being extended down to the base plate so that a realistic sound with energy and good granularity can be reproduced. - Powerful and natural reproduction of mid and bass range sounds is achieved with minimal use of absorbent acoustic materials
The energy of the standing waves generated within the cabinet is concentrated using our unique sound path architecture, and absorbent acoustic materials are positioned to efficiently eliminate the standing waves. This means that we can greatly reduce reliance on absorbent acoustic materials to control the sound and the energy of necessary sounds is not lost, resulting in powerful and natural mid and bass range sounds.
Names of parts

Installation
e.g.,

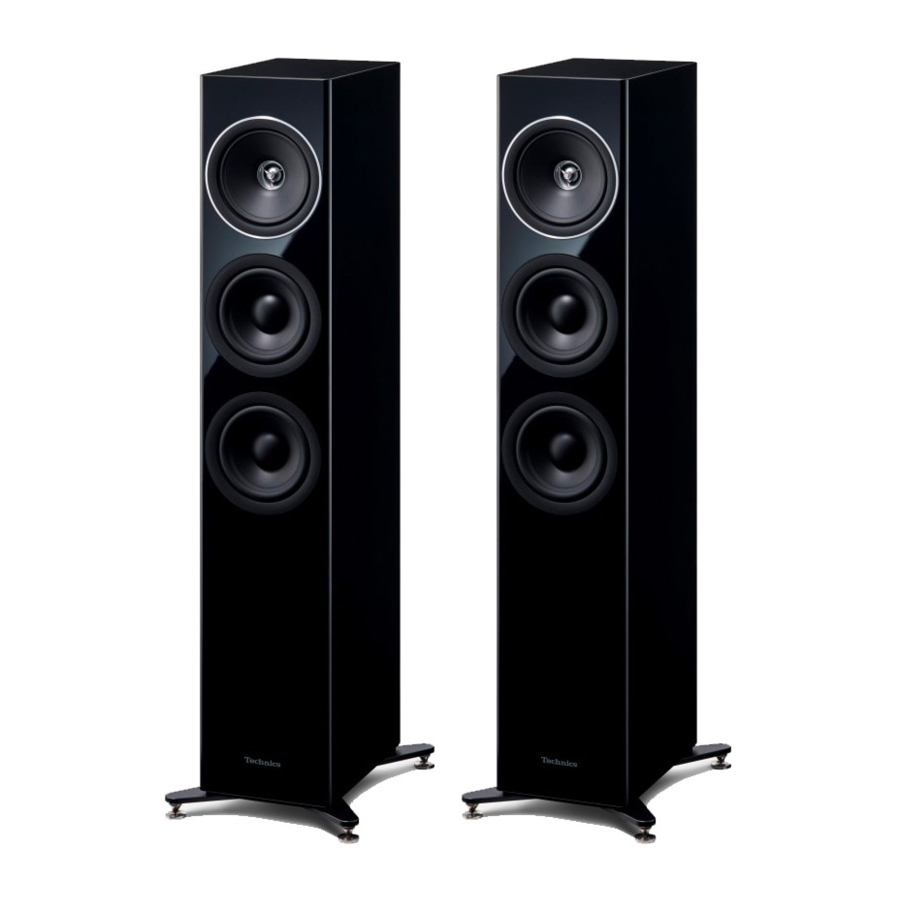
 Speaker units
- Each speaker must be carried and installed by at least two people.
- Do not touch the speaker units. Doing so may result in incorrect audio quality.
- Place the speakers at approximately the same distance from the listening position.
- The speakers produce bass sound from the bass reflex ports on the rear as well as from the front. Install the speakers at least 5 cm (2") away from the walls so that they do not cover the bass reflex ports on the rear.
- Keep the amplifier or any other device and the speakers at least 1 cm (13/32") away from each other.
For optimum position
The quality and volume of the bass sound, sound localisation performance, sound ambience, and other factors that determine the audio quality vary depending on the installation location of this unit, listening position, room conditions, and other factors. Refer to the information below when installing the speakers.
Determining an installation location.
- Each speaker has a mass of approximately 35 kg (78 lbs). Check that the installation location is strong enough to bear this mass.
- If you need to secure the speakers against tipping over, consult an installation specialist. The strength of the floor and wall must be verified. (See "Preventing the device from tipping over")
- Put the speakers on a flat safe surface.
If the speakers wobble when placed, use the spacers. (See "Placing the unit using the spikes", "Placing the unit using the rubber feet") - To minimize the gap in audio quality between the left and right speakers, install them so that acoustic conditions (reflection and absorption of sound) around them are the same.
Adjusting the distances between the rear of the speakers and the walls
If you install the speakers close to a wall or in a corner, the bass sound will be more powerful; however, when the speakers are too close to it, sound localisation performance and sound ambience may deteriorate. If this occurs, adjust the distance between the speakers and the front wall, which should be between 30 cm (12") to 60 cm (24"). (Please note that the distance between the speakers and the side walls should be greater than 60 cm (24").)
- Do not drag the speakers by force. Doing so may damage the speaker and the floor.
Adjusting the angle of the speakers
Angle the front side of the speakers toward the listener. Following these steps will help the speakers deliver more precise sound localisation.
Adjusting the acoustics of the room and speaker layout
Depending on the room environment (including the size and shape of the room, distance to the walls and reverberation level), certain sounds may be exaggerated or suppressed, making them difficult to hear. In such cases, adjusting the reverberation level by moving the speakers, changing your listening position or covering the walls and windows with thick curtains may help resolve the problem.
- The spikes may enhance the audio quality. (See "Placing the unit using the spikes")
Attaching the base plates
- Remove the accessories.
- Remove the accessories from the styrofoam blocks, and place them in a location away from children.

- Remove the accessories from the styrofoam blocks, and place them in a location away from children.
- Place the styrofoam blocks in an area suitable for work.
- Remove the packaging box of the speaker net.

- Place the speaker on the styrofoam blocks removed in Step 2.

- Keep the following points in mind when lifting up the speaker.
- Hold the bottom so that your hands do not slip.
- Keep the following points in mind when lifting up the speaker.
- Roll up the protective bags (2 pcs) to uncover the bottom of the speaker.
![]()
- Attach the base plates (4 pcs) to the speaker securely with the supplied screws.

- Loosely pre-mount the three screws with your hands first, and then tighten them with a screwdriver.
- After attaching the base plates, ensure that they do not wobble.


Placing the unit using the spikes
The spikes may enhance the audio quality.
- Panasonic is not responsible for any accidents or damage caused by improper assembly or handling of the product. Do not attach the accessories in any other way than instructed in this Owner's Manual.
- Each speaker has a mass of approximately 35 kg (78 lbs). When tilting the speakers to attach the spikes, ensure that the work is done by at least two people. When attaching the spikes, exercise caution to avoid catching your fingers or toes between the speakers and floor or tipping the speakers over. In addition, ensure that you spread a thick mat or similar item on the side of the floor where you will be tilting the speakers to prevent damage to the floor.
- Each spike will be taking weights of 8 kg (17.6 lbs.) or more. This means that marks and indentations can occur in the installation location. To prevent the spikes from damaging the area, use the supplied spike shoes or purchase spike shoes with large contact surfaces and adequate strength.
- Moving the speakers with the spikes attached may cause damage to the floor. Before changing the installation location, remove the spikes.
To avoid floor damage, have two thick mats (or similar) available. Place them in the unpacking location and the installation location in advance.
- Place the speaker vertically on a thick mat (or similar).
![]()
- Remove the protective bags (2 pcs) and the cardboard covering the speaker.
- Carry the speaker to the installation location while tilting it forward, and place it on a thick mat (or similar).

- Tilt the speaker forward, and screw the spikes into the two rear-side base plates.
When using the spike shoes, place them under the spikes.

- While aligning the tips of the spikes with the indentations on the spike shoes, slowly bring the speaker back to the upright position.
![]()
- In the same way as Step 4, tilt the speaker backwards and remove the thick mat (or similar).
- Screw the spikes into the two front-side base plates.
When using the spike shoes, place them under the spikes. - If the speakers wobble, place the spacers under the spike shoes.
![]()


Placing the unit using the rubber feet
Attach the rubber feet (4 pcs) to the recesses on the base plates in advance.
- Peel off the backing paper from the rubber feet, and push them firmly into the base plates without touching the adhesive surface of the rubber feet.


- Panasonic is not responsible for any accidents or damage caused by improper assembly or handling of the product. Do not attach the accessories in any other way than instructed in this Owner's Manual.
- Each speaker weighs approximately 35 kg (78 lbs). Ensure that the work is done by at least two people. Be careful not to catch your fingers or toes between the speaker and the floor or tip over the speaker.
- Each rubber feet will be taking weights of 8 kg (17.6 lbs.) or more. This means that marks and indentations can occur in the installation location.
- Dragging the speaker along the floor may cause the rubber feet to peel off.
When changing the installation location of the speaker, always use at least two people to lift it.
To avoid floor damage, have a thick mat (or similar) available. Place it in the unpacking location in advance.
- Place the speaker vertically on a thick mat (or similar).
![]()
- Remove the protective bags (2 pcs) and the cardboard covering the speaker.
- Hold the speaker so that it is tilted forward and move it to the installation location.

- If the speakers wobble after being placed, place the spacers under the rubber feet. This will prevent the rubber feet from wobbling on the installation surface.


Preventing the device from tipping over
The speakers may tip over in a disaster such as a powerful earthquake or in an accident. For your safety, be sure to secure the speakers against tipping over.
Each speaker weighs approximately 35 kg (78 lbs) in total. Verify that the speaker locations are strong enough to withstand this weight.
For details, consult an installation specialist.
When securing the speakers to a horizontal surface

Secure each speaker to the floor with wires or similar items as shown in the illustration.
When securing the speakers to a vertical surface

Loop a band or similar item around each speaker, and connect it to a sturdy wall or column with a stout wire, chain or similar item, as shown in the illustration.
- The measures described above do not guarantee protection against all disasters and accidents, including earthquakes. Please note that Panasonic is not responsible for any damage to the speakers, their installation locations or other objects caused by the work performed to secure the speakers from tipping over.
- Use of the spikes will make the speakers more vulnerable to tipping over.
Connections
Connecting the unit cables
The speakers are not supplied with speaker cables. For connection, use commercially-available speaker cables.

- Turn the knobs to loosen them, and insert the core wires into the holes.
![]()
- Tighten the knobs.
![]()


If it is difficult to connect the speaker cables, loosen the knobs as far as possible, then connect.
- Be careful not to cross (short-circuit) or reverse the polarity of the speaker wires as doing so may damage the amplifier.
![]()

Connecting with an amplifier
- Before connection, turn off the amplifier and disconnect its power cord.
- For details, refer to the operating instructions of the amplifier.
Single wiring connection
- Connect the short wires (supplied)

- Connect the amplifier and speaker with the speaker cable (commercially available)

- The speaker cable is connected to the HF knob in the above diagram, but you will still achieve a normal stereo effect if you connect to the LF knob.


Bi-wiring connection
- Do not use the short wires (supplied) when using bi-wiring connection.


- Do not move the speaker while the speaker cables are connected. This may cause a short circuit.
- When the connections are completed, pull the speaker cables lightly to check that they are connected firmly.
- Wire the polarity (+/-) of the terminals correctly. Not doing so may adversely affect stereo effects or cause malfunction.
Attaching the speaker nets
The speakers are supplied with speaker nets, which protect the speaker units from dust.
Use the magnets to fix the speaker nets to the speaker units.

![information]() You can enjoy superior quality audio by removing the speaker nets before playback.
You can enjoy superior quality audio by removing the speaker nets before playback.
Notes on use
To protect the speakers from damage caused by excessive input, observe the following precautions:
- Reduce the volume in the following cases to avoid damage:
- When playing distorted sound.
- When the speakers are receiving howling from a microphone or record player, noise from FM broadcasts, or continuous signals from an oscillator, test disc, or electronic instrument.
- When adjusting the sound quality.
- When turning the amplifier on or off.
- Avoid raising the volume level too much when enhancing the treble sound with a graphic equalizer or any other controls.
- Avoid outputting excessively loud sound with a small power amplifier. Doing so will increase the amplifier's harmonic distortion and may damage the speakers.
- You can damage your speakers and shorten their useful life if you play sound at high levels over extended periods.
- Do not touch the speaker terminals with your hands or other objects while the speakers are in use. Depending on the conditions of use, doing so may expose you to high voltage.
Unit care
Wipe the speakers with the supplied cleaning cloth.
- When dirt is heavy, wring a wet cloth tightly to wipe the dirt, and then wipe it with a dry cloth.
- Do not use solvents including benzine, thinner, alcohol, kitchen detergent, a chemical wiper, etc. This might cause the exterior case to be deformed or the coating to come off.
Specifications
| Type | 3-way 4 speakers, bass-reflex type (coaxial 2-way midrange/built-in tweeters) |
| Speaker unit | |
| Woofer | 16 cm (6 1/2") cone type x2 |
| Midrange/Tweeter | Coaxial 16 cm (6 1/2") cone type x1 / 2.5 cm (1") dome type x1 |
| Impedance | 4 Ω |
| Input power (IEC) | 200 W (MAX) 100 W (RATED) |
| Sound pressure level | 86 dB (2.83 V/m) 83 dB (W/m) |
| Frequency range | 33 Hz to 90 kHz (-10 dB) |
| Crossover frequency | 500 Hz, 3.4 kHz |
| Dimensions (WkHkD) | |
| With the spikes | 292 mm x 1,114 mm x 366 mm (11 1/2" x 43 27/32" x 14 2/5") |
| With the rubber feet | 292 mm x 1,093 mm x 366 mm (11 1/2" x 43 1/32" x 14 2/5 ") |
| Mass (Weight) | Approx. 35 kg (78 lbs) |
| Operating temperature range | 0°C to +40°C (+32°F to +104°F) |
| Operating humidity range | 20% to 80% RH (no condensation) |
- Specifications are subject to change without notice.
- Mass and dimensions are approximate.
Safety precautions

![burn hazard]() Do not disassemble or modify the product. Doing so may cause damage or fire.
Do not disassemble or modify the product. Doing so may cause damage or fire.![shock hazard]() Do not place the speakers in unstable locations, such as on a wobbly table or sloping surface. Do not place the speakers on high or uneven surfaces or on surfaces vulnerable to vibrations or shocks.
Do not place the speakers in unstable locations, such as on a wobbly table or sloping surface. Do not place the speakers on high or uneven surfaces or on surfaces vulnerable to vibrations or shocks.
If the speakers tip over or fall, personal injury may result.- Keep small accessories out of reach of children. If accidentally ingested, there will be adverse physical effects. Should you suspect that small accessories have been ingested, consult your physician immediately.
- Do not hang the speakers from the ceiling or on the wall. Doing so may cause the speaker to fall off, causing personal injury.
![burn hazard]() Do not insert objects into the holes of the bass reflex ports on the rear side. Doing so may cause a fire or personal injury. Be extra cautious when children are near.
Do not insert objects into the holes of the bass reflex ports on the rear side. Doing so may cause a fire or personal injury. Be extra cautious when children are near.
 Do not disassemble or modify the product. Doing so may cause damage or fire.
 Do not place the speakers in unstable locations, such as on a wobbly table or sloping surface. Do not place the speakers on high or uneven surfaces or on surfaces vulnerable to vibrations or shocks.
- Do not stand on or hang down from the speakers. If the speakers tip over or are damaged, personal injury may result.
![burn hazard]() Do not use the speakers over a long period of time when the sound is distorted. Doing so may cause the speakers to overheat, resulting in a malfunction or fire.
Do not use the speakers over a long period of time when the sound is distorted. Doing so may cause the speakers to overheat, resulting in a malfunction or fire.- Do not place heavy or large items on the speakers. If the speakers tip over or fall, personal injury may result.
- Do not touch the diaphragms. Doing so may deform the diaphragms, and as a result, sound may not be output correctly.
- Keep the speakers out of reach of children, including infants. Not doing so may cause personal injury if the speakers tip over.
- Do not place the speakers in locations subject to extremely high temperatures. In particular, avoid locations exposed to direct sunlight and near heating equipment. Please also note that doing so may cause the outer casing or internal components to deteriorate.
![burn hazard]()
![shock hazard]()
Do not place the speakers in locations subject to greasy fumes or steam, or in humid or dusty locations. Doing so may cause electricity to be conducted through oil, moisture or dust, resulting in a fire or electric shock.- Keep magnetic items away from the product. Powerful magnets inside the speakers and speaker nets may damage debit cards, travel cards (transit passes), clocks and other objects.
- Do not insert a finger into the bass reflex ports on the rear of the speakers. Pay close attention to children as doing so may cause personal injury.
![burn hazard]() Do not connect the speakers to an amplifier with an output greater than their allowable input. Doing so may cause the speakers to overheat, resulting in a fire.
Do not connect the speakers to an amplifier with an output greater than their allowable input. Doing so may cause the speakers to overheat, resulting in a fire.- Do not attempt to lift or carry the main unit with the knobs on the main unit. Injury may result if the units drop. This can also cause damage to the product, so care should be taken.
- Each speaker must be carried and installed by at least two people. Dropping it may cause injury.
- Secure the speakers against tipping over. If they tip over in a disaster such as a powerful earthquake or in an accident, personal injury may result.
- Before use, be sure to attach the base plates and either the spikes or the rubber feet. Otherwise, the product may tip over, causing injury.
About descriptions in this Owner's Manual
- The illustrations shown may differ from your unit.
For the U.S.A. and Canada
If you have any questions, visit:
U.S.A.: http://shop.panasonic.com/support
Canada: http://panasonic.ca/english/support
Register online at https://shop.panasonic.com/RegisterTechnics (U.S. customers only)
For the United Kingdom and Ireland customers
Sales and Support Information
Customer Communications Centre
- For customers within the UK: 0333 222 8777
- For customers within Ireland: 01 447 5229
- Monday–Friday 9:00 am – 5:00 pm, (Excluding public holidays).
- For further support on your product, please visit our website: www.technics.com/uk/
Documents / Resources
References
![shop.panasonic.com]() Panasonic - Official Consumer Product Support
Panasonic - Official Consumer Product Support![panasonic.ca]() Panasonic - Official Consumer Product Support
Panasonic - Official Consumer Product SupportHi-Fi Audio | Technics UK
Download manual
Here you can download full pdf version of manual, it may contain additional safety instructions, warranty information, FCC rules, etc.
Advertisement
Thank you! Your question has been received!


Need Assistance?
Do you have a question about the SB-G90M2 that isn't answered in the manual? Leave your question here.