Cub Cadet 221 HP Operator's Manual
Single stage
Hide thumbs
Also See for 221 HP:
- Illustrated parts manual (28 pages) ,
- Specifications (2 pages) ,
- Operator's manual (20 pages)
Advertisement
Table of Contents
Safe Operation Practices • Set-Up • Operation • Maintenance • Service • Troubleshooting • Warranty
O
'
M
peratOr
s
anual
Single-Stage Snow Thrower — Model 221 HP
WARNING
READ AND FOLLOW ALL SAFETY RULES AND INSTRUCTIONS IN THIS MANUAL
BEFORE ATTEMPTING TO OPERATE THIS MACHINE.
FAILURE TO COMPLY WITH THESE INSTRUCTIONS MAY RESULT IN PERSONAL INJURY.
CUB CADET LLC, P.O. BOX 361131 CLEVELAND, OHIO 44136-0019
Printed In USA
Form No. 769-07046
(April 28, 2011)
Advertisement
Table of Contents

Related Manuals for Cub Cadet 221 HP


Summary of Contents for Cub Cadet 221 HP
- Page 1 READ AND FOLLOW ALL SAFETY RULES AND INSTRUCTIONS IN THIS MANUAL BEFORE ATTEMPTING TO OPERATE THIS MACHINE. FAILURE TO COMPLY WITH THESE INSTRUCTIONS MAY RESULT IN PERSONAL INJURY. CUB CADET LLC, P.O. BOX 361131 CLEVELAND, OHIO 44136-0019 Printed In USA Form No. 769-07046...
-
Page 2: Table Of Contents
Locate your nearest Cub Cadet Dealer at (877) 282-8684 ◊ Write us at Cub Cadet LLC • P.O. Box 361131 • Cleveland, OH • 44136-0019 If you have any problems or questions concerning the machine, phone your local Cub Cadet dealer or contact us directly. Cub Cadet’s Customer Support telephone numbers, website address... -
Page 3: Safe Operation Practices
Important Safe Operation Practices WARNING! This symbol points out important safety instructions which, if not followed, could endanger the personal safety and/or property of yourself and others. Read and follow all instructions in this manual before attempting to operate this machine. Failure to comply with these instructions may result in personal injury. - Page 4 Safe Handling of Gasoline To avoid personal injury or property damage use extreme care in handling gasoline. Gasoline is extremely flammable and the vapors are explosive. Serious personal injury can occur when gasoline is spilled on yourself or your clothes which can ignite. Wash your skin and change clothes immediately.
-
Page 5: Clearing Clogged Discharge Chute
Clearing a Clogged Discharge Chute Hand contact with the rotating impeller inside the discharge chute is the most common cause of injury associated with snow throwers. Never use your hand to clean out the discharge chute. To clear the chute: SHUT THE ENGINE OFF! Wait 10 seconds to be sure the impeller blades have stopped rotating. -
Page 6: Safety Symbols
Safety Symbols This page depicts and describes safety symbols that may appear on this product. Read, understand, and follow all instructions on the machine before attempting to assemble and operate. Symbol WARNING! Your Responsibility—Restrict the use of this power machine to persons who read, understand and follow the warnings and instructions in this manual and on the machine. -
Page 7: Assembly & Set-Up
Assembly & Set-Up Contents of Carton • One Snow Thrower • One 3-Prong Extension Cord • One Engine Operator’s Manual NOTE: All references to the left or right side of the snow thrower are from the operator’s position. Any exceptions will be noted. Unpacking the Snow Thrower Open the top of the carton. - Page 8 Installing the Chute Place the chute handle on the lower chute as shown in Fig. 3-3. Be certain that the handle is aligned in the channel on the chute and the tabs snap into place. Channel Figure 3-3 Remove the hex washer screws in the chute base. See Fig. 3-4.
-
Page 9: Controls & Features
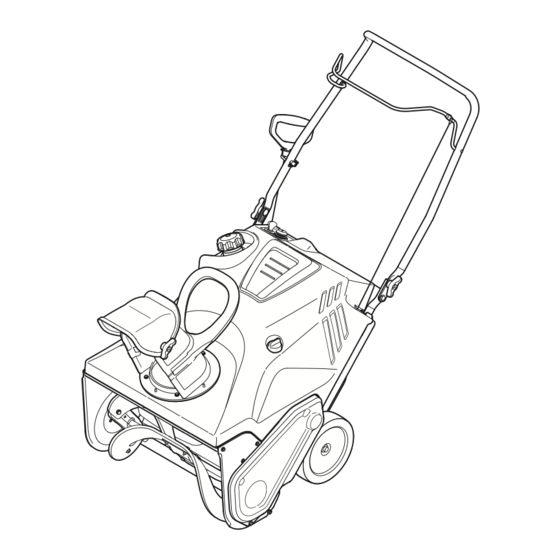
Controls & Features Chute Control Handle Chute Assembly Shave Plate Auger When engaged, the auger rotation draws snow into the auger housing and throws it out the discharge chute. Rubber paddles on the auger also aid in propelling the snow thrower as they come in contact with the pavement. -
Page 10: Operation
Operation NOTE: Refer to the Engine Operator’s Manual for instruction on starting, stopping and operating the engine. Engaging the Auger To engage the auger and start throwing snow, squeeze the auger control against the handle. Release to stop the auger. See Fig. -
Page 11: Maintenance & Adjustment
Maintenance & Adjustments Adjustments WARNING! Before servicing, repairing or inspecting the snow thrower, disengage the auger control. Stop the engine and remove the key to prevent unintended starting. Shave Plate To check the adjustment of the shave plate, place the machine on a level surface. - Page 12 NOTE: The bottom of the panel has tabs that help hold it in place. NOTE: An oil drain extension kit is available separately. Contact your local Cub Cadet dealer or contact Cub Cadet’s Customer Support for kit #753-06684. Change the oil and/or the spark plug as instructed in your Engine Operator’s manual.
-
Page 13: Service
Service Replacing Belt Run the snow thrower until the fuel tank is empty. Pull the recoil starter handle until resistance is felt. Then tip the snow thrower back until it rests on the handles. Slide a board up through the auger and through the chute to secure the auger in place. - Page 14 Replacing Auger Paddles The snow thrower auger’s rubber paddles are subject to wear and should be replaced if any signs of excessive wear are present. CAUTION: Do NOT allow the auger’s rubber paddles to wear to the point where portions of the metal auger itself can come in contact with the pavement.
-
Page 15: Troubleshooting
Troubleshooting Problem Excessive vibration Loose parts or damaged auger. Snow thrower fails to self- Auger control cable out of adjustment. propel Auger drive belt loose or damaged. Augers continue to rotate Auger control cable out of adjustment. Snow thrower fails to Chute assembly clogged. -
Page 16: Replacement Parts
Replacement Parts Component Phone (800) 965-4CUB to order replacement parts or a complete Parts Manual (have your full model number and serial number ready). Parts Manual downloads are also available free of charge at www.cubcadet.com. Part Number and Description 731-08171 Shave Plate 954-04050 Belt... - Page 17 Notes...
- Page 18 10— n ectiOn Otes...
- Page 19 10 — n ectiOn Otes...
-
Page 20: Warranty
MANUFACTURER’S LIMITED WARRANTY FOR The limited warranty set forth below is given by Cub Cadet LLC with respect to new merchandise purchased and used in the United States, its possessions and territories, and by MTD Products Limited with respect to new merchandise purchased and used in Canada and/or its territories and possessions.