Shure MV51 - USB Microphone Manual
- User manual (70 pages) ,
- Manual (14 pages) ,
- User manual (13 pages)
Advertisement
- 1 General Description
- 2 Mounting and Placement
- 3 Quick Setup
- 4 Touch Panel Interface Controls
- 5 Applications
- 6 The MOTIV App
- 7 Adjusting Microphone Level
- 8 Input Meter Level
- 9 Monitoring with the MOTIV Device
- 10 Recording Tips
- 11 Library
- 12 Editing Your Audio
- 13 Sharing MOTIV Recordings
- 14 Sampling Rate and Bit Depth
- 15 Troubleshooting
- 16 System Requirements
- 17 Specifications
- 18 Accessories
- 19 Documents / Resources
General Description
The Shure MV51 is a professional-quality USB condenser microphone, ideal for home recording, podcasting, and video conferencing. The attractive and durable all-metal design features an adjustable kickstand for desktop use, and can also mount onto a microphone stand. A touch panel user interface provides control of microphone gain, headphone level, application modes, and muting.
Features
- Easily adjust settings with the intuitive touch panel interface
- Compatible with most iDevices (iPhone, iPad, and iPod) through Lightning interface
- Compatible with most computers, tablets and smart phones through USB interface
- Large-diaphragm electret condenser microphone captures speech and music with excellent clarity
- Sleek design includes all-metal housing for professional-grade durability
- Headphone output allows real-time monitoring of the live signal and audio from the computer or device
- Preset DSP modes include equalization and compression settings for specific applications
- Desktop kickstand includes a removable tip for mounting onto a microphone stand
Mounting and Placement
Desktop Aim the microphone towards the sound source by adjusting the kickstand.
Microphone Stand Unscrew the end cap to thread the kickstand onto a standard 5/8" microphone stand.

Kickstand End Cap
Quick Setup
The MV51 is compatible with most devices that have a USB or Lightning connector.
- Connect the microphone to a computer or mobile device. Use the appropriate cable (USB or Lightning).
Drivers will be installed automatically. The touch panel illuminates to indicate a successful connection. - Open the sound control panel. Select the Shure MV51 driver.
Raise the level on both the MV51 product and the host computer for proper monitoring. - Confirm that the MV51 is the selected audio device.
Plug headphones into the MV51 device audio output and play an audio track. If you can hear sound, the microphone is functioning properly.
If your computer settings default to another device, open the sound control panel and select the MV51 device. - Adjust the headphone volume on the Shure MV51 device driver.
Open the MV51 driver from the sound control panel and raise the headphone volume from the playback or output tab. - Use the MODE button to select the preset mode that fits your application.
If the audio is too quiet or causes distortion, adjust the gain manually. Refer to the "Adjusting Microphone Level" topic in this guide for more details. - In your recording application, select the MV51 as the input source.
See your software user guide for information on assigning input sources.
You are ready to record.
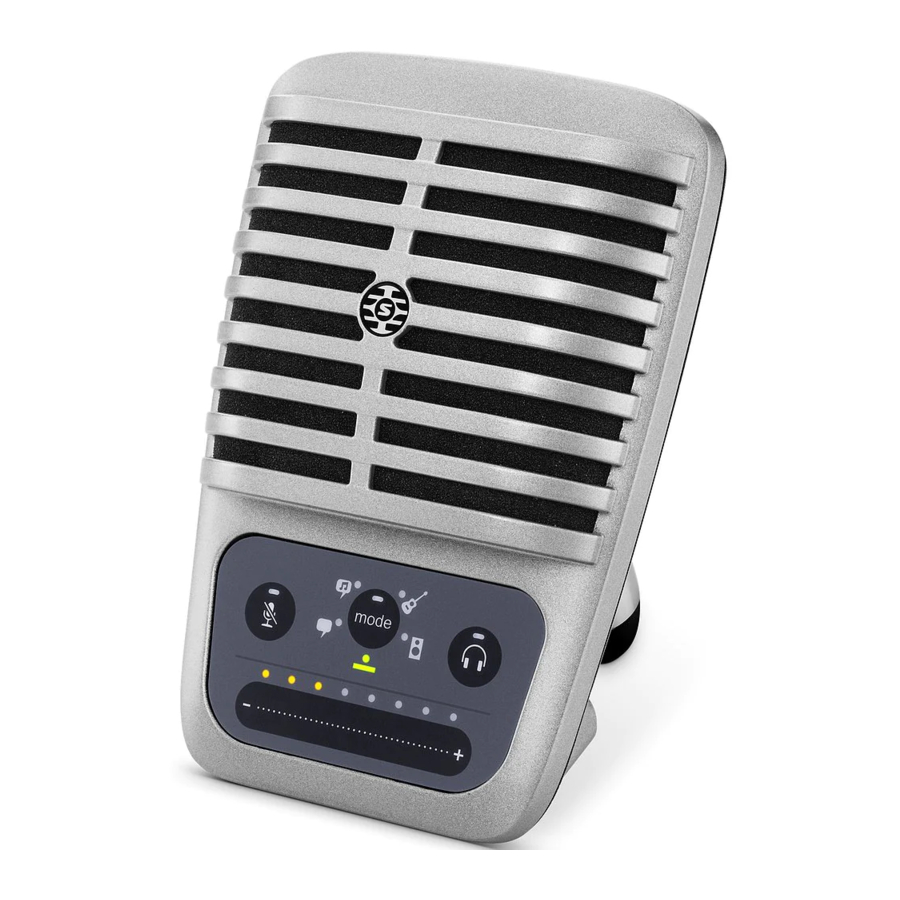
Touch Panel Interface Controls
Touch Panel
- Volume Control Slider Adjust microphone or headphone level by sliding your finger across the control surface.
- Press the mode button to activate microphone level.
- Press the headphone button to activate headphone volume.
- LED bar Displays microphone and headphone level. The LED color indicates the level being displayed or adjusted.
- Green: Microphone level
- Orange: Headphone level
- Mute Button Press to mute and unmute the microphone.
- Mode Selector Press to select preset mode.
- Headphone Volume Selector Press to select headphone level controls (orange LED bar). Then use the volume control slider to adjust headphone level. Press again to return to microphone level display (green LED bar).
Applications
This section suggests microphone placement for typical use cases. Keep in mind that there are many effective ways to record a given source. Experiment with the following microphone placement and settings to find what works best.
Podcast and Voice Recording
Set the microphone to the Speech mode. Speak directly into the front of the microphone at a distance of 2-12 inches (5-30 cm) away. Speaking closer to the microphone results in more bass response, similar to voices on a radio broadcast. Make additional gain adjustments if necessary.

Typical position for speech
Acoustic Instruments and Music
To capture acoustic sources, such as singing, acoustic guitar, soft percussion, or other musical instruments, use a close microphone placement.
Aim the microphone directly at the sound source. For a single source, such as a string instrument or a vocalist, place the microphone 6 to 12 inches (15 to 30 cm) away. For a small group or a performer who is singing and playing an instrument simultaneously, use a distance of 2 to 10 feet (0.6m to 3 m). Placing the microphone farther away results in more ambient room sound.
Set the microphone to the Acoustic or Singing mode and make additional gain adjustments if necessary.
Bands and Loud Sources
To record a band with drums or amplified instruments, aim the microphone towards the group at a distance of 6 to 15 feet (1.8 to 4.6 m). Placement of the microphone depends on the size of the room, number of people, and instrument volume. If possible, walk around the room and listen to find where it sounds best.

For other loud sources, such as an electric guitar amplifier, aim the microphone at the sound source from 0-18 inches (0-45 cm) away.
Set the microphone to the Band mode and make additional gain adjustments if necessary.

Bypass EQ and Compression (Flat)
To record a signal without any processing, set the microphone to the Flat mode. This mode is appropriate for any application when you want to bypass equalization and compression presets, and is ideal when applying signal processing to the recording at a later time.
Additional Tips
Shure offers additional educational publications on recording techniques for specific instruments and applications. Visit shure.com for more information.
The MOTIV App
Use the MOTIV app to change microphone settings and to record, edit, and share audio. The device stores the most recently used settings for quick setup each time you record.
Tip: Turn on Airplane Mode and Do Not Disturb to prevent interruptions to the recording caused by phone calls, text messages, or alerts.

Tap Device on the navigation bar to access the device settings tab.
Device Setup

Microphone Settings
- Connected Mic Status Displays the name of the connected MOTIV microphone.
- Input Meter Displays the strength of the input signal and whether that signal is mono or stereo. The loudest peaks should reach within the target range (indicated by the shaded region between -12 and 0 dB).
- Microphone Gain/Monitoring Adjust the gain slider to match the volume of the sound source. Tap the headphone icon to turn on the input monitor when making adjustments.
- Custom Presets Tap the caret to quickly access your saved presets. Or tap the Save button to save current settings as a new custom preset. See Custom Presets for more information.
- Preset Modes Select a mode to set stereo width, equalization, and compression for specific applications. Refer to the "Preset Modes" topic for more details.
- Polar Pattern Selection Swipe to choose between Stereo, Mono Cardioid, Mono Bidirectional or Raw Mid-Side pick-up patterns. Then adjust the width of the stereo microphone pickup area.
Tip: Consider the location of the microphone and the size of the sound source when adjusting the width. For example, a large orchestra or ensemble recording will benefit from a wide stereo image to achieve increased separation between instruments. Other applications, such as speech, benefit from a narrow width for improved clarity with rejection of ambient (room) sound. - Advanced Features First select a preset mode, then use the advanced controls to fine tune your audio recording and dial in your sound. Your settings will be retained in the microphone. See "Advanced Features," "Wind Noise Reduction" and "LeftRight Channel Swap" for more information on how these features work.
Preset Modes
Five selectable modes optimize settings for gain, stereo width, equalization, and compression. Set the microphone level and try the modes to find which sounds best. Preset modes can affect the strength of the input signal, so adjust the microphone level as needed after changing presets.
| Mode | Application | Characteristics |
 Speech | speech | Narrow stereo width to reject background noise, equalization that emphasizes clarity and fullness, and gentle compression. |
 Singing | solo or group vocal performances | Medium stereo width with subtle equalization to add richness and clarity for a natural sound. |
 Flat | any | An unprocessed signal (no equalization or compression settings used). Adds flexibility when processing the audio after recording. |
 Acousti c | acoustic instruments and quiet music | Medium stereo width with transparent compression to smooth out volume spikes and bring out quiet passages. The equalizer setting emphasizes detail and an overall natural sound. |
 Loud | live performance and louder sources | Wide stereo to increase separation between sources. Equalization further improves definition by reducing frequencies that can make the instrumentation sound crowded. |
Custom Presets
Create and save custom presets to quickly access frequently used mic settings.
- Start with the preset mode that best suits your application needs.
- Adjust advanced settings, like compression, for clarity and consistency.
- Tap Save to rename and save your new custom preset. The original preset will remain available.
- The new custom preset is added to your list.
To access saved presets:
- Tap the caret (arrow) in the Preset row to view your list of available presets.
- Tap custom preset and Apply Preset to instantly apply gain, stereo, equalization, and compression preferences.
Tip: You can save a custom preset at any point by tapping Save.
Advanced Mic Settings
After you have selected the preset mode for your application, fine tune the sound of your recording with limiter, compressor, and equalizer controls. Your settings will be retained in the microphone when using other audio and video recording applications.
Limiter
Toggle the limiter on to set an input threshold and prevent distortion from volume peaks in your recordings.
Compressor
Choose no compression, or select light or heavy compression to control volume when your sound source is dynamic. The compressor will narrow the dynamic range, which means that quiet signals are boosted and loud signals are lowered.
Wind Noise Reduction

Wind Noise Reduction engages a low-frequency cutoff filter that reduces rumble caused by environmental noise. Use the included foam windscreen in combination with wind reduction to counteract rumble and plosives (bursts of air hitting the microphone).
To further reduce wind noise, use the optional Rycote™ Windjammer, which fits over the included foam windscreen.
Equalizer

Change the preset modes to hear the DSP changes, and then use the equalizer to boost or cut bands of frequencies to improve sound clarity.
Note: Equalization within presets will not be displayed. However, the equalizer graphic in the advanced settings status bar displays the user-selected equalization.

Tap to access the MOTIV equalizer. Equalization changes are displayed in the equalizer image.
EQ persists between preset mode changes.
Adjusting Microphone Level
Select the correct preset mode for your recording application. If you hear distortion or the audio is too low, adjust the microphone level in the audio or sound control panel of your computer or recording device.
Tips:
- Set the microphone level before adjusting headphone volume.
- The headphone volume does not affect the signal level sent to the computer.
- Use the volume slider on the front panel to adjust the microphone gain level.
Note: The microphone gain control is independent of the preset modes. Set your microphone level and experiment with dynamic processing options via the preset modes.
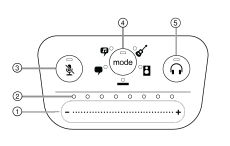
Adjusting Headphone Level
The headphone monitoring level is affected by the MV51 device level and the computer settings level. Raise your computer volume up and easily adjust headphones through the MV51 device headphone settings.
Accessing the Control Panel
PC
- Open the sound control panel and select the Recording tab.
- Open the Shure MV51 device.
- Under the Levels tab, adjust the gain level using the slider.
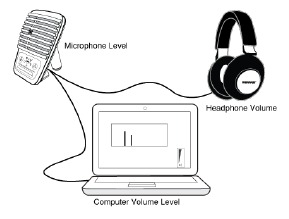
Mac®
- Open the Audio Midi Settings panel.
- Select the Shure MV51 device.
- Click on Input to adjust the gain using the slider.
![]()
Mac audio settings panel
Input Meter Level
If your digital audio workstation or recording software has input meters, adjust the microphone level so it peaks between -12 and -6 dB. Otherwise, simply listen to the audio to make sure it is loud enough and not distorting.

Peak Levels
The target range for peak levels on a typical meter is between -12 and -6 dB.
Monitoring with the MOTIV Device
The headphone output provides an equal blend of the direct microphone signal and audio playback from the computer. This allows you to conveniently adjust the overall headphone volume with one control on the device touch panel. To change the playback audio level relative to the direct microphone signal level, adjust the computer or DAW mixer settings.
Tip: When first connecting the microphone to your computer, make sure to raise the volume level in the sound control panel of the computer for a strong audio signal. Then adjust headphone level on the device for comfortable monitoring.
Recording Tips
Turn On Airplane Mode and Do Not Disturb
When you plug a MOTIV device into your iOS device, a warning message prompts you to enable Airplane Mode and Do Not Disturb mode. It's important to do this to avoid recording interference from phone calls, messages, and various notifications. Tap X to dismiss this warning message.
Note: Leave Airplane Mode off to add geolocation information to your audio file.
Use the Dark Theme
Select the Dark screen option to change the app display from light gray to very dark gray. The darker display is ideal for discreet recording in low-light situations. A darker screen also conserves battery life.
You can access the theme appearance setting by going to Menu > Settings > Appearance
Capture the Complete Performance
To ensure that you capture the entire sound source, start your recording before the performance starts and edit the recording later to trim any silence.
Note: If your microphone accidentally becomes disconnected during recording, MOTIV will automatically stop the recording. The save file dialog will appear, prompting you to name and save your audio.
Keep Screen Awake During Recording
Select the Keep Awake While Recording option so you can continuously monitor gain levels during longer recording sessions without the screen going dark.
You can access the Keep Screen Awake option by going to Menu > Settings > Keep Screen Awake During Recording.
Note: Disabling sleep mode will affect battery time while recording.
Recording Acoustic and Electric Guitar with the MV51
Library

- Library Search/Sort/Select
- Search: Search for files in your library by file name or file type.
- Sort: Tap the sort icon to organize files by name, date, size or file type.
- Select: Use the Select button to choose one or multiple recordings to convert, share, or delete.
- Sort Order Tap the caret to display the tracks in order or reverse order.
- Track List Displays your list of recorded tracks.
- Recently Deleted Your recently deleted files will be stored here for 30 days. See the Recently Deleted files topic to learn how to recover files.
- Audio Player Bar
- Tap the track name to open the playback window
- Tap the Edit scissors icon to access the file Editor.
- Play and pause recordings.
- Tap the three dots to rename, share, convert file format, add artwork, or delete files.
Converting Multiple Files
Shure MOTIV allows you to convert, share, or delete multiple files at a time. Only WAV files can be converted.
- Tap Select in the top-right corner of My Recordings.
- Select all the files that you want to convert. A blue check mark will appear next to selected files.
- Tap Save As to display conversion options. Converting the files adds the new files to the My Recordings list.
Playback
Double-tap the track name in the audio player to access the Playback window.

- Track Information Displays the name of the currently playing track, including file format, bit depth, sample rate, and stereo or mono.
- Track Artwork Keep the MOTIV artwork. Or customize your artwork with images from the photos in your device. See "Customize Track Artwork".
- File Information Displays the record date and time, and the microphone that was used.
- Playback Timeline See where you are in the track as it progresses. The time elapsed and time remaining are displayed below the timeline.
- Playback Controls Edit, Rewind, Play/Pause, Fast-Forward, and Loop your track.

Playback in horizontal view

Editing Your Audio
![]()
Tap Edit to access editing controls for each track.
The MOTIV Editor allows you to polish your recordings before sharing them with friends or online.
There are two edit mode options:
- Split Mode allows you to split a long audio file into one or more separate tracks. This is useful when you've recorded a long performance and want to be able to listen to different sections individually.
- Trim Mode lets you trim the start and end of your recorded track.
Navigating The Timeline
There are three ways to move around the timeline.
- Double tap the timeline to bring playhead to current view.
- Use the markers to move the playhead to a specific point.
- Tap and drag the red playhead bar to a new point in the timeline.
Press Play to begin playback from that selected point.
Pinch two fingers together to zoom out. Pinch apart to zoom in.

Use Landscape mode in the Editor to view more of the waveform.
Creating A Loop
![]()
Create a loop to isolate and repeat a selection of audio.
- Select the Loop button to select the entire track. The waveform in the highlighted blue area will be looped.
- Select and drag the markers on the timeline to adjust your loop.
- Press Play to hear the loop and adjust until you find the best sound.
Markers
![]()
Markers are audio bookmarks that allow you to return to specific points in your recording. They do not affect playback start and stop points but are useful for reference. When used in Split mode, the marker placement determines the split point for the file. Markers are identified by hour, minute, second, and millisecond (00:00:00:00), however they cannot be placed closer than one second apart from one another.
Markers in Record Mode
Adding a marker: Tap the Marker button to insert a marker at the playhead location.
Markers in Edit Mode
The marker list opens with Start and End markers for your audio track.
Playback from a specific point: Tap any marker to begin playback from that marker point.
Adding a marker: Press the plus sign to insert a marker at the playhead location.
Moving a marker: Press and drag an existing marker to a new location on the timeline.
Using the marker list: Tap the marker in the list to move the playhead to that location.
Renaming markers: Press and hold the marker label in the list.
Deleting markers: Swipe left on the marker in the list to reveal the delete option.
Editor

- Trim / Split Select Select your type of edit mode.
- Timeline Display See your entire timeline. Zoom in for precise editing.
- Enhance toggle Toggle the Enhance feature on and off. See the Enhance section for more information.
- Mirror Fade toggle Turn Mirror on to make intro and outro fade curves symmetrical.
- Add Markers Tap the + sign to add a marker at the playhead position.
- Marker List All recordings begin with Start and End markers. See "Markers" for more information.
Editing in Trim Mode
Trim mode is used to trim the extra space from the Start and End of your audio track.
- Go to My Recordings to select the audio file that you would like to edit.
- Select the Edit icon to open the Editor.
- The blue lines represent the Start and End points of your track. Select and drag the blue line to adjust Start and End times.
- Select Loop to have the loop play in a circle and allow you to hear your track before committing to edits.
Tip: To undo the last action on your iOS device, just shake the device. You will receive a pop-up asking you to Undo the last action or Cancel.
Editing in Split Mode

- Trim / Split Select Select your type of edit mode.
- Timeline Display See your entire timeline. Zoom in for precise editing.
- Enhance toggle Toggle the Enhance feature on and off. See the Enhance section for more information.
- Add Markers Tap the + sign to add a marker at the playhead position.
- Marker List All recordings begin with Start and End markers. Displays position in hours, minutes, seconds, and milliseconds. See "Markers" for more information.
Note: Double tap on the timeline to zoom in to a location. The closest possible zoom length is two seconds. After you reach the closest zoom, the double-tap will zoom out.
Use Split Mode when you have a long audio file that you'd like to divide into smaller audio files. Create new edited files while keeping your original file intact.
- Go to My Recordings to select the audio file that you would like to edit.
- Select the Edit icon to open the Editor.
- Place a marker at the point where you want to split the audio.
- Select Split.
- Keep the original file format or select a new one.
- MOTIV uses the file name but adds numbers to the names of your new, separated tracks. In Split mode, when you divide a track in half, My Recordings now displays three tracks. The original track remains intact and the first and second tracks that were created with the Split edit.
Sharing MOTIV Recordings
Save to Camera Roll
Convert your audio into a video file that can be easily shared to social media from your iOS device Camera Roll.
- In My Recordings, select the file you want to convert.
- Select the Share button.
- Select Save to Camera Roll.
- The conversion will happen automatically. Large files will take longer to convert.
Note: The first time you save to Camera Roll you will be asked to grant permission for file sharing between apps. If you accidentally dismiss permissions, you can always change access in the iOS device settings. Granting permission creates a MOTIV folder inside the Camera Roll. - When the conversion process is complete, you will receive a notification letting you know that the save to Camera Roll was successful and your track is available for sharing.
Customize Track Artwork
You have the option to add an image to your recording.
- In the My Recordings tab, select the file that needs artwork.
- Tap the three dots next to the file name.
- Select Add Artwork to view available image files.
- Select a photo. If you decide to change the artwork, repeat the process and select another image.
Save to Dropbox™
Save your MOTIV files to Dropbox to store backup copies, free up space on your iOS device, or share to social media.
- Open the MOTIV app and go to My Recordings.
- Tap the Select button to choose one or multiple files.
- Select share and choose Dropbox.
Note: You may need to grant access between MOTIV and Dropbox. Selecting "Allow" creates a MOTIV folder inside Dropbox and links the apps. - When the file successfully uploads, the file saved notification appears.
Note: Large files may take longer to upload.
Now that your file is uploaded to Dropbox, you can store backup copies of your recordings or share them on social media.
AirDrop® with MOTIV
MOTIV supports the ability to AirDrop WAV files to selected contacts.
- Open the MOTIV app and go to My Recordings.
- Tap the Select button to choose one or multiple files.
- Select Share and then More to see your AirDrop contacts.
Save to iTunes
Use iTunes to easily transfer audio files between your desktop computer and iOS device.
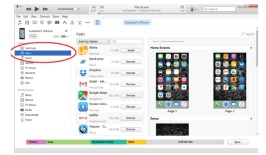
- Connect your iOS device to a computer and open iTunes.
Note: The most current version of iTunes is recommended. - Select your device icon and then select "Apps" from the settings column.
![]()
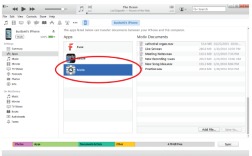
- Select MOTIV from the file sharing section at the bottom of the screen. You might need to scroll all the way to the bottom using the far right scroll bar. This will display your MOTIV documents.
![]()
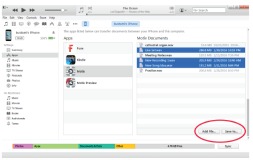
- Highlight the recordings you'd like to save and choose the "Save to" button.
![]()
Note: Large files may take longer to upload.
Now that your files are downloaded to your computer you can add them to the iTunes library or import them into any audio editing program.
Note: Use the add file button to upload audio from your computer to the MOTIV app.
Sampling Rate and Bit Depth
Sample Rate and Bit Depth settings are found in a drop down menu in the audio or sound control panel of your computer. You can adjust these variables to fit your needs. Select a lower sample rate for podcast recording, when it is important to have a smaller file for easy download. Select a higher sample rate for music and more dynamic recordings.
Tip: Record at a higher sample rate and bounce down to an M4A for a file with the highest sound quality at a manageable size.
Tip for PC users: Make sure that the sample rate and bit depth microphone settings, found in the sound control panel of the computer, match with the sample rate and bit depth selected in your software.
Troubleshooting
| Issue | Solution |
| The display does not illu minate | Make sure that the MV51 is fully plugged in. |
| Audio is too low | Check the computer sound control panel settings. When first connecting the MV51 to your computer, make sure to raise the computer volume level. |
| Audio sounds bad | Check the sound control panel of the computer to ensure that the MV51 is fully plugged in and recognized. |
| Audio is distorted | Use the audio meter to ensure that volume peaks are within the target range. If level is reaching the red peak indicator of the input meter, turn the gain down. |
| Audio sounds unnatural or jittery | Make sure that the sample rate and bit depth microphone settings, found in the sound control panel of the computer, are consistent with the sample rate and bit depth selected in your software. |
| MV51 is plugged in, but the volume meter does not register a signal. | Edit the privacy setting for the iOS device under SETTINGS > PRIVACY > MICROPHONE to give the recording application permission to use the microphone. |
| Device not working with | The MV51 requires 250 mA per port. Check USB hub documentation for current/port specifi- |
| USB hub. | cation. |
System Requirements
System Requirements and Compatibility: Mac
- MacOS 10.13 to 10.15
- 64 bit
- Minimum 2 GB of RAM
- Minimum 500 MB of hard disk space
System Requirements and Compatibility: Windows
- Windows 10
- 64 bit
- Minimum 2 GB of RAM
- Minimum 500 MB of hard disk space
System Requirements and Compatibility: iOS
- iOS: iOS 14 and higher
- iPhone: iPhone 6s and higher
- iPod Touch: 7th gen
- iPad: iPad 5th gen and higher
- iPad Mini: iPad Mini 4th gen and higher
System Requirements and Compatibility: Android
Will work with any Android device that has:
- Android Pie 9.0 and higher
- USB Host Power Requirement of ≥100 mA
- USB Audio Class 1.1 support and higher
Android is a trademark of Google Inc.
Note: See https://www.shure.com/MOTIVcompatibility for information on supportive Android devices.
Specifications
MFi Certified
Yes
DSP Modes (Presets)
Speech/Singing/Acoustic/Loud/Flat
Transducer Type
Electret Condenser (25 mm)
Polar Pattern
Unidirectional (Cardioid)
Bit Depth
16-bit/24-bit
Sampling Rate
44.1/48 kHz
Frequency Response
20 Hz to 20,000 Hz
Adjustable Gain Range
0 to +36 dB
Sensitivity
-39 dBFS/Pa at 1 kHz [1] [2}
Maximum SPL
130 dB SPL [2]
Headphone Output
3.5 mm (1/8')
Power Requirements
Powered through USB or Lightning connector
Mute Switch Attenuation
Yes
Mounting Stand
Built-in
Stand Adapter
5/8-27 thread mount (standard mic stand mount)
Housing
all metal construction
Net Weight
574.7 g (20.27oz.)
Dimensions
128 x 86 x 70 mm H x W x D
- 1 Pa=94 dB SPL
- At Minimum Gain, Flat Mode
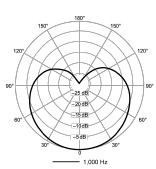
Polar Pattern

Frequency Response
Accessories
Furnished Accessories
| 1 m USB cable | AMV-USB |
| 1 m USB-C cable | 95C38076 |
| 5/8" to 3/8" (Euro) Threaded Adapter | 95A2050 |

Documents / ResourcesDownload manual
Here you can download full pdf version of manual, it may contain additional safety instructions, warranty information, FCC rules, etc.
Advertisement
Thank you! Your question has been received!


Need Assistance?
Do you have a question about the MV51 that isn't answered in the manual? Leave your question here.