Advertisement
General Description
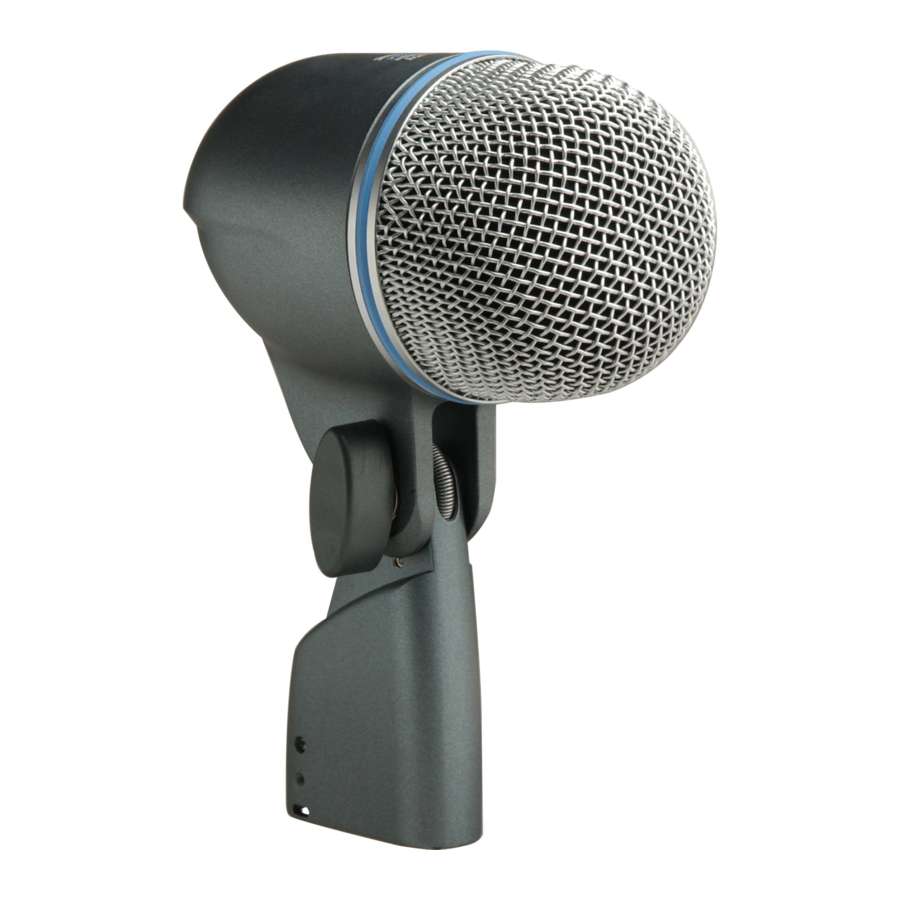
The Beta 52®A is a precision-engineered dynamic microphone with a tailored frequency response designed specifically for kick drums and other bass instruments. It provides superb attack and "punch," and delivers studio quality sound even at extremely high sound pressure levels (SPL). An integrated, locking stand adapter simplifies mounting and adjustments.
Featuring a modified supercardioid pattern, the Beta 52A exhibits remarkable gain before feedback and excellent off-axis rejection. A hardened, steel mesh grille and die-cast metal construction withstands years of abuse, making it ideal for touring sound reinforcement.
Features
- Premier live performance microphone with Shure quality, ruggedness, and reliability
- Modified supercardioid pick-up pattern for maximum gain before feedback and superior rejection of off-axis sound
- Tailored frequency response specifically shaped for kick drums and bass instruments
- Neodymium magnet for greater sensitivity and higher output
- Advanced pneumatic shock mount system that minimizes transmission of mechanical noise and vibration
- Dent-resistant, steel mesh grille and enamel coated die-cast metal construction resist wear and abuse
- Studio quality performance, even at high SPL
- Built-in stand adapter with dynamic locking system and XLR connector simplifies setup and provides greater flexibility
Applications
General Rules for Kick Drum Mic Placement
- Make sure microphone does not touch drum head or damping inside of the drum.
- Aim the microphone toward the desired sound source and away from unwanted sources.
- Place closer to beater head for more attack, further away for more resonance.
- Work close to the microphone for extra bass response.
- Avoid excessive handling to minimize pickup of mechanical noise and vibration.
Applications and Placement
The following table lists the most common applications and placement techniques. Keep in mind that microphone technique is largely a matter of personal taste; there is no one "correct" microphone position.
| Application | Suggested Microphone Placement | Tone Quality |
| Kick Drum | 5 to 7.5 cm (2 to 3 in.) away from beater head, slightly off-center from beater. | Sharp attack; maximum bass sound, highest sound pressure level. |
| 20 to 30 cm (8 to 12 in.) from beater head, on-axis with beater. | Medium attack; balanced sound. NOTE: To create a tighter sound with more "punch," place a pillow or blanket on bot tom of the drum against the beater head. | |
| Guitar & Bass Amplifiers | 2.5 cm (1 in.) from speaker, on-axis with center of speaker cone. | Sharp attack; emphasized bass. |
| 2.5 cm (1 in.) from speaker, at edge of speaker cone. | Sharp attack; higher frequency sound. | |
| 60 to 90 cm (2 to 3 ft.) back from speaker, on-axis with speaker cone. | Softer attack; reduced bass. |
Avoiding Pickup of Unwanted Sound Sources
A supercardioid microphone has the greatest sound rejection at points 120° toward the rear of the microphone. Place the microphone so that unwanted sound sources, such as monitors and loudspeakers, are at these angles, not directly behind it. To minimize feedback and ensure optimum rejection of unwanted sound, always test microphone placement before a performance.

Recommended Loudspeaker Locations for Supercardioid Microphones
Proximity Effect
Unidirectional (cardioid) microphones progressively boost bass frequencies by 6 to 10 dB below 100 Hz when the microphone is at a distance of about 6 mm (1/4 in.) from the sound source. This phenomenon, known as proximity effect, can be used to create a warmer, more powerful sound. To prevent explosive low frequency sound during close-up use, the bass response gradually rolls off. This provides greater control and helps the user take advantage of proximity effect.
Using the Stand Adapter
The integrated stand adapter resists slipping when struck or bumped, yet permits adjustments without loosening the knob.

- Thread the microphone onto the stand.
- Before tightening the adjustment knob, adjust the stand height and position as necessary.
- Tighten the adjustment knob to lock the microphone in place. Do NOT use tools or over tighten.
Specifications
Type
Dynamic (moving coil)
Frequency Response
20 to 10,000 Hz
Polar Pattern
Supercardioid
Output Impedance
45 Ω
Sensitivity
at 1kHz, open circuit voltage
-64 dBV/Pa(0.6 mV) [1]
Maximum SPL
1 kHz at 1% THD, 1 kΩ load 174 dB
Polarity
Positive pressure on diaphragm produces positive voltage on pin 2 with respect to pin 3
Weight
0.605 kg(1.35 lbs)
Connector
Three-pin professional audio (XLR), male, balanced
[1] 1 Pa=94 dB SPL
Typical Frequency Response

Typical Polar Patterns

Accessories
Furnished Accessories
| 5/8" to 3/8" (Euro) Threaded Adapter | 95A2050 |
| Storage Bag | 95A2324 |
Replacement Parts
| Cartridge for BETA52 and BETA52A | R175 |
| Grille for BETA52A | RK321 |
| Plug (Connector) Assembly | 90J1984 |

Documents / ResourcesDownload manual
Here you can download full pdf version of manual, it may contain additional safety instructions, warranty information, FCC rules, etc.
Advertisement
Thank you! Your question has been received!


Need Assistance?
Do you have a question about the BETA52A that isn't answered in the manual? Leave your question here.