Sennheiser HDV 820 - Digital Headphone Amplifier Manual
- Quick manual (4 pages) ,
- Instruction manual (29 pages) ,
- Instruction manual (28 pages)
Advertisement
- 1 Your Device
- 2 Package contents
- 3 Product overview
- 4 Putting the device into operation
- 5 Using the Device
- 6 Cleaning and maintaining the Device
- 7 Installing firmware updates
- 8 If a problem occurs
- 9 Specifications
- 10 Documents / Resources
Your Device
The HDV 820 headphone amplifier is the result of our many years of audio expertise and the perfect complement to high-end audiophile headphones of the Sennheiser brand for the ultimate in sound quality and performance. The HDV 820 offers consistently symmetrical signal processing and extremely low harmonic distortion to ensure unadulterated and perfect music enjoyment. Designed in Germany, the HDV 820 convinces with its black design and incredible precision and sound quality. The amplifier is manufactured by a team of experts at our factory specialized in headphones and audiophile products in Tullamore, Ireland.
The HDV 820 is equipped with a high-resolution ESS SABRE32 DAC (digital-to-analog converter) that has a resolution of 32 bits and a sampling rate of up to 384 kHz. The amplifier can also process DSD256 files with a frequency of up to 12.3 MHz and features various audio inputs and outputs, allowing you to choose the optimum connection for your audio devices and headphones. The HDV 820 reproduces both digital and analog audio sources with superb sound quality.
Fittingly for a product that gives such an incredibly pure sound experience, the HDV 820 also inspires by its design. With its black anodized housing and white LEDs, the HDV 820 perfectly matches Sennheiser's HD 800 S flagship high-end headphones to deliver the ultimate audiophile listening experience.
Features
- Symmetrical signal processing with exact signal transmission over the entire frequency spectrum and extremely low harmonic distortion
- Dynamic range of more than 120 dB, wide bandwidth and high transient response due to short signal paths
- Outstanding ESS SABRE32 DAC (digital-analog converter) with a resolution of 32 bits and a sampling rate of up to 384 kHz
- Automatic adjustment of the sampling rate (44.1 kHz to 384 kHz)
- USB Audio (up to 32 bits/384 kHz and up to DSD256)
- Can be used with up to four dynamic headphones
- balanced headphone sockets (2 x 4.4 mm jack socket, 1 x XLR4 socket)
- High-quality XLR-3/¼" (6.35 mm) jack combo socket for connection of unbalanced headphones
- High flexibility due to different connection possibilities:
- Digital inputs: S/PDIF coaxial/optical, USB
- Analog inputs: balanced XLR-3, unbalanced RCA
- Analog output: balanced XLR-3, level adjustable (for connection of active loudspeakers or a power amplifier)
- Developed in Germany and manufactured in Ireland
Package contents

 A list of accessories can be found on the HDV 820 product page at www.sennheiser-hearing.com. Contact your local Sonova Consumer Hearing partner: www.sennheiser-hearing.com/service-support
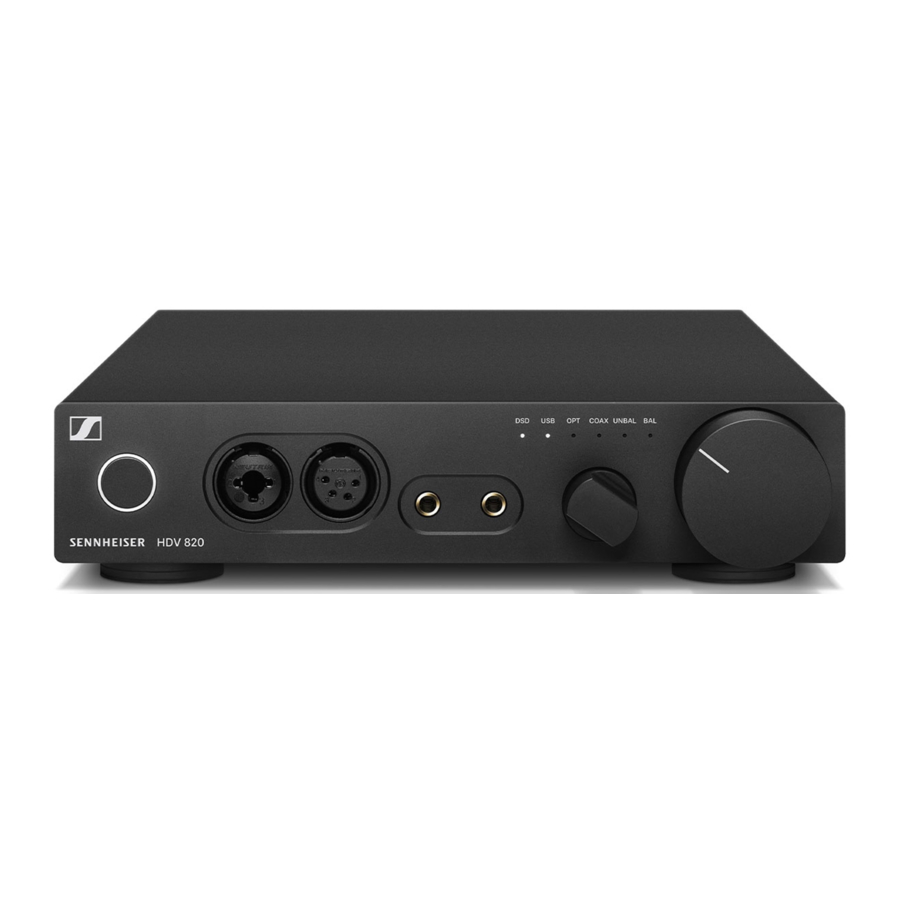
Product overview
Overview of the front panel

- On/off button with LED
- Headphone output, XLR-3/¼" (6.35 mm) jack combo socket, unbalanced
- Headphone output, XLR-4 socket, balanced
- Headphone outputs, 4.4 mm jack socket, balanced
- DSD reproduction LED
- Input selection LED
- Input selection rotary switch
- Volume rotary switch
- Type plate (bottom)
Overview of the rear panel

- XLR-3 input socket, balanced (BAL R, L)
- Rotary switches Input gain rotary switch (–GAIN+) for RCA input
- RCA input socket, unbalanced (UNBAL L, R)
- S/PDIF input, optical (OPT)
- S/PDIF input, coaxial (COAX)
- USB input, type B (USB)
- XLR-3 output socket, balanced (BAL R, L)
- IEC mains socket ~100-240 VAC 50/60 Hz
Putting the device into operation
Setting up the unit

Risk of staining of furniture surfaces!
Varnish or furniture polish may degrade the feet of the product, which could stain your furniture.
- Do not place the product on delicate surfaces; if necessary, use a non-slip pad under the product.
- Place the headphone amplifier on a flat, horizontal and low-vibration surface.
- Ensure circulating ventilation. The product generates heat which is dissipated through the housing.
Connecting the unit to audio sources
You can connect several audio sources to the headphone amplifie r and switch between these connected sources using the Input selection rotary switch.
- Switch your audio sources off before connecting the headphone amplifier.
- Select a suitable high-quality connection cable for your audio source. For an optimal listening experience, we recommend using cables with a length of 3 m.
- To connect the headphone amplifier to your audio source, refer to the connection diagram suitable for your audio source (see the following chapters):
| Connection possibility of the audio source (OUT) | Connection cable | |
 | USB | USB 2.0 certified cable with Type A and Type B connector |
| Optical (OPT) | Optical cable | |
| Coaxial (COAX) | Coaxial cable (75 Ω) | |
 | RCA (UNBAL) | Stereo audio cable with 2 RCA connectors at each end |
| XLR-3 (BAL) | 2 balanced XLR-3 cables | |
Connection possibility of the audio source: digital, USB connection

Connection cable: USB 2.0 certified cable with type B connetor for connection to the headphone amplifier.
For best signal transmission and audio quality, use a USB OTG cable (USB On-the-Go; available from your specialist dealer) to connect your mobile HiRes audio player or smartphone.
Requirements for digital connections
The digital audio inputs DIGITAL IN (OPT or COAX) can receive digital audio signals in PCM format (supported sampling rates: optical: up to 96 kHz, coaxial: up to 192 kHz).
Information on how to set the audio signal of the connected device to PCM can be found in the Sound or Settings menu or in the instruction manual of your device.
If an incompatible digital audio signal is being received, the Input selection LED (OPT or COAX) lights up white and the DSD reproduction LED flashes white. Music cannot be reproduced.

* The appearance of the Sound menu can vary depending on the device you are using
Connection possibility of the audio source: digital, coaxial connection

Connection cable: coaxial cable (75 Ω)
Connection possibility of the audio source: digital, optical connection

Connection cable: optical cable
Connection possibility of the audio source: analog, RCA, unbalanced

Connection cable: stereo audio cable with 2 RCA connectors at each end
Connection possibility of the audio source: analog, XLR-3, balanced

Connection cable: 2 balanced XLR-3 cables
Using the unit connected to a Mac/PC
You can connect the HDV 820 via USB directly to your Mac or PC and use it as an audio output device. Depending on the driver and settings used, high-resolution music files can be reproduced via the high-quality DAC (digital-to-analog converter) of the HDV 820.
Notes on DSD reproduction
If you are using your Mac or PC for native reproduction of DSD music files, the DSD reproduction LED on the headphone amplifier lights up, indicating the DSD mode of the DAC.

Information on the possible configuration options for your Mac or PC for native reproduction of DSD music files using thirdparty software can be found on the HDV 820 product page or at www.sennheiser-hearing.com/download.
Apple OS X operating system
For an Apple Mac OS X operating system from version 10.6 onwards, you do not have to install a driver. The HDV 820 is recognized automatically.
- From the System Preferences, select "Sound" and then select "Sennheiser HDV 820" as the default audio output device.

- Open the "Audio Midi Setup" utility program and select "Sennheiser HDV 820" from the left-side column.

- From the drop-down menu, select "Use this device for sound output".
- In the device settings, select the maximum sample rate from the "Format" drop-down list. Select "384000 Hz" for the best possible sound quality.


Microsoft Windows operating system
If you use a Microsoft Windows operating system, you have to install USB Audio drivers that come with the "HDV 820 USB Audio Software Package". After installation of the drivers, the HDV 820 is recognized automatically.
System requirements
- Intel Core 2 processor with 1.6 GHz (minimum) or similar processor
- 2 GB RAM (minimum)
- Microsoft Windows 7/8/8.1/10/11 operating system (32 or 64 bit)
- HDV 820 USB Audio Software Package
The software package contains the following components:
- WDM USB audio driver
- ASIO USB audio driver
- Control Panel
- HDV 820 Updater
Notes on the USB audio modes
If you use standard software (e.g. Windows Media Player or Apple iTunes), the best possible transmission mode is limited by the operating system (the played music file is mixed with System Sounds and adapted to the sample rate and bit depth set for the WDM driver).
For native reproduction of high-resolution files (without driverinduced adaptation of sample rate and bit depth; 32 bits/up to 384 kHz or DSD files), you require an ASIO driver and special thirdparty software, which transmits the music file natively from the player software to the DAC of the HDV 820.
Example: Microsoft Windows 10
To install the "HDV 820 USB Audio Software Package" and to set the HDV 820 as the default audio output device:
- Install the "HDV 820 USB Audio Software Package". The software package can be the Internet at www.sennheiser-hearing.com/download or be obtained from your Sonova Consumer Hearing partner. You need administrator rights for installation.
- Open the Control Panel and select "Sound"

The "Sound" window opens. - Select "HDV 820" as the default audio output device.

- Click on "Properties" and, in the "Advanced" tab, select the maximum sample rate from the "Default Format" drop-down list. Select "2 channel, 32 bits, 192000 Hz (studio quality)" for the best possible sound quality.

- Click on "OK" to apply the settings.


Using the Sennheiser Control Panel
The Control Panel allows you to configure the HDV 820 for the reproduction of high-resolution music files and to monitor the current operating state.
| Tab | Control Panel view | Display/Setting option |
| Status |  | USB Audio device Currently connected and used device. If several devices are connected simultaneously, you can select the desired device here. |
| Current sample rate PCM: 44100, 48000, 88200, 96000, 176400, 192000, 352800, 384000 Hz DSD: 2822400, 5644800, 11289600 Hz | ||
| Buffer settings |  | USB streaming mode The buffer of the USB streaming mode controls the latency of the music signal from the file source (PC client) and the DAC (HDV 820). The lower the latency, the more CPU power the PC client has to allocate to this process. Recommended setting: "Reliable". |
| ASIO buffer size The ASIO buffer size controls the data transfer between the driver and the playback software. The ASIO buffer size depends on the buffer of the USB streaming mode. Recommended setting: "Auto". | ||
| Client information |  | Current state Information on the PC client on which the Control Panel is installed and on the streaming state ("Active" or "Stopped"). The type of driver used is displayed via the number of active WDM or ASIO clients. |
| Information |  | Device information/Driver information Information on the currently connected device and the driver. |
Connecting the unit to a power amplifier or to active loudspeakers
You can use the headphone amplifier as a preamplifier and connect it to a power amplifier or to active loudspeakers using analog XLR- 3 cables. The output level can be adjusted via the Volume rotary switch.

Connection cable: 2 balanced XLR-3 cables
- Switch your audio devices off before connecting the headphone amplifier. Connecting the headphone amplifier to the power supply system
Connecting the unit to the power supply system
Danger of damage to the product!
If you connect to an unsuitable power supply, the product can be damaged.
- Use a suitable power cable (supplied) to connect the product to the power supply system (100 to 240 V AC, 50 or 60 Hz).
- Connect a suitable power cable (supplied) to the IEC mains socket and a wall socket.


To completely disconnect the headphone amplifier from the power supply system:
- Unplug the power supply unit from the wall socket.
Using the Device
Switching the unit on/off

Danger of hearing damage!
Listening at high volume levels for long periods of time can lead to permanent hearing defects.
- Before putting your headphones on, adjust the volume to a low level.
- Do not continuously expose yourself to high volume levels.
To switch the HDV 820 on:
- Press the on/off button.
When the headphone amplifier is switched on, the on/off button is backlit in white
![]()

To switch the HDV 820 off after use:
- Press the on/off button.
The headphone amplifier and all LEDs go off.
![]()

To completely disconnect the HDV 820 from the power supply system:
- Unplug the power plug from the wall socket,
Connecting headphones
The HDV 820 features a total of 4 headphone sockets for dynamic headphones:
- 1 unbalanced XLR-3/¼" (6.35 mm) jack combo socket
- 1 balanced XLR-4 socket
- 2 balanced 4.4 mm jack sockets
The volume setting and the settings of the audio source apply to all headphones. For an optimal listening experience, we recommend using high-impedance headphones and cables with a length of 3 m.
- Connect one or several pairs of headphones.


Selecting the audio source

Danger of hearing damage!
Before switching to a different audio source, first set the volume on the headphone amplifier to a low level. Different audio sources and different listening material (e.g. different pieces of music on different CDs/sound carriers) can have widely varying signal levels. In the case where you switch to a higher level audio source from a lower one without first reducing the volume level this can lead to high volume levels in the headphones and could damage your hearing.
- Set the volume on the headphone amplifier to a low level before switching to a different audio source.
- Use the Input selection rotary switch to select your connected audio source.
The Input selection LED lights up white, indicating the selected audio source.


| Selection | Selected audio source on the headphone amplifier |
| USB | USB (digital), the DSD reproduction LED might also light up white |
| OPT | Optical (digital) |
| COAX | Coaxial (digital) |
| UNBAL | RCA (analog) |
| BAL | XLR-3 (analog) |
Adjusting the signal level of the RCA input (UNBAL)
In order to optimally set the gain of the headphone amplifier, you ca n use the input gain rotary switch to adjust the signal level of the RCA input (UNBAL).
- Turn the input gain rotary switch (– GAIN +) towards the
+ sign: if the signal is too low or
– sign: if the signal is overmodulated.


Adjusting the volume
Danger of hearing damage!
Listening at high volume levels for long periods of time can lead to permanent hearing defects.
- Before putting your headphones on, adjust the volume to a low level.
- Do not continuously expose yourself to high volume levels.
- Use the volume control to adjust the desired volume.


The volume setting applies to the headphone connections and the audio outputs (ANALOG OUT). If you have connected several identical headphones to the headphone amplifier, the volume setting applies to all headphones.
Cleaning and maintaining the Device

Liquids can damage the electronics of the product!
Liquids entering the housing of the product can cause a short-circuit and damage the electronics.
- Keep all liquids far away from the product.
![]()
- Do not use any solvents or cleansing agents

- Disconnect the product from the power supply system before cleaning.
- Clean the product with a soft, dry cloth (supplied).
Installing firmware updates
The DAC (digital-to-analog converter) firmware can be updated using the free of charge "Sennheiser HDV 820 Updater" program.
The program can be the Internet at www.sennheiser-hearing.com/download or be obtained from your Sonova Consumer Hearing partner. The program is available for Windows and Mac operating systems.
- Make sure that the HDV 820 is connected to your Mac or PC via USB and that it is switched on.
- From Windows or MacOS, start the "Sennheiser HDV 820 Updater" program and follow the instructions on the screen.
- The program automatically checks if the new DAC firmware is compatible with your HDV 820. If this is the case, the program guides you through the installation steps and then confirms successful installation.
![]()

If a problem occurs
| Problem | Possible cause | Corrective action |
| No audio signal | The HDV 820 is switched off | Switch the HDV 820 on. |
| The Input selection rotary switch is set to a different audio source | Set the INPUT rotary switch to the desired audio source. | |
| The Input selection rotary switch is between two positions | Set the Input selection rotary switch to one of the two inputs. | |
| The volume is adjusted to low | Increase the volume. | |
| No sound when the digital input (OPT or COAX) is selected | The data format of the digital audio source is not PCM | Set the audio source to PCM data format. |
| The audio signal is very low or distorted when an analog audio source is connected | The volume of the audio signal on the audio source is adjusted too low or too high | If possible, adjust the volume of the audio signal on the audio source to a medium level. |
| The signal level of the audio input is adjusted too low/too high | Increase or reduce the signal level of the ANALOG IN UNBAL audio input. | |
| Audio signal only on one ear | The analog audio cable is not properly connected | Properly connect the audio cable to the playback device. |
| The headphone plug is not properly connected | Properly connect the headphones to the headphone amplifier. | |
| The PC does not recognize the HDV 820 as the audio output device | No driver is installed | Install the USB Audio driver. |
| No audio signal when the HDV 820 is connected to a PC or Mac via USB | Another audio output device is selected on the PC or Mac | Select "Sennheiser HDV 820" as the audio output device. |
| Sound dropouts when connected via USB | The USB cable is not properly shielded | Use a USB cable that is at least USB 2.0 certified. |
If a problem occurs that is not listed in the above table or if the problem cannot be solved with the proposed solutions, please contact your Sonova Consumer Hearing partner for assistance.
To find a partner in your country, search at www.sennheiser-hearing.com/service-support.
Specifications


Documents / Resources
References

Download manual
Here you can download full pdf version of manual, it may contain additional safety instructions, warranty information, FCC rules, etc.
Download Sennheiser HDV 820 - Digital Headphone Amplifier Manual
Advertisement
Thank you! Your question has been received!


Need Assistance?
Do you have a question about the HDV 820 that isn't answered in the manual? Leave your question here.