Sennheiser HDVA 600 - Pure Audio in Perfection Manual
- Product sheet (2 pages) ,
- Instruction manual (18 pages)
Advertisement
The HDVA 600 headphone amplifier
The state-of-the-art HDVA 600 headphone amplifier allows you to fully exploit the potential of your high-end headphones. The HDVA 600's consistently symmetrical signal processing and extremely low harmonic distortion ensures an unadulterated and perfect music enjoyment.
The HDVA 600's output circuitry is designed for use with up to four dynamic headphones. Consistent wiring and the use of XLR-4 sockets ensures an excellent channel separation.
You can connect digital audio sources such as CD, DVD and Blu-Rayplayers and analog audio sources such as as tuners, open reel machines and turntables with a corresponding preamplifier to the HDVA 600. Digital sources are connected via their analog outputs. The input selection rotary switch allows you to switch between the connected audio sources.
The headphone amplifier and the Sennheiser HD 800, HD 700 and HD 650 high-end headphones are optimally matched with regard to technology, design and performance characteristics and fulfil the demands of the most discerning audiophile.
Features
- Symmetrical signal processing with exact signal transmission over the entire frequency spectrum and extremely low harmonic distortion
- Can be used with up to four dynamic headphones
- 122 dB dynamic range, wide bandwidth and high transient response due to short signal paths
- Balanced XLR-4 sockets and high-quality ¼" (6.35 mm) jack sockets for connection of headphones
- Connection possibilities:
- analog inputs: balanced XLR-3, unbalanced RCA
- analog output: balanced XLR-3
- High-quality components
Package contents
 | 1 HDVA 600 analog headphone amplifier |
 | 1 quick guide |
 | 1 safety guide |
 | 1 CD ROM with a detailed instruction manual as PDF |
Required accessories

A suitable and approved mains cable is available from your Sennheiser service partner.
 A list of accessories can be found on the HDVA 600 product page at www.sennheiser.com. For information on suppliers, contact your local Sennheiser partner: www.sennheiser.com > "Service & Support".
Product overview
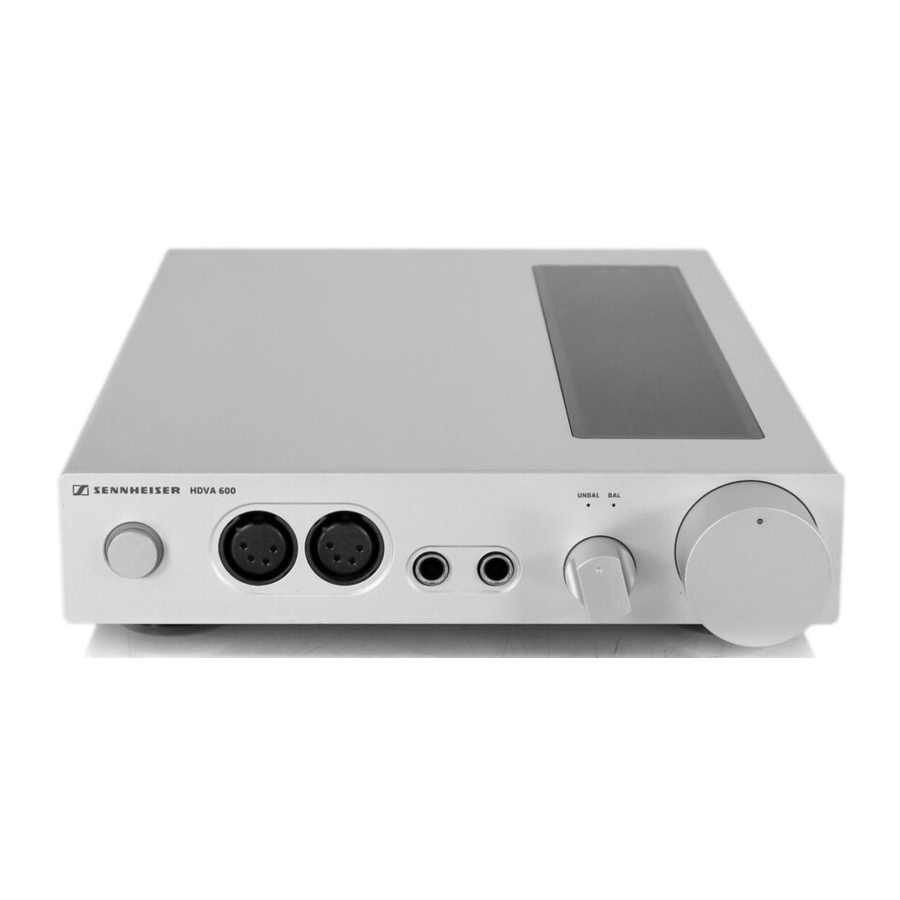
Overview of the front panel

- On/off button
- Headphone outputs, XLR-4 socket, balanced
- Headphone outputs, ¼" (6.35 mm) jack socket, unbalanced
- Input selection LED
- Input selection rotary switch
- Volume control
Overview of the rear panel

- XLR-3 input socket, balanced (BAL L, R)
- Input attenuation rotary switch (-GAIN+) for RCA input
- RCA input socket, unbalanced (UNBAL L, R)
- XLR-3 output socket, balanced (BAL L, R)
- Mains socket
The type plate and the electrical data can be found on the base of the product.
Putting the HDVA 600 into operation
Setting up the headphone amplifier

Risk of staining of furniture surfaces!
Varnish or furniture polish may degrade the feet of the product, which could stain your furniture.
- Do not place the product on delicate surfaces; if necessary, use a nonslip pad under the product.
- Place the headphone amplifier on a flat, horizontal surface.
- Ensure sufficient ventilation. The headphone amplifier generates heat which is dissipated through the housing.
Connecting the headphone amplifier to audio sources
You can connect several audio sources to the headphone amplifier and switch between these connected sources using the input selection rotary switch.
- Switch your audio source off.
- Select a suitable high-quality connection cable for your audio source and, if necessary, a suitable adapter. Please observe the maximum recommended cable length L max.
| Connection possibilities of the audio source (OUT) | Connection cable/adapter | L max | |
 | XLR-3 (analog) | 2 balanced XLR-3 cables | 10 m |
 | RCA (analog) | Stereo audio cable with 2 RCA plugs on each end | 1 m |
- Proceed as described in the corresponding chapter.
- Connection possibility of the audio source: analog, balanced (XLR-3)
Connection cable: 2 balanced XLR-3 cables

- Connection possibility of the audio source: analog, unbalanced (RCA)
Connection cable: Stereo audio cable with 2 RCA plugs on each end


Integrating the headphone amplifier into an existing connection between devices (daisy-chaining the audio signal)
You can integrate the HDVA 600 into an existing connection between your audio source and an additional device. By way of example of an amplifier as an additional device, this chapter describes how to integrate the HDVA 600 into an existing connection.
- Pull out the plug of the connection cable from the input IN on the amplifier.
- Connect this plug to a suitable input IN on the HDVA 600.
![]()
- Connect a second connection cable to the input IN on the amplifier and to the output OUT on the HDVA 600.

- Use the input selection rotary switch to select the corresponding audio source.


Connecting the headphone amplifier to the mains
Danger of damage to the product!
If you use an unsuitable power supply, this can cause damage to the product.
- Use a suitable mains cable to connect the product to the mains (100 to 240 V AC, 50 or 60 Hz).
- Connect the mains cable to the mains socket and a wall socket.
To disconnect the headphone amplifier from the mains:
- Unplug the mains cable from the wall socket.
![]()

Using the HDVA 600
Switching the HDVA 600 on/off

Hearing damage due to high volumes!
Listening at high volume levels for long periods can lead to permanent hearing defects.
- Set the volume to a low level before putting on the headphones.
- Do not continuously expose yourself to high volumes.
- Press the on/off button.
When the headphone amplifier is switched on, the on/off button is backlit. When you switch off the headphone amplifier, the backlighting of the on/off button goes off.


Connecting headphones
The HDVA 600 features 2 balanced XLR-4 sockets and 2 unbalanced ¼" (6.35 mm) jack sockets for connecting up to 4 headphones. We recommend using high-impedance headphones for an optimal listening experience.
- Connect one or several pairs of headphones.


Selecting an audio source
Danger of hearing damage!
In order to protect your hearing, before switching to a different audio source, first set the volume on the headphone amplifier to a low level. Different signal sources and different listening material (e.g. different pieces of music on different CDs) can have widely varying signal levels. In the case where you switch to a higher level signal source from a lower one without first reducing the volume level this can lead to high volume levels in the headphones and could damage your hearing.
- Set the volume on the headphone amplifier to a low level before switching to a different audio source.
- Use the input selection rotary switch to select your connected audio source.

Switch position Selected input on the headphone amplifier UNBAL
![]()
RCA (analog) BAL
![]()
XLR-3 (analog)


Adjusting the signal level of the RCA input
In order to optimally set the gain of the headphone amplifier, you can use the input attenuation rotary switch (-GAIN+) to adjust the signal level of the RCA input.
- Turn the input attenuation rotary switch (-GAIN+) towards the
+ sign: if the signal is too low or
- sign: if the signal is overmodulated.


Adjusting the volume
- Use the volume control to adjust the volume.


Cleaning and maintaining the HDVA 600
Liquids can damage the electronics of the product!
Liquids entering the housing of the device can cause a short circuit and damage the electronics.
- Keep all liquids far away from the product.
- Do not use any cleansing agents or solvents.
- Disconnect the product from the mains before cleaning.
- Only use a dry and soft cloth to clean the product.
If a problem occurs...
| Problem | Possible cause | Solution |
RCA input: signal distorted or too low | The sensitivity is adjusted too high or too low | Adjust the signal of the analog audio source. |
Analog XLR-3 input: signal distorted or too low | The audio signal is adjusted too high or too low at the audio source | Adjust the audio signal directly at the audio source. |
If a problem occurs that is not listed in the above table or if the problem cannot be solved with the proposed solutions, please contact your local Sennheiser partner for assistance.
To find a Sennheiser partner in your country, search at www.sennheiser.com > "Service & Support".
Specifications


Documents / Resources
References

Download manual
Here you can download full pdf version of manual, it may contain additional safety instructions, warranty information, FCC rules, etc.
Download Sennheiser HDVA 600 - Pure Audio in Perfection Manual
Advertisement
Thank you! Your question has been received!


Need Assistance?
Do you have a question about the HDVA 600 that isn't answered in the manual? Leave your question here.