Table of Contents
Advertisement
Advertisement
Table of Contents

Related Manuals for Sennheiser HDV 820


Summary of Contents for Sennheiser HDV 820
- Page 1 HDV 820 Digital headphone amplifier Instruction manual HDV 820 | 1...
-
Page 2: Table Of Contents
Product overview ................8 Overview of the front panel ............8 Overview of the rear panel .............. 8 Putting the HDV 820 into operation ..........9 Setting up the headphone amplifier ..........9 Connecting the headphone amplifier to audio sources ....9 Using the headphone amplifier connected to a Mac/PC ... -
Page 3: Important Safety Instructions
16. To completely disconnect this product from the AC mains, dis- connect the power supply cord plug from the AC receptacle. 17. The plug of the power supply cord shall remain readily accessible. HDV 820 | 3... - Page 4 We therefore recommend using special software for secure deletion of data to ensure that personal data is not misused. We recommend backing up the data saved on your flash drive regu- larly. Sennheiser does not accept liability for damage or loss of data. 4 | HDV 820...
- Page 5 It is considered improper use when this product is used for any appli- cation not named in this instruction manual. Sennheiser is not liable for damages to USB devices that are not con- sistent with the USB specifications. Sennheiser does not accept liability for damage arising from abuse or misuse of this product and its attachments/accessories.
-
Page 6: The Hve 820 Headphone Amplifier
Fittingly for a product that gives such an incredibly pure sound experience, the HDV 820 also inspires by its design. With its black anodized housing and white LEDs, the HDV 820 perfectly matches Sennheiser's HD 800 S flagship high-end headphones to deliver the ultimate audiophile listening experience. -
Page 7: Package Contents
USB flash drive (SD-U16L version) with instruction manual (as PDF file) and driver software for Microsoft Windows operating systems A list of accessories can be found on the HDV 820 product page at www.sennheiser.com. Contact your local Sennheiser partner: www.sennheiser.com > “Sales Partner”. -
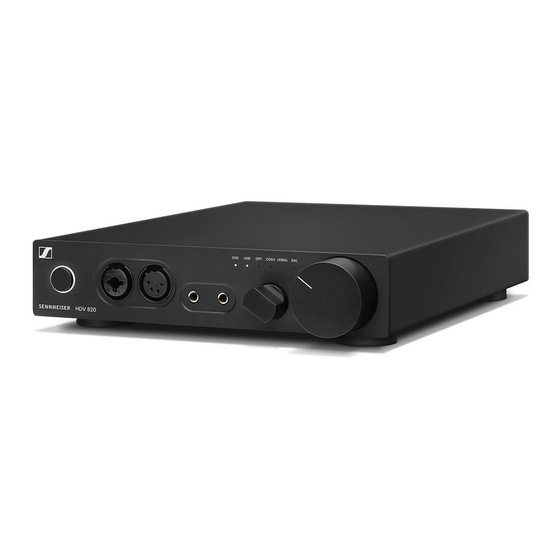
Page 8: Product Overview
S/PDIF input, (–GAIN+) for RCA input coaxial (COAX) USB input, RCA input socket, unbalanced (UNBAL L, R) Type B (USB) XLR-3 output socket, balanced (BAL R, L) IEC mains socket ~100-240 VAC 50/60 Hz 8 | HDV 820... -
Page 9: Putting The Hdv 820 Into Operation
▷ Select a suitable high-quality connection cable for your audio source. For an optimal listening experience, Sennheiser recom- mends using cables with a length of 3 m. ▷ To connect the headphone amplifier to your audio source, refer to... - Page 10 Putting the HDV 820 into operation Connection possibility of the audio source: digital, USB connection UNBAL COAX - GAIN + ANALOG IN DIGITAL IN ANALOG OUT Connection cable: USB 2.0 certified cable with Type B connector for connection to the headphone amplifier ▷...
- Page 11 Putting the HDV 820 into operation Connection possibility of the audio source: digital, coaxial connection COAX UNBAL COAX - GAIN + ANALOG IN DIGITAL IN ANALOG OUT Ω Connection cable: coaxial cable (75 Connection possibility of the audio source: digital, ...
-
Page 12: Using The Headphone Amplifier Connected To A Mac/Pc
Using the headphone amplifier connected to a Mac/PC You can connect the HDV 820 via USB (see page 10) directly to your Mac or PC and use it as an audio output device. Depending on the driver and settings used, high-resolution music files can be repro- duced via the high-quality DAC (digital-to-analog converter) of the HDV 820. - Page 13 Putting the HDV 820 into operation Apple OS X operating system For an Apple Mac OS X operating system from version 10.6 onwards, you do not have to install a driver. The HDV 820 is recognized auto- matically. ▷ From the System Preferences, select “Sound” and then select “Sennheiser HDV 820”...
- Page 14 32 bits/up to 384 kHz or DSD files), you require an ASIO driver and special third- party software, which transmits the music file natively from the player software to the DAC of the HDV 820 (see page 12). 14 | HDV 820...
- Page 15 Putting the HDV 820 into operation Example: Microsoft Windows 10 To install the “HDV 820 USB Audio Software Package” and to set the HDV 820 as the default audio output device: ▷ Install the “HDV 820 USB Audio Software Package” from the USB flash drive (supplied).
- Page 16 Putting the HDV 820 into operation Using the Sennheiser Control Panel The Control Panel allows you to configure the HDV 820 for the repro- duction of high-resolution music files and to monitor the current operating state. Display/Setting option Control Panel view USB Audio device Currently connected and used device.
-
Page 17: Connecting The Headphone Amplifier To A Power Amplifier Or To Active Loudspeakers
Putting the HDV 820 into operation Connecting the headphone amplifier to a power amplifier or to active loudspeakers You can use the headphone amplifier as a preamplifier and connect it to a power amplifier or to active loudspeakers using analog XLR-3 cables. -
Page 18: Connecting The Headphone Amplifier To The Power Supply System
Putting the HDV 820 into operation Connecting the headphone amplifier to the power supply system CAUTION Danger of damage to the product! If you connect to an unsuitable power supply, the product can be damaged. ▷ Use a suitable power cable (supplied) to connect the product to the power supply system (100 to 240 V AC, 50 or 60 Hz). -
Page 19: Using The Hdv 820
To switch the HDV 820 off after use: ▷ Press the on/off button. The headphone amplifier and all LEDs go off. To completely disconnect the HDV 820 from the power supply sys- tem: ▷ Unplug the power plug from the wall socket,... -
Page 20: Connecting Headphones
Using the HDV 820 Connecting headphones The HDV 820 features a total of 4 headphone sockets for dynamic headphones: • 1 unbalanced XLR-3/¼" (6.35 mm) jack combo socket • 1 balanced XLR-4 socket • 2 balanced 4.4 mm Pentaconn jack sockets The volume setting and the settings of the audio source apply to all headphones. -
Page 21: Selecting The Audio Source
Using the HDV 820 Selecting the audio source WARNING Danger of hearing damage! Before switching to a different audio source, first set the volume on the headphone amplifier to a low level. Different audio sources and different listening material (e.g. different pieces of music on different CDs/sound carriers) can have widely varying signal levels. -
Page 22: Adjusting The Signal Level Of The Rca Input (Unbal)
Using the HDV 820 Adjusting the signal level of the RCA input (UNBAL) In order to optimally set the gain of the headphone amplifier, you can use the input gain rotary switch to adjust the signal level of the RCA input (UNBAL). -
Page 23: Cleaning And Maintaining The Hdv 820
The program is available for Windows and Mac operating systems. ▷ Make sure that the HDV 820 is connected to your Mac or PC via USB and that it is switched on. ▷ From Windows or MacOS, start the “Sennheiser HDV 820 Updater”... -
Page 24: If A Problem Occurs
If a problem occurs that is not listed in the above table or if the problem cannot be solved with the pro- posed solutions, please contact your Sennheiser partner for assistance. To find a Sennheiser partner in your country, search at www.sennheiser.com > “Service & Support”. 24 | HDV 820... -
Page 25: Specifications
Max. input level 18 dBV Ω Input impedance 20 k Analog input UNBAL (RCA) Max. input level 20 dBV (with minimum amplification GAIN) Ω Input resistance 10 k Digital inputs COAX/OPT (coaxial/optical) Standard S/PDIF Supported data streams HDV 820 | 25... - Page 26 Ω Impedance min. 16 Headphone output (XLR-4) Pin assignment 0: Chassis 1: L+ 2: L− 3: R+ 4: R− Impedance Ω min. 16 Headphone outputs (Pentaconn, 4.4 mm) Pin assignment L– R– Impedance Ω min. 16 26 | HDV 820...
-
Page 27: Manufacturer Declarations
Manufacturer Declarations Manufacturer Declarations Warranty Sennheiser electronic GmbH & Co. KG gives a warranty of 24 months on this product. For the current warranty conditions, please visit our website at www.sennheiser.com or contact your Sennheiser partner. FOR AUSTRALIA ONLY Sennheiser’s goods come with guarantees that cannot be excluded under the Australian Consumer Law. - Page 28 Changes or modifications made to this equipment not expressly approved by Sennheiser electronic Corp. may void FCC authorization to operate this equipment. Cet appareil est conforme à la Partie 15 des réglementations de la FCC.
- Page 29 Sennheiser electronic GmbH & Co. KG Am Labor 1, 30900 Wedemark, Germany www.sennheiser.com Publ. 08/17, 570794/A01...