TP-Link Tapo C125 - AI Home Security Wi-Fi Camera Manual
- User manual (28 pages) ,
- Quick start manual (67 pages) ,
- Quick start manual (23 pages)
Advertisement
Introduction
This guide provides a brief introduction to the AI Home Security Wi-Fi Camera and the Tapo app, as well as regulatory information.
Please note that features available in Tapo may vary by model and software version. Tapo availability may also vary by region. All images, steps, and descriptions in this guide are only examples and may not reflect your actual Tapo Camera experience.
Conventions
In this guide, the following convention is used:
| Convention | Description |
| Underline | Hyperlinks are in blue and underlined. You can click to redirect to a website. |
 Note: Note: | Ignoring this type of note might result in a malfunction or damage to the device. |
More Info
- Specifications can be found on the product page at https://www.tapo.com.
- Our Technical Support and troubleshooting information can be found at https://www.tapo.com/support/.
When you are away home, there are always something you care about. This is where the smart camera functions. No matter your child is climbing the kitchen cabinet, or the pet is stealing snacks, the AI Home Security Wi-Fi Camera helps you stay with them anytime, anywhere. Receive a notification whenever your camera detects motion and see a video clip of this motion to check everything.
- Smart AI Detection and Notification – Smart AI identifies people, pets, and vehicles while also recognizing abnormal sounds, notifying users as needed.
- 2K QHD* + AI Image Enhancement + HDR – Utilizing AI image enhancement technology, experience superior clarity even in low light or overexposed settings.
*Compatible with Alexa and Google Assistant supported displays. User experience is dependent on the connected device's specifications. - Physical Privacy Shutter – When enabled, maintain your privacy with the lens blocked by the privacy shutter.
- Two-Way Audio – Enables communication through a built-in microphone and speaker.
- Discreet Night Vision with 940nm IR LED – Enjoy unobtrusive night-time monitoring of your baby or pet with the barely-noticeable, low-intensity 940nm IR LED.
- Local* and Cloud** Storage Supported – Save recorded videos on the microSD card* (up to 512 GB) or by using Tapo Care cloud storage services.
*microSD card needs to be purchased separately. Actual storage capacity depends on the size of the microSD card used.
*Subscribe for cloud storage at https://www.tapo.com/tapocare/ - Customizable Alarm & Siren – Trigger the recorded audio as an alarm when motion is detected.
- Ultra-Wide 140°Field of View – Capture more views with an ultra-wide field of view.
- Magnetic Mounting – Effortlessly set up your Tapo C125 using its versatile magnetic base.
- Activity Zones – Notifies you when activity is detected in specific zones.
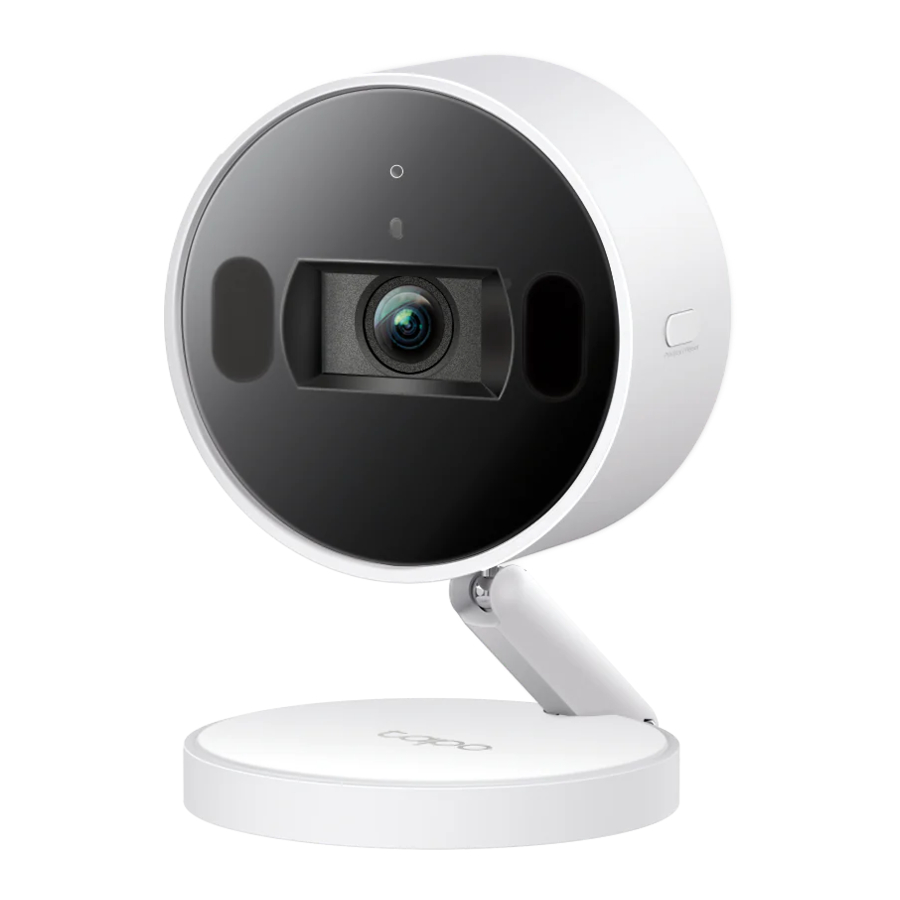
Appearance
Front

- Microphone
- System LED
- IR LEDs
- Lens
- Lens Cap
When Privacy Mode is on, the lens cap shuts to block the camera lens. Do not manually push the lens cap up to prevent scratches.
Back

- Speaker
- DC Power Connector
Side

microSD Card
Slot Insert a microSD card (not included) and initialize it on the Tapo app for local recording.
Adjust View
Tilt and rotate the camera and stand for your desired viewing angle.
Privacy / Reset Button
- Press once: Turn on/off Privacy Mode after setup.
- Press for 5s: Reset Wi-Fi settings only.
- Press for 10s: Reset to factory default settings.
System LED Indication
| Solid red | Starting up, video recording or live streaming |
| Blinking red and blue | Ready for setup |
| Blinking blue quickly | Connecting to Wi-Fi |
| Blinking red slowly | Connected to Wi-Fi |
| Solid blue | Connected to the cloud |
| Blinking red quickly | Camera updating or camera resetting |
Before You Start

Position your camera's adjustable stand for setup.

If the camera lens is hidden, do not manually push the lens cap up to prevent scratches.
Note: After setup, you can press the Privacy/Reset button once to turn off Privacy Mode and the camera lens will appear.
Set Up Your Camera
Follow the steps below to get started with your new camera.
Step 1. Download Tapo App
Get the Tapo app from the App Store or Google Play, or by scanning the QR code below.


OR


Step 2. Log In

Open the app, and log in with your TP-Link ID.
If you don't have an account, create one first.
Step 3. Add Your Camera

Tap the ![]() button in the app and search for your model. Follow the app instructions to
button in the app and search for your model. Follow the app instructions to
Set Up Using Amazon Frustration-Free Setup
What is Amazon Frustration-Free Setup?
Amazon Frustration-Free Setup can help connect and set up Tapo smart devices in fewer steps, without having to remember and re-enter your Wi-Fi password on each device.
To use this feature, confirm the following:
- The new Tapo device supports Amazon FFS.
- The new Tapo device is purchased from Amazon.
- You have an Amazon FFS enabled Alexa device or router.
- You have saved your Wi-Fi information to Amazon by using Alexa echo.
- Your Tapo device and router are on the same network as your Alexa echo.
LED Indications during Amazon Frustration-Free Setup
| LED | Status |
| Blinking red and blue | Ready for setup |
| Blinking blue | FFS setup in progress |
| Solid blue | Working properly |
If the LED does not turn solid blue after a long time, you can try to add the Tapo device manually. (Press the Reset button on your Tapo device once.
Then open the Tapo app, tap the + button on the page, select your device model, and follow the app instructions. )
How to use Amazon Frustration-Free Setup with Tapo devices
- Open theAmazon Alexa app. Then tap More and select Skills & Games
![]()
- Enter Tapo in the search bar and choose Tapo.

- Tap the ENABLE TO USE button.
![]()
- Log in with your TP-Link ID that has bound to your Tapo device, and tap Authorize. After authorized successfully, the message Tapo has been successfully linked will come up.

- Plug in your Tapo device and the setup will complete automatically in two minutes.
For setting up more Tapo devices, just plug in and enjoy!


Done!
If this device displays on the Home page in the Tapo app, it indicates this device has been successfully associated with your Amazon account and joined your Wi-Fi network automatically.
If this device does not display on the Home page in the Tapo app, try setting it up manually. (Tap the + button on the page, select your device model, and then follow the app instructions.)
Set Up HomeKit
This is a HomeKit-enabled device. You can set up and easily control your Tapo devices with HomeKit from your iPhone or iPad.
Before You Start
- Your iPhone/iPad should be connected to a stable 2.4 GHz Wi-Fi network with internet access.
- Ensure your iPhone/iPad and Apple home hub (if any) are connected to the same Wi-Fi network.
- To control this HomeKit-enabled device, the latest iOS or iPadOS version is recommended.
- HomeKit will be disabled 10 minutes after the Tapo device is powered on. You can power off your Tapo device, then power it on and try again.
Set Up HomeKit
Option 1: Set Up in the Home App
- Find the QR code as below on your Tapo device or in its packaging.
![]()
- Open the Home app and add the accessory by scanning the HomeKit QR code or entering the provided numeric setup code.
- Follow the instructions in the Home app to complete setup.

Option 2: Set Up in the Tapo App
- Open the Tapo app. If you have set up the device, go to Device Settings > Add to Home.
- Find the QR code as below on your Tapo device or in its packaging.
![]()
- Follow the instructions in the Tapo app to complete setup.

To control a Tapo device in the Home app, we must follow Apple guidelines. As a result, some Tapo app features will be disabled.
To know about the disabled features in the Home app, refer to https://www.tp-link.com/support/faq/3653/ or scan the QR code:

Failed to Set Up HomeKit?
- Move your iPhone/iPad and the Tapo device closer to the router to get a stronger Wi-Fi signal.
- Factory reset the Tapo device and restart your phone. Then try again.
- Refer to the FAQ below for detailed instructions:https://www.tp-link.com/support/faq/3390/
![]()

Install Your Camera
When you finish adding your camera in the Tapo app, you can set it on a table or shelf. You can also mount it using its versatile magnetic base. Follow the steps below to install your new camera.
Option 1: Set on a table or shelf

- Place the camera on your desired table or shelf.
- Adjust the stand angle to the notch position in the base for more stability.
Option 2: Mount to metallic surfaces

The camera has a magnet in its base, allowing magnetic attachment to metallic surfaces.
Option 3: Stick to a clean wall
- Attach the included adhesive to the back of the metal plate properly.
![warning]() Note: The adhesive is for one-time use. Avoid re-using the adhesive to ensure its adhesion.
Note: The adhesive is for one-time use. Avoid re-using the adhesive to ensure its adhesion.
![]()
- Wipe off the dust from the surface, stick the metal plate with the adhesive to the clean wall, and press it down for 15 seconds to ensure the plate is firmly attached. Then attach the camera to the plate.

![warning]() Note: This is applicable with tile, glass, marble, metal, stainless steel, and hard wall surfaces.
Note: This is applicable with tile, glass, marble, metal, stainless steel, and hard wall surfaces.


Option 4. Mount to the wall
- Stick the mounting template to the desired mounting place. Drill two holes according to the template.
![]()
- Insert two anchors into the holes and use the screws to affix the metal plate over the anchors. Then attach the camera to the plate.


Documents / Resources
References
Tapo Smart | Smart Devices for Smart Living
Support | Tapo
Tapo Care | Tapo
![www.apple.com]() App Store - Apple
App Store - Apple![play.google.com]() Google Play
Google PlayWhat Camera Features Are Available in the Tapo and Home Apps | TP-Link
How to Troubleshoot when a TP-Link HomeKit-enabled device fails to add to Apple’s Home App
Download manual
Here you can download full pdf version of manual, it may contain additional safety instructions, warranty information, FCC rules, etc.
Download TP-Link Tapo C125 - AI Home Security Wi-Fi Camera Manual
Advertisement
Thank you! Your question has been received!


Need Assistance?
Do you have a question about the Tapo C125 that isn't answered in the manual? Leave your question here.