Table of Contents

Related Manuals for Polycom Horizon VVX-450


Summary of Contents for Polycom Horizon VVX-450
- Page 1 IT IT MOBILE TELEPHONY TELEMATICS Horizon VVX-450 Your How-To User Guide Work smarter achieve more • MOBILE • TELEPHONY • TELEMATICS phone: 0333 043 4000 email: support@communicatebetter.co.uk web: communicatebetter.co.uk...
-
Page 2: Table Of Contents
Contents Contents ............................2 Introduction ............................4 How to set up the Horizon VVX-450 ....................5 Phone Keys and Hardware ......................5 VVX-450 Hardware Features and descriptions ................6 Phone Icons and Status Indicators ....................7 Calls Actions ............................ 9 Place calls ............................ - Page 3 View the Contact Directory ......................17 Listen to Voicemail......................... 17 Enabling Wi-Fi functionality ......................22...
-
Page 4: Introduction
Introduction Horizon VVX-450 Guide This user guide will help you to navigate and use your VVX450 phone. It will give you an overview of your phone, and walk you through tasks so you can successfully use your phone to perform... -
Page 5: How To Set Up The Horizon Vvx-450
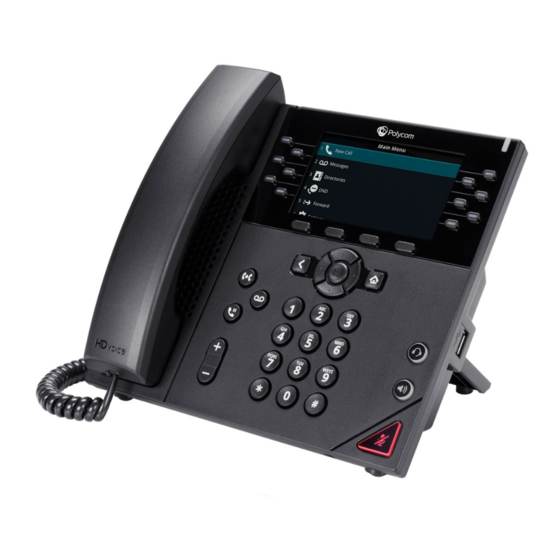
How to set up the Horizon VVX-450 The phone will arrive pre-configured and needs to be connected to the internet & powered up using Power over Ethernet (PoE) or via AC power supply. Phone Keys and Hardware The figure below shows the main phone keys and features. -
Page 6: Vvx-450 Hardware Features And Descriptions
VVX-450 Hardware Features and descriptions Reference Feature Feature Description Number Enable you to select a phone line, view calls on a Line keys line, or quickly call a favorite contact. Secures the handset in the cradle when your phone stand is positioned at a high angle. To secure the handset, remove the tab, reverse it so the protrusion Reversible tab points up, and re-insert it. -
Page 7: Phone Icons And Status Indicators
Phone Icons and Status Indicators Registered line Phone warning Unregistered line Login credentials invalid Outgoing call Shared line Held call Call forwarding enabled Incoming call Presence status (Available) Active conference Presence status (Busy or In a Call) Do Not Disturb enabled Presence status (Away) Favorite Presence status (Do Not Disturb) - Page 8 Received call Presence status (Offline) Missed call New message Wireless network...
-
Page 9: Calls Actions
Calls Actions Place calls • The VVX 450 phone can manage a maximum of three active, incoming, and held audio calls at a time. However, you can have only one active call in progress with numerous other incoming calls or calls on hold on all phones. 1. -
Page 10: Resume A Call
Resume a Call • You can view and resume all held calls on the phone. Do one of the following - • Select Resume. • From the Calls screen, select the call and select Resume. Ending Calls You can end active calls at any time, however, you must resume held calls before you can end the call. You can end an active call on your phone at any time. -
Page 11: Transfer A Call
Transfer a Call You can transfer a call to another contact and choose the transfer type you want to use for the call. Procedure 1. During a call, do one of the following • Press Transfer to use the default transfer type. •... -
Page 12: Managing Calls
Managing Calls Display Calls from the Lines Screen You can display the calls for each line from the Lines screen. When you select a phone line that has a held call, the first held call on that line is automatically resumed, even if you already have an active call on a different line. -
Page 13: Reject Incoming Calls
Reject Incoming Calls You can reject a call and send the call directly to voicemail. Rejected calls display in the Missed Calls list in your Recent Calls list. Rejecting calls is not available for shared lines. 1. From the Incoming Call screen, select Reject. Reject Calls from a Contact You can send incoming calls from a particular contact directly to your voicemail. -
Page 14: Call Forwarding
Call Forwarding You can forward an incoming call to a contact or forward all incoming calls to a contact. To forward an incoming call: 1. In the Incoming Call screen, select Forward. 2. From the Call Forwarding screen, enter the forwarding number, and select Forward. To forward all incoming calls: 1. -
Page 15: Audio Conference Calls
Audio Conference Calls The VVX450 phone can manage a maximum of three active or held conference calls at a time.. However, you can have only one active conference call in progress with numerous other conference calls on hold. Initiate a Conference Call You can initiate a conference call with up to two contacts. -
Page 16: End A Conference Call
End a Conference Call When you end a conference call, your connection to the call and all other participants will end 1. During a conference call, select End Call. Hold a Conference Call When you place a conference call on hold, you place all conference participants on hold. ... -
Page 17: Phone Actions
Phone Actions View the Contact Directory You can view and add contacts to the Contact Directory. To view the Contact Directory: From the Home screen, Directories > Contact Directory. Listen to Voicemail 1. Navigate to Messages. 2. Select Message Center. 3. - Page 18 Enabling Wi-Fi functionality for the Polycom VVX450 By default, the Polycom VVX450 is configured to connect via a wired connection. To enable the Wi-Fi functionality a USB Wi-Fi dongle needs to be connected to the device and the Wi-Fi option needs to be enabled from within the menu.
- Page 19 Entering the “Wi-Fi” menu option will present the current status, which as default will be “Off” To enable this functionality, navigate down to “On” and press the “Select” key Once this is selected, the phone will advise you that it requires a reboot, select “Cancel” to go back or “Yes”...
- Page 20 Once the device has started the above prompt will be displayed on screen, press “Start” to begin the setup. The ability to scan for a Wi-Fi network is presented. A list of available networks will populate this page from here press “Select”...
- Page 21 The device will then join the chosen Wi-Fi network. A visual indicator is present at the top right corner of the display.
- Page 22 Need more help? Contact support If you are stuck with any of the above and require assistance... Call: 0333 043 4000 Email: support@communicatebetter.co.uk and our dedicated care team will gladly lend support. We create success stories. As an award-winning market leader, Communicate Better keeps clients up to speed with cutting edge technology, providing cost-effective solutions for growing businesses.