Advertisement
Quick Links
Advertisement

Related Manuals for Rowenta LISSIMA CERAMIC & IONIC


Summary of Contents for Rowenta LISSIMA CERAMIC & IONIC
- Page 1 NOT CV9020 - 011428 1-41 11/01/05 14:23 Page 1 011428 - 49/04 CV9020...
- Page 2 NOT CV9020 - 011428 1-41 11/01/05 14:23 Page 2...
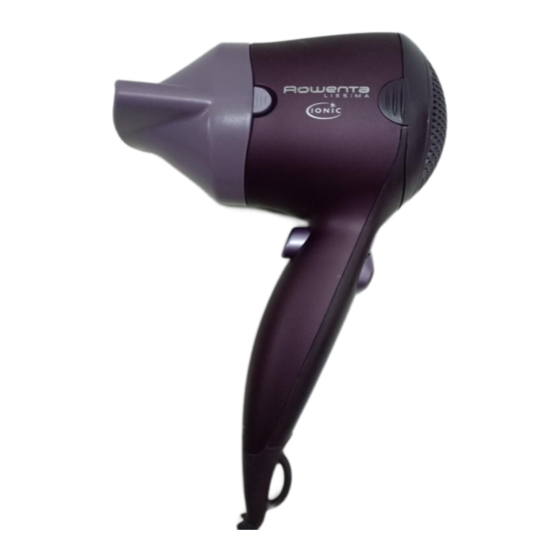
- Page 3 NOT CV9020 - 011428 1-41 11/01/05 14:23 Page 3 1. ALLGEMEINE BESCHREIBUNG 1. GENERAL DESCRIPTION A. Zubehör zum Glätten A. Straightener attachment B. Kämme B. Combs C. Glättplatten mit Keramiküberzug C. Ceramic straightening plates D. Taste zum Entfernen des Zubehörs D.
- Page 4 NOT CV9020 - 011428 1-41 11/01/05 14:23 Page 4...
- Page 5 NOT CV9020 - 011428 1-41 11/01/05 14:23 Page 5...
- Page 6 NOT CV9020 - 011428 1-41 11/01/05 14:23 Page 6 Wenn Sie ein optimales Ergebnis erzielen möchten, lesen Sie bitte vor der Verwendung Bedienungsanleitung und Sicherheitsanweisungen aufmerksam durch! • „Ultra-liss system with Ceramic”: Dieses exklusive System glättet und trocknet das Haar sanft in einem einzigen Arbeitsgang.
- Page 7 NOT CV9020 - 011428 1-41 11/01/05 14:23 Page 7 FESTSTELLBARER FIXIERKNOPF: Zum Fixieren der Frisur am Ende des Fönvorgangs wird ein weniger heißer Luftstrahl auf die Haare gerichtet. Drücken Sie den „Fixierknopf” (6). Nach einem weiteren Druck auf den Knopf heizt der Föhn wieder auf die ursprüngliche Temperatur auf. KONZENTRATOR : Mit dem Konzentrator können Sie die ausströmende Luft direkt und noch präziser auf die jeweils gewünschte Haarpartie lenken.
- Page 8 NOT CV9020 - 011428 1-41 11/01/05 14:23 Page 8 TIPPS VON DEN PROFIS Mehr Volumen an der Haarwurzel : Sobald das Haar trocken und glatt ist, das Gerät erneut an den Haarwurzeln unter der entsprechenden Strähne ansetzen und sie ca. 3 cm horizontal glätten. (Abb. 11), anschließend 5 Sek. lang, direkt von der Kopfhaut aus Fixierknopf (Abb.
- Page 9 NOT CV9020 - 011428 1-41 11/01/05 14:23 Page 9 WIE GLÄTTEN SIE LANGES ODER MITTEL-LANGES HAAR? (Abb.18/Abb.19) Das Haar dazu in 5 Bereiche teilen. Bereich 1: Beginnen Sie mit dem Nackenbereich - Das Haar mit Hilfe eines Kammes horizontal unterhalb des Ohres von einem Ohr zum anderen unterteilen. - Die übrigen Haare mit einer Haarnadel feststecken.
- Page 10 NOT CV9020 - 011428 1-41 11/01/05 14:23 Page 10 WIE GLÄTTEN SIE GESTUFTES ODER MITTEL-LANGES HAAR? (Abb.25) - Die Haare mit der Trockenfunktion (Kopf nach unten) vortrocknen. - In dieser Position Strähne für Strähne (Abb. 26), zunächst die Stirnfransen, dann die Seiten, die Strähnen auf dem Kopf und schließlich die Nackenpartie glät- ten.
-
Page 11: Wartung
NOT CV9020 - 011428 1-41 11/01/05 14:23 Page 11 5. WARTUNG ACHTUNG! : Das Gerät vor dem Reinigen immer ausschalten (Stecker aus der Steckdose) A- Reinigung des Geräts : - Ihr Gerät benötigt keine aufwendige Wartung. Sie können es mit einem trockenen oder leicht feuchten Tuch reinigen. -
Page 12: Safety Recommendations
NOT CV9020 - 011428 1-41 11/01/05 14:23 Page 12 To obtain the best results with your LISSIMA dryer, read the instructions and safety precautions carefully before using. • “Ultra-liss system with Ceramic”: This exclusive system allows you to smooth your hair and to dry it gently in a single step. - Page 13 NOT CV9020 - 011428 1-41 11/01/05 14:23 Page 13 LOCKABLE COOL SHOT BUTTON: To fix your hairstyle, you can direct cooler air towards your hair when it is almost dry. Press the “Cool shot” button (Fig. 6), then press the button again to return to the original temperature.
-
Page 14: Styling Tips
NOT CV9020 - 011428 1-41 11/01/05 14:23 Page 14 STYLING TIPS Volume at the roots: Once your hair is dry and straightened, place the dryer at the roots again, under the lock of hair to be styled, insert the smoothing prongs into the thickness of the hair and start smoothing the lock in the opposite direction to the way the hair grows for about 3 cm (Fig. -
Page 15: Section 1 : Start By Straightening The Hair At The Nape Of Your Neck
NOT CV9020 - 011428 1-41 11/01/05 14:23 Page 15 HOW TO STRAIGHTEN LONG OR SHOULDER-LENGTH HAIR? : (fig.18/19) Gradually separate your hair into 5 sections. Section 1 : Start by straightening the hair at the nape of your neck. - Separate your hair horizontally with a comb, taking it from below one ear to the other ear (Fig.20). - Attach the rest of your hair with a hair clip. - Page 16 NOT CV9020 - 011428 1-41 11/01/05 14:24 Page 16 HOW TO STRAIGHTEN SHOULDER-LENGTH, LAYERED HAIR: (fig.25) - Dry your hair until just damp using the normal hair dryer function, with your head leaning forward. - Keep your head down and straighten each lock of hair (Fig.26), starting with the fringe and gradually working your way down to the side sections and top of the head, finishing by the hair at the nape.
-
Page 17: Maintenance
If the detachable fuse cover is lost, a replacement may be purchased from an approved Rowenta Service Centre (see enclosed Service Information leaflet). Information for supply may also be obtained from the plug manufacturer. - Page 18 NOT CV9020 - 011428 1-41 11/01/05 14:24 Page 18...
- Page 19 NOT CV9020 - 011428 1-41 11/01/05 14:24 Page 19...
- Page 20 NOT CV9020 - 011428 1-41 11/01/05 14:24 Page 20...
- Page 21 NOT CV9020 - 011428 1-41 11/01/05 14:24 Page 21...
- Page 22 NOT CV9020 - 011428 1-41 11/01/05 14:24 Page 22...
- Page 23 NOT CV9020 - 011428 1-41 11/01/05 14:24 Page 23...
- Page 24 NOT CV9020 - 011428 1-41 11/01/05 14:24 Page 24...
- Page 25 NOT CV9020 - 011428 1-41 11/01/05 14:24 Page 25...
- Page 26 NOT CV9020 - 011428 1-41 11/01/05 14:24 Page 26...
- Page 27 NOT CV9020 - 011428 1-41 11/01/05 14:24 Page 27...
- Page 28 NOT CV9020 - 011428 1-41 11/01/05 14:24 Page 28...
- Page 29 NOT CV9020 - 011428 1-41 11/01/05 14:24 Page 29...
- Page 30 NOT CV9020 - 011428 1-41 11/01/05 14:24 Page 30...
- Page 31 NOT CV9020 - 011428 1-41 11/01/05 14:24 Page 31...
- Page 32 NOT CV9020 - 011428 1-41 11/01/05 14:24 Page 32...
- Page 33 NOT CV9020 - 011428 1-41 11/01/05 14:24 Page 33...
- Page 34 NOT CV9020 - 011428 1-41 11/01/05 14:24 Page 34...
- Page 35 NOT CV9020 - 011428 1-41 11/01/05 14:24 Page 35...
- Page 36 NOT CV9020 - 011428 1-41 11/01/05 14:24 Page 36...
- Page 37 NOT CV9020 - 011428 1-41 11/01/05 14:24 Page 37...
- Page 38 NOT CV9020 - 011428 1-41 11/01/05 14:24 Page 38...
- Page 39 NOT CV9020 - 011428 1-41 11/01/05 14:24 Page 39...
- Page 40 NOT CV9020 - 011428 1-41 11/01/05 14:24 Page 40...
- Page 41 NOT CV9020 - 011428 1-41 11/01/05 14:24 Page 41...