Advertisement
Sunbeam's Safety Precautions
SAFETY PRECAUTIONS FOR YOUR SUNBEAM BENCHTOP BLENDER.
- Ensure fingers are kept well away from the blades when in use.
- Do not blend warm/hot ingredients. Always cool ingredients to room temperature before blending. Hot/warm ingredients can eject out of the jug when a sudden steaming is caused.
- Always operate on a flat surface.
- Ensure the control dial is in the 'off' position before plugging into the power outlet.
- Take care when removing the jug from the base, emptying the bowl/jug or during fitting and removal of blade system, as blades are extremely sharp.
- Warning of potential injury from misuse.
- Switch off the appliance and disconnect from supply before changing accessories or approaching parts that move in use.
Sunbeam is very safety conscious when designing and manufacturing consumer products, but it is essential that the product user also exercise care when using an electrical appliance. Listed below are precautions which are essential for the safe use of an electrical appliance:
- Read carefully and save all the instructions provided with an appliance.
- Always turn the power off at the power outlet before you insert or remove a plug. Remove by grasping the plug - do not pull on the cord.
- Turn the power off and remove the plug when the appliance is not in use and before cleaning.
- Do not use your appliance with an extension cord unless this cord has been checked and tested by a qualified technician or service person.
- Always use your appliance from a power outlet of the voltage (A.C. only) marked on the appliance.
- Refer to "Care and Cleaning" section for details on how to clean surfaces in contact with food.
- Appliance can be used by persons with reduced physical, sensory or mental capabilities or lack of experience and knowledge if they have been given supervision or instruction concerning use of the appliance in a safe way and if they understand the hazards involved.
- This appliance shall not be used by children. Keep the appliance and its cord out of reach of children.
- Children should be supervised to ensure that they do not play with the appliance.
- The temperature of accessible surfaces may be high when the appliance is operating.
- Never leave an appliance unattended while in use.
- Do not use an appliance for any purpose other than its intended use.
- Do not place an appliance on or near a hot gas flame, electric element or on a heated oven.
- Do not place on top of any other appliance.
- Do not let the power cord of an appliance hang over the edge of a table or bench top or touch any hot surface.
- Do not operate any electrical appliance with a damaged cord or after the appliance has been damaged in any manner. If damage is suspected, return the appliance to the nearest Sunbeam Appointed Service Centre for examination, repair or adjustment.
- For additional protection, appliances should be supplied through the use of a residual current device (RCD) with a tripping current not exceeding 30mA in the electrical circuit supplying power to your appliances.
- Do not immerse the appliance in water or any other liquid unless recommended.
- Appliances are not intended to be operated by means of an external timer or separate remote control system.
- This appliance is intended to be used in household and similar applications such as: staff kitchen areas in shops, offices and other working environments; farm houses; by clients in hotels, motels and other residential type environments; bed and breakfast type environments.
- If the supply cord is damaged, it must be replaced by the manufacturer, its service agent or similarly qualified persons in order to avoid a hazard.
If you have any concerns regarding the performance and use of your appliance, please visit the Sunbeam Website or contact Sunbeam Consumer Care - details are on the back page. Ensure the above safety precautions are understood.
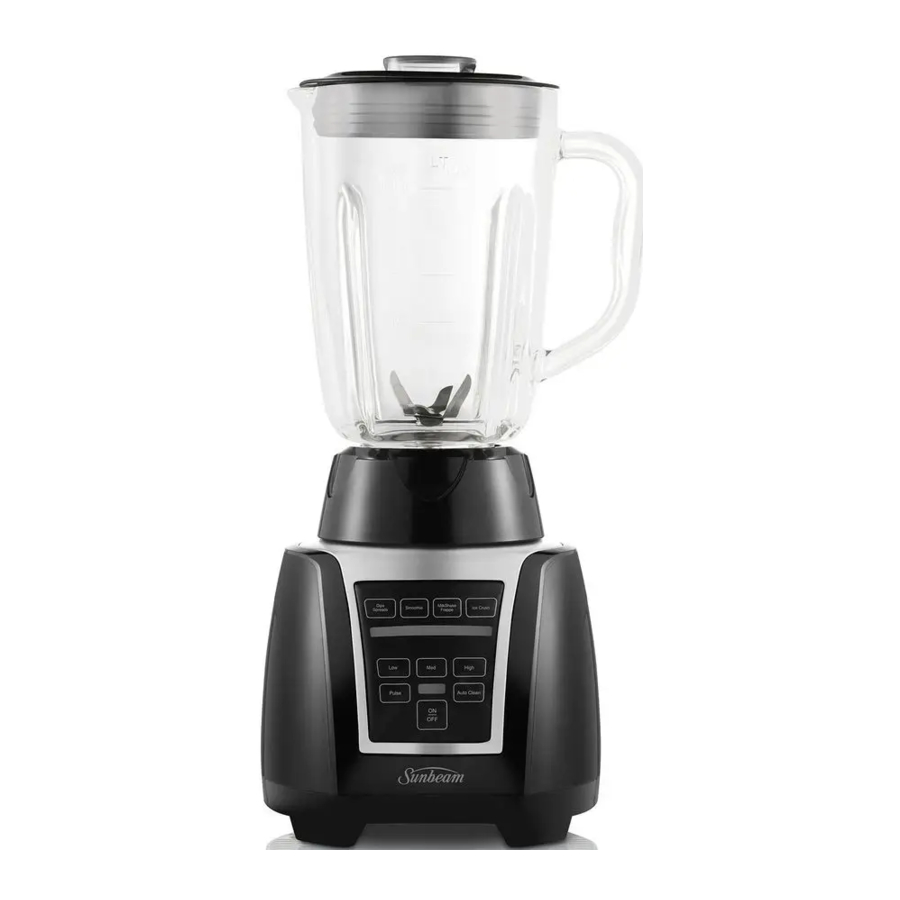
Features Of Your Auto Clean Blender

- Ingredient Cup
Handy 30mL ingredient cup. - Jug Lid With Pouring Hole
Pouring hole allows you to easily add ingredients during blending, without removing the lid. - 1.25L Glass Jug
The 1.25L glass jug features an easy to pour lip and is marked in both cups and litres (L) for ease of use. - Detachable Blade Assembly
The detachable blade assembly unit unscrews from the glass blending jug for convenient and thorough cleaning. - 6 Way Stainless Steel Blade System
The heavy-duty, stainless steel blade with a six-blade construction, crushes ice cubes, produces a smooth consistency when pureeing and combines ingredients perfectly for a smoothie. - 550 Watt Motor
- Control Panel
This blender features 4 pre-programed blending options: Smoothie, Dip/Spread, Milkshake/Frappe, Ice Crush. This blender also features 3 different speeds and an Auto Clean function. - Non-Slip Feet
Before Using Your Auto Clean Blender

Always ensure your blender is unplugged from the power outlet before fitting or removing the blade assembly. Always handle the blade assembly with caution, as the blades are extremely sharp.
Wash and Dry Parts
Note: Before using your Auto Clean Blender, we recommend removing the six-blade system for thorough cleaning.
Remove carefully the Blade system from the glass jug by turning it clockwise. Remove the ingredient cup from the lid. Wash the blade assembly, ingredient cup, lid and glass jug in warm soapy water. Rinse and allow thorough air drying.
Note: When removing the blade assembly from the jug you may need to slightly tilt the blade so that it slides out easily.
Re-assemble the six-blade system in the glass jug
Place carefully the blade assembly in the glass jug. Ensure that the blade assembly is firmly in place by turning it anticlockwise.
Do not remove the stainless steel blades from the blade assembly. The blender jug will leak if the six-blade system is not assembled correctly.
Using Your Auto Clean Blender
Using the blender
- Place the blender jug onto the motor base.
Note: Do not switch 'ON' the Auto Clean Blender without the lid in position. - Place ingredients into the glass jug. Do not exceed the maximum indicated level – 1.25L.
- Position the lid with ingredient cup onto the blender jug. Ensure the lid is firmly in place.
Pre-Programmed Functions
- Press the ON/OFF button to turn the blender on. The On indicator light will flash.
- Press the desired function button:
- SMOOTHIE
- DIPS/SPREADS
- MILKSHAKES/FRAPPE
- ICE CRUSH
The corresponding function light will come on, and remain on until the program is finished.
- To stop the program, press the function button again. You can stop the program at any time to cancel the program.
- When the program is finished, the motor automatically stops. The On indicator light will flash, showing that the blender is ready to use.
Speed Functions
Your blender has three speeds settings: LOW, MED and HIGH. You can use these functions for personal recipes or to continue blending after a pre-programmed function is finished.
- Press the ON/OFF button to turn the blender on. The On indicator light will flash.
- Press the desired speed button to start blending. The speed function will keep running until you press the speed function button again. Please note the function will automatically switch off after 2 min.
Auto Clean Function
- Press the ON/OFF button to turn the blender on. The On indicator light will flash.
- Half fill the glass jug with warm water and a small amount of detergent.
- Press on the Auto Clean function. The unit will clean itself, without you having to handle the sharp blades.
- Rinse and dry, being careful as the blades are sharp.
Pulse Function
Use the pulse function to crush ice or chop food.
- Press the ON/OFF button. The On indicator light will flash.
- Press and hold the PULSE button. The pulse function operates only as long as the PULSE button is held down.
- Release the PULSE button to stop.
Using your Auto Clean Blender
| Processing Task | Food | Suggested Setting | Suggested Processing Procedure |
| Aerating | Milkshakes, Smoothies | Smoothie & Milkshake/ Frappe | Use chilled milk. Blend until desired consistency is achieved. |
| Chopping | Nuts, Chocolate, Garlic or Herbs | PULSE | Process ½ cup at a time, to ensure evenly sized pieces. |
| Crumbing | Bread Crumbs | PULSE & Medium | Tear bread roughly. Blend until desired consistency. |
| Crumbing | Biscuit Crumbs | PULSE & Medium | Break into pieces and as desired pulse or blend until crumbed. |
| Crushing Ice | Ice Cubes | PULSE | Use the PULSE button several times until crushed as desired consistency. |
| Emulsifying | Salad Dressing | Low | Blend until well combined. Oil may be added to the mixture during processing through the pouring hole in the lid. |
| Pureeing | Soups, Vegetables, Fruits | Medium, High or Dip/Spread | Blend until smooth. |
Handy Blending Hints
- Nothing can beat a blender for making smooth purees and sauces or for whipping up frothy drinks - from healthy breakfast shakes to frozen daiquiris.
- Use your blender for chopping small amounts of food like nuts, bread crumbs and whole spices.
- Turn any oil-based salad dressing into a creamy style dressing by blending it until slightly thickened.
- Food items for blending should be cut into cubes (approximately 2-3cm), this will assist in achieving an even result.
- Ensure the lid is firmly and securely placed on the jug. Do not operate the blender without the lid on, if you wish to add any additional ingredients remove the ingredient cup and add as necessary.
- Never fill above the maximum level indicator 1.25L. When blending very liquid substances do not fill the jug above 1L to avoid spilling.
- To ensure efficient mixing when blending dry mixtures, it may be necessary to stop the blender and push ingredients down the sides of the jug with a spatula.
- When pureeing fruit or vegetables, cooked or raw, cut into small pieces to facilitate blending.
- When making bread crumbs, use 2 to 3 day old bread, leaving crusts on, to minimise the possibility of clumping. If only fresh bread is available, dry it out for a few minutes in a low heated oven.
- When blending a variety of ingredients together, blend the liquids first, then add dry ingredients.
- Always ensure stones are removed from fruit and bones from meat as these can harm the blades.
- Don't allow a used blender to sit for too long as the food will dry onto the blades, making it very difficult to clean. If you can't clean the blender straight away, pour some warm water in it and allow to soak.
- Do not process hot/warm liquids in your blender. Allow to cool to room temperature before blending.
Care And Cleaning
Auto Clean Function
- Press the ON/OFF button to turn the blender on. The On indicator light will flash.
- Half fill the glass jug with warm water and a small amount of detergent.
- Press on the Auto Clean function. The unit will clean itself, without you having to handle the sharp blades.
- Rinse and dry, being careful as the blades are sharp.
For Thorough Cleaning
Turn the blender jug upside down. Unscrew the blade assembly from the jug. Wash the blender lid, ingredient cup, blade assembly and blender jug in warm soapy water.

Take care when cleaning the blades as they are extremely sharp.
Note: The jug, blade, seal, locking ring, lid and feeder cap may be washed in a dishwasher.
To Clean The Motor Base
Use a damp, soft sponge with mild detergent and wipe over the motor base.
Note: Never immerse the motor base in water.

Documents / ResourcesDownload manual
Here you can download full pdf version of manual, it may contain additional safety instructions, warranty information, FCC rules, etc.
Advertisement
Thank you! Your question has been received!


Need Assistance?
Do you have a question about the PBT3000 that isn't answered in the manual? Leave your question here.