Siemens Gigaset C595 User Manual
Siemens gigaset c595: user guide
Hide thumbs
Also See for Gigaset C595:
- User manual (92 pages) ,
- Manual (86 pages) ,
- User manual (226 pages)
Table of Contents
Advertisement
Quick Links
Advertisement
Table of Contents

Related Manuals for Siemens Gigaset C595


Summary of Contents for Siemens Gigaset C595
- Page 1 C590 - C595 Issued by Gigaset Communications GmbH Schlavenhorst 66, D-46395 Bocholt Gigaset Communications GmbH is a licensee of the Siemens trademark © Gigaset Communications GmbH 2009 All rights reserved. Subject to availability. Rights of modification reserved. www.gigaset.com...
-
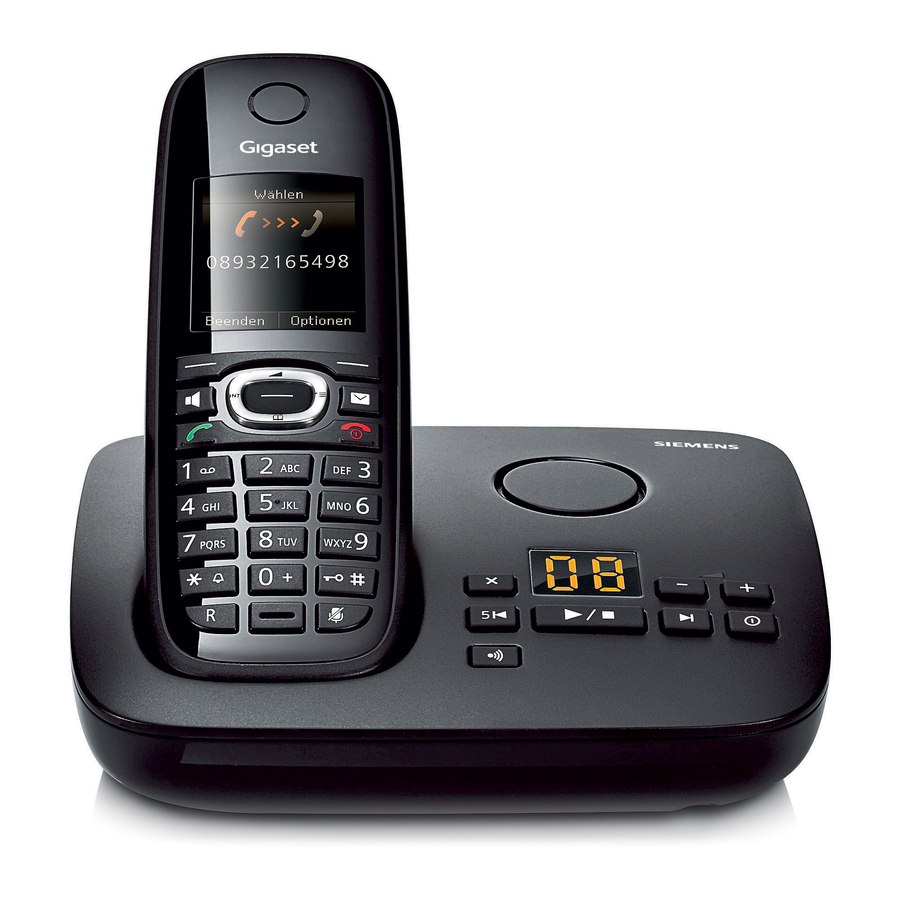
Page 2: The Handset At A Glance
The handset at a glance à 07:15 INT 1 14 Oct Calls 1 Display in idle status 2 Battery charge status ¢ page 16) ¢ 3 Display keys ( page 20) Gigaset service contact numbers: For personal advice on our range of products and for repairs or guarantee/warranty claims call: Service Centre UK: 08453 6708 12 (local call cost charge) - Page 3 Display symbols Display symbols The following symbols are displayed dependent on the settings and the operating status of your telephone: à ó Û 07:15 08:00 INT 1 14 Oct ™ ¾ à Calls Signalling ¢ External call ( page 28) Ø...
-
Page 4: The Base At A Glance
You can use the keys on the base to register handsets to the base, search ¢ for handsets (paging) page 56 and operate the integrated answering machine (Gigaset C595 only). Gigaset C595 base 1 Registration/paging key Press briefly: Search for handsets (paging) ¢ page 56. -
Page 5: Table Of Contents
Safety precautions ........7 Gigaset C590/C595 – more than just a telephone ... . 8 First steps . - Page 6 Incoming SMS message list ........35 Answering machine list (Gigaset C595 only) ......36 Call lists .
- Page 7 Contents Using a handset as a room monitor ..... . . 59 Handset settings ........60 Quick access to numbers and functions .
-
Page 8: Safety Precautions
Warning Read the safety precautions and the user guide before use. Explain their content and the potential hazards associated with using the telephone to your children. Only use the mains adapter supplied, as indicated on the underside of the base. -
Page 9: Gigaset C590/C595 - More Than Just A Telephone
Gigaset C590/C595 – more than just a telephone Gigaset C590/C595 – more than just a telephone Your telephone sets new standards for the way you communicate at home. The large TFT display, user-friendly keypad and clearly laid out menu are very simple to use. -
Page 10: First Steps
First steps Checking the pack contents one Gigaset C590/C595 base one mains adapter one Gigaset C59H handset one phone cord two batteries one battery cover one belt clip one user guide If you have purchased a model with multiple handsets the package should contain two batter- ies, a battery cover, a belt clip and a charging cradle... -
Page 11: Setting Up The Base And Charging Cradle (If Included)
Please note: Never expose the telephone to the influence of heat sources, direct sunlight or other electrical devices. Protect your Gigaset from moisture, dust, corrosive liquids and vapours. -
Page 12: Connecting The Charging Cradle (If Included)
Connecting the charging cradle (if included) If you need to disconnect the plug from the charging cradle, press the release button and disconnect the plug 2. ¤ Connect the flat plug from the mains adapter 1. ¤ Plug the mains adapter into the plug socket 2. -
Page 13: Setting Up The Handset For Use
The phone could also malfunction or be damaged as a result of using batteries that are not of the recommended type. * Gigaset Communications GmbH is a licensee of the Siemens trademark. ¤ Insert the batteries the right way round. - Page 14 Attaching the belt clip The handset has notches on each side to attach the belt clip. ¤ To attach – press the belt clip onto the back of the handset so that the protrusions on the belt clip engage with the notches. ¤...
- Page 15 First steps Initial charging and discharging of the batteries The correct charge level can only be displayed if the batteries are first fully charged and discharged. Please note After the first battery charge and discharge you may replace your hand- set in the base/charging cradle after every call.
-
Page 16: Setting The Date And Time
Setting the date and time Set the date and time so that the correct date and time can be assigned to incoming calls, and so that the alarm can be used. Calls Date/Time Date: 31.01.2009 Time: 00:00 Back ¤ Enter the hours and minutes as four digit numbers via the keypad, e.g. - Page 17 First steps Back Date/Time ‰ Saved Display in idle status Once the phone is registered and the time set, the idle display is shown as in this example. If the answering machine is activated, the answering machine à icon will be displayed in the header. Displays Reception signal between the base and handset: –...
-
Page 18: Connecting The Headset
Connecting the headset A compatibility list of tested headsets can be found on the Internet at: www.plantronics.com/productfinder. You can connect a headset with a 2.5 mm jack connec- tor, including HAMA and Plantronics M40, MX100 und MX150 headset types. First steps... -
Page 19: What Would You Like To Do Next
Setting the earpiece volume Recording a personal announcement for the answering machine Setting Eco Mode / Eco Mode+ Preparing the telephone for SMS reception Operating the telephone on a PABX Registering existing Gigaset handsets to a base Transferring directory entries from existing Gigaset... -
Page 20: Using The Phone
Using the phone Control key Below, the side of the control key that you must press in the respective operating situation is marked in black (top, bottom, right, left, centre), e.g. v for "press right on the control key" or w for "press the centre of the control key". -
Page 21: Display Keys
Using the phone Display keys The functions of the display keys change depending on the particular operating situation. Example: Back Some important display keys: Open a context-dependent menu. Options Confirm selection. Û Delete key: delete one character/word at a time from right to left. Go back one menu level or cancel operation. -
Page 22: Menu Guidance
Menu guidance Your telephone's functions are accessed using a menu that has a number of levels. The menu display can be extended (Expert mode) or reduced (Standard mode). Standard mode is activated by default. Settings or functions that are only available in expert mode are marked in these... -
Page 23: Activating/Deactivating The Handset
Using the phone Activating/deactivating the handset With the phone in idle status, press and hold the end call key (confirmation tone) to switch off the handset. Press and hold the end call key again to switch the handset on. Please note When the handset is switched on, an animation of the Gigaset logo will be displayed for several seconds. -
Page 24: Illustration Of Operating Steps In The User Guide
Illustration of operating steps in the user guide The operating steps are shown in abbreviated form. Example: The illustration: Ï ¢ ¢ Eco Mode means: Settings Ë Ì É Back Settings Display Language Registration Menu View Eco Mode Back ¢ (³... - Page 25 Using the phone Eco Mode Eco Mode Eco Mode+ Back Telephony Eco Mode Eco Mode+ Back Press down on the control key s ¤ ³ ´ until the on the display. Change ¤ Press the display key activate/deactivate the function. Changes are effective immediately ³...
-
Page 26: Menu Overview
(the active mode is marked with Ø). §Select§ Menu options that are only available in expert mode are marked with the Open the main menu: When the telephone is in idle status press Ë You have activated an SMS mailbox (general or private) without a PIN... - Page 27 Menu overview Ì Voice Mail Play Messages Activation * Announcements * • Recordings * • Call Screening * • Network Mailbox ** • Set Key 1 * Only base with answering machine ** Only base without answering machine Ç Select Services Withhold Number All Calls Ringback Off...
- Page 28 Ï Settings Date/Time Audio Settings Display Language Registration • Telephony • System Menu View Eco Mode ¢ page 15 Handset Volume • Advisory Tones Ringtones(Handset) Ringtones (Base) • Music on hold Screensaver Large Font Colour Schemes • Backlight ¢ page 61 Register Handset De-reg.
-
Page 29: Making Calls
Pressing the speaker key d. ¤ Gigaset C590: Press the display key §Accept§ ¤ Gigaset C595: Press the display key Ô machine ( If the handset is in the base/charging cra- dle and the Auto Answer function is acti- ¢... -
Page 30: Speaker Mode
Switching between earpiece and speaker mode Gigaset C595 During a call and when listening to the answering machine (Gigaset C595 only), activate or deactivate speaker mode. If you wish to place the handset in the base/charging cradle during a call: ¤... -
Page 31: Making Calls Using Network Services
Making calls using network services Making calls using network services Network services are functions that your network provider makes available to you. You have to request these services from your network provider. ¤ If you require assistance, please contact your network provider. Calling Line Identification Withhold Calling Line Identification once (CLIR):... -
Page 32: Call Divert (Cd)
The previous call is placed on hold. The other participant hears an announcement. Enter the second participant's telephone number. The phone number is dialled. You are connected to the second participant. If the caller does not answer, select the display key participant. -
Page 33: Using The Directory And Lists
Redial list Incoming SMS message list Call lists List of missed appointments Answering machine list (Gigaset C595 only) You can create a personalised directory for your own individual handset. You can also send lists/entries to other handsets ¢ page 34). - Page 34 Order of directory entries Directory entries are generally sorted alphabetically by surname. Spaces and digits take first priority. If only the first name was entered in the directory, this is incorporated into the sort order instead of the surname. The sort order is as follows: 1.
- Page 35 SMS to the directory. A number is displayed: §Options§ ¤ Complete the entry Gigaset C595: Message playback is inter- rupted during the number transfer from the answering machine list. Copying a number or e-mail address from the directory In some operating situations, you can open the directory to copy a number or e- mail address, for example.
-
Page 36: Redial List
¤ Change multiple line input: Annivers. (Date) Enter day/month/year in 8-digit format. Anniversary (time) Enter the hour/minute for the reminder call in 4-digit format. Anniversary (tone) Select the type of signal for the reminder. Press the display key. §Save§ Please note A time must be specified for reminder calls. -
Page 37: Answering Machine List (Gigaset C595 Only)
– Accepted calls ( ™ – Missed calls ( š – Outgoing calls ( – Calls recorded by the answering machine (Ã, Gigaset C595 only) Press the talk key c to return the calls selected. Select the display key to access addi- §View§... -
Page 38: List Of Missed Appointments
In idle status, the display shows an icon for the new message: Icon New message... Ã ... in the answering machine list (Gigaset C595 only) or on the network mailbox ™ ... in list of missed calls Ë ... in the SMS list ... -
Page 39: Making Cost-Effective Calls
Making cost-effective calls Making cost-effective calls Make phone calls through a network pro- vider who offers particularly low-cost call rates (call-by-call). Automatic network provider code (preselection) You can store a call-by-call number (prese- lection number), which is automatically placed in front of numbers when you dial them. -
Page 40: Sms (Text Messages)
SMS (text messages) Your device is delivered ready to send SMS messages. Preconditions: Calling Line Identification is enabled for your phone line. Your network provider supports SMS on the fixed line network (information on this can be obtained from your network provider). -
Page 41: Receiving An Sms
SMS (text messages) Draft SMS list You can save an SMS in the draft SMS list, and edit and send it later. Saving an SMS in the draft SMS list ¤ You are writing an SMS ( Press the display key. §Options§... -
Page 42: Incoming
Incoming SMS list The incoming SMS list contains: All received SMS messages, starting with the most recent. SMS messages that could not be sent due to an error. New SMS messages are signalled on all Gigaset C59H handsets by the the display, the flashing message key f and an advisory tone. -
Page 43: Sms With Vcard
SMS (text messages) Copying the number to the directory Copying the sender's number ¤ Open the incoming message list and ¢ select entry ( page 41). ¢ Copy to Directory §Options§ ¤ ¢ Complete the entry page 34. Please note An attached mailbox identifier is added to the directory. -
Page 44: Notification By Sms
• Notification by SMS You can be notified about missed calls or new answering machine messages (Gigaset C595 only) via SMS. Precondition: For missed calls, the caller's number (CLI) must have been transmit- ted. Notification is sent to your mobile phone or another device with SMS functionality. -
Page 45: Setting Sms Centres
SMS (text messages) Press the display key. §Save§ Active mailboxes are marked with μ in the mailbox list. They are shown in the SMS list and can, if necessary, be displayed by pressing the message key f. Deactivating a mailbox ¤... -
Page 46: Sms On A Pabx
Sending an SMS via another SMS centre ¤ Activate the SMS centre (2 to 4) as the active send service centre. ¤ Send the SMS. SMS on a PABX You can only receive an SMS when the Calling Line Identification is for- warded to the extension of the PABX (CLIP). -
Page 47: Sms Troubleshooting
SMS functionality, i.e. you are not reg- istered with the provider. ¥ Send any SMS to automatically register your telephone to receive SMS. Messages are only received during the day. The terminal is recorded in your SMS pro- vider's database as having no fixed line net- work SMS functionality, i.e. -
Page 48: Operating The Answering Machine Of The Gigaset C595 Base
¢ ¢ Ì (μ= on) Activation Press the display key. §Edit§ Operating the answering machine of the Gigaset C595 base ¤ Change multiple line input: Activation: Select the answering machine. • Mode: Answer &... - Page 49 Operating the answering machine of the Gigaset C595 base • Recording a personal announcement/ advisory message ¢ ¢ Ì Announcements ¢ Rec. Announcement Rec. Advisory Msg. Press the display key to start §OK§ the recording. You hear the ready tone (short tone).
- Page 50 Open menu. §Options§ Mark as New Select and press Operating the answering machine of the Gigaset C595 base An announcement informs you of the message's new status. Playback of the current message is can- celled. Playback of next message starts, if applicable.
-
Page 51: Activating/Deactivating Call Screening
Operating the answering machine of the Gigaset C595 base Diverting an external call to the answering machine You can divert an incoming external call to the answering machine even if it is deacti- vated. Precondition: Sufficient memory space is available on the answering machine. -
Page 52: Resetting Fast Access For The Answering Machine Using Key 1
. You will be connected directly. The setting for fast access applies to all registered handsets. Operating the answering machine of the Gigaset C595 base Operating when on the move (remote operation) You can check and activate your answer- ing machine from any other telephone (hotel, pay phone etc.), or initiate ring-... - Page 53 Operating the answering machine of the Gigaset C595 base Activating the answering machine ¤ Phone home and let the phone ring until you hear: "Please enter PIN". Enter system PIN. Your answering machine is activated. It tells you how much memory time is left.
-
Page 54: Using The Network Mailbox
With fast access, you can dial the network mailbox or the integrated answering machine (Gigaset C595 only) directly. Gigaset C590: Fast access is preset for the network mailbox. You only need to enter the number of the network mailbox. -
Page 55: Eco Dect
Gigaset CS590/CS595. Reduced energy consumption Your telephone has a power-saving adapter plug and uses less power. Reducing radiation The radiation from your telephone is reduced automatically: The handset's transmission power is reduced depending on the distance to the base. -
Page 56: Setting The Alarm Clock
Setting the alarm clock Precondition: The date and time have ¢ already been set ( page 15). Activating/deactivating the alarm clock and setting the wake-up time É ¢ ¢ Alarm Clock ¤ Change multiple line input: Activation: Select or Off. Time: Enter the wake-up time in 4-digit for- mat. -
Page 57: De-Registering Handsets
Using several handsets Registering other handsets You can register other Gigaset handsets and handsets for other devices with GAP functionality as follows. On the handset ¤ Start to register the handset as described in its user guide. On the base Press and hold the registration/paging key ¢... - Page 58 Transferring a call to another handset You can transfer an external call to another handset (connect). Open the list of handsets. The external participant hears hold music if activated ¢ page 65). Select a handset or press §OK§ When the internal participant answers: ¤...
-
Page 59: Listening In To An External Call
Using several handsets Listening in to an external call Precondition: The Listening In must be activated. You are conducting an external call. An internal participant can listen in on this call and take part in the conversation. All participants are made aware of the "listen- ing in"... -
Page 60: Using A Handset As A Room Monitor
Using a handset as a room monitor If the room monitor is activated, a previ- ously saved destination number is called as soon as a set noise level is reached. You can save an internal or external number in your handset as the destination number. All of the handset keys are deactivated, with the exception of the display keys. -
Page 61: Handset Settings
Handset settings When the room monitor function is acti- vated, the idle display looks as shown below: Ã 07:15 Á INT 1 22 Oct Room Monitor 0891234567 Options Changing the set destination number É ¢ ¢ Room Monitor ¤ Enter and save number as described in "Activating the room monitor and entering the destination number"... -
Page 62: Changing The Display Language
Dialling a number/changing assignment Precondition: The digit key already has a number assigned to it. When the handset is in idle status ¤ Press and hold the digit key. The number is dialled immediately. ¤ Briefly press the digit key: Press the display key with number/ name (abbreviated if necessary) to dial the number or... -
Page 63: Activating/Deactivating Auto Answer
Handset settings Press the display key. §Save§ When the screensaver conceals the dis- play, briefly press a to show the idle display. Setting large font You can increase the front size of print and symbols in selection fields, lists and in the directory to improve readability. -
Page 64: Changing Ringtones
Press the display key to save §Save§ the setting. Switching on/off the ringtone for anonymous calls You can set your telephone not to ring if a caller withholds their number. The call will only be signalled in the display. In idle status: Ï... -
Page 65: Activating/Deactivating Advisory Tones
Handset settings • Activating/deactivating advisory tones Your handset uses advisory tones to tell you about different activities and statuses. The following advisory tones can be acti- vated/deactivated independently of each other: Key click: every key press is confirmed. Acknowledge tones: –... -
Page 66: Base Settings
Base settings The base settings are carried out using a registered Gigaset C59H handset. Changing the base ringtones Volume: You can choose between five volumes (1–5; e.g. volume 3 = Š) and the "crescendo" ringtone (6; volume increases with each ring = ‡). Ringtones: You can select a ringtone from a list of pre-loaded ringtones. -
Page 67: Protecting Against Unauthorised Access
Changing the system PIN You can change the 4-digit system PIN set on the base (default setting: 0000) to a 4- digit PIN known only by you. Gigaset C595: Setting a system PIN facili- tates remote operation of the answering ¢ machine page 51. -
Page 68: Connecting The Base To The Pabx
Connecting the base to the PABX The following settings are only necessary if your PABX requires them; see the PABX user guide. You cannot send or receive SMS messages on PABXs that do not support Calling Line Identification. • Dialling modes and recall The current setting is indicated by Changing the dialling mode The following dialling modes can be... -
Page 69: Setting Pauses
Connecting the base to the PABX Setting pauses Changing the pause after line seizure You can change the length of the pause that is inserted between pressing the talk key c and sending the number. Open the main menu. *#Q5# L Press keys. -
Page 70: Service (Customer Care)
¢ Activate the ringtone ( 2. Call divert set for "All Calls". ¥ ¢ Deactivate call divert ( 3. The telephone only rings when the phone number is transferred. ¥ Activate the ringtone for anonymous ¢ calls ( page 63). -
Page 71: Authorisation
You cannot listen to messages on the net- work mailbox. Your PABX is set for dial pulsing. ¥ Set your PABX to tone dialling. Gigaset C595 only: No time is specified for a message in the call list. Date and time have not been set. ¥... -
Page 72: Guarantee Certificate
Service (Customer Care) dom the Guarantee is issued by: Giga- set Communications UK Limited, Fara- day House, Sir William Siemens Square, Frimley, Camberley, Surrey, GU16 8QD. Any other claims resulting out of or in connection with the device shall be excluded from this Guarantee. -
Page 73: Environment
Environment Environment Our environmental mission statement We, Gigaset Communications GmbH, bear social responsibility and are actively com- mitted to a better world. Our ideas, tech- nologies and actions serve people, society and the environment. The aim of our glo- bal activity is to secure sustainable life resources for humanity. -
Page 74: Appendix
Customer Care pages is regularly updated: www.gigaset.com/customercare Base power consumption In standby mode: Gigaset C590: approx. 1,1 watt Gigaset C595: approx. 1,2 watt During the call: Gigaset C590: approx. 1,0 watt Gigaset C595: approx. 1,1 watt Appendix Capacity (mAh) approx. -
Page 75: Writing And Editing Text
+5°C to +45°C, 20% to tions in operation 75% relative humidity Dialling mode DTMF (tone dialling)/ DP (dial pulsing) Pin connections on the telephone jack 1 unused 2 unused 5 unused 6 unused Writing and editing text The following rules apply when writing... - Page 76 Accessories Gigaset handsets Upgrade your Gigaset to a cordless PABX: Gigaset C59H handset Illuminated graphic colour display (65k colours) Illuminated keypad Speaker mode Polyphonic ringtones Directory for around 150 entries SMS (precondition: CLIP must be enabled) Room monitor www.gigaset.com/gigasetc59h Gigaset SL78H handset Illuminated graphic colour display (256k colours) Illuminated keypad Speaker mode...
- Page 77 Accessories Gigaset S67H/S68H handset Illuminated graphic colour display (65k colours) Illuminated keypad Speaker mode Polyphonic ringtones Directory for around 250 entries Picture CLIP SMS (precondition: CLIP must be enabled) Headset socket Bluetooth (Gigaset S68H only) Room monitor www.gigaset.com/gigasetS67H Gigaset SL37H handset Illuminated graphic colour display (65k colours) Illuminated keypad Speaker mode...
- Page 78 Gigaset HC450 – door intercom for cordless phones Use the intercom from your cordless phone – no need for a fixed home phone Intuitive user functions using the display keys (open door, switch on entry light) Simple to configure using the handset menu Forward to outside phone numbers (intercom feature) Simple to install and register with the Gigaset system Replaces existing doorbell key –...
-
Page 79: Mounting The Base On The Wall
Mounting the base on the wall Mounting the base on the wall C595: 64 mm C590: 43 mm approx. 2.5 mm Mounting the charging cradle on the wall 21 mm approx. 2.5... -
Page 80: Index
Index Access code ....for a PABX ....Access protection . - Page 81 ....Cancelling preselection ... Care of the telephone ... . CD, see Call divert...
- Page 82 screensaver ....setting ..... . symbols .
- Page 83 Index Icon alarm clock ....answering machine ..for new messages ....keypad lock .
- Page 84 new message icon ... . . playing back ....Microphone ..... Missed calls .
- Page 85 ....Talk key ..... Telephone jack, pin connections Text message, see SMS Tone dialling .