Advertisement
Available languages
Available languages
Quick Links
Model: SA 315 (DPST):
240 Volt 40 AMP
Digital Industrial Timer Switch
Double-Pole, Single Throw
Outdoor Industrial Timer
Zip-Set Technology Auto Sunset On
Illuminated Display and Keypad
Battery Backup (batteries included)
Installation
Step 1
WARNING:
Turn power OFF at circuit
breaker or remove fuse.
Step 3
Study your wiring diagram and decide which knockouts to use. Select the knockouts to be used for your
wire cable clamp or conduit connector and remove the appropriate knockout. Install the wire cable clamps with locknuts.
You are now ready to mount the timer on the wall.
Knockout
Outer Circle is fit for a 3/4 inch
cable
clamp wire connector or
conduit
Outdoor Timer's 3 mounting hole location
Step 4
Mount case in a vertical position
using mounting holes provided.
Step 5
WIRING:
Connect in accordance with Local and
National Electrical Codes (NEC). See
suggested circuit diagram below. DO
NOT USE ALUMINIUM WIRE.
Caution: Only use for 240 VAC
loading only. Otherwise the
timer can be damaged.
Easy wiring
1. Strip 5/8 inch of the wire insulation.
5/8"
2. Unscrew, lift and twist plastic protective cover
to access the terminals.
3. Identify your Line and Load wires.
4. Run your wires through the knockouts and
clamp wire connectors (not provided).
cable
5. Connect and tighten the ground wire to
grounding terminal at bottom of case.
7.Insert the wire ends under the proper terminal
plates and tighten the screws firmly.
8. Replace the plastic protective cover.
Step 6
Restore power at fuse
box or circuit breaker.
Turn Power ON
Zip-Set Quick Set-up
Zip-set Technology "Sunset Auto on" is easy to program. The clock is set at the factory to the (212) Eastern time zone so you just need to enter
your area code before using. The timer will automatically adjust for your location to turn your appliances and lighting on at sunset. Your SA 315 will
automatically adjust to the changing sunset times as the year progresses.
Your program settings are protected by the integrated back-up battery; even with brown-outs or black-outs, the Zip-set will store settings and turn
your lights and appliances correctly on at sunset once the electric current resumes.
Please read this manual, before installing your new Sylvania Timer.
Inner circle is fit for 1/2 (3/8) inch
cable clamp wire connector or
conduit
Mount the timer in the desired location using the three mounting holes (A,B,C) provided. The best
A
mounting position for the timer is at eye level with sufficient room for the door cover to swing fully open.
Affix box to wall
The top mounting hole (A) is a slotted type mounting hole, so measure and secure this to the wall with the first (A) screw.
The head of the screw (or fastener) should be slightly larger than the narrow portion of the slotted hole.
Hang the timer on screw A. Screw timer into the wall using the remaining two mounting holes (B & C) to provide
B
C
a secure permanent mounting for the timer.
Back of timer unit
Line
240 V.A.C.
Input Only
PRESSURE PLATE
TERMINAL SCREW
MAKE SURE WIRE
INSULATION CLEARS
PRESSURE PLATE
Fast Set Up Instructions for Zip-Set™ Timers
Find and press "Mode" button, until you see the Zip-Set icon
1
Then depress & hold the Clear (Zip-Set) button until the display flashes.
Set your area code
2
3
Set how many hours after sunset that you wish the fixture to
turn the power off (2, 4, 6, 8, 10, 12, 14 or 16 hrs).
Detailed set up and function instructions are on back side of this manual.
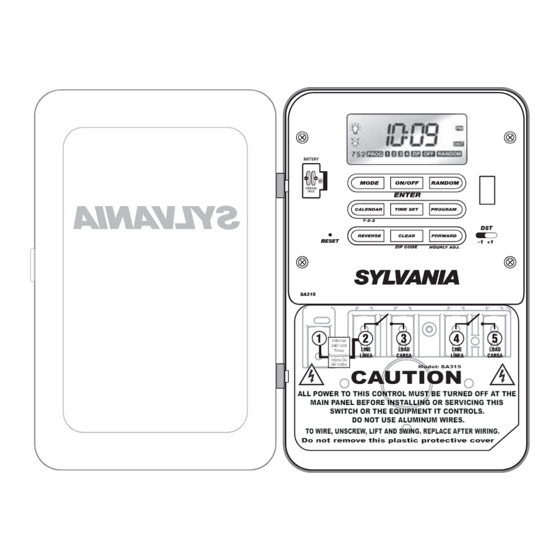
BATTERY
SA315
1
2
3
4
5
Internal
240 Volt
LINE
LOAD
LINE
LOAD
Timer
Temporizador
LÍNEA
CARGA
LÍNEA
CARGA
Interno De
240 Voltios
Model: SA315
CAUTION
ALL POWER TO THIS CONTROL MUST BE TURNED OFF AT THE
MAIN PANEL BEFORE INSTALLING OR SERVICING THIS
SWITCH OR THE EQUIPMENT IT CONTROLS.
DO NOT USE ALUMINUM WIRES.
TO WIRE, UNSCREW, LIFT AND SWING. REPLACE AFTER WIRING.
Do not remove this plastic protective cover
Positioning Timer
Step 2
Remove the old timer, identify wiring and disconnect
wires from the timer you are replacing or map out
a new location for your timer.
ounting the timer, it is important
When m
that it is in an environment which is free from
excessive contaminants such as oil, moisture, or dirt.
Always mount timer case in a vertical position.
Ensure that the timer position and its knockouts are
in line with your planned wiring. Knockouts
are made to industrial standards: 1/2 , 3/8, or 3/4 inch wire
cable clamp connectors and locknuts.
Attach appropriate wire cable clamps to the timer box.
Please make the jumper wire according to the load requirement.
The minimum size wire for a 15 AMP general purpose circuit is
AWG 14 wire. For 20 AMP circuit, use AWG 12 wire. For larger
loads such as dryers, use not less than AWG 10 wire and follow
Internal
240
Timer
Line 1
Line 2
Ground
Step 7
Test Timer:
Press ON/OFF
Button
To set:
use "Reverse" / "Forward" buttons and ON/OFF
to Confirm or Enter.
or
then to set press
Yes- You are DONE!
Thank you for purchasing the SA 315 an Industrial 40
Amp digital Timer.
It is an easy to set up and operate industrial timer with
Zip-Set Auto Sunset On Technology and other
advanced features.
Features:
• Zip-Set Technology; automatically turns lights on at
sunset time – just enter your phone area code.
• 4 independent on/off programmable timers with 1 minute
setting intervals.
• Daylight Savings Time (DST) switch.
• Timers can be set to work weekends(2), weekdays(5), or
all week(7).
• Random function for security.
• Manual Override.
• 40 Amp Heavy Duty Relay
This product has passed
ETL testing. It is certified
and complies with both
U.S. and Canadian
product safety standards.
Jumper Wire
National Electrical Codes.
Volt
Jumper wire
(not included)
to
CLEAR
ZIP-SET
BATTERY
(238mm) H
9.4 inch
SA315
1
2
3
3
5
Internal
240 Volt
LINE
LOAD
LINE
LOAD
Timer
Temporizador
LÍNEA
CARGA
LÍNEA
CARGA
Interno De
240 Voltios
Model: SA315
CAUTION
ALL POWER TO THIS CONTROL MUST BE TURNED OFF AT THE
MAIN PANEL BEFORE INSTALLING OR SERVICING THIS
SWITCH OR THE EQUIPMENT IT CONTROLS.
DO NOT USE ALUMINUM WIRES.
TO WIRE, UNSCREW, LIFT AND SWING. REPLACE AFTER WIRING.
Do not remove this plastic protective cover
Outdoor timer case
(146mm) W
5.75 inch
Knockouts
5
Load
240 V.A.C.
Input Only
Advertisement

Related Manuals for Sylvania SA 315 DPST


Summary of Contents for Sylvania SA 315 DPST
- Page 1 This product has passed Do not remove this plastic protective cover ETL testing. It is certified and complies with both U.S. and Canadian Please read this manual, before installing your new Sylvania Timer. product safety standards. Positioning Timer Step 2 Installation...
- Page 2 Timer Operation Manual Override On/Off Button. The override setting will not change the next timed event. To override the On or Off settings, press the Activate the Zip-Set Sunset timer MODE Button until "ZIP" icon is displayed. The Zip-Set sunset timer is set and active. 1.
- Page 3 No quite esta cubierta protectora de plástico Está certificado y cumple con ambas normas de seguridad de productos, las de los EE.UU. y Por favor lea este manual antes de instalar su temporizador Sylvania nuevo. las de Canadá. Posicionamiento Del Temporizador Paso 2: Instalación...
- Page 4 Funcionamiento del temporizador Control manual On/Off (Encendido/Apagado). La configuración manual no cambiará en el próximo evento Para usar control manual en los ajustes On u Off (Encendido u Apagado), presione el botón temporizado. Active el temporizador Zip-Set Sunset Botón MODE hasta que se visualice el icono "ZIP". El temporizador Zip-Set está ajustado y activo. 1.