STANLEY AIRPRO 120 CDC120SCA - 12 Volt Corded Compressor Manual
- Instruction manual (2 pages)
Advertisement
INTRODUCTION
Congratulations on purchasing your new Stanley® AIRPRO 120® Corded Digital Air Compressor with Digital Gauge. Read this Instruction Manual and follow the instructions carefully before using this unit.
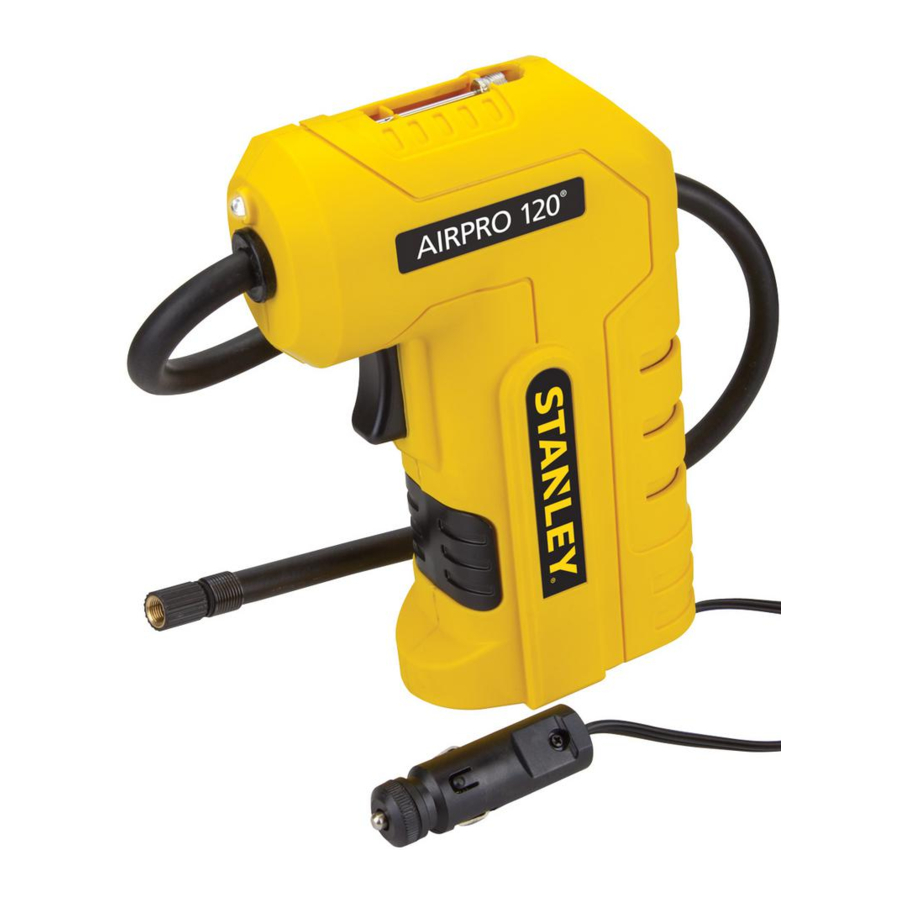
FEATURES
- LED Area Light
- Nozzle Adapter Storage Compartment
- Storage Clips (2 in total)
- Compressor Trigger
- Air Hose and Sure Fit ® Nozzle
- 12V DC Accessory Plug
- 12V DC Accessory Plug Storage Compartment
- Digital Display (PSI Pressure Value)
- Nozzle Adapter
- Decrease Pressure Control Button (–)
- Power Button
- Increase Pressure Control Button (+)
INSTALLING THE AIR HOSE STORAGE CLIPS

Position each of the (2) Air Hose Storage Clips against one of the slots on the right side of the unit; then simply snap them into the top slot and bottom slot respectively (as shown).
PORTABLE COMPRESSOR
This 12 Volt DC Air Compressor is the designed for use with vehicle tires, trailer tires and recreational inflatables. The compressor hose with tire fitting is stored on the storage clips at the side of unit. A Nozzle Adapter is supplied and is stored in the Nozzle Adapter Storage Compartment. Refer to the "Features" section to locate all components.
The 12V DC Air Compressor can be used in either Auto Mode or Manual Mode, as detailed in the following sections.

When the compressor is operated either in the Manual Mode or at a low PSI in the Auto Mode, the unit may start in low and gradually rev up. When the compressor is operated at higher PSIs in Auto Mode, the unit may operate normally for several minutes, then rev down for a few minutes before returning to normal operation. This feature protects the unit from overheating during normal use. In any event, do not operate the compressor continuously for extended periods of time (approximately 10 minutes, depending on ambient temperatures), as it may overheat. This could damage the compressor. If the compressor must be operated for longer periods: every 10 minutes press and hold the Power Button for one second to turn the compressor off, then restart after a cooling down period of approximately 30 minutes.
Note: The LED Area Light will remain lit as long as the unit is turned on.
Inflating Tires or Products with Valve Stems in Auto Mode
In the Auto Mode, the desired pressure value can be preset and stored in the unit's memory and the compressor will automatically stop once this preset pressure is reached. The Power Button turns the unit on and off. The Increase Pressure Control Button (+) and Decrease Pressure Control Button (–) are used to select a pressure value for when the compressor is used in Auto Mode. All three buttons are located on the control panel on the back of the unit (refer to the "Features" section to locate).
- Connect the unit's 12V DC Accessory Plug to a vehicle's accessory outlet or other 12 volt DC power source. Rotate the plug slightly to make sure there is good contact. Position the unit to allow adequate space for proper ventilation of the compressor.
- Screw the Sure Fit ® nozzle onto the valve stem. Do not overtighten.
- Press the Power Button to turn the unit on. The digital display will alternately show the flashing pre-set PSI value (that was last set by the Pressure Control Buttons) for 2 seconds; then it will flash the current pressure of the item being inflated for 5 seconds. The display will then light solid.
- Press the Increase (+) and Decrease (–) Pressure Control Buttons to select the desired pressure from a range preset values (between 3 and 120), which will display on the backlit LCD screen. Hold the Button to scroll upward or downward more quickly. Once the desired pressure has been reached, release the Button and wait two seconds. The digital display will flash the new selected pressure. This pressure value is now stored in the unit's memory until it is manually reset.
- Press the Power Button once more to begin inflation. The digital display will only show the current pressure of the object (which will light solid) to indicate that the compressor is working. Monitor the pressure on the LCD screen.
- When desired pre-set pressure is reached, the compressor will stop automatically. Press and hold the Power Button for one second to turn off the unit.
- Unscrew and remove the Sure Fit ® nozzle from the valve stem.
- Disconnect the unit's 12V DC Accessory Plug from the vehicle's accessory outlet or other 12 volt DC power source. Store the plug inside the storage compartment at the base of unit.
IMPORTANT AUTO MODE OPERATING NOTES:
- To interrupt the inflation process, press the Power Button once. To resume the inflation process, press the Power Button again.
- To switch to Manual Mode, press the Power Button once to stop the inflation process, then press the Compressor Trigger. (The unit cannot switch to the Manual Mode while it is inflating.)
- To shut down the unit at any time, press and hold the Power Button for one second.
- To select a new pressure value, press the Power Button once, then press the Increase (+) or Decrease (–) Pressure Control Buttons and resume the inflation process at step 5.
Inflating Tires or Products With Valve Stems in Manual Mode
In the Manual mode, the Compressor Trigger on the front of the unit is used to operate the compressor until the desired pressure value is reached.
- Connect the unit's 12V DC Accessory Plug to a vehicle's accessory outlet or other 12 volt DC power source. Rotate the plug slightly to make sure there is good contact. Position the unit to allow adequate space for proper ventilation of the compressor.
- Screw the Sure Fit ® nozzle onto the valve stem. Do not overtighten.
- Press the Power Button to turn the unit on. The digital display will alternately show the flashing pre-set PSI value (that was last set by the Pressure Control Buttons) for 2 seconds; then it will flash the current pressure of the item being inflated for 5 seconds (which will then light solid).
- Press the Compressor Trigger to begin the inflation process. The digital display will only show the current pressure of the object which will light solid to indicate that the compressor is working. Monitor the pressure on the LCD screen.
- When the desired pressure is reached, release off the Compressor Trigger and the compressor will stop. Press and hold the Power Button for one second to turn off the unit.
- Unscrew and remove the Sure Fit ® nozzle from the valve stem.
- Disconnect the unit's 12V DC accessory plug from the vehicle's accessory outlet or other 12 volt DC power source. Store the plug inside the storage compartment at the base of unit.
IMPORTANT MANUAL MODE OPERATING NOTES:
- To interrupt the inflation process, release the Compressor Trigger. To resume the inflation process, press the Compressor Trigger again.
- To switch to Auto Mode, release the Compressor Trigger, then press the Increase (+) or Decrease (–) Pressure Control Buttons or the Power Button. (The unit cannot switch to the Auto Mode while it is inflating.)
- To shut down the unit at any time, press and hold the Power Button for one second.
Inflating Other Inflatables Without Valve Stems
Inflation of other items requires use of the nozzle adapter.
Rotate the plug slightly to make sure there is good contact. Position the unit to allow adequate space for proper ventilation of the compressor.
- Screw the nozzle adapter into the Sure Fit ®
- Insert the nozzle adapter into item to be inflated.
- Press the Power Button to turn the unit on. The digital display will alternately show the flashing pre-set PSI value (that was last set by the Pressure Control Buttons) for 2 seconds; then it will flash the current pressure of the item being inflated for 5 seconds (which will then light solid).
- Follow either steps 4 through 6 in the "Inflating Tires or Products With Valve Stems at Auto Mode" section or steps 4 through 5 in the "Inflating Tires or Products With Valve Stems at Manual Mode" section.
![]()
Small items such as volleyballs, footballs, etc. inflate very rapidly. Do not over-inflate. - Disconnect the nozzle adapter from the inflated item.
- Unscrew and remove the nozzle adapter from the Sure Fit
- Disconnect the unit's 12V DC Accessory Plug from the vehicle's accessory outlet or other 12 volt DC power source. Store the plug inside the storage compartment at the base of unit.
USING THE LED AREA LIGHT
The Area Light is controlled by the Compressor. When the Compressor is turned on, the Area Light is activated. When the Compressor is tuned off, the Area Light turns off. Press the Power Button (refer to the "Features" section to locate) to turn the Compressor and Area Light on. Press the Power Button and hold for one second to turn the unit off. Make sure the Power Button is turned off when the unit is being stored.
CARE AND MAINTENANCE
Never submerge the unit in water. If the unit gets dirty, gently clean the outer surfaces of the unit with a soft cloth moistened with a mild solution of water and detergent. Except for the fuse in the 12V DC Accessory Plug, there are no user-replaceable parts.
Fuse Replacement (in Vehicle Accessory Plug)
")
- Unscrew the end cap of the plug (counterclockwise).
- Remove the fuse and check it with a continuity checker to see if it is good or blown.
- Replace with a new 15 amp fuse, if needed.
- Carefully reassemble (turning clockwise). DO NOT OVERTIGHTEN.
- Test for proper operation of the unit.
TROUBLESHOOTING
Air Compressor will not turn on
- Make sure the Power Button is pressed to turn the unit on and that all directions in the "Portable Compressor" section have been followed exactly.
- Make sure the 12V DC Accessory Plug is properly connected to a functioning DC power source. Rotate the plug slightly to make sure there is good contact.
- The fuse in the 12V DC Accessory Plug may be blown.
Air Compressor will not inflate
- Make sure the Power Button is pressed to turn the unit on and that all directions in the "Portable Compressor" section have been followed exactly.
- Make sure the nozzle is securely screwed on to the valve stem when attempting to inflate tires; or that the nozzle adapter is securely screwed into the Sure Fit on all other inflatables.
LED Area Light does not come on
- Make sure the Power Button has been pressed to turn the unit on (when the Compressor is turned on, the Area Light turns on).
If the unit does not operate after taking the steps given above, contact the manufacturer at (877) 571-2391.
ACCESSORIES
Recommended accessories for use with your tool may be available from the manufacturer. If you need assistance regarding accessories, please contact the manufacturer at (877) 571-2391.

The use of any accessory not recommended for use with this appliance could be hazardous.
SERVICE INFORMATION
Whether you need technical advice, repair, or genuine factory replacement parts, contact the manufacturer at (877) 571-2391.
SPECIFICATIONS
| Input: | 12V DC |
| LED Area Light: | 1 white LED |
| Compressor: 12V DC Acccessory | 120 PSI maximum |
| Plug Fuse: | 15A |
Sure Fit® and AIRPRO® are registered U.S. trademarks owned by Baccus Global, LLC.
Imported by Baccus Global LLC, One City Centre, 1 North Federal Highway, Suite 200, Boca Raton, FL 33432
www.Baccusglobal.com
1-877-571-2391

Documents / Resources
References
Download manual
Here you can download full pdf version of manual, it may contain additional safety instructions, warranty information, FCC rules, etc.
Download STANLEY AIRPRO 120 CDC120SCA - 12 Volt Corded Compressor Manual
Advertisement
Thank you! Your question has been received!


Need Assistance?
Do you have a question about the AIRPRO 120 CDC120SCA that isn't answered in the manual? Leave your question here.