Advertisement
Quick Links
ORDERING REPLACEMENT PARTS
To order replacement parts, contact the ICON Health & Fitness, Ltd. office, or write:
ICON Health & Fitness, Ltd.
Customer Service Department
Unit 4, Revie Road Industrial Estate
Revie Road
Beeston
Leeds, LS118JG
UK
Tel:
08457 089 009
Outside the UK: 0 (044) 113 387 7133
Fax: 0 (044) 113 387 7125
To help us assist you, please be prepared to give the following information:
• The MODEL NUMBER of the product (PETL30134)
• The NAME of the product (PROFORM
®
360 P treadmill)
• The SERIAL NUMBER of the product (see the front cover of this manual)
• The KEY NUMBER and DESCRIPTION of the desired part(s) (see the PART LIST and the EXPLODED DRAW-
ING in the centre of this manual)
Part No. 222837 R0505A
Printed in USA © 2005 ICON IP, Inc.
Class H Fitness Product
Model No. PETL30134
Serial No.
Serial
Number
Decal
QUESTIONS?
As a manufacturer, we are com-
mitted to providing complete
customer satisfaction. If you
have questions, or if there are
missing or damaged parts,
please call:
08457 089 009
or write:
ICON Health & Fitness, Ltd.
Customer Service Department
Unit 4
Revie Road Industrial Estate
Revie Road
Beeston
Leeds, LS118JG
UK
email: csuk@iconeurope.com
CAUTION
Read all precautions and instruc-
tions in this manual before using
this equipment. Save this manual
for future reference.
USER'S MANUAL
Visit our website at
www.iconeurope.com
Advertisement

Related Manuals for Pro-Form 360P PulseMonitor


Summary of Contents for Pro-Form 360P PulseMonitor
- Page 1 ORDERING REPLACEMENT PARTS To order replacement parts, contact the ICON Health & Fitness, Ltd. office, or write: ICON Health & Fitness, Ltd. Class H Fitness Product Customer Service Department Unit 4, Revie Road Industrial Estate Model No. PETL30134 USER'S MANUAL Revie Road Serial No.
- Page 2 NOTES TABLE OF CONTENTS IMPORTANT PRECAUTIONS ..............3 BEFORE YOU BEGIN .
- Page 3 SUGGESTED STRETCHES IMPORTANT PRECAUTIONS The correct form for several basic stretches is shown at the right. Move slowly as you stretch—never bounce. WARNING: 1. Toe Touch Stretch To reduce the risk of burns, fire, electric shock, or injury to persons, read the following important precautions and information before operating the treadmill.
- Page 4 CONDITIONING GUIDELINES 21. Inspect and properly tighten all parts of the this manual. Never remove the motor hood un- treadmill regularly. less instructed to do so by an authorised ser- vice representative. Servicing other than the ergy. Only after the first few minutes does your body 22.
- Page 5 Locate the Reed Switch (10) and the Magnet (18) on BEFORE YOU BEGIN the left side of the Pulley (17). Turn the Pulley until the 3 mm Magnet is aligned with the Reed Switch. Make sure that the gap between the Magnet and the Reed Congratulations for selecting the new PROFORM ing this manual, please call our Customer Service ®...
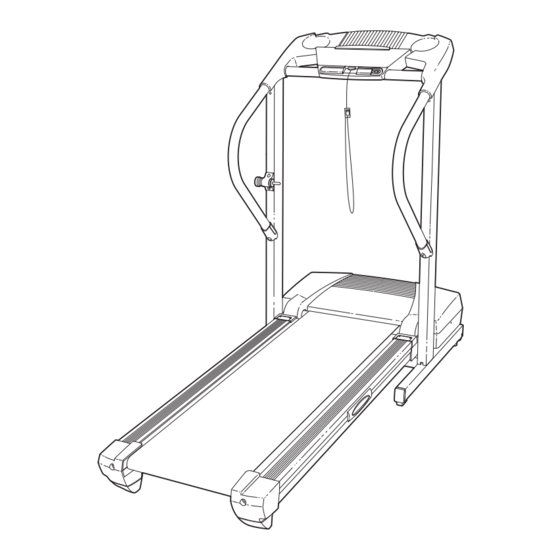
- Page 6 ASSEMBLY TROUBLESHOOTING Assembly requires two persons. Set the treadmill in a cleared area and remove all packing materials. Do not Most treadmill problems can be solved by following the steps below. Find the symptom that applies, and dispose of the packing materials until assembly is completed. Note: The underside of the treadmill walking belt is follow the steps listed.
- Page 7 HOW TO LOWER THE TREADMILL FOR USE 3. With the help of a second person, raise the Uprights (25, 29) to the vertical position. 1. Hold the upper end of the treadmill with your right hand as shown. Using your left hand, pull the latch knob to the left Open part bag B.
- Page 8 6. Place the Console Base (47) on the Right Handrail (72) HOW TO FOLD AND MOVE THE TREADMILL and the Left Handrail (not shown). Attach the Console Base with four 3/4” Screws (61) (only two Screws are shown). Do not overtighten the Screws. HOW TO FOLD THE TREADMILL FOR STORAGE Insert the Wire Harness (42) through the two indicated Before folding the treadmill, adjust the incline to the...
- Page 9 When you are finished using the treadmill, move When you are finished exercising, remove the OPERATION AND ADJUSTMENT the on/off switch near the power cord to the off po- key. sition. Step onto the foot rails, press the Stop button, and THE PERFORMANT LUBE WALKING BELT adjust the incline of the treadmill to the lowest...
- Page 10 To stop the walking belt, press the Stop button. Note: The console can CONSOLE DIAGRAM The Time/Incline display will begin to flash. To display speed and dis- tance in either miles or restart the walking belt, press the Start button or kilometers.
- Page 11 PART LIST—Model No. PETL30134 PART IDENTIFICATION CHART R0505A Remove this chart and use it to identify small parts during assembly. Save No. Qty. Description No. Qty. Description No. Qty. Description this chart and the EXPLODED DRAWING/PART LIST for future reference. Hood Wire Cover Plastic Bushing...
- Page 12 EXPLODED DRAWING—Model No. PETL30134 R0505A...