Advertisement
Table of Contents
- 1 Main Features
- 2 Table of Contents
- 3 Installing Batteries
- 4 Part Names and Functions
- 5 Making the Connections
- 6 Operation
- 7 Storing Settings (Write Operation)
- 8 Changing the Operation of the Heel Switch
- 9 Creating "Custom" Wah Effects (Customize Mode)
- 10 Setting the Drive/Noise Suppressor (DRIVE SELECT Mode)
- 11 Returning Settings to Their Factory Defaults (Factory Reset)
- 12 Resetting the Pedal Sensitivity (PEDAL CALIBRATION Mode)
- 13 Setting Mode Chart
- 14 Troubleshooting
- 15 Sample Settings
- 16 Specifications
- Download this manual
PW-10
WAH PEDAL
Owner's Manual
Thank you, and congratulations on your choice of
BOSS PW-10 Wah Pedal.
Before using this unit, carefully read the sections
entitled: "USING THE UNIT SAFELY" and
AC
DC
"IMPORTANT NOTES" (separate sheet). These
AC & BATTERY
POWERED
sections provide important information concerning the
proper operation of the unit. Additionally, in order to
feel assured that you have gained a good grasp of
FET
every feature provided by your new unit, this manual
should be read in its entirety. The manual should be
saved and kept on hand as a convenient reference.
Advertisement
Table of Contents

Related Manuals for Boss V-Wah PW-10


Summary of Contents for Boss V-Wah PW-10
- Page 1 PW-10 WAH PEDAL Owner’s Manual Thank you, and congratulations on your choice of BOSS PW-10 Wah Pedal. Before using this unit, carefully read the sections entitled: “USING THE UNIT SAFELY” and “IMPORTANT NOTES” (separate sheet). These AC & BATTERY POWERED sections provide important information concerning the proper operation of the unit.
-
Page 2: Main Features
Main Features The world’s first modeling wah pedal, utilizing COSM technology to create a wide variety of wah sounds Eight different sounds include an original BOSS “ADVANCED” tone and the sound of “vintage wah” pedals that are now so hard to obtain, “DOUBLE RESONANCE,” which cre- ates an analog synth-like sound, “UNI-V,”... -
Page 3: Table Of Contents
Contents Main Features... 2 Installing Batteries ... 4 Part Names and Functions ... 6 Making the Connections... 10 Operation ... 13 Storing Settings (Write Operation) ... 18 Changing the Operation of the Heel Switch... 20 Creating “Custom” Wah Effects (Customize Mode)... 22 Setting the DRIVE/Noise Suppressor (DRIVE SELECT Mode)... -
Page 4: Installing Batteries
Installing Batteries fig.02 Insert the included batteries as shown in fig- ure, being careful to orient the batteries cor- rectly. • Batteries are supplied with the unit. The life of these batteries may be limited, however, since their primary purpose was to enable testing. - Page 5 * When turning the unit upside-down, handle with care to avoid dropping it, or allowing it to fall or tip over. * When the batteries run down, the ON/OFF indicator gets dim. If this happens, replace with new batteries. * When replacing the batteries, use six R6/LR6 (AA) type. * Battery life can vary depending on battery type.
-
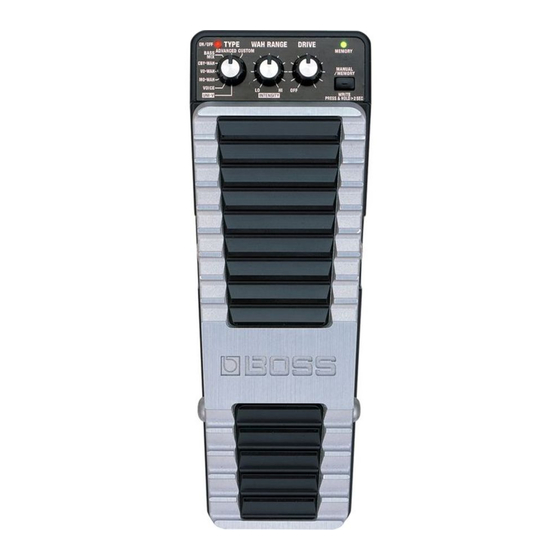
Page 6: Part Names And Functions
Part Names and Functions fig.03 1. AC Adaptor Jack This jack is for connecting an AC adaptor (BOSS PSA-series, sold separately). Using an AC adaptor makes possible long perfor- mances with no worry about batteries going dead. 2. INPUT Jack This jack is for connection to an electric guitar or bass guitar. - Page 7 4. Pedal Controls the wah effect. Step down hard on the pedal, and the toe switch is activated. Rock the pedal back, then put firm pressure on the heel to activate the heel switch. You can change the pedal torque (the force or load required to pivot the pedal) by adjusting the screw located on the right side of the unit (shown by arrow).
- Page 8 Part Names and Functions fig.04 7. ON/OFF Indicator This lights up when the wah effect selected with the TYPE knob is on. The indicator blinks when the unit is in bypass. * When the batteries run down, the ON/ * The ON/OFF indicator shows whether the 8.
- Page 9 9. TYPE Knob This selects the effect to be controlled with the pedal. (p. 14) 10. WAH RANGE Knob This adjusts the range of frequencies to which the wah effect is applied. * When TYPE is set to “VOICE,” this knob selects the type of expression used.
-
Page 10: Making The Connections
Making the Connections Effector Guitar Amplifier Bass Amplifier fig.05 AC Adaptor PSA-series (option) Electric Bass Guitar Guitar... - Page 11 Should you experience such problems, you should relocate such wireless devices so they are at a greater distance from this unit, or switch them off. • Use a cable from Roland to make the connection. If using some other make of connection cable, please note the following precautions.
- Page 12 Making the Connections Turninng the Power On Once the connections have been completed, turn on power to your various devices in the order specified. By turning on devices in the wrong order, you risk causing malfunction and/or damage to speakers and other devices. •...
-
Page 13: Operation
Operation So you are better able to follow along with the following explanations, you should first step down firmly on the pedal to switch on the toe switch, and turn on the wah effect (ON/OFF indicator is lit). Also, set the WAH RANGE knob to the center position, and the DRIVE knob to OFF, and press the MANUAL/MEMORY button to set it to “MEMORY”... - Page 14 * All product names mentioned in this document are trademarks or registered trademarks of their respective owners. Those companies are not affiliated with BOSS and have not licenced or autho- rized BOSS's PW-10. Their marks are used solely to identify the equipment whose sound is simulated by BOSS's PW-10.
- Page 15 2. Rotate the WAH RANGE knob to adjust the frequencies to which the wah effect is to be applied. The band of frequencies to which the effect is applied rises as the knob is turned to the right (clockwise); turning the knob to the left lowers the range of frequencies. Turning this to the left is effective when using a bass guitar.
- Page 16 Operation VOICE Type Played WAH RANGE Pedal Talking modulation-like sound Realistic human voice Remarks...
- Page 17 3. If you want to add distortion, turn the DRIVE knob to the right. The distortion increases the more the knob is turned to the right. You can select and store one of the eight different “distortion” types, such as “METAL ZONE,”...
-
Page 18: Storing Settings (Write Operation)
Do not switch off the power while a write operation is in progress. 1. Hold down the MANUAL/MEMORY button for at least two seconds. The MEMORY indicator blink, and the PW-10 is put into write standby. fig.07 2. Press the MANUAL/MEMORY button to select the memory (number) to which you want to store the sound. - Page 19 3. When you want to change the output level for DRIVE, use the DRIVE knob to adjust the volume level. * You cannot adjust this output level if DRIVE is off when Step 1 is carried out. 4. Hold down the MANUAL/MEMORY button for at least two seconds. The write operation is completed when the MEMORY indicator begin to blink more rapid- fig.09 Blink...
-
Page 20: Changing The Operation Of The Heel Switch
Changing the Operation of the Heel Switch You can select either of two ways (A and B) to switch between “MANUAL” and “MEMORY 1–3” when the rear switch is pressed. A. Each time the heel switch is pressed, the unit switches to “MANUAL” and then through “MEMORY (1–3)”... - Page 21 You can use the following procedure to switch the operation of the rear switch (A/B). 1. Turn off the power to the guitar amp. 2. Switch off the PW-10’s power. • When running on battery power: Disconnect the connection plug from the INPUT jack.
-
Page 22: Creating "Custom" Wah Effects (Customize Mode)
• When running on power from an AC adaptor: Insert the AC adaptor plug into the AC Adaptor jack. The ON/OFF indicator blinks seven times, and the PW-10 switches to Custom- ize mode. 6. Turn on the power to the guitar amp. - Page 23 7. With the TYPE knob, select the wah type on which you want to base your custom effect. * Until the TYPE knob is turned, the last wah type set to CUSTOM remains selected. TYPE knob Base wah type CUSTOM DOUBLE (factory setting) RESONANCE...
- Page 24 Creating “Custom” Wah Effects (Customize Mode) When the knob is at the center position, the sonic qualities are as modeled. * When selecting MO-WAH, the high frequency range is being boosted as the knob is turned to the right. 10.When you have obtained the desired wah effect, press the MANUAL/MEM- ORY button.
- Page 25 Rather than using a low- er impedance, the PW-10 models the effect that this low impedance has on the tone. Presence controls this effect. Turning the...
-
Page 26: Setting The Drive/Noise Suppressor (Drive Select Mode)
• When running on power from an AC adaptor: Insert the AC adaptor plug into the AC Adaptor jack. The ON/OFF indicator blinks six times, and the PW-10 switches to DRIVE SE- LECT mode. 5. Turn on the power to the guitar amp. - Page 27 * All product names mentioned in this document are trademarks or registered trademarks of their respective owners. Those companies are not affiliated with BOSS and have not licenced or autho- rized BOSS's PW-10. Their marks are used solely to identify the equipment whose sound is simulated by BOSS's PW-10.
- Page 28 10.When you have finished making the settings, press the MANUAL/MEM- ORY button. After the MEMORY indicator blinks and the settings are saved, the PW-10 returns to normal operation (“MANUAL” mode). * You cannot switch between MEMORY and MANUAL while in DRIVE Mode.
-
Page 29: Returning Settings To Their Factory Defaults (Factory Reset)
Returning Settings to Their Factory Defaults (Factory Reset) You can restore the following settings to their factory-set values. Memory Settings Memory 1: red (p. 37) Memory 2: green (p. 37) Memory 3: yellow (p. 37) Analog synth-like sound CUSTOM Wah Type (p. 23) CUSTOM DRIVE Type (p. - Page 30 Returning Settings to Their Factory Defaults (Factory Reset) 1. Turn off the power to the guitar amp. 2. Switch off the PW-10’s power. • When running on battery power: Disconnect the connection plug from the INPUT jack. • When running on power from an AC...
-
Page 31: Resetting The Pedal Sensitivity (Pedal Calibration Mode)
Resetting the Pedal Sensitivity (PEDAL CALIBRATION Mode) The PW-10’s pedal sensitivity has been adjusted at the factory, so this procedure is not usually necessary. However, if the wah effect is not being applied when you press the pedal, if the effect sounds strange, or if the pedal exhibits other such prob- lems, use the following procedure to make the settings. - Page 32 Resetting the Pedal Sensitivity (PEDAL CALIBRATION Mode) 6. With the toe of the pedal completely depressed, press and then release the MANUAL/MEMORY button. The MEMORY indicator lights up red when the pedal position is acknowl- edged. fig.12 * If the pedal is not positioned correctly, the MEMORY indicator blinks red.
- Page 33 9. Tilt the pedal back again and press down with your heel to press the heel switch. When pressing of the switch is acknowl- edged, the MEMORY indicator blinks red, then the PW-10 returns to normal op- eration (“MANUAL” mode). Resetting the Pedal Sensitivity (PEDAL CALIBRATION Mode)
-
Page 34: Setting Mode Chart
Setting Mode chart The following table shows the correspondence between the TYPE knob and the mode that is set when the power is switched on while the MANUAL/MEMORY button is held down. TYPE knob CUSTOM ADVANCED BASS MIX CBY-WAH VO-WAH MO-WAH VOICE UNI-V... -
Page 35: Troubleshooting
Troubleshooting The power doesn't come on: IIs the guitar connected correctly to the INPUT jack? Check the connections again. * When running off batteries, the unit won't switch on unless there's something plugged into the INPUT jack. This helps conserve the batteries. - Page 36 Pedal not working normally: Is there any debris or other foreign mat- ter between the pedal and the PW-10? Check the underside of the pedal. If there is nothing unusual there, reset the pedal sensitivity (p.
-
Page 37: Sample Settings
Sample Settings Combination of wah and distortion (Factory Default Memory 1: red) fig.14 DRIVE Type (p. 26): GUV DIST Combination of UNI-V and distortion (Factory Default Memory 2: green) fig.15 DRIVE Type (p. 26): BLUES OD Analog synth-like sound (Factory Default Memory 3: yellow) fig.16 Customize Mode (p. - Page 38 Sample Settings Vintage Wah fig.17 Wah with wider range fig.18 Sound with distortion added fig.19 Rotary Sound fig.20...
- Page 39 “Talking” modulation sound fig.21 Bass Wah fig.22 Oh Yeah! fig.23 Synth bass sound fig.24 Customize Mode (p. 22): DOUBLE RESONANCE Sample Settings...
-
Page 40: Specifications
Specifications PW-10: Pedal Wah Nominal Input Level...-20 dBu Input Impedance...1 M Nominal Output Level...-20 dBu Output Impedance ...1 k Recommended Load Impedance...10 k Controls...Pedal Indicators ...ON/OFF Indicator Connectors...INPUT Jack Power Supply...DC 9V: Dry Battery (R6/LR6 (AA) type) x 6 or greater... - Page 41 Current Draw ...55 mA Dimensions ...100 (W) x 270 (D) x 100 (H; max.) mm Weight ...1.3 kg/ 2 lbs 14 oz (including batteries) Accessories...Owner's Manual Options...AC Adaptor (PSA-series) * 0 dBu = 0.775 Vrms * In the interest of product improvement, the specifications and/or appearance of this unit are subject to change without prior notice.
- Page 42 Setting Memo...
- Page 43 This product complies with the requirements of European Directive 89/336/EEC. FEDERAL COMMUNICATIONS COMMISSION RADIO FREQUENCY INTERFERENCE STATEMENT This equipment has been tested and found to comply with the limits for a Class B digital device, pursuant to Part 15 of the FCC Rules.
- Page 44 G6017356...