Table of Contents
Advertisement
Available languages
Available languages
Quick Links
Operator's Manual
2-Cycle
WEEDWACKER
Model Nos. 316.74082* & 316.74089*
*The last digit of the model number varies.
CAUTION: Before using this product,
read this manual and follow all its Safety
Rules and Operating Instructions.
Sears Brands Management Corporation, Hoffman Estates, IL 60179 U.S.A.
769-11986 / 00
®
GAS TRIMMERS
Visit our website: www.craftsman.com
• SAFETY
• ASSEMBLY
• OPERATION
• MAINTENANCE
• ESPAÑOL, P. 21
11/16
Advertisement
Chapters
Table of Contents

Related Manuals for Craftsman WEEDWACKER 316.74082 Series


Summary of Contents for Craftsman WEEDWACKER 316.74082 Series
- Page 1 CAUTION: Before using this product, • OPERATION read this manual and follow all its Safety • MAINTENANCE Rules and Operating Instructions. • ESPAÑOL, P. 21 Sears Brands Management Corporation, Hoffman Estates, IL 60179 U.S.A. Visit our website: www.craftsman.com 769-11986 / 00 11/16...
-
Page 2: Table Of Contents
TABLE OF CONTENTS NOTE: This operator's manual covers multiple models. Features may vary by model. Not all features in this manual are applicable Safety ..........2 to all models. - Page 3 • IMPORTANT SAFETY INSTRUCTIONS • READ ALL INSTRUCTIONS BEFORE OPERATING SAFETY WARNINGS FOR GAS UNITS WARNING: WARNING: When using the unit, all safety Gasoline is highly flammable and instructions must be followed. Please read these its vapors can explode if ignited. Take the following instructions before operating the unit in order to ensure the precautions: safety of the operator and any bystanders.
- Page 4 • Always turn the unit off when operation is delayed or when OTHER SAFETY WARNINGS carrying the unit from one location to another. Make sure all • Maintain the unit with care. Follow all maintenance instructions moving parts come to a complete stop. in this manual.
- Page 5 • SAFETY & INTERNATIONAL SYMBOLS • This operator's manual describes safety and international symbols and pictographs that may appear on this product. Read the operator's manual for complete safety, assembly, operating and maintenance and repair information. SYMBOL MEANING SYMBOL MEANING •...
-
Page 6: Know Your Unit
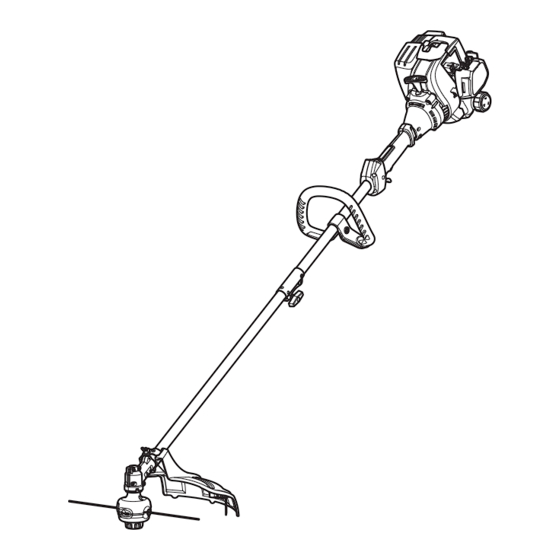
KNOW YOUR UNIT Model No. 316.74082* Muffler Spark Plug APPLICATIONS Starter Rope Grip As a trimmer: • Cutting grass and light weeds Throttle Air Filter • Edging Lockout Cover • Decorative trimming around trees, fences, etc. On/Off Switch Other optional attachments may be used with this unit. Handle ASSEMBLY TOOLS REQUIRED Fuel Cap... -
Page 7: Specifications
Model No. 316.74089* Spark Plug Muffler APPLICATIONS Starter Rope Grip As a trimmer: • Cutting grass and light weeds Air Filter Throttle Cover • Edging Lockout • Decorative trimming around trees, fences, etc. Other optional attachments may be used with this unit. On/Off Switch Handle Fuel Cap... -
Page 8: Assembly
ASSEMBLY INSTALLING THE CUTTING HEAD SHIELD Slot Cutting Head Mount Bracket MODEL NO. 316.74082* Shield WARNING: To prevent serious personal injury, never operate the unit without the cutting head shield in place. 1. Remove the wing nut and washer from the cutting head shield. 2. - Page 9 INSTALLING AND ADJUSTING THE HANDLE Handle 316.74082* Installing the Handle 1. Push the handle down onto the upper shaft housing (Fig. 5 or Fig. 6). Make sure the bolt hole faces to the right (Fig. 5 or Fig. 6). Upper Shaft Safety Label 2.
- Page 10 INSTALLING AND REMOVING THE ATTACHMENT The coupler enables the use of various optional attachments. WARNING: Before using any attachment, read and understand the manual that came with the attachment. Follow all safety information contained within. Loosen WARNING: To avoid serious personal injury and damage to the unit, shut the unit off before removing or Tighten installing an attachment.
-
Page 11: Oil And Fuel
OIL AND FUEL FUELING THE UNIT OIL AND FUEL MIXING INSTRUCTIONS The use of old and/or improperly mixed fuel is the most common cause WARNING: Gasoline is extremely flammable. Ignited of performance problems. Use only fresh, clean unleaded gasoline. vapors may explode. Always stop the engine and allow it Follow the instructions carefully for the proper gasoline/oil mixture. -
Page 12: Starting And Stopping
STARTING AND STOPPING WARNING: On/Off Switch Operate this unit only in a well-ventilated outdoor area. Carbon monoxide exhaust fumes can be (I = On / O = Off) lethal in a confined area. WARNING: Avoid accidentally starting the unit. To avoid serious injury, the operator and the unit must be in a stable Throttle position when pulling the starter rope (Fig. -
Page 13: Operation
OPERATION HOLDING THE UNIT WARNING: Always wear eye, hearing, hand, foot and body protection to reduce the risk of injury when operating this unit. WARNING: To prevent serious personal injury, avoid arm contact with the engine while operating the unit. The engine may be extremely hot. - Page 14 DECORATIVE TRIMMING When trimming around trees, posts, fences, etc., rotate the whole unit so that the cutting head is at a 30° angle to the ground (Fig. 15). Fig. 15 EDGING The trimmer attachment can be used for edging (Fig. 16). Alternatively, a bladed lawn edger attachment can also be purchased for use with this unit.
-
Page 15: Maintenance
MAINTENANCE MAINTENANCE SCHEDULE WARNING: To avoid serious personal injury, always stop the engine and allow it to cool before cleaning or maintaining Perform these required maintenance procedures at the frequency the unit. Never perform cleaning or maintenance while the stated in the table. These procedures should also be a part of any unit is running. - Page 16 Bump Knob 5 in. (12.5 cm) 5 in. (12.5 cm) Fig. 20 Removing Old Trimming Line and Obstructions (Bump Head) Flat-head 1. When the trimming line runs out, the last piece should automatically Screwdriver eject from the cutting head. If it does not, push the bump knob down and pull the remaining line out of the cutting head.
- Page 17 WARNING: Never use metal-reinforced line, wire, chain or rope. These can break off and become dangerous projectiles. NOTE: When using Craftsman® Hassle Free™ XTRA QUIET Spiral Line, use the line best suited for the job at hand. Medium-sized (red) Cutting line is designed for cutting grass and small weeds.
- Page 18 MAINTAINING THE AIR FILTER Air Filter Failure to maintain the air filter can result in poor performance or can cause permanent damage to the engine. Engine failure due to improper air filter maintenance is not covered by the product warranty. Cleaning the Air Filter 1.
-
Page 19: Cleaning And Storage
CLEANING AND STORAGE CLEANING STORAGE • Never store a fueled unit where fumes may reach an open flame WARNING: To avoid serious personal injury, always stop or spark. the engine and allow it to cool before cleaning or maintaining • Allow the engine to cool before storing. -
Page 20: Troubleshooting
TROUBLESHOOTING PROBLEM SOLUTION THE ENGINE WILL NOT START The fuel tank is empty Fill the fuel tank with properly-mixed fuel The primer bulb was not pressed enough Press the primer bulb 10 times or until fuel is visible Press the throttle lockout, squeeze the throttle control and pull the The engine is flooded starter rope until the engine starts The fuel is old (over 30 days) and/or improperly mixed... - Page 21 PRECAUCIÓN: Antes de utilizar, este • ENSAMBLAJE producto lea este manual y siga todas • OPERACIÓN las reglas de seguridad e instrucciones de operación. • MANTENIMIENTO Sears Brands Management Corporation, Hoffman Estates, IL 60179 U.S.A. Visite nuestro sitio web: www.craftsman.com 769-11986 / 00 11/16...
-
Page 22: Seguridad
TABLA DE CONTENIDO NOTA: Este manual del operador cubre múltiples modelos. Las características pueden variar según los modelos. No todas las Seguridad ......... . .22 características de este manual son aplicables a todos los Conozca su unidad . - Page 23 • INSTRUCCIONES DE SEGURIDAD IMPORTANTES • LEA TODAS LAS INSTRUCCIONES ANTES DE USAR LA ADVERTENCIAS DE SEGURIDAD PARA LAS UNIDADES UNIDAD A GASOLINA ADVERTENCIA: ADVERTENCIA: Se deben respetar La gasolina es todas las instrucciones de seguridad al usar la unidad. Por sumamente inflamable y sus vapores pueden explotar si se favor, lea estas instrucciones antes de utilizar la unidad para encienden.
- Page 24 • No se extienda demasiado. Siempre debe estar bien afirmado y OTRAS ADVERTENCIAS DE SEGURIDAD mantener el equilibrio adecuado. Tenga cuidado al trabajar • El mantenimiento de la unidad debe ser minucioso. Siga todas sobre escalinatas, cuestas empinadas o pendientes. Para evitar las instrucciones de mantenimiento de este manual.
- Page 25 • SÍMBOLOS INTERNACIONALES Y DE SEGURIDAD • Este manual del operador describe símbolos de seguridad e internacionales, así como pictogramas, que pueden aparecer en este producto. Lea el manual del operador para obtener información completa sobre seguridad, montaje, funcionamiento, mantenimiento y reparaciones. SÍMBOLOS SIGNIFICADO SÍMBOLOS SIGNIFICADO •...
-
Page 26: Conozca Su Unidad
CONOZCA SU UNIDAD Nº de modelo 316.74082* Silenciador Bujía de encendido APLICACIONES Empuñadura cuerda de arranque Como recortadora: • Corta hierbas y malezas ligeras Bloqueo del Tapa del • Bordeado acelerador filtro de aire • Recorte decorativo alrededor de árboles, vallas, etc. Interruptor encendido / Con esta unidad se pueden usar otros dispositivos de sujeción... -
Page 27: Especificaciones
Nº de modelo 316.74089* Bujía de encendido Silenciador Empuñadura APLICACIONES cuerda de arranque Como recortadora: • Corta hierbas y malezas ligeras Tapa del filtro de Bloqueo del • Bordeado aire acelerador • Recorte decorativo alrededor de árboles, vallas, etc. Interruptor Con esta unidad se pueden usar otros dispositivos de sujeción encendido / opcionales. -
Page 28: Ensamblaje
ENSAMBLAJE INSTALACIÓN DEL PROTECTOR DEL CABEZAL DE CORTE Ranura Protector del Soporte de Nº DE MODELO 316.74082* cabezal de corte montaje ADVERTENCIA: A fin de evitar que se produzcan lesiones personales graves, no opere nunca la unidad sin el protector del cabezal de corte en su lugar. 1. - Page 29 INSTALACIÓN Y AJUSTE DE LA MANIJA Manija 316.74082* Instalación de la manija 1. Oprima la manija hacia abajo sobre el alojamiento del eje Alojamiento superior (Fig. 5 or Fig. 6). Asegúrese de que el orificio del perno del eje Etiqueta de mire hacia la derecha (Fig.
- Page 30 INSTALACIÓN Y EXTRACCIÓN DEL ACCESORIO El acoplador permite el uso de varios accesorios opcionales. ADVERTENCIA: Antes de comenzar a utilizar cualquiera de los accesorios, lea y comprenda el manual que viene con dicho accesorio. Tenga en cuenta toda la Afloje información de seguridad que incluye.
-
Page 31: Aceite Y Combustible
ACEITE Y COMBUSTIBLE INSTRUCCIONES PARA LA MEZCLA DEL ACEITE Y EL COMBUSTIBLE El uso de combustible viejo y/o mal mezclado es la causa más frecuente de los problemas de rendimiento. Sólo se debe utilizar gasolina nueva, limpia y sin plomo. Siga atentamente las instrucciones para que la mezcla de gasolina/aceite sea adecuada. -
Page 32: Arranque Y Parada
ARRANQUE Y PARADA ADVERTENCIA: Interruptor Opere esta unidad solamente en un encendido / apagado área exterior bien ventilada. El monóxido de carbono de (I = Encendido / los gases de escape puede ser letal en un área confinada. O = Apagado) ADVERTENCIA: Evite arrancar la unidad por accidente. -
Page 33: Operación
OPERACIÓN CÓMO SOSTENER LA UNIDAD ADVERTENCIA: Utilice siempre protección ocular, auditiva, de manos, pies y corporal para reducir el riesgo de sufrir lesiones durante la operación de esta unidad. ADVERTENCIA: A fin de evitar lesiones personales graves, evite el contacto del brazo con el motor mientras opere la unidad. - Page 34 NOTA: El hilo puede romperse: • Si se enreda con objetos extraños • Por la fatiga normal del hilo • Si se intenta cortar plantas gruesas • Si se empuja el hilo contra objetos como paredes o cercas RECORTE DECORATIVO Cuando recorte alrededor de árboles, postes, vallas, etc., rote toda la unidad de manera que el cabezal de corte quede en un ángulo de 30°...
-
Page 35: Mantenimiento
MANTENIMIENTO PLAN DE MANTENIMIENTO ADVERTENCIA: A fin de evitar lesiones personales graves, siempre pare el motor y deje que se enfríe antes de Lleve a cabo los procedimientos necesarios de mantenimiento con limpiar o mantener la unidad. No realice ninguna tarea de la frecuencia indicada en la tabla. - Page 36 Perilla de impacto 5 pulgadas (12.5 cm) 5 pulgadas (12.5 cm) Fig. 20 Extracción de hilo de recorte viejo y obstrucciones (Cabezal de Destornillador impacto) Separación de cabeza plana 1. Cuando el hilo de corte se acaba, el último trozo es expulsado automáticamente del cabezal de corte.
- Page 37 Los mismos pueden desprenderse y convertirse en un proyectil peligroso. Cabezal NOTA: Cuando use la Línea Espiral Craftsman® Hassle Free™ XTRA de corte QUIET, use la línea que mejor se ajuste al trabajo en cuestión. La Orificios línea de tamaño mediano (de color rojo) está...
- Page 38 MANTENIMIENTO DEL FILTRO DE AIRE Filtro de Si no se mantiene el filtro de aire se puede obtener un rendimiento aire insuficiente o se pude dañar el motor de manera permanente. Las averías del motor ocasionadas por un mantenimiento inadecuado del filtro de aire no están cubiertas por la garantía del producto.
- Page 39 MANTENIMIENTO DE LA BUJÍA 1. Detenga el motor y déjelo enfriar. Agarre firmemente la pipa (capucha) y sáquela de la bujía. 2. Limpie alrededor de la bujía. Saque la bujía de la culata girándola en sentido contrario a la agujas del reloj con una llave de bujía de 5/8 de pulgada.
-
Page 40: Limpieza Y Almacenamiento
LIMPIEZA Y ALMACENAMIENTO LIMPIEZA ALMACENAMIENTO • Nunca almacene la unidad con combustible en lugares donde ADVERTENCIA: A fin de evitar lesiones personales las emanaciones pueden alcanzar llamas abiertas o chispas. graves, siempre pare el motor y deje que se enfríe antes de •... -
Page 41: Localización Y Solución De Problemas
SOLUCIÓN DE PROBLEMAS PROBLEMA SOLUCIÓN EL MOTOR NO ARRANCA Llene el depósito de combustible con combustible que se haya El depósito de combustible está vacío mezclado adecuadamente El bulbo del cebador no se presionó lo suficiente Oprima el bulbo del cebador 10 veces o hasta que se vea combustible Oprima el bloqueo del acelerador, apriete el control del acelerador y El motor se ahoga tire de la cuerda de arranque hasta que arranque el motor... - Page 42 NOTAS...
- Page 43 NOTAS...
- Page 44 NOTAS...
- Page 45 NOTAS...
- Page 46 NOTAS...
- Page 47 NOTAS...