Table of Contents
Advertisement
IMPORTADOR
Comercializadora Thomson de México,
S.A. de C.V.
Álvaro Obregón No. 151. Piso 13.
Col. Roma. Delegación Cuauhtémoc
C.P . 06700. México, D.F.
Telefono: 52-55-11-020360
RFC: CTM-980723-KS5
EXPORTER
Thomson Inc.
P .O. Box 1976
Indianapolis, IN 46206 - 1976
© 2005 Thomson Inc.
Trademark(s) ® Registered
Marca(s) Registrada(s)
Marque(s) Deposée
www.rca.com
Printed in China / Impreso en China
5589341A
Advertisement
Table of Contents
Troubleshooting

Related Manuals for RCA RTD210


Summary of Contents for RCA RTD210
- Page 1 C.P . 06700. México, D.F. Telefono: 52-55-11-020360 RFC: CTM-980723-KS5 EXPORTER Thomson Inc. P .O. Box 1976 Indianapolis, IN 46206 - 1976 © 2005 Thomson Inc. Trademark(s) ® Registered Marca(s) Registrada(s) Marque(s) Deposée www.rca.com Printed in China / Impreso en China 5589341A...
- Page 2 RTD210 RTD218 It is important to read this instruction book prior to using your new product for the first time. Es importante leer este manual antes de usar por vez primera su euipo.
-
Page 3: Fcc Information
For instructions on how to obtain service, refer to the warranty included in this Guide. Product Dolby Digital DVD Audio video receiver Brand: RCA Model: RTD210 / RTD218 Electrical current consumption 120V 60Hz 120 Watts IMPORTER Comercializadora Thomson de México, S.A. -
Page 4: Table Of Contents
Inserting Batteries into Remote Control .3 Set Up and Maintenance of the Receiver ......3 Protect your Components from Overheating . -
Page 5: Getting Started
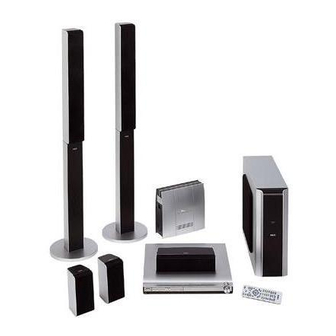
Unpacking The Speakers • one set of speakers including 1 set of left and right front speakers, 1 centre speaker, 1 subwoofer, 1 wireless signal receiver and 1 set of left and right rear speakers. RTD210 STANDBY One pair of “AAA”... -
Page 6: Inserting Batteries Into Remote Control
• Do not stack components directly on top of each other. • Allow adequate ventilation when placing your compo- nents in a stand. • Place the receiver near the top shelf of the stand so heated air rising from it will not affect other components. Disc you can play... -
Page 7: Connecting To Audio-Visual Components
S-video S-video provides a better connection for the video portion of the signal than composite video (yellow color terminal). When connecting S-video cable, a Composite video cable (yellow RCA connector) must also be used. Progressive scan You can enable the progressive scan function through the main menu only if the following requirments are fulfilled: 1. - Page 8 Speaker Polarity When connecting the speakers, make sure the polarities (“+” speaker wire to “+” on the receiver) of speaker wires and terminals are matched. If the cords are reversed, the sound will be distorted and lack bass (“out of phase”...
-
Page 9: Connecting The Speakers
3. Make sure the transmitter is in STANDBY mode before pressing the POWER button to turn the receiver on. 4. The LED on the receiver will flash when searching for a signal, they will turn green after the signal has been found. -
Page 10: Positioning Your Speaker
Positioning your speaker 1 Left, Right (Front Speakers) They carry primarily music and sound effects. 2 Center In surround mode, the center speaker carries much of the dialogue as well as music and effects. It should be set between the left and right speakers. 3 Surround (Rear Speakers) Their overall sound balance should be as close as possible to the front speakers. -
Page 11: Preferred Surround Placement
Getting Started Preferred surround placement Location If possible, place surround speakers to either side of the lis- tening area, not behind it. Courtesy Dolby Laboratories Height If space permits, install surround speakers 2-3 feet above viewers. This helps to minimize localization effects. Courtesy Dolby Laboratories Aiming Aiming surround speakers straight across the room, not... -
Page 12: Test Tone / Channel Balance
Channel level = 0 dB Subwoofer = STRONG Restore to default settings When the receiver is on and the disc tray is opened, press SUBWOOFER for 5 seconds until the screen goes black, then the initial language selection menu will appear. -
Page 13: Operating Your Receiver
STANDBY/ON PHONE Receiver Controls 1. STANDBY / ON • To turn on or off the receiver. 2. OPEN / CLOSE • Press to open / close the CD compartment door. 3. SOURCE • To select input source. For example, DVD/CD, VCR, etc. -
Page 14: Remote Control
UP/DOWN to adjust level setting. 20. TV • Press to select the television. Functions in TV mode (available when using a RCA TV) 3. CH+, CH- • Press to change channel. 7. LEFT / RIGHT • Press to use the zoom function (with a 16:9 television only) 9. -
Page 15: Display
Operating Your Receiver Display DVD / VCD / CD / mp3 • Unit in DVD, VCD, CD or mp3 mode. D I G I TA L • Audio output is in Dolby Digital mode. (For DVD only) • Audio output is in Dolby PL II Movie, Dolby PL II Music or Dolby Prologic Emulation mode. -
Page 16: Switching On/Off
ON/OFF on the remote control to turn on the receiver. STANDBY/ON PHONE • When the receiver is on, press ON/OFF on the remote or STANDBY/ON on the receiver to return to the standby mode. When you turn up the unit for the first time: 1. -
Page 17: Connection Of Audio Source
(See details in Tuner section) 2. The receiver is also equipped with DVD/CD player. Press the SOURCE button on the main unit or DVD/CD button on the remote to activate the feature. -
Page 18: Advanced Sound Control
Sound Enhancement Systems This receiver is equipped with several built-in sound enhancement systems. Dolby Pro Logic II The Pro Logic II mode uses the built-in circuit to steer the Left, Center, Right and Surround left and right channel audio signals and uses all five speakers to play both stereo and Dolby Pro Logic program source, such as TV and VCR. -
Page 19: Fine Setting Of Components
When in AUX 1 mode, you can choose either analog in or optical in, press AUX 1 repeatedly to toggle between them. Default Settings The receiver will keep the last selection in memory as long as it doesn’t enter standby mode. SOURCE... -
Page 20: Fine Setting Of The Speakers
Advanced Sound Control IMPORTANT NOTE • Always use the subwoofer for optimum sound quality. Advanced Setting Factory Default Setting The receiver speaker distance default settings are the following: Front speakers (L/R) 4.5 feet Center speaker (Cch) 4.5 feet Rear speaker (SUR) -
Page 21: Speaker Icons
Advanced Sound Control Speaker Icons The receiver shows the speakers’ settings on the display with the following icons: Front Speakers Center Speakers Surround Speakers Subwoofer Displaying Program Formats When a digital source starts playing, the receiver automati- cally switches to proper surround mode and provides set- ting information via the speaker icons located on the right- hand side of the display. -
Page 22: Dvd Player
Basic Playback Features 1. To select the DVD/CD input source, press SOURCE on the main unit until "DVD/CD" appears on the display. You may also directly press DVD/CD on the remote. 2. Press OPEN/CLOSE to open the tray and load a disc, with the label facing up. -
Page 23: Slow Motion Playback (Dvd Only)
DVD Player Slow motion playback 1. Press PLAY/PAUSE on the main unit or PAUSE on the remote control to freeze the picture during playback. 2. To advance picture in slow motion. Press FORWARD on the remote control for forward slow motion and REVERSE (DVD only) for backward slow motion Press repeatedly to change speed to 1/16 times, 1/8 times, 1/4 times and 1/2 times. - Page 24 Selecting a title 1. Open the title menu. 2. Enter a title number using the number keys on the remote control. You can also use UP/DOWN to change the title number. INFO RDS Note: Some discs have one title only. Selecting a chapter 1.
- Page 25 DVD Player Selecting an camera angle 1. Open the camera angle menu, or press ANGLE on the remote. 2. Press UP/DOWN to select the angle you want. SURROUND SUBWOOFER Note: This feature only works if the disc was created with multiple angles. Selecting an zoom ratio 1.Press ZOOM repeatedly on the remote to select the zoom ratio.
- Page 26 Play mode 1. Refer to page 20 “General use” to open the playmode menu, or press PLAYMODE directly. 2. Press UP/DOWN to select among : Standard > Program > Random > Title Repeat > Chapter Repeat > Repeat AB > Standard 3.
- Page 27 DVD Player Insert items to the playlist 1. Select the program menu from the OSD banner to dis- play the program edit playlist. Chapter 1 1: -- 2: -- Chapter 2 3: -- Chapter 3 4: -- Chapter 4 5: -- Chapter 5 Done Chapter 6...
-
Page 28: Setup Menu
Set up menu General use 1. In STOP and RESUME mode, the set up menu will be dis- played on screen. The menu shows the current settings. Play Play Mode Parental Control Player Menus Display Disc Menus Sound Langauges Audio Subtitles 2. -
Page 29: Menu Language
DVD Player Subtitle language This step will define the default subtitle language. Choosing a subtitle language from the on-screen banner display will only overwrite this setting temporarily. 1. Open the subtitle language menu. English French Spanish Player Menus German Disc Menus Italian Audio Subtitles... - Page 30 Rating (Parental control) This setting prevents the playback of DVDs that may not be suitable for all audiences, by using the rating level that may be encoded on the disc. If the rating level of the disc is higher than the preset level (to be set in this step), the play- back will be prohibited unless the password (see next step) is entered.
- Page 31 DVD Player Important: Keep the password in a safe place or remember it reliably as access to rated discs or rating / password menus requires the correct password. Change the password In order to change the password in parental lock menu, the current password must first be entered.
- Page 32 TV aspect This step selects the TV aspect, wide-screen (16:9) or conventional (4:3). 1. Open the TV Image menu. 4X3 Letterbox TV Image 4X3 Standard Front Display Black Level 16X9 Widescreen PAL/NTSC 2. Use UP/DOWN to select TV aspect and then press OK to select.
-
Page 33: Cd / Mp3 Player
CD / mp3 Player mp3 recommendations • Use .mp3 as the extension when converting audio files into mp3 for saving onto CD-R(W) or CD-ROM, e.g. Rocky08.mp3. Do not use any other extension e.g. .doc, .pdf. • Do not use the .mp3 extension for other text or non-audio data files as this may result in serious malfunction and harmful noise interference. -
Page 34: Quick Scan
4. Press PREV on the main unit or CH- on the remote to return to the previous track. Press NEXT on the main unit or CH + on the remote to go to the next track. 5. Press STOP on the main unit or STOP on the remote con- trol to end playback. -
Page 35: On-Screen Banner Display For Cd Playback
CD / mp3 Player On- screen banner display for CD playback Track Bookmark Time indicator Playmodes 00:03:20 PLAY General use 1. Press INFO on the remote control to hide and show the on- screen banner. (Only audio CD banner) SURROUND SUBWOOFER EQ. - Page 36 Bookmarks (Audio CDs Only) The bookmark feature allows you to mark a point on the disc for quick access. 12 bookmarks can be selected. Adding Bookmarks (Audio CDs Only) 1. Open the bookmark menu. 2. Use the arrow keys to highlight the “Bookmark” option, then press OK to enter bookmark menu.
- Page 37 CD Player Program playback Edit program 1. In STOP mode, enter the OSD banner to display the edit playlist (program screen) 1: -- 3: -- Track 1 5: -- Track 2 7: -- Track 3 9: -- Track 4 11: -- Track 5 2.
-
Page 38: On-Screen Display For Mp3 Playback
On- screen display for mp3 playback Standard Play File mode 1. In the playmode window, press UP/DOWN on the remote to select the standard mode. 2. In the file window, use the arrow buttons on the remote to select the file you wish to begin playing. Current Selection Title1 Not Selected... -
Page 39: Mp3 Player
mp3 Player Program playback Edit program 1. In STOP mode, enter the OSD banner to display the edit playlist (program screen) 1: -- 3: -- Track 1 5: -- Track 2 7: -- Track 3 9: -- Track 4 11: -- Track 5 2. -
Page 40: Jpeg Cd
On- screen display for JPEG CD File mode 1. In the JPEG mode window, use UP/DOWN to select a directory, and the OK button on the remote to enter differ- ent directories. You can use the LEFT button to go up one layer in the directory. -
Page 41: On-Screen Display For Divx
Div X On- screen display for Div X Your player is an Official DivX Certified™ product that Plays DivX ® 5, DivX ® 4, DivX ® 3, and DivX ® VOD video content, in compliance with DivX Certified™ technical requirements.The correct playing of DivX in your player, depends on the preparation and production of the audio and video files, the codecs used, the type of recording equipment employed and the parameters of your comput-... -
Page 42: To Rent (Purchase) Divx Vod Files
To rent (purchase) DivX VOD files DivX VOD files are similar to DVD video rental discs.The dif- ference lies in the access to the media. DivX VOD files are downloaded after paying a rental from certain commercial web sites. Prior to downloading a VOD you need to input the registration number of your DVD player on the purchase form of the site. -
Page 43: Radio
Radio Operating the Radio The receiver has a built-in tuner that allows for FM radio function. Manual tuning 1. Connect the FM antenna accordingly. 2. Press SOURCE on the front of the unit until the tuner mode is selected. You may also directly press TUNER on the remote control. - Page 44 Manual preset 1. Tune to a radio station (see "Manual tuning" on page 38 above for details) 2. Press MENU on the remote control. "PRESET" will appear on the display. SURROUND SUBWOOFER 3. While the word "PROG" is still flashing, input your desired preset number (1-40) using the UP/DOWN on the remote control, then press OK again to store it.
-
Page 45: Troubleshooting Tips
1 to 2 hours. Disc cannot be played. • Wipe the disc clean. • Use a RCA lens cleaner. • The disc's region no. differs from your player's region No. Search forward & reverse playback does not work ? •... -
Page 46: Troubleshooting Tips
Front Channels: 75 Watts each Channel (1KHz, 6 Ohm) Rear Channels: 50 Watts each Channel (1KHz, 6 Ohm) Center Channel (RTD210): 100 Watts (1KHz, 4 Ohm) Center Channel (RTD218): 125 Watts (1KHz, 4 Ohm) Subwoofer Channel (RTD210): 100 Watts (100Hz, 4 Ohm) -
Page 47: Care And Maintenance
Care and Maintenance Disconnect the audio system from the power source before performing any maintenance. Cleaning Clean the exterior of the system using a soft dust cloth. The player CAUTION! This system operates with a laser. It must only be opened by a qualified technician. •... - Page 48 45 days from date of shipment to the rental firm, whichever comes first. What we will do: • Pay any Authorized RCA Audio Service Center the labor charges to repair your unit. • Pay any Authorized RCA Audio Service Center for the new or, at our option, refurbished replacement parts required to repair your unit.